本文主要是介绍vue3中使用antv-X6实现关系图,希望对大家解决编程问题提供一定的参考价值,需要的开发者们随着小编来一起学习吧!
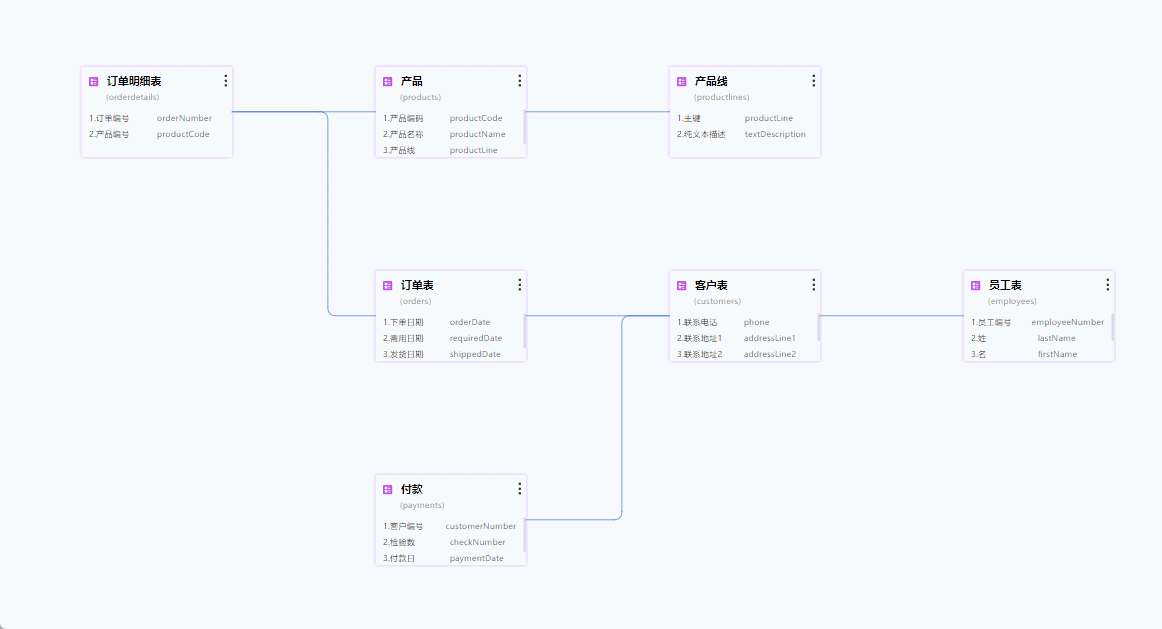
先看效果图:
1、安装 npm install@antv/x6 --save
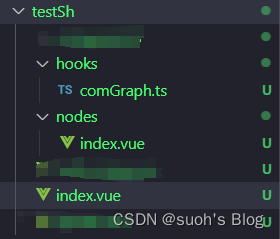
这里使用的X6中自定义节点的方式实现的,项目目录如下,hooks里面存放一些函数和变量
nodes里面是自定义节点的页面,最外围的index.vue就是主渲染页面
2、testSh/index.vue
注意:
(1)代码如下,里面有个useMouse()函数,追踪鼠标位置,这个需要项目中安装vueuse,可以查看下面文章去自行安装,Vueuse中文文档详解_笔记大全_设计学院
<template><div class="w-full h-full"><div class="centerPart w-full h90%"><div id="container" ref="containerRef"></div></div></div>
</template><script setup lang="ts">
import {messageWarning,
} from "@/utils/element-utils/notification-common";
import { Graph } from "@antv/x6";
import { register } from "@antv/x6-vue-shape";
import { DagreLayout } from "@antv/layout";
import type { Edge } from "@antv/x6";
import { edgeStyle, setEdge, ILink, Data } from "./hooks/comGraph";
import GraphNode from "./nodes/index.vue";const graph = ref<Graph>(); //graph实例
const containerRef = ref(); //graph容器ref实例
let nodes: any = ref([]);
let edges: any = ref([]);
const myLinks = ref<any>([]); //保存我的所有边onMounted(() => {getNodeList();
});
// 获取节点和边
const getNodeList = async () => {let { tables, links } = Data;nodes.value = tables;links.forEach((aa: any, i: any) => {aa.modelId = aa.modelId + i;});edges.value = links;myLinks.value = links;init();
};
// 放大缩小zoom
const resizeGraph = (val: string) => {val == "add" ? graph.value?.zoom(0.1) : graph.value?.zoom(-0.1);
};
// graph初始化
const init = () => {const data: any = {nodes: [],edges: [],};register({shape: "custom-node",width: 250,height: 150,component: GraphNode,});// 添加节点nodes.value.forEach((item: any, i: string) => {data.nodes!.push({id: item?.path,shape: "custom-node",label: item?.name,data: {...item,toolClickEvent: nodeClickCallback, //结点操作回调事件}, //向节点组件传递数据或者方法});});// 添加边edges.value.forEach((item: any, i: string) => {data.edges!.push({source: item.sourcePath,target: item.targetPath,...edgeStyle,});});// 初始化实例graph.value = new Graph({container: document.getElementById("container")!,//对画布进行缩放mousewheel: {enabled: true, //是否开启滚轮缩放交互maxScale: 2, //缩放的倍数minScale: 0.1, //缩放的最小倍数},autoResize: true, //设置撑开屏幕panning: true,background: {color: "#F7FAFD",},onEdgeLabelRendered: (args) => {const { selectors, edge } = args as anyconsole.log(selectors, edge, '------------');},});// 基本布局,从左向右const dagreLayout = new DagreLayout({type: "dagre",rankdir: "LR",align: "UL",ranksep: 150,nodesep: 100,});const model: any = dagreLayout.layout(data);graph.value.fromJSON(model);// 监听节点的点击事件,点击进行连线graph.value.on("node:click", ({ node }) => {node.toFront();// 创建连线终点通过点击节点确定// 当起点存在时,表明创建终点if (tempSourceID) {createLink(node);}});
};
// 节点的tool工具函数,编辑关联和删除
const nodeClickCallback = (type: string, node: any) => {switch (type) {case "edit":changeEdit(node);break;case "remove":changeRemove(node);break;case "link":createLink(node);break;}
};
// 节点编辑
const changeEdit = (node: any) => { };
// 节点删除
const changeRemove = (node: any) => { };
//---------------------------------创建关联线--------------------------------------
// 创建关联
let tempSourceID: string = ""; //关联线起点暂存id
let tempSourceData: any; //关联线起点暂存数据
let tempEdge: Edge; //暂存edge实例
const { x, y } = useMouse();
// 鼠标动作追踪
const handleMouseMove = () => {if (!tempSourceID) {return;}let local = graph.value!.pageToLocal(x.value, y.value);// 链接到边,减的数字是坐标终点距离鼠标小手的位置,减值越大,离的越远// setTarget获取链接到画布的终止点tempEdge.setTarget({ x: local.x - 15, y: local.y - 15 });
};const createLink = (node: any) => {if (!tempSourceID) {//起始点为空,就创建起始点// 设置初始点idtempSourceID = node.id;tempSourceData = node.data;if (graph.value) {let local = graph.value.pageToLocal(x.value, y.value);// 添加edgetempEdge = graph.value?.addEdge({source: { cell: tempSourceID },target: { x: local.x, y: local.y },...edgeStyle,});}// 监听鼠标移动事件document.addEventListener("mousemove", handleMouseMove);} else {//否则存在起点的话就创建终点cancleLink();if (tempSourceID === node.id) {messageWarning("不可与自身创建关联!");} else {// some数组中至少存在一个元素满足指定条件// 判断节点的起点和终点都对应上才返回trueconst isExist = myLinks.value.some((e: any) => {return ((e["sourcePath"] == tempSourceID && e["targetPath"] == node.id) ||(e["sourcePath"] == node.id && e["targetPath"] == tempSourceID));});if (isExist) {messageWarning("已存在关系");} else {// 创建节点if (graph.value) {console.log(12121, "------------");tempEdge = graph.value.addEdge(setEdge(tempSourceID, node.id, true));const newLink: ILink = {sourceModelId: tempSourceData.modelId,targetModelId: node.data.modelId,mainField: "",type: "1",unionType: "inner",sourceField: "",targetField: "",sourcePath: tempSourceData["path"],targetPath: node.data["path"],sourceTable: tempSourceData.code,targetTable: node.data.code,};myLinks.value.push(newLink);}}// 重置暂存标志位tempSourceID = "";}}
};// 取消连线
const cancleLink = (edge: Edge = tempEdge) => {console.log(edge, "------------");if (!edge) return;graph.value?.removeEdge(edge.id);// 监听鼠标移动事件移除document.removeEventListener("mousemove", handleMouseMove);
};
const saveModel = () => {// 拿到所有的线条关系console.log(myLinks.value, "------------");
};
</script><style scoped lang="scss">
#container {height: 100%;position: relative;.footTool {position: absolute;bottom: 0;background-color: #f6f9fc;height: 10%;}
}
</style>
3、node/index.vue
这个是自定义节点页面,定义好之后,在主页面中进行引入
<template><div class="node"><div><div class="flex topttitle pd-10"><svg width="20px" height="20px" viewBox="0 0 20 20" :style="{ 'margin-top': '5px' }"><g fill="#be49e7"><pathd="M13.6149425,0 C14.5639836,0 15.3333333,0.769349769 15.3333333,1.7183908 L15.3333333,13.6149425 C15.3333333,14.5639836 14.5639836,15.3333333 13.6149425,15.3333333 L1.7183908,15.3333333 C0.769349769,15.3333333 0,14.5639836 0,13.6149425 L0,1.7183908 C0,0.769349769 0.769349769,0 1.7183908,0 L13.6149425,0 Z M6.4916986,8.2247765 L3.3584504,8.2247765 C3.01776901,8.2247765 2.74159217,8.50095334 2.74159217,8.84163474 L2.74159217,11.9748829 C2.74159217,12.3155643 3.01776901,12.5917412 3.3584504,12.5917412 L6.4916986,12.5917412 C6.83237999,12.5917412 7.10855683,12.3155643 7.10855683,11.9748829 L7.10855683,8.84163474 C7.10855683,8.50095334 6.83237999,8.2247765 6.4916986,8.2247765 Z M11.9748829,11.3580247 L8.84163474,11.3580247 C8.50095334,11.3580247 8.2247765,11.6342015 8.2247765,11.9748829 C8.2247765,12.3155643 8.50095334,12.5917412 8.84163474,12.5917412 L11.9748829,12.5917412 C12.3155643,12.5917412 12.5917412,12.3155643 12.5917412,11.9748829 C12.5917412,11.6342015 12.3155643,11.3580247 11.9748829,11.3580247 Z M11.9748829,8.61643252 L8.84163474,8.61643252 C8.50095334,8.61643252 8.2247765,8.89260936 8.2247765,9.23329076 C8.2247765,9.57397216 8.50095334,9.850149 8.84163474,9.850149 L11.9748829,9.850149 C12.3155643,9.850149 12.5917412,9.57397216 12.5917412,9.23329076 C12.5917412,8.89260936 12.3155643,8.61643252 11.9748829,8.61643252 Z M6.4916986,2.74159217 L3.3584504,2.74159217 C3.01776901,2.74159217 2.74159217,3.01776901 2.74159217,3.3584504 L2.74159217,6.4916986 C2.74159217,6.83237999 3.01776901,7.10855683 3.3584504,7.10855683 L6.4916986,7.10855683 C6.83237999,7.10855683 7.10855683,6.83237999 7.10855683,6.4916986 L7.10855683,3.3584504 C7.10855683,3.01776901 6.83237999,2.74159217 6.4916986,2.74159217 Z M11.9748829,5.48318433 L8.84163474,5.48318433 C8.50095334,5.48318433 8.2247765,5.75936117 8.2247765,6.10004257 C8.2247765,6.44072397 8.50095334,6.71690081 8.84163474,6.71690081 L11.9748829,6.71690081 C12.3155643,6.71690081 12.5917412,6.44072397 12.5917412,6.10004257 C12.5917412,5.75936117 12.3155643,5.48318433 11.9748829,5.48318433 Z M11.9748829,2.74159217 L8.84163474,2.74159217 C8.50095334,2.74159217 8.2247765,3.01776901 8.2247765,3.3584504 C8.2247765,3.6991318 8.50095334,3.97530864 8.84163474,3.97530864 L11.9748829,3.97530864 C12.3155643,3.97530864 12.5917412,3.6991318 12.5917412,3.3584504 C12.5917412,3.01776901 12.3155643,2.74159217 11.9748829,2.74159217 Z"id="形状结合"></path></g></svg><h1 class="head-name">{{ data.name }}</h1><div class="head-tool"><ElDropdown trigger="click" :teleported="true"><BIcon size="20"><BSvg name="wenjianjiabeifen11" /></BIcon><template #dropdown><ElDropdownMenu><ElDropdownItem @click="operateFunc('edit')">编辑</ElDropdownItem><ElDropdownItem @click="operateFunc('link')">创建关联</ElDropdownItem><ElDropdownItem @click="operateFunc('remove')">删除</ElDropdownItem></ElDropdownMenu></template></ElDropdown></div></div><h6 class="secondTitle">({{ data.path }})</h6></div><div class="content"><div class="flex field-item" v-for="(item, i) in data.fields" :key="i"><span>{{ i + 1 }}.{{ item.name }}</span><span>{{ item.code }}</span></div></div></div>
</template><script setup lang="ts">
const getNode: any = inject("getNode");
const node: any = getNode(); //当前节点
let data = ref<any>(node.getData()); //当前节点数据const operateFunc = (type: string) => {data.value.toolClickEvent(type, node);console.log(data.value, "------------");
};
onMounted(() => {});
</script><style scoped lang="scss">
.node {width: 250px;height: 150px;background: #fff;display: flex;z-index: 1000 !important;flex-direction: column;box-shadow: rgb(233, 170, 255) 0px 0px 6px 0px;.topttitle {padding: 12px;padding-bottom: 0;height: 40px;position: relative;.head-tool {position: absolute;right: 0;z-index: 100;cursor: pointer;}}.head-name {color: #000000;font-size: 18px;line-height: 25px;font-weight: bold;overflow: hidden;text-overflow: ellipsis;white-space: nowrap;padding-left: 10px;}.secondTitle {color: #999;font-size: 14px;line-height: 20px;overflow: hidden;text-overflow: ellipsis;white-space: nowrap;padding-left: 40px;padding-bottom: 10px;font-weight: normal;border-bottom: 1px solid #e0e7ed;}.content {flex: 1;overflow: auto;cursor: pointer;}.field-item {height: 27px;font-size: 14px;padding: 12px;display: flex;align-items: center;span:nth-child(1) {display: block;width: 50%;}span:nth-child(2) {color: #697a8f;}}
}
</style>
4、hooks/comGraph.ts
存放一些静态变量
// 线的样式
export const edgeStyle = {attrs: {line: {stroke: "rgb(26, 97, 211)", //线条颜色strokeWidth: 1, //线条粗细targetMarker: null, //不设置箭头},},allowNode: true,snap: true,allowLoop: false,router: {// 路由类型 normal orth(正交路由)name: "manhattan", //智能正交,自动避开障碍args: {step: 70,padding: 50,offset: 24,},},allowMulti: true,connector: {name: "jumpover",args: {radius: 14,},},
};
// 设置线
export const setEdge = (source: string, target: string, showLable: boolean) => {return {shape: "double-edge",source: { cell: source },target: { cell: target },label: showLable ? [] : "",...edgeStyle,};
};
//线和节点数据
export const Data = {"tables": [{"name": "产品线","path": "productlines","fields": [{"code": "productLine","name": "主键",},{"code": "textDescription","name": "纯文本描述",}]},{"name": "客户表","path": "customers","fields": [{"code": "phone","name": "联系电话",},{"code": "addressLine1","name": "联系地址1",},{"code": "addressLine2","name": "联系地址2",},{"code": "city","name": "所在城市",},{"code": "state","name": "州",},]},{"name": "订单表","path": "orders","fields": [{"code": "orderDate","name": "下单日期",},{"code": "requiredDate","name": "需用日期",},{"code": "shippedDate","name": "发货日期",},{"code": "status","name": "状态",},]},{"name": "订单明细表","path": "orderdetails","fields": [{"code": "orderNumber","name": "订单编号",},{"code": "productCode","name": "产品编号",},]},{"name": "员工表","path": "employees","fields": [{"code": "employeeNumber","name": "员工编号",},{"code": "lastName","name": "姓",},{"code": "firstName","name": "名",},{"code": "extension","name": "分机号",},{"code": "email","name": "电子邮件",},]},{"name": "付款","path": "payments","fields": [{"code": "customerNumber","name": "客户编号",},{"code": "checkNumber","name": "检验数",},{"code": "paymentDate","name": "付款日",},{"code": "amount","name": "金额",}]},{"name": "产品","path": "products","fields": [{"code": "productCode","name": "产品编码",},{"code": "productName","name": "产品名称",},{"code": "productLine","name": "产品线",},{"code": "productScale","name": "生产规模",}]}],"links": [{"sourcePath": "orders","targetPath": "customers",},{"sourcePath": "payments","targetPath": "customers",},{"sourcePath": "customers","targetPath": "employees",},{"sourcePath": "orderdetails","targetPath": "products",},{"sourcePath": "orderdetails","targetPath": "orders",},{"sourcePath": "products","targetPath": "productlines",}]
}
有问题的可以评论区讨论~
这篇关于vue3中使用antv-X6实现关系图的文章就介绍到这儿,希望我们推荐的文章对编程师们有所帮助!


