本文主要是介绍生产环境_从数据到层级结构JSON:使用Spark构建多层次树形数据_父子关系生成,希望对大家解决编程问题提供一定的参考价值,需要的开发者们随着小编来一起学习吧!
代码补充了!兄弟萌
造的样例数据
val data = Seq(("USA", "Male", "Asian", "Chinese"),("USA", "Female", "Asian", "Chinese"),("USA", "Male", "Black", "African"),("USA", "Female", "Black", "African"),("USA", "Male", "White", "European"),("USA", "Female", "White", "European"),("Europe", "Male", "Asian", "Chinese"),("Europe", "Female", "Asian", "Chinese"),("Europe", "Male", "Black", "African"),("Europe", "Female", "Black", "African"),("Europe", "Male", "White", "European"),("Europe", "Female", "White", "European")
)
代码核心逻辑
import org.apache.hadoop.io.serializer.Serialization
import org.apache.spark.{SparkConf, SparkContext}
import org.apache.spark.sql.types.{StringType, StructField, StructType}import org.apache.spark.sql.{Dataset, Row, SparkSession}
import org.json4s.NoTypeHints
import org.json4s.DefaultFormats
import org.json4s.jackson.Serialization.writePretty定义Node类
//case class Node(title: String, key: String, children: Seq[Node])
/*作者:Matrix70
博客地址:https://blog.csdn.net/qq_52128187?type=blog
时间:20231205*/
object Parent_child_v7_xuqiu {def main(args: Array[String]): Unit = {val conf = new SparkConf().setAppName("Parent_child_v3").setMaster("local[1]")val sc = new SparkContext(conf)val spark = SparkSession.builder.appName("Parent_child_v3").getOrCreate()import spark.implicits._val df1 = sc.textFile("C:\\zzcode\\workplace\\src\\main\\data\\country")val schema = StructType(Array(StructField("Country", StringType, nullable = true),StructField("Gender", StringType, nullable = true),StructField("Ethnicity", StringType, nullable = true),StructField("Race", StringType, nullable = true)))val rowRDD = df1.map(line => {val parts = line.split(",")Row(parts(0), parts(1), parts(2), parts(3))})val df = spark.createDataFrame(rowRDD, schema)df.show()// 构建节点层级结构并转换为JSON格式def toHierarchy(df: Dataset[Row]): String = {def buildHierarchy(country: String): Node = {val uniqueGenders = df.filter($"Country" === country).select("Gender").distinct().as[String].collect()val genderNodes = uniqueGenders.map { gender =>val filteredRows = df.filter($"Country" === country && $"Gender" === gender)val ethnicityNodes = filteredRows.select("Ethnicity").distinct().as[String].collect().map { ethnicity =>val children = filteredRows.filter($"Ethnicity" === ethnicity).select("Race").as[String].collect().map(race => Node(race, s"$country-$gender-$ethnicity-$race", Seq.empty))Node(ethnicity, s"$country-$gender-$ethnicity", children)}Node(gender, s"$country-$gender", ethnicityNodes)}Node(country, country, genderNodes)}val uniqueCountries = df.select("Country").distinct().as[String].collect()val roots = uniqueCountries.map(buildHierarchy)implicit val formats: DefaultFormats.type = DefaultFormatswritePretty(roots)}// 调用toHierarchy并打印结果val resultJSON = toHierarchy(df)println(resultJSON)spark.stop()}
}
提供给前端的html树结构样例
代码生成结果提供给前端的格式
[{"title": "USA","key": "USA","children": [{"title": "Male","key": "USA-Male","children": [{"title": "Asian","key": "USA-Male-Asian","children": [{"title": "Chinese","key": "USA-Male-Asian-Chinese","children": []}]},{"title": "Black","key": "USA-Male-Black","children": [{"title": "African","key": "USA-Male-Black-African","children": []}]},{"title": "White","key": "USA-Male-White","children": [{"title": "European","key": "USA-Male-White-European","children": []}]}]},{"title": "Female","key": "USA-Female","children": [{"title": "Asian","key": "USA-Female-Asian","children": [{"title": "Chinese","key": "USA-Female-Asian-Chinese","children": []}]},{"title": "Black","key": "USA-Female-Black","children": [{"title": "African","key": "USA-Female-Black-African","children": []}]},{"title": "White","key": "USA-Female-White","children": [{"title": "European","key": "USA-Female-White-European","children": []}]}]}]},{"title": "Europe","key": "Europe","children": [{"title": "Male","key": "Europe-Male","children": [{"title": "Asian","key": "Europe-Male-Asian","children": [{"title": "Chinese","key": "Europe-Male-Asian-Chinese","children": []}]},{"title": "Black","key": "Europe-Male-Black","children": [{"title": "African","key": "Europe-Male-Black-African","children": []}]},{"title": "White","key": "Europe-Male-White","children": [{"title": "European","key": "Europe-Male-White-European","children": []}]}]},{"title": "Female","key": "Europe-Female","children": [{"title": "Asian","key": "Europe-Female-Asian","children": [{"title": "Chinese","key": "Europe-Female-Asian-Chinese","children": []}]},{"title": "Black","key": "Europe-Female-Black","children": [{"title": "African","key": "Europe-Female-Black-African","children": []}]},{"title": "White","key": "Europe-Female-White","children": [{"title": "European","key": "Europe-Female-White-European","children": []}]}]}]}
]
//https://blog.csdn.net/qq_52128187?type=blog
补充html文件
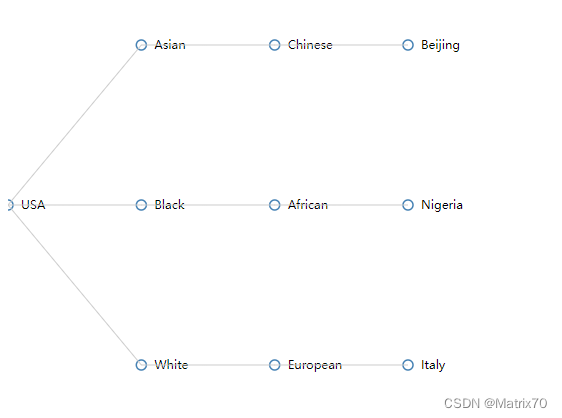
json生成前端界面展示代码,可以保存在本地文件,命名为html即可在浏览器打开查看,就是我上面的层级结构的样子了。
<!DOCTYPE html>
<html>
<head><title>JSON to Tree Example</title><script src="https://d3js.org/d3.v6.min.js"></script><style>.node circle {fill: #fff;stroke: steelblue;stroke-width: 1.5px;}.node text {font-size: 12px;}</style>
</head>
<body><div id="tree-container"></div><script>
// JSON字符串
const jsonStr = `{"title": "USA","key": "USA","children": [{"title": "Asian","key": "USA-Asian","children": [{"title": "Chinese","key": "USA-Asian-Chinese","children": [{"title": "Beijing","key": "USA-Asian-Chinese-Beijing","children": []}]}]},{"title": "Black","key": "USA-Black","children": [{"title": "African","key": "USA-Black-African","children": [{"title": "Nigeria","key": "USA-Black-African-Nigeria","children": []}]}]},{"title": "White","key": "USA-White","children": [{"title": "European","key": "USA-White-European","children": [{"title": "Italy","key": "USA-White-European-Italy","children": []}]}]}]
}`;// 解析JSON字符串为树状结构
const data = JSON.parse(jsonStr);// 创建绘图容器
const svg = d3.select("#tree-container").append("svg").attr("width", 500).attr("height", 500);// 创建树布局
const treeLayout = d3.tree().size([400, 400]);// 将数据转换为层级关系
const root = d3.hierarchy(data);// 计算节点的位置
treeLayout(root);// 绘制节点和链接
const nodes = root.descendants();
const links = root.links();const nodeGroup = svg.selectAll(".node").data(nodes).enter().append("g").attr("transform", d => `translate(${d.y}, ${d.x})`);nodeGroup.append("circle").attr("r", 5).style("fill", "#fff").style("stroke", "steelblue").style("stroke-width", "1.5px");nodeGroup.append("text").attr("x", 13).attr("y", 4).style("font-size", "12px").text(d => d.data.title);svg.selectAll(".link").data(links).enter().append("path").attr("class", "link").attr("d", d => {return `M${d.source.y},${d.source.x}L${d.target.y},${d.target.x}`;}).style("fill", "none").style("stroke", "#ccc").style("stroke-width", "1px");
</script>
</body>
</html>
其实我要的结果就是能匹配上数据格式,如下图。前端的同事他们渲染后,基本就是这个样子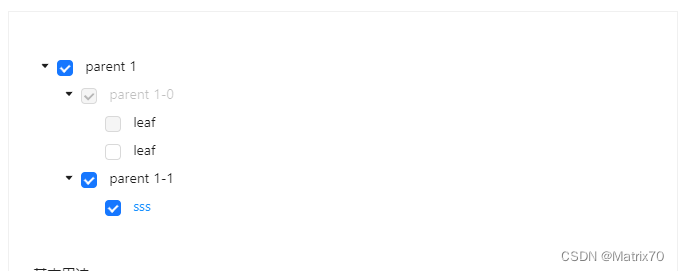
参考文章获连接:
Ant Design Vue — An enterprise-class UI components based on Ant Design and Vue.js,这个网页是树形控件的结构,给我提供一个基本构建思路吧
ok!!!
这篇关于生产环境_从数据到层级结构JSON:使用Spark构建多层次树形数据_父子关系生成的文章就介绍到这儿,希望我们推荐的文章对编程师们有所帮助!


