本文主要是介绍Zynq-7000、FMQL45T900的GPIO控制(二)-----SDK配置GPIO外部中断输入,希望对大家解决编程问题提供一定的参考价值,需要的开发者们随着小编来一起学习吧!
本文详细说明一下使用SDK中使用MIO/EMIO作为输入中断
SDK中使用MIO/EMIO作为输入中断
这个使用场景可以扩展到PL的可以通过EMIO或者MIO,告知PS中断来了,需要PS处理一些特定事物,当然也可以连接最简单的按键。
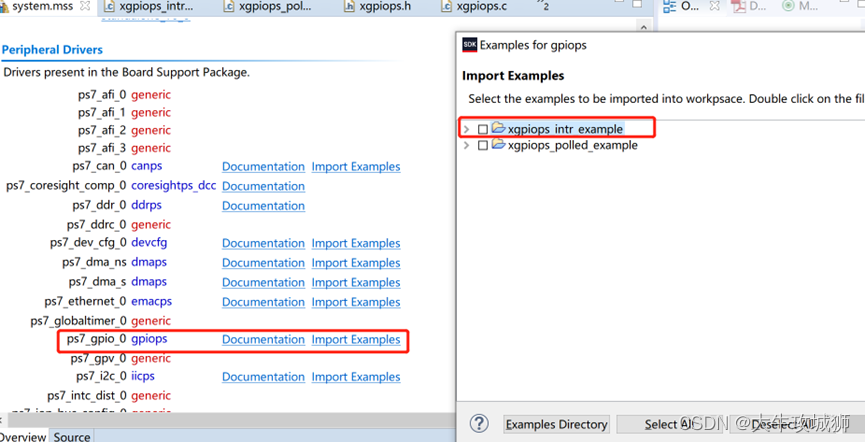
这个可以参考SDK自带例程来实现需要的功能,通过这个例程实现修改,在SDK中可以这样导入该例程。

源码分析
这个例程比骄简单,这里仅仅看输入管脚的配置即可,例程中将输入管脚Input_Pin = 14,即使用MIO14作为外部中断输入
首先初始化,初始化使用MIO14,说明使用bank0
Input_Pin = 14;
GPIO的初始化
/* Initialize the Gpio driver. */ConfigPtr = XGpioPs_LookupConfig(DeviceId);if (ConfigPtr == NULL) {return XST_FAILURE;}XGpioPs_CfgInitialize(Gpio, ConfigPtr, ConfigPtr->BaseAddr);/* Run a self-test on the GPIO device. */Status = XGpioPs_SelfTest(Gpio);if (Status != XST_SUCCESS) {return XST_FAILURE;}/* Set the direction for the specified pin to be input */XGpioPs_SetDirectionPin(Gpio, Input_Pin, 0x0);
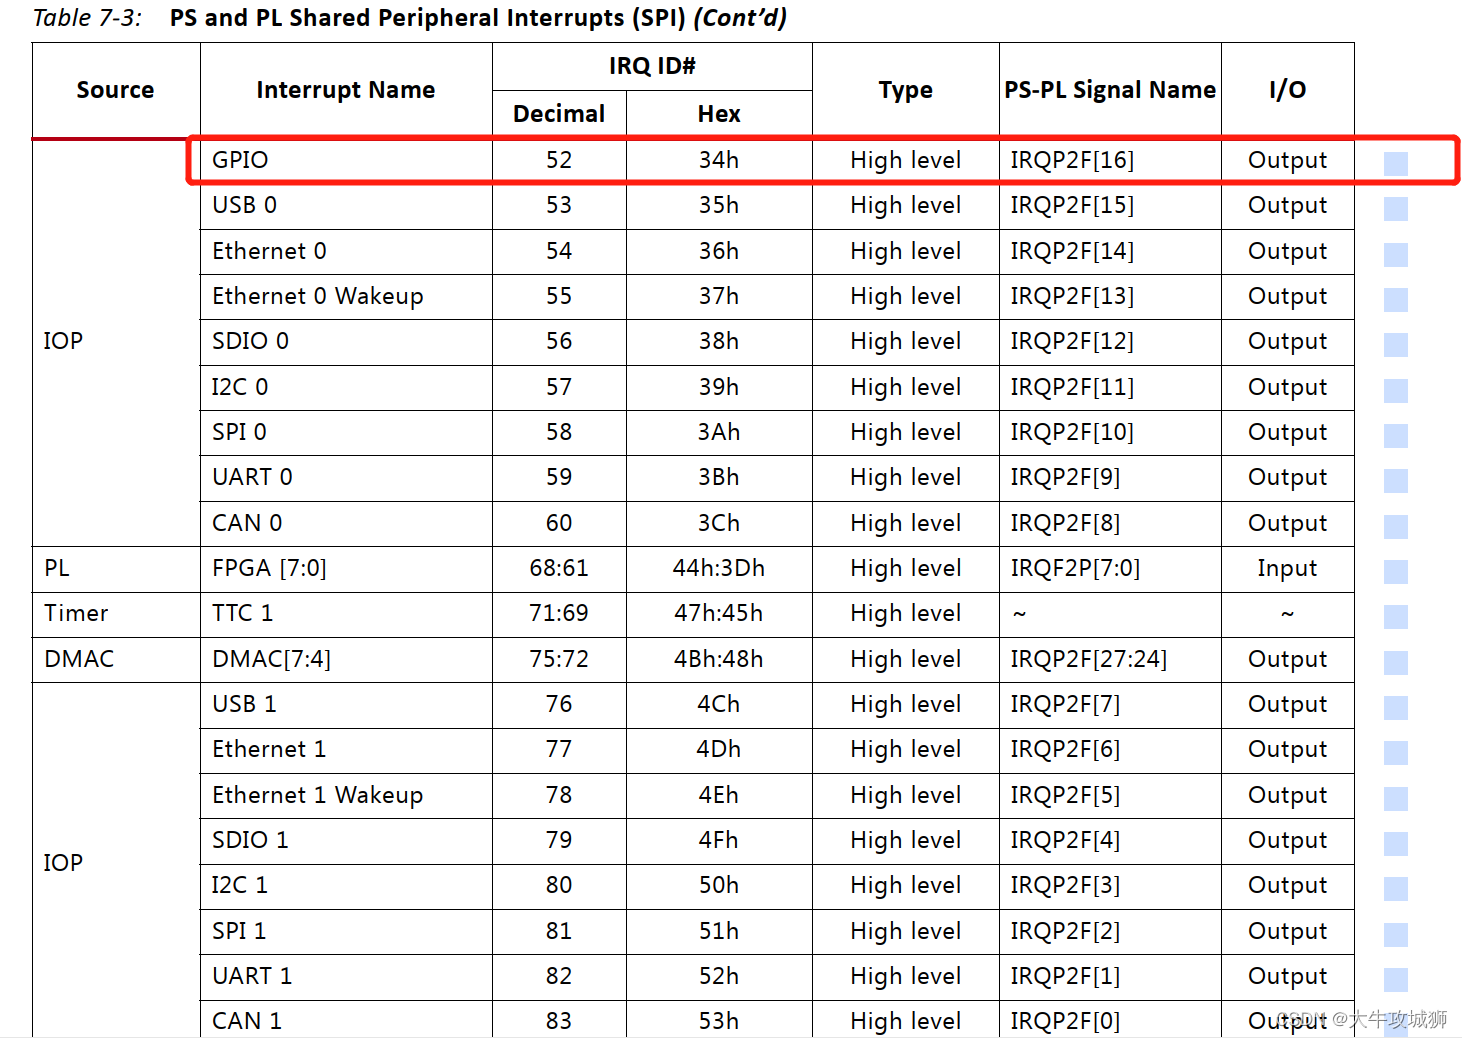
初始化中断,这里的宏定义GPIO_INTERRUPT_ID就是等于52,也就是GPIO的快速中断号
在著名手册ug585表格7-3中我们可以清晰的看到所有快速中断的编号。
这里有个疑问 MIO/EMIO在Zynq-7000、国产zynq-7000的GPIO控制(一)中一共有118个,怎么找到到底哪个管脚产生了中断呢?????

#define XPS_GPIO_INT_ID 52U
#define XPAR_XGPIOPS_0_INTR XPS_GPIO_INT_ID
#define GPIO_INTERRUPT_ID XPAR_XGPIOPS_0_INTR
/** Setup the interrupts such that interrupt processing can occur. If* an error occurs then exit.*/Status = SetupInterruptSystem(Intc, Gpio, GPIO_INTERRUPT_ID);if (Status != XST_SUCCESS) {return XST_FAILURE;}针对这个中断配置函数详细分析,这个函数的详细代码如下
刚开始调用的几个函数,都是对中断的初始化
Xil_ExceptionInit
XScuGic_LookupConfig
XScuGic_CfgInitialize
Xil_ExceptionRegisterHandler
XScuGic_Connect
这里最关键关键是GPIO_BANK,需要根据自己使用的GPIO BANK进行修改,如果不知道gpio在哪个bank,参考《Zynq-7000、国产zynq-7000的GPIO控制(一)》
初始化配置的中断输入管脚是Input_Pin = 14;
所以
#define XGPIOPS_BANK0 0x00U /**< GPIO Bank 0 */
#define GPIO_BANK XGPIOPS_BANK0 /* Bank 0 of the GPIO Device */
如果需要配置成其他管脚,一定要修改这里的BANK定义
其中配置中断类型函数
XGpioPs_SetIntrType
这里配置bank0,第三个参数表示中断类型,代码中采用上升沿
#define XGPIOPS_IRQ_TYPE_EDGE_RISING 0x00U /**< Interrupt on Rising edge */
#define XGPIOPS_IRQ_TYPE_EDGE_FALLING 0x01U /**< Interrupt Falling edge */
#define XGPIOPS_IRQ_TYPE_EDGE_BOTH 0x02U /**< Interrupt on both edges */
#define XGPIOPS_IRQ_TYPE_LEVEL_HIGH 0x03U /**< Interrupt on high level */
#define XGPIOPS_IRQ_TYPE_LEVEL_LOW 0x04U /**< Interrupt on low level */
这里注册中断处理函数
/* Set the handler for gpio interrupts. */
XGpioPs_SetCallbackHandler(Gpio, (void *)Gpio, IntrHandler);
这里使能对应管脚的中断,这个偏移量,也要根据自己的中断引脚做修改
/* Enable the GPIO interrupts of Bank 0. */
XGpioPs_IntrEnable(Gpio, GPIO_BANK, (1 << Input_Pin));
/*****************************************************************************/
/**
*
* This function sets up the interrupt system for the example. It enables falling
* edge interrupts for all the pins of bank 0 in the GPIO device.
*
* @param	GicInstancePtr is a pointer to the XScuGic driver Instance.
* @param	GpioInstancePtr contains a pointer to the instance of the GPIO
*		component which is going to be connected to the interrupt
*		controller.
* @param	GpioIntrId is the interrupt Id and is typically
*		XPAR_<GICPS>_<GPIOPS_instance>_VEC_ID value from
*		xparameters.h.
*
* @return	XST_SUCCESS if successful, otherwise XST_FAILURE.
*
* @note		None.
*
****************************************************************************/
static int SetupInterruptSystem(XScuGic *GicInstancePtr, XGpioPs *Gpio,u16 GpioIntrId)
{int Status;XScuGic_Config *IntcConfig; /* Instance of the interrupt controller */Xil_ExceptionInit();/** Initialize the interrupt controller driver so that it is ready to* use.*/IntcConfig = XScuGic_LookupConfig(INTC_DEVICE_ID);if (NULL == IntcConfig) {return XST_FAILURE;}Status = XScuGic_CfgInitialize(GicInstancePtr, IntcConfig,IntcConfig->CpuBaseAddress);if (Status != XST_SUCCESS) {return XST_FAILURE;}/** Connect the interrupt controller interrupt handler to the hardware* interrupt handling logic in the processor.*/Xil_ExceptionRegisterHandler(XIL_EXCEPTION_ID_INT,(Xil_ExceptionHandler)XScuGic_InterruptHandler,GicInstancePtr);/** Connect the device driver handler that will be called when an* interrupt for the device occurs, the handler defined above performs* the specific interrupt processing for the device.*/Status = XScuGic_Connect(GicInstancePtr, GpioIntrId,(Xil_ExceptionHandler)XGpioPs_IntrHandler,(void *)Gpio);if (Status != XST_SUCCESS) {return Status;}/* Enable falling edge interrupts for all the pins in bank 0. */XGpioPs_SetIntrType(Gpio, GPIO_BANK, 0x00, 0xFFFFFFFF, 0x00);/* Set the handler for gpio interrupts. */XGpioPs_SetCallbackHandler(Gpio, (void *)Gpio, IntrHandler);/* Enable the GPIO interrupts of Bank 0. */XGpioPs_IntrEnable(Gpio, GPIO_BANK, (1 << Input_Pin));/* Enable the interrupt for the GPIO device. */XScuGic_Enable(GicInstancePtr, GpioIntrId);/* Enable interrupts in the Processor. */Xil_ExceptionEnableMask(XIL_EXCEPTION_IRQ);return XST_SUCCESS;
}
中断处理函数
由于采用上升沿触发中断的方式,这里进入中断处理函数,读取一下中断管脚的值,看看是否为高电平,如果为高电平说明是有效触发。
/****************************************************************************/
/**
* This function is the user layer callback function for the bank 0 interrupts of
* the GPIO device. It checks if all the switches have been pressed to stop the
* interrupt processing and exit from the example.
*
* @param	CallBackRef is a pointer to the upper layer callback reference.
* @param	Status is the Interrupt status of the GPIO bank.
*
* @return	None.
*
* @note		None.
*
******************************************************************************/
static void IntrHandler(void *CallBackRef, u32 Bank, u32 Status)
{XGpioPs *Gpio = (XGpioPs *)CallBackRef;u32 DataRead;/* Push the switch button */DataRead = XGpioPs_ReadPin(Gpio, Input_Pin);if (DataRead != 0) {AllButtonsPressed = TRUE;}
}
用这几篇帖子深入探讨一下ZYNQ-7000/FMQL45T900的GPIO相关设计,都说GPIO最简单,这样记录下来起始还是很费劲的。可以根根据需求,直接跳转到相关的内容
Zynq-7000、FMQL45T900的GPIO控制(一)-----SDK配置GPIO普通输入输出模式,以及GPIO编号_大牛攻城狮的博客-CSDN博客
Zynq-7000、FMQL45T900的GPIO控制(二)-----SDK配置GPIO外部中断输入_大牛攻城狮的博客-CSDN博客
Zynq-7000、FMQL45T900的GPIO控制(三)---linux管脚编号计算_大牛攻城狮的博客-CSDN博客
Zynq-7000、FMQL45T900的GPIO控制(四)---linux应用层配置GPIO输入控制_大牛攻城狮的博客-CSDN博客
Zynq-7000、FMQL45T900的GPIO控制(五)---linux应用层配置GPIO输出控制_大牛攻城狮的博客-CSDN博客
Zynq-7000、FMQL45T900的GPIO控制(六)---linux驱动层配置GPIO输入输出控制_大牛攻城狮的博客-CSDN博客
(1条消息) Zynq-7000、FMQL45T900的GPIO控制(七)---linux驱动层配置GPIO中断输入_大牛攻城狮的博客-CSDN博客
这篇关于Zynq-7000、FMQL45T900的GPIO控制(二)-----SDK配置GPIO外部中断输入的文章就介绍到这儿,希望我们推荐的文章对编程师们有所帮助!


