本文主要是介绍Isaac Sim教程07 拓展编程Extension,希望对大家解决编程问题提供一定的参考价值,需要的开发者们随着小编来一起学习吧!
Isaac Sim 拓展编程Extension
版权信息
Copyright 2023 Herman Ye@Auromix. All rights reserved.This course and all of its associated content, including but not limited to text,
images, videos, and any other materials, are protected by copyright law.
The author holds all rights to this course and its contents.Any unauthorized use, reproduction, distribution, or modification of this course
or its contents is strictly prohibited and may result in legal action.
This includes, but is not limited to:
Copying or distributing course materials without express written permission.
Reposting, sharing, or distributing course content on any platform without proper attribution and permission.
Creating derivative works based on this course without permission.
Permissions and InquiriesIf you wish to use or reproduce any part of this course for purposes other than personal learning,
please contact the author to request permission.The course content is provided for educational purposes, and the author makes no warranties or representations
regarding the accuracy, completeness, or suitability of the course content for any specific purpose.
The author shall not be held liable for any damages, losses,
or other consequences resulting from the use or misuse of this course.Please be aware that this course may contain materials or images obtained from third-party sources.
The author and course creator diligently endeavor to ensure that these materials
are used in full compliance with copyright and fair use regulations.
If you have concerns about any specific content in this regard,
please contact the author for clarification or resolution.By enrolling in this course, you agree to abide by the terms and conditions outlined in this copyright notice.
学习目标
- 熟悉Omniverse中拓展的概念
- 熟悉Omniverse中拓展的包架构
- 熟悉Omniverse中拓展的创建
- 了解Omniverse中拓展在工具配置、场景导入和强化学习中的使用
难度级别
| 初级 | 中级 | 高级 |
|---|---|---|
| √ |
预计耗时
40 mins
学习前提
| 对象 | 类型 | 状态 |
|---|---|---|
| Ubuntu22.04操作系统 | 软件 | 已确认 |
| Isaac Sim | 软件 | 已配置 |
| Isaac Sim基本概念 | 知识 | 已了解 |
| Isaac Sim基本使用 | 知识 | 已了解 |
| Isaac Sim高级使用 | 知识 | 已了解 |
什么是拓展(Extension)
拓展是构建在 Omniverse Kit 基础上的应用程序的核心组成部分。它们是独立构建的应用程序模块,而 Omniverse Isaac Sim 中使用的所有工具都是作为拓展构建的。只需在拓展管理器中安装它们,就能在不同的 Omniverse 应用程序中轻松使用。
通俗地讲,当加载Isaac Sim时,看到有非常多的拓展启动成功,这是因为Isaac Sim的主体就是由拓展构成的。
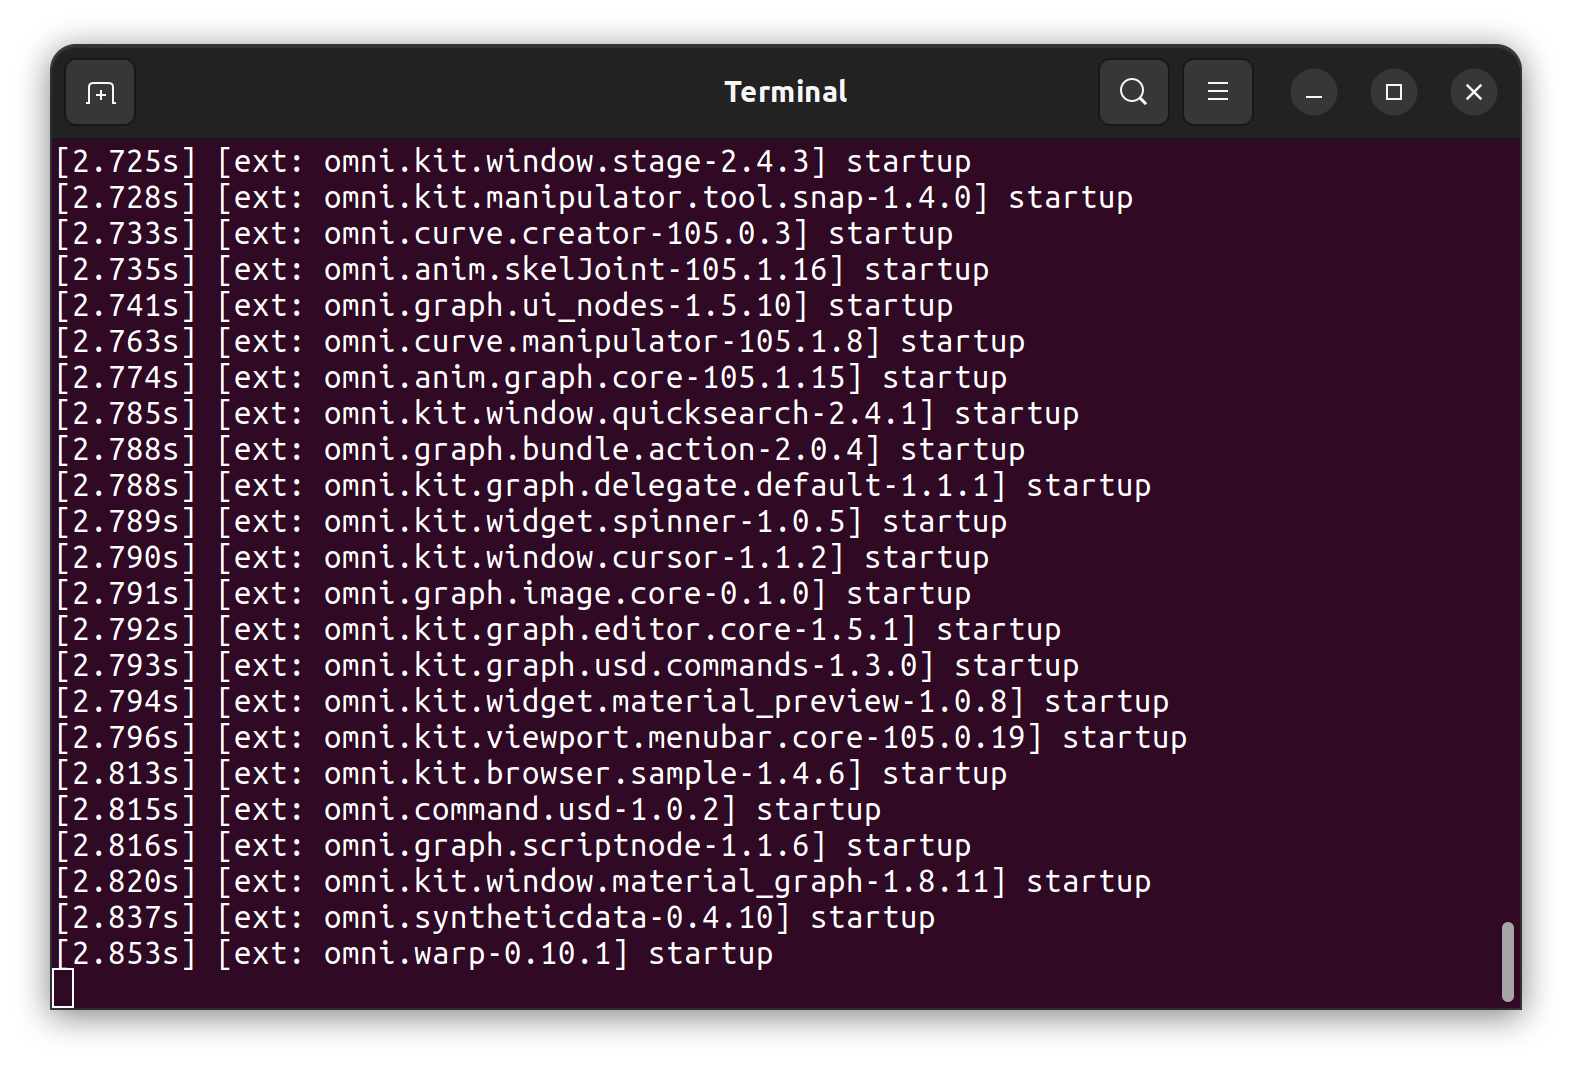
拓展的最简形式就是一个包含配置文件(extension.toml)的拓展包文件夹,和ROS2中的功能包的理念有相似之处。
拓展系统会检测到该拓展,如果启用,将按照配置文件中指示的操作执行相应任务,其中可能包括加载 Python 模块、Carbonite 插件、共享库、应用设置等。
这个拓展包的具体的目录结构如下:
.
├── config  # 拓展包的配置文件夹
│   └── extension.toml  # 拓展包的.toml配置文件
├── data  # 包相关资料及数据存放的文件夹
│   ├── icon.png  # 包图标
│   └── preview.png  # 包功能展示图
├── docs  # 文档文件夹
│   ├── CHANGELOG.md  # 修订记录
│   └── README.md  # 拓展包的README
└── My_Test_Extension_python  # 具体代码文件夹├── extension.py  # 包含了让用户的自定义扩展能够显示在工具栏上所需的标准样板的类。├── global_variables.py  # 存储全局变量,例如包名和包描述的字符串├── __init__.py  # 方便在import时载入extension.py的所有内容├── README.md  # Python文件夹的README└── ui_builder.py  # UI绘制及具体案例的处理逻辑
创建新的扩展包
首先,依次选择Isaac Utils -> Generate Extension Templates,以打开扩展模板生成工具。
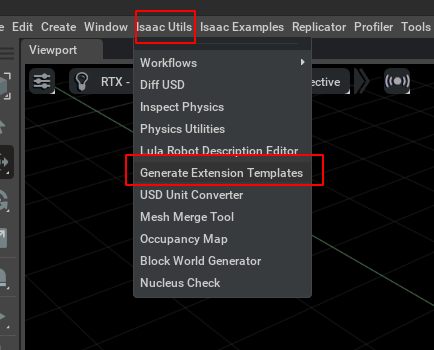
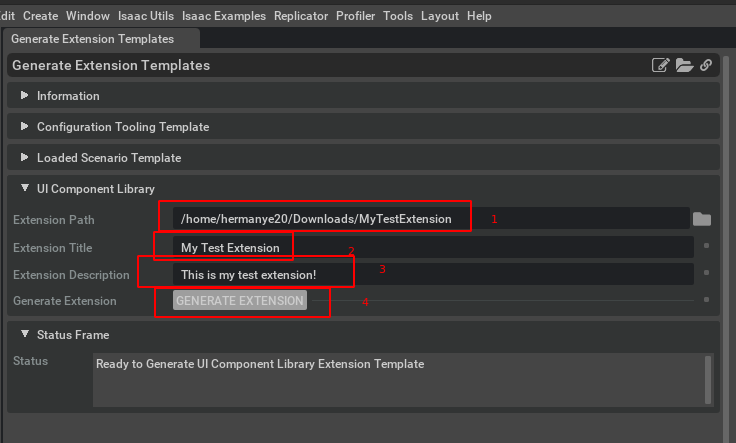
在扩展模板生成工具中,按照以下顺序填写信息:
- Extension Path:将要设置的拓展包所在的位置,为自定义的一个空文件夹。
- Extension Title:自定义扩展的名称。
- Extension Description:自定义扩展的描述。
然后,点击GENERATE EXTENSION,以生成标准的扩展文件夹。
使用扩展
首先,依次点击Window -> Extensions,以打开扩展管理。
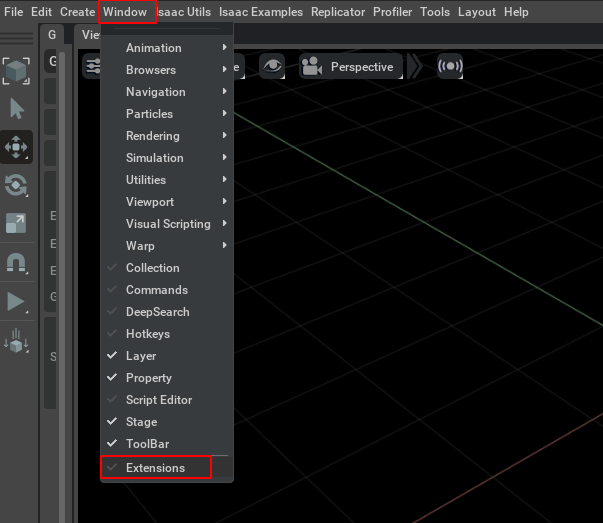
在这里,可以看到众多可供选择的扩展。
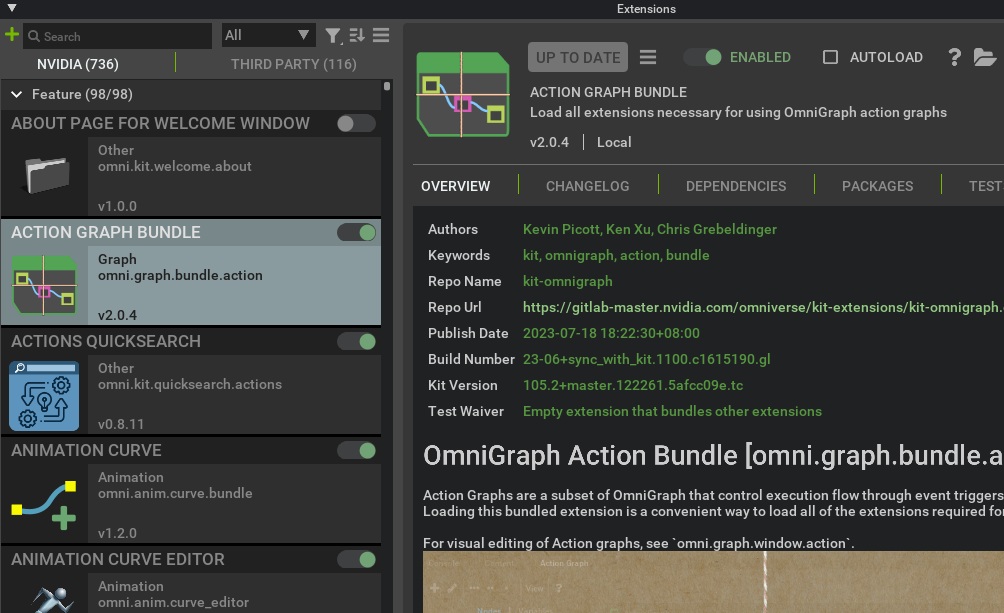
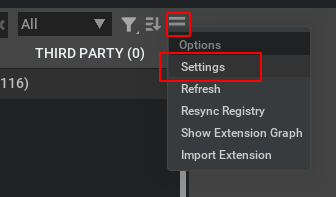
接下来,按照以下步骤将自定义的扩展添加到IsaacSim的扩展搜索路径中:
- 依次点击图标 ->
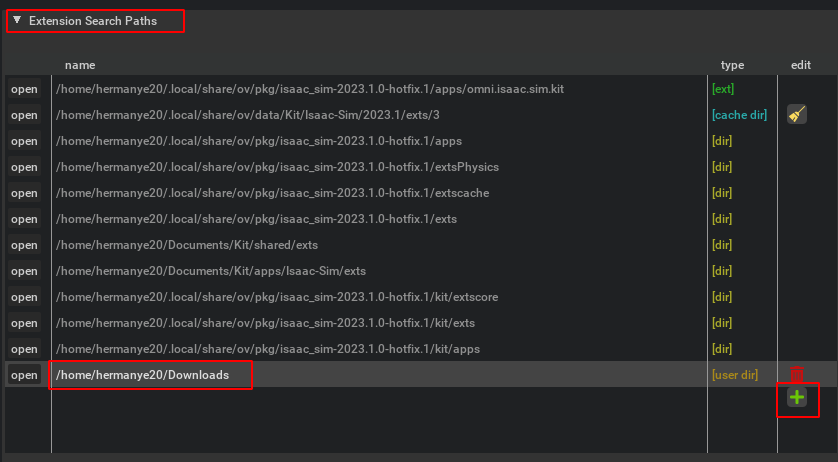
Settings->加号。 - 输入扩展包所在文件夹的路径,将其添加到IsaacSim的扩展搜索路径中。
在这个例子中,扩展包被存储在 /home/hermanye20/Downloads 文件夹中。
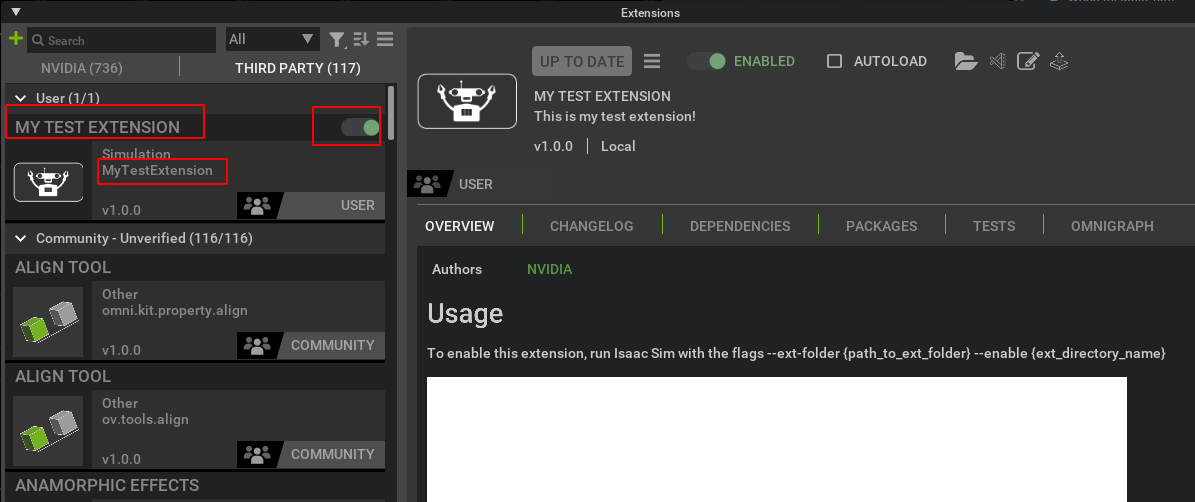
添加完成后,可以观察到自定义的扩展。
最后,在上部的工具栏中即可找到新导入的扩展工具。
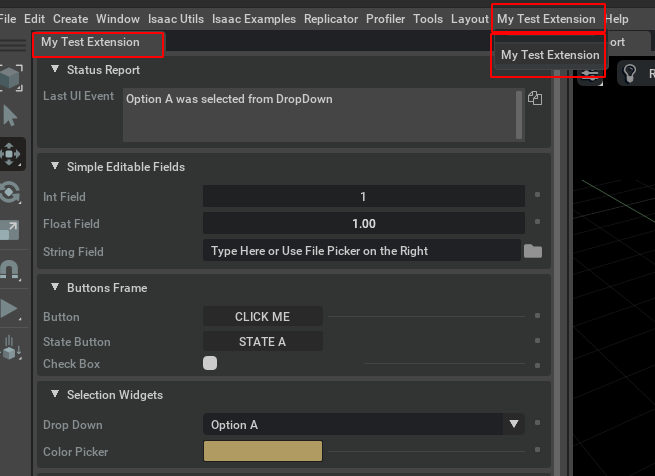
熟悉拓展包的内容
生成的拓展文件夹目录应当如下:
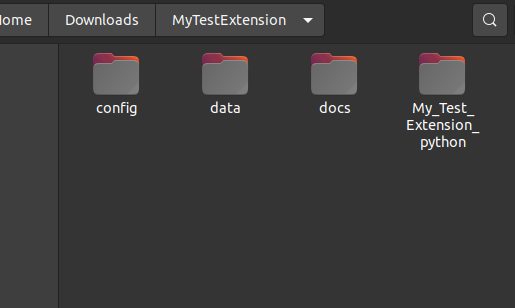
具体的目录结构如下:
.
├── config  # 拓展包的配置文件夹
│   └── extension.toml  # 拓展包的.toml配置文件
├── data  # 包相关资料及数据存放的文件夹
│   ├── icon.png  # 包图标
│   └── preview.png  # 包功能展示图
├── docs  # 文档文件夹
│   ├── CHANGELOG.md  # 修订记录
│   └── README.md  # 拓展包的README
└── My_Test_Extension_python  # 具体代码文件夹├── extension.py  # 包含了让用户的自定义扩展能够显示在工具栏上所需的标准样板的类。├── global_variables.py  # 存储全局变量,例如包名和包描述的字符串├── __init__.py  # 方便在import时载入extension.py的所有内容├── README.md  # Python文件夹的README└── ui_builder.py  # UI绘制及具体案例的处理逻辑
extension.toml
toml是一种非常方便的语言,相关规则可以参考toml official。
该文件包含这个拓展包相关的描述,包括它在Isaac Sim中显示的对应的内容。
[core]  # 通用扩展属性,由 Extension Manager 核心系统直接使用
reloadable = true  # 是否可重新加载,扩展系统将监视扩展的文件是否发生更改,并在其中任何一个发生更改时尝试重新加载扩展
order = 0          # 多个拓展时的执行顺序[package]  # 拓展包信息部分,包括扩展和显示面向用户的有关包的详细信息
version = "1.2.3"  # 版本号
category = "simulation"  # 扩展类别,用于 UI,包含animation、graph、rendering、audio、simulation、example、internal、other
title = "My Test Extension"  # 标题,面向用户的包名称,用于 UI
description = "This is my test extension!"  # 描述,面向用户的包描述,用于 UI
authors = ["Herman Ye <hermanye233@icloud.com>"]  # 作者列表
repository = "https://github.com/orgs/Auromix/repositories"  # 对应的仓库信息
keywords = ["Test", "MyExtension", "WOW"]  # 描述拓展的关键词列表
changelog = "docs/CHANGELOG.md"  # Isaac Sim中显示的修订日志文件路径
readme = "docs/README.md"  # README文件路径
preview_image = "data/preview.png"  # 包的功能预览图像路径
icon = "data/icon.png"  # 包的图标路径[dependencies]  # 依赖配置部分,可以指定版本号和设备tag
"omni.kit.uiapp" = {}
"omni.isaac.ui" = {}
"omni.isaac.core" = {}[[python.module]]  # Python模块配置部分
name = "My_Test_Extension_python"  # 模块名称(拓展包的python相关文件夹)
在Isaac Sim的拓展管理器中呈现的效果应当如下图:
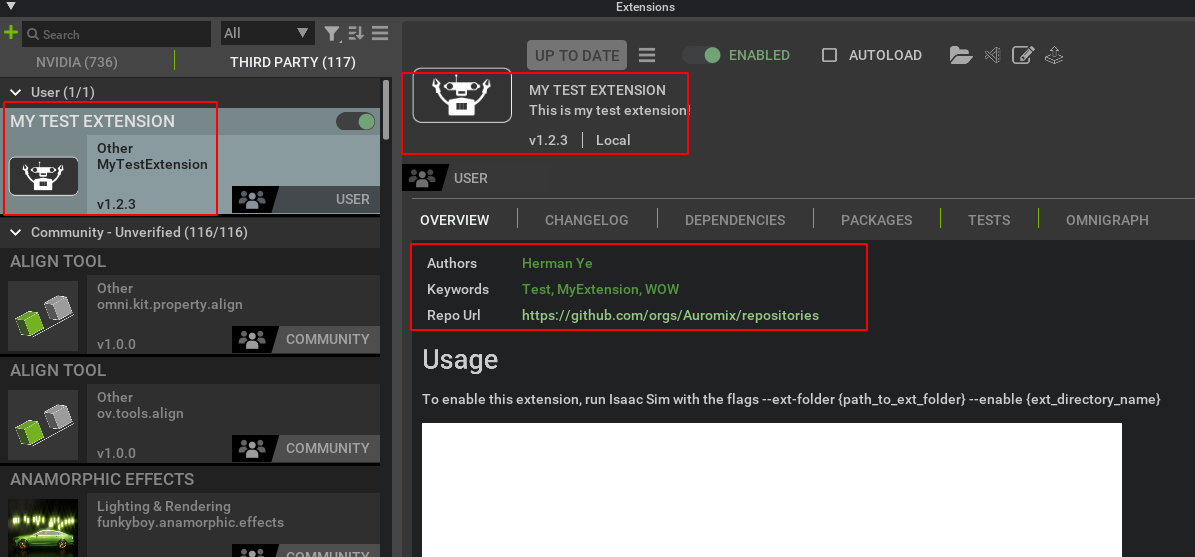
ui_builder.py
在进行自定义拓展时最重要的文件,在这个文件里设置满足自定义拓展所需的回调函数,并且他们还可以创建Isaac Sim 中的UI 元素。
这个代码包含了绘制UI相关的类UIBuilder,这个类将在extension.py中被调用。
# Copyright (c) 2022-2023, NVIDIA CORPORATION. All rights reserved.
#
# NVIDIA CORPORATION and its licensors retain all intellectual property
# and proprietary rights in and to this software, related documentation
# and any modifications thereto. Any use, reproduction, disclosure or
# distribution of this software and related documentation without an express
# license agreement from NVIDIA CORPORATION is strictly prohibited.
## 引入os模块,用于获取文件扩展名相关操作
import os
# 引入类型提示
from typing import List
# 引入Omniverse的UI工具包,用于在 Kit 扩展中创建美观且灵活的图形用户界面
import omni.ui as ui
# Isaac Sim UI 实用程序扩展提供了用于创建以机器人为中心的 UI 元素的辅助函数
from omni.isaac.ui.element_wrappers import (Button,CheckBox,CollapsableFrame,ColorPicker,DropDown,FloatField,IntField,StateButton,StringField,TextBlock,XYPlot,
)
from omni.isaac.ui.ui_utils import get_styleclass UIBuilder:def __init__(self):# UI块(Frame)是可以包含多个UI元素的子窗口,可以理解成 widget 小组件# 关系可以被理解为一个拓展Extension里面可以有多个Frame,一个Frame里面可以有多个UI元素self.frames = []# 用于存储使用omni.isaac.ui.element_wrappers中的UIElementWrapper创建的UI元素,以便在cleanup()中调用它们的cleanup()函数self.wrapped_ui_elements = []# 打开扩展时调用(在build_ui()之后直接调用的)def on_menu_callback(self):"""Callback for when the UI is opened from the toolbar.This is called directly after build_ui()."""pass# 当时间线事件触发时(停止、暂停或播放时)调用def on_timeline_event(self, event):"""Callback for Timeline events (Play, Pause, Stop)Args:event (omni.timeline.TimelineEventType): Event Type"""pass# 在每次物理步进时调用,物理步进仅在时间线播放时发生def on_physics_step(self, step):"""Callback for Physics Step.Physics steps only occur when the timeline is playingArgs:step (float): Size of physics step"""pass# 当舞台Stage事件触发时(打开或关闭时)调用def on_stage_event(self, event):"""Callback for Stage EventsArgs:event (omni.usd.StageEventType): Event Type"""pass# 当扩展将要关闭而应清理资源时调用# 在舞台关闭或扩展热重新加载时调用。执行任何必要的清理工作,比如移除活动回调函数。# 从 omni.isaac.ui.element_wrappers 导入的按钮实现了一个清理函数,应当在此时调用。def cleanup(self):"""Called when the stage is closed or the extension is hot reloaded.Perform any necessary cleanup such as removing active callback functionsButtons imported from omni.isaac.ui.element_wrappers implement a cleanup function that should be called  """# 此初始模板中的任何UI元素实际上都没有任何需要清理的内部状态。# 但是,最好在所有包装的UI元素上调用cleanup()以简化开发。# 此处执行了UI元素的清理函数。for ui_elem in self.wrapped_ui_elements:ui_elem.cleanup()# 构建UI,这个函数将在UI窗口关闭并重新打开时被调用def build_ui(self):"""Build a custom UI tool to run your extension.This function will be called any time the UI window is closed and reopened."""# 依次按照顺序从上到下创建UI块# 创建一个UI块,用于打印最新的UI事件的演示self._create_status_report_frame()# 创建一个UI块,演示用户输入的简单UI元素的演示self._create_simple_editable_fields_frame()# 创建一个UI块,其中包含不同类型的按钮的演示self._create_buttons_frame()# 创建一个UI块,其中包含不同的选择小部件的演示self._create_selection_widgets_frame()# 创建一个UI块,其中包含不同的绘图工具的演示self._create_plotting_frame()def _create_status_report_frame(self):# CollapsableFrame是可折叠的用户界面块,此处创建一个名为“Status Report”的可折叠UI块,并将其设置为展开状态# Ref:https://docs.omniverse.nvidia.com/py/isaacsim/source/extensions/omni.isaac.ui/docs/index.html#omni.isaac.ui.element_wrappers.ui_widget_wrappers.CollapsableFrameself._status_report_frame = CollapsableFrame("Status Report", collapsed=False)with self._status_report_frame:# 使用omni.ui.VStack创建一个Isaac Sim风格的垂直布局的UI块# Ref:https://docs.omniverse.nvidia.com/kit/docs/omni.ui/latest/omni.ui/omni.ui.VStack.html#omni.ui.VStackwith ui.VStack(style=get_style(), spacing=5, height=0):# 创建一个文本框,在这个案例中用于打印最新的UI相关事件# Ref:https://docs.omniverse.nvidia.com/py/isaacsim/source/extensions/omni.isaac.ui/docs/index.html#omni.isaac.ui.element_wrappers.ui_widget_wrappers.TextBlockself._status_report_field = TextBlock("Last UI Event",  # UI元素的左侧显示文本num_lines=3,  # 可见的行数tooltip="Prints the latest change to this UI",  # 鼠标悬停在UI元素上时显示的文本include_copy_button=True,  # 是否包含复制辅助按钮方便用户复制文本框中的内容)def _create_simple_editable_fields_frame(self):# CollapsableFrame是可折叠的用户界面块,此处创建一个名为“Simple Editable Fields”的可折叠UI块,并将其设置为展开状态# Ref:https://docs.omniverse.nvidia.com/py/isaacsim/source/extensions/omni.isaac.ui/docs/index.html#omni.isaac.ui.element_wrappers.ui_widget_wrappers.CollapsableFrameself._simple_fields_frame = CollapsableFrame("Simple Editable Fields", collapsed=False)with self._simple_fields_frame:# 使用omni.ui.VStack创建一个Isaac Sim风格的垂直布局的UI块# Ref:https://docs.omniverse.nvidia.com/kit/docs/omni.ui/latest/omni.ui/omni.ui.VStack.html#omni.ui.VStackwith ui.VStack(style=get_style(), spacing=5, height=0):# 创建一个整数字段,用于演示包含用户输入和拖拽功能的整数滑条# Ref:https://docs.omniverse.nvidia.com/py/isaacsim/source/extensions/omni.isaac.ui/docs/index.html#omni.isaac.ui.element_wrappers.ui_widget_wrappers.IntFieldint_field = IntField("Int Field",  # UI元素的左侧显示文本default_value=1,  # 默认值tooltip="Type an int or click and drag to set a new value.",  # 鼠标悬停在UI元素上时显示的文本lower_limit=-100,  # 最小值upper_limit=100,  # 最大值on_value_changed_fn=self._on_int_field_value_changed_fn,  # int值更改时调用的函数)self.wrapped_ui_elements.append(int_field)  # 将这个UI元素添加到UI元素列表中# 创建一个浮点字段,用于演示包含用户输入和拖拽功能的浮点滑条# Ref:https://docs.omniverse.nvidia.com/py/isaacsim/source/extensions/omni.isaac.ui/docs/index.html#omni.isaac.ui.element_wrappers.ui_widget_wrappers.FloatFieldfloat_field = FloatField("Float Field",  # UI元素的左侧显示文本default_value=1.0,  # 默认值tooltip="Type a float or click and drag to set a new value.",  # 鼠标悬停在UI元素上时显示的文本step=0.5,  # 拖动鼠标时可更改浮点数的最小步长format="%.2f",  # 显示浮点数时的格式lower_limit=-100.0,  # 最小值upper_limit=100.0,  # 最大值on_value_changed_fn=self._on_float_field_value_changed_fn,  # float值更改时调用的函数)self.wrapped_ui_elements.append(float_field)  # 将这个UI元素添加到UI元素列表中def is_usd_or_python_path(file_path: str):# 使用os.path.splitext获取文件的扩展名_, ext = os.path.splitext(file_path.lower())# 判断文件扩展名是否为.usd或.py,如果是则返回Truereturn ext == ".usd" or ext == ".py"# 创建一个字符串字段,用于演示包含用户输入或者文件夹选择器来获取的路径字符串字段# Ref:https://docs.omniverse.nvidia.com/py/isaacsim/source/extensions/omni.isaac.ui/docs/index.html#omni.isaac.ui.element_wrappers.ui_widget_wrappers.StringFieldstring_field = StringField("String Field",  # UI元素的左侧显示文本default_value="Type Here or Use File Picker on the Right",  # 默认值tooltip="Type a string or use the file picker to set a value",  # 鼠标悬停在UI元素上时显示的文本read_only=False,  # 是否只读,如果为True则不允许用户输入multiline_okay=False,  # 是否允许出现换行符on_value_changed_fn=self._on_string_field_value_changed_fn,  # string值更改时调用的函数use_folder_picker=True,  # 是否使用文件夹选择器item_filter_fn=is_usd_or_python_path,  # 用于过滤文件的过滤器函数,此处只允许选择扩展名为.usd或.py的文件)self.wrapped_ui_elements.append(string_field)  # 将这个UI元素添加到UI元素列表中def _create_buttons_frame(self):# CollapsableFrame是可折叠的用户界面块,此处创建一个名为“buttons_frame”的可折叠UI块,并将其设置为展开状态# Ref:https://docs.omniverse.nvidia.com/py/isaacsim/source/extensions/omni.isaac.ui/docs/index.html#omni.isaac.ui.element_wrappers.ui_widget_wrappers.CollapsableFramebuttons_frame = CollapsableFrame("Buttons Frame", collapsed=False)with buttons_frame:# 使用omni.ui.VStack创建一个Isaac Sim风格的垂直布局的UI块# Ref:https://docs.omniverse.nvidia.com/kit/docs/omni.ui/latest/omni.ui/omni.ui.VStack.html#omni.ui.VStackwith ui.VStack(style=get_style(), spacing=5, height=0):# 创建一个按钮,用于演示用户的点击# Ref:https://docs.omniverse.nvidia.com/py/isaacsim/source/extensions/omni.isaac.ui/docs/index.html#omni.isaac.ui.element_wrappers.ui_widget_wrappers.Buttonbutton = Button("Button",  # UI元素的左侧显示文本"CLICK ME",  # 按钮上的文本tooltip="Click This Button to activate a callback function",  # 鼠标悬停在UI元素上时显示的文本on_click_fn=self._on_button_clicked_fn,  # 按钮被点击时调用的函数)self.wrapped_ui_elements.append(button)  # 将这个UI元素添加到UI元素列表中# 创建一个状态按钮,用于演示用户的点击造成的状态切换(A OR B)# Ref:https://docs.omniverse.nvidia.com/py/isaacsim/source/extensions/omni.isaac.ui/docs/index.html#omni.isaac.ui.element_wrappers.ui_widget_wrappers.StateButtonstate_button = StateButton("State Button",  # UI元素的左侧显示文本a_text="State A",  # 按钮在A状态下的按钮文本b_text="State B",  # 按钮在B状态下的按钮文本tooltip="Click this button to transition between two states",  # 鼠标悬停在UI元素上时显示的文本on_a_click_fn=self._on_state_btn_a_click_fn,  # 在状态 A 下单击按钮时应调用的函数on_b_click_fn=self._on_state_btn_b_click_fn,  # 在状态 B 下单击按钮时应调用的函数physics_callback_fn=None,  # 当按钮处于状态 B 时,将在每个物理步骤中调用的函数# Info@HermanYe:该函数应该有一个物理步长参数(浮点数)。返回值将不会被使用。默认为无。# Info@HermanYe:具体使用参考Loaded Scenario Template)self.wrapped_ui_elements.append(state_button)  # 将这个UI元素添加到UI元素列表中# 创建一个可勾选的,用于演示用户的点击造成的选中和取消选中(YES OR NO)# Ref:https://docs.omniverse.nvidia.com/py/isaacsim/source/extensions/omni.isaac.ui/docs/index.html#omni.isaac.ui.element_wrappers.ui_widget_wrappers.CheckBoxcheck_box = CheckBox("Check Box",  # UI元素的左侧显示文本default_value=False,  # 默认值tooltip=" Click this checkbox to activate a callback function",  # 鼠标悬停在UI元素上时显示的文本on_click_fn=self._on_checkbox_click_fn,  # 当复选框被点击时调用的函数)self.wrapped_ui_elements.append(check_box)  # 将这个UI元素添加到UI元素列表中def _create_selection_widgets_frame(self):# CollapsableFrame是可折叠的用户界面块,此处创建一个名为“Selection Widgets”的可折叠UI块,并将其设置为展开状态# Ref:https://docs.omniverse.nvidia.com/py/isaacsim/source/extensions/omni.isaac.ui/docs/index.html#omni.isaac.ui.element_wrappers.ui_widget_wrappers.CollapsableFrameself._selection_widgets_frame = CollapsableFrame("Selection Widgets", collapsed=False)with self._selection_widgets_frame:# 使用omni.ui.VStack创建一个Isaac Sim风格的垂直布局的UI块# Ref:https://docs.omniverse.nvidia.com/kit/docs/omni.ui/latest/omni.ui/omni.ui.VStack.html#omni.ui.VStackwith ui.VStack(style=get_style(), spacing=5, height=0):def dropdown_populate_fn():# 返回一个字符串列表,用于填充下拉列表return ["Option A", "Option B", "Option C"]# 创建一个下拉列表,用于演示用户的不同选择# Ref:https://docs.omniverse.nvidia.com/py/isaacsim/source/extensions/omni.isaac.ui/docs/index.html#omni.isaac.ui.element_wrappers.ui_widget_wrappers.DropDowndropdown = DropDown("Drop Down",  # UI元素的左侧显示文本tooltip=" Select an option from the DropDown",  # 鼠标悬停在UI元素上时显示的文本populate_fn=dropdown_populate_fn,  # 用于填充下拉菜单元素列表的函数,默认值为首元素on_selection_fn=self._on_dropdown_item_selection,  # 当下拉菜单元素被选中时调用的函数)self.wrapped_ui_elements.append(dropdown)  # 将这个UI元素添加到UI元素列表中# 重新填充DropDown菜单,这将调用用户设置的populate_fn,用于初次填充下拉菜单元素列表# Warning@HermanYe: 如果不调用此函数,下拉菜单将不会显示任何内容dropdown.repopulate()# 创建一个颜色选择器,用于演示Isaac Sim中的颜色选择# Ref:https://docs.omniverse.nvidia.com/py/isaacsim/source/extensions/omni.isaac.ui/docs/index.html#omni.isaac.ui.element_wrappers.ui_widget_wrappers.ColorPickercolor_picker = ColorPicker("Color Picker",  # UI元素的左侧显示文本default_value=[0.69, 0.61, 0.39, 1.0],  # 默认值  [r,g,b,a]tooltip="Select a Color",  # 鼠标悬停在UI元素上时显示的文本on_color_picked_fn=self._on_color_picked,  # 当颜色被选中时调用的函数)self.wrapped_ui_elements.append(color_picker)  # 将这个UI元素添加到UI元素列表中def _create_plotting_frame(self):# CollapsableFrame是可折叠的用户界面块,此处创建一个名为“Plotting Tools”的可折叠UI块,并将其设置为展开状态# Ref:https://docs.omniverse.nvidia.com/py/isaacsim/source/extensions/omni.isaac.ui/docs/index.html#omni.isaac.ui.element_wrappers.ui_widget_wrappers.CollapsableFrameself._plotting_frame = CollapsableFrame("Plotting Tools", collapsed=False)with self._plotting_frame:with ui.VStack(style=get_style(), spacing=5, height=0):import numpy as npx = np.arange(-1, 6.01, 0.01)y = np.sin((x - 0.5) * np.pi)# Ref:https://docs.omniverse.nvidia.com/py/isaacsim/source/extensions/omni.isaac.ui/docs/index.html#omni.isaac.ui.element_wrappers.ui_widget_wrappers.XYPlotplot = XYPlot("XY Plot",  # UI元素的左侧显示文本tooltip="Press mouse over the plot for data label",  # 鼠标悬停在UI元素上时显示的文本x_data=[x[:300], x[100:400], x[200:]],  # x轴数据y_data=[y[:300], y[100:400], y[200:]],  # y轴数据x_min=0.1,  # X轴数据过滤的最小值,超出此范围的数据将不会被绘制x_max=5.4,  # X轴数据过滤的最大值,超出此范围的数据将不会被绘制y_min=-1.5,  # Y轴数据过滤的最小值,超出此范围的数据将不会被绘制y_max=1.5,  # Y轴数据过滤的最大值,超出此范围的数据将不会被绘制x_label="X [rad]",  # X轴标签y_label="Y",  # Y轴标签plot_height=10,  # 绘图区域的高度legends=["Line 1", "Line 2", "Line 3"],  # 图例show_legend=True,  # 是否显示图例plot_colors=[  # 指定绘制颜色的列表,分别对应每个xy数据集,如果不指定则使用默认颜色[255, 0, 0],[0, 255, 0],[0, 100, 80],],)# 以下均为回调函数,用于演示UI元素的在发生和用户的交互时触发的回调功能def _on_int_field_value_changed_fn(self, new_value: int):# 当整数字段的值发生变化时,将会调用此函数,默认的传入参数为新的整数值status = f"Value was changed in int field to {new_value}"# 调用TextBlock的set_text()函数,用于设置文本框中的文本self._status_report_field.set_text(status)# 以下功能与上述相同,不再赘述def _on_float_field_value_changed_fn(self, new_value: float):status = f"Value was changed in float field to {new_value}"self._status_report_field.set_text(status)def _on_string_field_value_changed_fn(self, new_value: str):status = f"Value was changed in string field to {new_value}"self._status_report_field.set_text(status)def _on_button_clicked_fn(self):status = "The Button was Clicked!"self._status_report_field.set_text(status)def _on_state_btn_a_click_fn(self):status = "State Button was Clicked in State A!"self._status_report_field.set_text(status)def _on_state_btn_b_click_fn(self):status = "State Button was Clicked in State B!"self._status_report_field.set_text(status)def _on_checkbox_click_fn(self, value: bool):status = f"CheckBox was set to {value}!"self._status_report_field.set_text(status)def _on_dropdown_item_selection(self, item: str):status = f"{item} was selected from DropDown"self._status_report_field.set_text(status)def _on_color_picked(self, color: List[float]):# 使用类型提示,将color的类型指定为List[float]formatted_color = [float("%0.2f" % i) for i in color]status = f"RGBA Color {formatted_color} was picked in the ColorPicker"self._status_report_field.set_text(status)
global_variables.py
用于存储用户在扩展模板生成器中创建扩展时指定的全局变量 ,例如标题和描述。
在此处,定义的全局变量EXTENSION_TITLE和EXTENSION_DESCRIPTION将在extension.py被使用。
# Copyright (c) 2022-2023, NVIDIA CORPORATION. All rights reserved.
#
# NVIDIA CORPORATION and its licensors retain all intellectual property
# and proprietary rights in and to this software, related documentation
# and any modifications thereto. Any use, reproduction, disclosure or
# distribution of this software and related documentation without an express
# license agreement from NVIDIA CORPORATION is strictly prohibited.
#EXTENSION_TITLE = "My Test Extension"EXTENSION_DESCRIPTION = "This is my test extension!"
_init_.py
当该拓展包从其他地方被导入时,将载入extension.py里的所有内容
# Copyright (c) 2022-2023, NVIDIA CORPORATION. All rights reserved.
#
# NVIDIA CORPORATION and its licensors retain all intellectual property
# and proprietary rights in and to this software, related documentation
# and any modifications thereto. Any use, reproduction, disclosure or
# distribution of this software and related documentation without an express
# license agreement from NVIDIA CORPORATION is strictly prohibited.
#
from .extension import *
extension.py
这个代码包含了让用户的自定义扩展能够显示在工具栏上所需的标准样板的类。
在大多数情况下,这个代码不需要修改和调整,在extension.py中,创建了标准回调函数,这些回调函数将会调用ui_builder中对应的事件回调函数,用户可以在ui_builder.py中完成这些函数的定制,使得在某些事件触发时执行回调。
一个例子是,当拓展关闭时触发回调,执行一些清理资源的操作。
# Copyright (c) 2022-2023, NVIDIA CORPORATION. All rights reserved.
#
# NVIDIA CORPORATION and its licensors retain all intellectual property
# and proprietary rights in and to this software, related documentation
# and any modifications thereto. Any use, reproduction, disclosure or
# distribution of this software and related documentation without an express
# license agreement from NVIDIA CORPORATION is strictly prohibited.
#import asyncio
import gcimport omni
import omni.kit.commands
import omni.physx as _physx
import omni.timeline
import omni.ui as ui
import omni.usd
from omni.isaac.ui.element_wrappers import ScrollingWindow
from omni.isaac.ui.menu import MenuItemDescription
from omni.kit.menu.utils import add_menu_items, remove_menu_items
from omni.usd import StageEventTypefrom .global_variables import EXTENSION_DESCRIPTION, EXTENSION_TITLE
from .ui_builder import UIBuilder"""
This file serves as a basic template for the standard boilerplate operations
that make a UI-based extension appear on the toolbar.This implementation is meant to cover most use-cases without modification.
Various callbacks are hooked up to a seperate class UIBuilder in .ui_builder.py
Most users will be able to make their desired UI extension by interacting solely with
UIBuilder.This class sets up standard useful callback functions in UIBuilder:on_menu_callback: Called when extension is openedon_timeline_event: Called when timeline is stopped, paused, or playedon_physics_step: Called on every physics stepon_stage_event: Called when stage is opened or closedcleanup: Called when resources such as physics subscriptions should be cleaned upbuild_ui: User function that creates the UI they want.
"""# Extension的标准模板
class Extension(omni.ext.IExt):# 父类是拓展Extension相关的类,主要有shutdown和startup两个函数。# Info@HermanYe: 扩展的实现,必须继承自 omni.ext.IExt 类# Info@HermanYe: 在Isaac Sim启用拓展后,系统会搜索该模块中所有的 omni.ext.IExt 类的子类# Ref: https://docs.omniverse.nvidia.com/kit/docs/kit-manual/104.0/omni.ext/omni.ext.IExt.htmldef on_startup(self, ext_id: str):"""Initialize extension and UI elements"""# 拓展的IDself.ext_id = ext_id# 获取USD的上下文# 这个类涉及管理USD舞台(stage)、处理异步操作,并提供与场景编辑和渲染相关的各种功能# Ref:https://docs.omniverse.nvidia.com/kit/docs/omni.usd/latest/omni.usd/omni.usd.UsdContext.html#omni.usd.UsdContextself._usd_context = omni.usd.get_context()# 构建一个滚动窗口,对应的拓展包的显示名称从global_variables.py中获取# 设定它的宽高,可见性,停靠的偏好位置self._window = ScrollingWindow(title=EXTENSION_TITLE, width=600, height=500, visible=False, dockPreference=ui.DockPreference.LEFT_BOTTOM)# 每当这个窗口的可见性发生变化时,调用函数 self._visibility_changed_fn 来处理任何必要的任务或更新self._window.set_visibility_changed_fn(self._on_window)# 获取Action的注册表,Omni Kit Actions Core 是一个用于创建、注册和发现Action的框架# Ref: https://docs.omniverse.nvidia.com/kit/docs/omni.kit.actions.core/1.0.0/omni.kit.actions.core/omni.kit.actions.core.get_action_registry.htmlaction_registry = omni.kit.actions.core.get_action_registry()# Info@HermanYe: "action" 是一种表示可以在Omni软件中执行的特定操作的对象。# Info@HermanYe: 这些操作可以是用户界面上的菜单项、工具栏按钮等,用户可以通过点击或调用相应的API来执行这些操作。# 创建并注册一个Actionaction_registry.register_action(ext_id,  # 拓展的IDf"CreateUIExtension:{EXTENSION_TITLE}",  # 可能为具体的行为字符串或操作的标识符self._menu_callback,  # 可能是菜单项的回调函数description=f"Add {EXTENSION_TITLE} Extension to UI toolbar",  # 描述)# 创建一个菜单项self._menu_items = [MenuItemDescription(name=EXTENSION_TITLE, onclick_action=(ext_id, f"CreateUIExtension:{EXTENSION_TITLE}"))]# 将新的菜单项添加到菜单中add_menu_items(self._menu_items, EXTENSION_TITLE)# 将开发者自定义的ui_builder.py中的UIBuilder实例化为一个对象self.ui_builder = UIBuilder()# 获取USD的上下文self._usd_context = omni.usd.get_context()# 获取物理接口self._physxIFace = _physx.acquire_physx_interface()# 初始化物理步进事件订阅self._physx_subscription = None# 初始化舞台Stage事件订阅self._stage_event_sub = None# 获取时间轴接口self._timeline = omni.timeline.get_timeline_interface()# 关闭时将调用def on_shutdown(self):# 清理资源self._models = {}# 从菜单中删除菜单项remove_menu_items(self._menu_items, EXTENSION_TITLE)# 获取Action的注册表action_registry = omni.kit.actions.core.get_action_registry()# 注销Actionaction_registry.deregister_action(self.ext_id, f"CreateUIExtension:{EXTENSION_TITLE}")# 清理Windowif self._window:self._window = None# 清理拓展包的UI资源self.ui_builder.cleanup()# 手动触发Python垃圾回收过程gc.collect()def _on_window(self, visible):if self._window.visible:# 订阅舞台Stage和时间轴事件# 获取USD的上下文self._usd_context = omni.usd.get_context()# 获取Stage事件流events = self._usd_context.get_stage_event_stream()# 创建舞台Stage事件订阅self._stage_event_sub = events.create_subscription_to_pop(self._on_stage_event)# 获取时间轴事件流stream = self._timeline.get_timeline_event_stream()# 创建时间轴事件订阅self._timeline_event_sub = stream.create_subscription_to_pop(self._on_timeline_event)# 构建UIself._build_ui()else:self._usd_context = Noneself._stage_event_sub = Noneself._timeline_event_sub = Noneself.ui_builder.cleanup()# 构建UIdef _build_ui(self):with self._window.frame:with ui.VStack(spacing=5, height=0):# 构建拓展包的UI,调用ui_builder.py中的构建函数self._build_extension_ui()async def dock_window():# 等待下一次更新await omni.kit.app.get_app().next_update_async()def dock(space, name, location, pos=0.5):# 获取窗口window = omni.ui.Workspace.get_window(name)if window and space:# 将窗口停靠到指定位置window.dock_in(space, location, pos)return window# 获取视口tgt = ui.Workspace.get_window("Viewport")# 将窗口停靠到左侧dock(tgt, EXTENSION_TITLE, omni.ui.DockPosition.LEFT, 0.33)# 等待下一次更新await omni.kit.app.get_app().next_update_async()# 启动一个协程,异步任务可以在后台运行,而不会阻塞主线程self._task = asyncio.ensure_future(dock_window())# 以上均为拓展Extension的标准模板,以下为用户自定义的函数的调用部分# 当点击菜单项时,调用这个函数def _menu_callback(self):# 切换窗口的可见性,如果可见则隐藏,如果隐藏则可见,这是为了在重复点击菜单项时,可以关掉窗口或者打开窗口self._window.visible = not self._window.visible# 打开拓展时,调用ui_builder中的on_menu_callback函数self.ui_builder.on_menu_callback()def _on_timeline_event(self, event):# 当时间轴事件类型为PLAY时if event.type == int(omni.timeline.TimelineEventType.PLAY):if not self._physx_subscription:# 创建物理步进事件的订阅self._physx_subscription = self._physxIFace.subscribe_physics_step_events(self._on_physics_step)# 当时间轴事件类型为STOP时elif event.type == int(omni.timeline.TimelineEventType.STOP):# 取消物理步进事件的订阅self._physx_subscription = None# 调用ui_builder中的on_timeline_event函数self.ui_builder.on_timeline_event(event)def _on_physics_step(self, step):# 调用ui_builder中的on_physics_step函数self.ui_builder.on_physics_step(step)def _on_stage_event(self, event):# 当舞台Stage事件类型为OPENED或CLOSED时if event.type == int(StageEventType.OPENED) or event.type == int(StageEventType.CLOSED):# 取消物理步进事件的订阅self._physx_subscription = None# 清理拓展包的UI资源self.ui_builder.cleanup()# 调用ui_builder中的on_stage_event函数self.ui_builder.on_stage_event(event)def _build_extension_ui(self):# 调用用户自定义的拓展UI构建内容来构建UIself.ui_builder.build_ui()
进一步学习拓展
查看其他标注案例拓展
如果希望了解更多的拓展案例,可以依次选择Isaac Utils -> Generate Extension Templates,以打开扩展模板生成工具。

在扩展模板生成工具中,找到Loaded Scenario Template以及其他的模板,按照以下顺序填写信息:
- Extension Path:将要设置的拓展包所在的位置,为自定义的一个空文件夹。
- Extension Title:自定义扩展的名称。
- Extension Description:自定义扩展的描述。
然后,点击GENERATE EXTENSION,以生成其他标准的扩展文件夹以供参考。
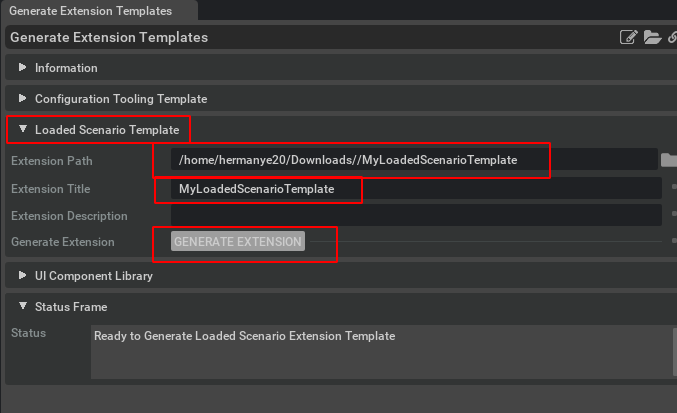
配置工具的模板
ui_builder.py
# Copyright (c) 2022-2023, NVIDIA CORPORATION. All rights reserved.
#
# NVIDIA CORPORATION and its licensors retain all intellectual property
# and proprietary rights in and to this software, related documentation
# and any modifications thereto. Any use, reproduction, disclosure or
# distribution of this software and related documentation without an express
# license agreement from NVIDIA CORPORATION is strictly prohibited.
#import numpy as np
import omni.timeline
import omni.ui as ui
from omni.isaac.core.articulations import Articulation
from omni.isaac.core.utils.prims import get_prim_object_type
from omni.isaac.core.utils.types import ArticulationAction
from omni.isaac.ui.element_wrappers import CollapsableFrame, DropDown, FloatField, TextBlock
from omni.isaac.ui.ui_utils import get_styleclass UIBuilder:def __init__(self):# UI块(Frame)是可以包含多个UI元素的子窗口,可以理解成 widget 小组件# 关系可以被理解为一个拓展Extension里面可以有多个Frame,一个Frame里面可以有多个UI元素self.frames = []# 用于存储使用omni.isaac.ui.element_wrappers中的UIElementWrapper创建的UI元素,以便在cleanup()中调用它们的cleanup()函数self.wrapped_ui_elements = []# 获取时间轴接口,以便以编程方式控制停止/暂停/播放self._timeline = omni.timeline.get_timeline_interface()# 运行案例的初始化函数self._on_init()####################################################################################           The Functions Below Are Called Automatically By extension.py###################################################################################def on_menu_callback(self):"""Callback for when the UI is opened from the toolbar.This is called directly after build_ui()."""# 当UI窗口关闭并重新打开时,重置内部状态self._invalidate_articulation()# 处理用户在打开此扩展之前加载其关节并按下播放的情况# 如果时间轴正在播放,则重新填充下拉菜单if self._timeline.is_playing():self._selection_menu.repopulate()passdef on_timeline_event(self, event):"""Callback for Timeline events (Play, Pause, Stop)Args:event (omni.timeline.TimelineEventType): Event Type"""passdef on_physics_step(self, step):"""Callback for Physics Step.Physics steps only occur when the timeline is playingArgs:step (float): Size of physics step"""pass# 当舞台Stage事件触发时(打开或关闭时)调用此函数def on_stage_event(self, event):"""Callback for Stage EventsArgs:event (omni.usd.StageEventType): Event Type"""# The ASSETS_LOADED stage event is triggered on every occasion that the selection menu should be repopulated:#   a) The timeline is stopped or played#   b) An Articulation is added or removed from the stage#   c) The USD stage is loaded or clearedif event.type == int(omni.usd.StageEventType.ASSETS_LOADED):self._selection_menu.repopulate()passdef cleanup(self):"""Called when the stage is closed or the extension is hot reloaded.Perform any necessary cleanup such as removing active callback functionsButtons imported from omni.isaac.ui.element_wrappers implement a cleanup function that should be called"""# 此处执行了UI元素的清理函数for ui_elem in self.wrapped_ui_elements:ui_elem.cleanup()def build_ui(self):"""Build a custom UI tool to run your extension.This function will be called any time the UI window is closed and reopened."""# CollapsableFrame是可折叠的用户界面块,此处创建一个名为“Selection Panel”的可折叠UI块,并将其设置为展开状态# Ref:https://docs.omniverse.nvidia.com/py/isaacsim/source/extensions/omni.isaac.ui/docs/index.html#omni.isaac.ui.element_wrappers.ui_widget_wrappers.CollapsableFrameselection_panel_frame = CollapsableFrame("Selection Panel", collapsed=False)with selection_panel_frame:with ui.VStack(style=get_style(), spacing=5, height=0):# 创建一个下拉列表,用于演示用户的不同关节选择# Ref:https://docs.omniverse.nvidia.com/py/isaacsim/source/extensions/omni.isaac.ui/docs/index.html#omni.isaac.ui.element_wrappers.ui_widget_wrappers.DropDownself._selection_menu = DropDown("Select Articulation",  # UI元素的左侧显示文本tooltip="Select from Articulations found on the stage after the timeline has been played.",  # UI元素的鼠标悬停提示文本on_selection_fn=self._on_articulation_selection,  # 当用户选择下拉菜单中的选项时,将调用此函数keep_old_selections=True,  # 如果为True,则在重新填充下拉菜单时保留旧的选项# populate_fn = self._find_all_articulations # Equivalent functionality to one-liner below)# 设置 populate_fn 以查找 USD Stage上指定类型为"articulation"的所有对象。# 这是一项便利功能,可满足下拉菜单的一个常见用例。这会覆盖用户设置的 populate_fn。# 使用 get_prim_object_type(prim_path) 函数来找到对象的类型self._selection_menu.set_populate_fn_to_find_all_usd_objects_of_type("articulation", repopulate=False)# CollapsableFrame是可折叠的用户界面块,此处创建一个名为“Robot Control Frame”的可折叠UI块,并将其设置为展开状态# Ref:https://docs.omniverse.nvidia.com/py/isaacsim/source/extensions/omni.isaac.ui/docs/index.html#omni.isaac.ui.element_wrappers.ui_widget_wrappers.CollapsableFrameself._robot_control_frame = CollapsableFrame("Robot Control Frame", collapsed=False)# 构建名为Robot Control Frame的UI块def build_robot_control_frame_fn():self._joint_control_frames = []self._joint_position_float_fields = []if self.articulation is None:TextBlock("Status", text="There is no Articulation Selected", num_lines=2)returnwith ui.VStack(style=get_style(), spacing=5, height=0):# 对于self.articulation的每个关节,创建一个可折叠的UI块,用于管理机器人关节for i in range(self.articulation.num_dof):joint_frame = CollapsableFrame(f"Joint {i}", collapsed=False)# 添加到self._joint_control_frames列表中self._joint_control_frames.append(joint_frame)# 在每个关节控制UI块中,添加控件以管理机器人关节with joint_frame:# 创建一个浮点字段,用于演示包含用户输入和拖拽功能的浮点滑条# Ref:https://docs.omniverse.nvidia.com/py/isaacsim/source/extensions/omni.isaac.ui/docs/index.html#omni.isaac.ui.element_wrappers.ui_widget_wrappers.FloatFieldfield = FloatField(label=f"Position Target", tooltip="Set joint position target")# 触发回调函数,当用户更改浮点字段的值时,将调用该函数,并传入默认的value值和补充的index值(此处=i)field.set_on_value_changed_fn(lambda value, index=i: self._on_set_joint_position_target(index, value))# 添加到self._joint_position_float_fields列表中self._joint_position_float_fields.append(field)self._setup_joint_control_frames()self._robot_control_frame.set_build_fn(build_robot_control_frame_fn)####################################################################################### Functions Below This Point Support The Provided Example And Can Be Replaced/Deleted######################################################################################def _on_init(self):# 初始化时,将self.articulation设置为Noneself.articulation = Nonedef _invalidate_articulation(self):"""This function handles the event that the existing articulation becomes invalid and there isnot a new articulation to select.  It is called explicitly in the code when the timeline isstopped and when the DropDown menu finds no articulations on the stage."""# 处理当现有的关节失效且没有新的关节可供选择时的事件。# 它会将 self.articulation 设置为 None,并重新构建名为Robot Control Frame的这个UI块。# 在代码中,当时间轴停止或下拉菜单在舞台上找不到关节时,会显式调用此函数。self.articulation = Noneself._robot_control_frame.rebuild()def _on_articulation_selection(self, selection: str):"""This function is called whenever a new selection is made in the"Select Articulation" DropDown.  A new selection may also bemade implicitly any time self._selection_menu.repopulate() is calledsince the Articulation they had selected may no longer be present on the stage.Args:selection (str): The item that is currently selected in the drop-down menu."""# 若无选中,则调用 _invalidate_articulation() 函数if selection is None:self._invalidate_articulation()return# 若有选中,则创建一个新的 Articulation 对象,并调用它的 initialize() 函数self.articulation = Articulation(selection)self.articulation.initialize()# 重新构建名为 Robot Control Frame 的这个UI块self._robot_control_frame.rebuild()def _setup_joint_control_frames(self):"""Once a robot has been chosen, update the UI to match robot properties:Make a frame visible for each robot joint.Rename each frame to match the human-readable name of the joint it controls.Change the FloatField for each joint to match the current robot position.Apply the robot's joint limits to each FloatField."""# 获取关节序号num_dof = self.articulation.num_dof# 获取关节名称dof_names = self.articulation.dof_names# 获取关节位置joint_positions = self.articulation.get_joint_positions()# 获取关节上下限lower_joint_limits = self.articulation.dof_properties["lower"]upper_joint_limits = self.articulation.dof_properties["upper"]# 对于每个关节for i in range(num_dof):# 指定对应关节的UI块和浮点字段frame = self._joint_control_frames[i]position_float_field = self._joint_position_float_fields[i]# 写出人类可读的关节名称到UI块的标题frame.title = dof_names[i]position = joint_positions[i]# 更新浮点字段的值和上下限position_float_field.set_value(position)position_float_field.set_upper_limit(upper_joint_limits[i])position_float_field.set_lower_limit(lower_joint_limits[i])def _on_set_joint_position_target(self, joint_index: int, position_target: float):"""This function is called when the user changes one of the float fieldsto control a robot joint position target.  The index of the joint and the newdesired value are passed in as arguments.This function assumes that there is a guarantee it is called safely.I.e. A valid Articulation has been selected and initializedand the timeline is playing.  These gurantees are given by careful UIprogramming.  The joint control frames are only visible to the user whenthese guarantees are met.Args:joint_index (int): Index of robot joint that was modifiedposition_target (float): New position target for robot joint"""# 构建一个ArticulationAction对象,用于控制机器人关节,并填入用户改变后的关节位置robot_action = ArticulationAction(joint_positions=np.array([position_target]),joint_velocities=np.array([0]),joint_indices=np.array([joint_index]),)# 应用机器人动作self.articulation.apply_action(robot_action)# def _find_all_articulations(self):# #    Commented code left in to help a curious user gain a thorough understanding#     import omni.usd#     from pxr import Usd#     items = []#     stage = omni.usd.get_context().get_stage()#     if stage:#         for prim in Usd.PrimRange(stage.GetPrimAtPath("/")):#             path = str(prim.GetPath())#             # Get prim type get_prim_object_type#             type = get_prim_object_type(path)#             if type == "articulation":#                 items.append(path)#     return items
实现场景的载入的模板
ui_builder.py
# This software contains source code provided by NVIDIA Corporation.
# Copyright (c) 2022-2023, NVIDIA CORPORATION.  All rights reserved.
#
# NVIDIA CORPORATION and its licensors retain all intellectual property
# and proprietary rights in and to this software, related documentation
# and any modifications thereto.  Any use, reproduction, disclosure or
# distribution of this software and related documentation without an express
# license agreement from NVIDIA CORPORATION is strictly prohibited.
#import numpy as np
import omni.timeline
import omni.ui as ui
from omni.isaac.core.articulations import Articulation
from omni.isaac.core.objects.cuboid import FixedCuboid
from omni.isaac.core.prims import XFormPrim
from omni.isaac.core.utils.nucleus import get_assets_root_path
from omni.isaac.core.utils.prims import is_prim_path_valid
from omni.isaac.core.utils.stage import add_reference_to_stage, create_new_stage, get_current_stage
from omni.isaac.core.world import World
from omni.isaac.ui.element_wrappers import CollapsableFrame, StateButton
from omni.isaac.ui.element_wrappers.core_connectors import LoadButton, ResetButton
from omni.isaac.ui.ui_utils import get_style
from omni.usd import StageEventType
from pxr import Sdf, UsdLuxfrom .scenario import ExampleScenarioclass UIBuilder:def __init__(self):# UI块(Frame)是可以包含多个UI元素的子窗口,可以理解成 widget 小组件# 关系可以被理解为一个拓展Extension里面可以有多个Frame,一个Frame里面可以有多个UI元素self.frames = []# 用于存储使用omni.isaac.ui.element_wrappers中的UIElementWrapper创建的UI元素,以便在cleanup()中调用它们的cleanup()函数self.wrapped_ui_elements = []# 获取时间轴接口self._timeline = omni.timeline.get_timeline_interface()# 启动场景初始化self._on_init()####################################################################################           The Functions Below Are Called Automatically By extension.py###################################################################################def on_menu_callback(self):"""Callback for when the UI is opened from the toolbar.This is called directly after build_ui()."""passdef on_timeline_event(self, event):"""Callback for Timeline events (Play, Pause, Stop)Args:event (omni.timeline.TimelineEventType): Event Type"""if event.type == int(omni.timeline.TimelineEventType.STOP):# 对于加载场景的拓展,播放和暂停可能没有什么价值,不如直接Load和Resetself._scenario_state_btn.reset()self._scenario_state_btn.enabled = Falsedef on_physics_step(self, step: float):"""Callback for Physics Step.Physics steps only occur when the timeline is playingArgs:step (float): Size of physics step"""passdef on_stage_event(self, event):"""Callback for Stage EventsArgs:event (omni.usd.StageEventType): Event Type"""if event.type == int(StageEventType.OPENED):# 如果用户打开了新的舞台,则重置拓展self._reset_extension()def cleanup(self):"""Called when the stage is closed or the extension is hot reloaded.Perform any necessary cleanup such as removing active callback functionsButtons imported from omni.isaac.ui.element_wrappers implement a cleanup function that should be called"""# 此初始模板中的任何UI元素实际上都没有任何需要清理的内部状态。# 但是,最好在所有包装的UI元素上调用cleanup()以简化开发。# 此处执行了UI元素的清理函数。for ui_elem in self.wrapped_ui_elements:ui_elem.cleanup()def build_ui(self):"""Build a custom UI tool to run your extension.This function will be called any time the UI window is closed and reopened."""# CollapsableFrame是可折叠的用户界面块,此处创建一个名为“World Controls”的可折叠UI块,并将其设置为展开状态# Ref:https://docs.omniverse.nvidia.com/py/isaacsim/source/extensions/omni.isaac.ui/docs/index.html#omni.isaac.ui.element_wrappers.ui_widget_wrappers.CollapsableFrameworld_controls_frame = CollapsableFrame("World Controls", collapsed=False)with world_controls_frame:# 使用omni.ui.VStack创建一个Isaac Sim风格的垂直布局的UI块# Ref:https://docs.omniverse.nvidia.com/kit/docs/omni.ui/latest/omni.ui/omni.ui.VStack.html#omni.ui.VStackwith ui.VStack(style=get_style(), spacing=5, height=0):# 创建一个特殊类型的 UI 按钮,连接到omni.isaac.core.World 以启用方便的“加载”功能# Ref:https://docs.omniverse.nvidia.com/py/isaacsim/source/extensions/omni.isaac.ui/docs/index.html#omni.isaac.ui.element_wrappers.core_connectors.LoadButtonself._load_btn = LoadButton("Load Button",  # UI元素的左侧显示文本"LOAD",  # 按钮上的文本setup_scene_fn=self._setup_scene,  # 按下“加载”按钮后,将创建一个新的World实例,然后调用此函数加载资产到世界中setup_post_load_fn=self._setup_scenario  # 当一切就绪时,将调用此函数来完成一些功能)# 指定物理步进和渲染步进的时间步长self._load_btn.set_world_settings(physics_dt=1 / 60.0, rendering_dt=1 / 60.0)# 将这个UI元素添加到UI元素列表中self.wrapped_ui_elements.append(self._load_btn)# 创建一个特殊类型的 UI 按钮,连接到omni.isaac.core.World 以启用方便的“重置”功能# Ref:https://docs.omniverse.nvidia.com/py/isaacsim/source/extensions/omni.isaac.ui/docs/index.html#omni.isaac.ui.element_wrappers.core_connectors.ResetButtonself._reset_btn = ResetButton("Reset Button",  # UI元素的左侧显示文本"RESET",  # 按钮上的文本pre_reset_fn=None,  # 在重置世界之前调用的函数post_reset_fn=self._on_post_reset_btn  # 在重置世界之后调用的函数# 当调用此函数时,时间线将在时间步 0 处暂停,添加到世界中的所有USD将被正确初始化并放置在默认位置)# 先禁止重置按钮,因为尚未Load,所以Reset没有意义self._reset_btn.enabled = False# 将这个UI元素添加到UI元素列表中self.wrapped_ui_elements.append(self._reset_btn)# CollapsableFrame是可折叠的用户界面块,此处创建一个名为“Run Scenario”的可折叠UI块,并将其设置为折叠状态# Ref:https://docs.omniverse.nvidia.com/py/isaacsim/source/extensions/omni.isaac.ui/docs/index.html#omni.isaac.ui.element_wrappers.ui_widget_wrappers.CollapsableFramerun_scenario_frame = CollapsableFrame("Run Scenario")with run_scenario_frame:# 使用omni.ui.VStack创建一个Isaac Sim风格的垂直布局的UI块# Ref:https://docs.omniverse.nvidia.com/kit/docs/omni.ui/latest/omni.ui/omni.ui.VStack.html#omni.ui.VStackwith ui.VStack(style=get_style(), spacing=5, height=0):# Ref:https://docs.omniverse.nvidia.com/py/isaacsim/source/extensions/omni.isaac.ui/docs/index.html#omni.isaac.ui.element_wrappers.ui_widget_wrappers.StateButtonself._scenario_state_btn = StateButton("Run Scenario",  # UI元素的左侧显示文本a_text="RUN",  # 按钮在A状态下的按钮文本b_text="STOP",  # 按钮在B状态下的按钮文本on_a_click_fn=self._on_run_scenario_a_text,  # 在状态 A 下单击按钮时应调用的函数on_b_click_fn=self._on_run_scenario_b_text,  # 在状态 B 下单击按钮时应调用的函数physics_callback_fn=self._update_scenario,  # 当按钮处于状态 B 时,将在每个物理步骤中调用的函数)# 先禁用Run Scenario按钮,因为尚未Load,所以Run Scenario没有意义self._scenario_state_btn.enabled = False# 将这个UI元素添加到UI元素列表中self.wrapped_ui_elements.append(self._scenario_state_btn)####################################################################################### Functions Below This Point Support The Provided Example And Can Be Deleted/Replaced######################################################################################def _on_init(self):# 初始化一个空的变量,用于存储后续创建的Articulationself._articulation = None# 初始化一个空的变量,用于存储后续创建的Cuboidself._cuboid = None# 创建一个新的Scenario实例,该实例来源于用户自定义的scenario.py文件self._scenario = ExampleScenario()def _add_light_to_stage(self):"""A new stage does not have a light by default.  This function creates a spherical light"""# 创建一个球形光源sphereLight = UsdLux.SphereLight.Define(get_current_stage(), Sdf.Path("/World/SphereLight"))# 设置球形光源的属性# 半径为2sphereLight.CreateRadiusAttr(2)# 强度为100000sphereLight.CreateIntensityAttr(100000)# 设置球形光源在世界下的位置XFormPrim(str(sphereLight.GetPath())).set_world_pose([6.5, 0, 12])def _setup_scene(self):"""This function is attached to the Load Button as the setup_scene_fn callback.On pressing the Load Button, a new instance of World() is created and then this function is called.The user should now load their assets onto the stage and add them to the World Scene.In this example, a new stage is loaded explicitly, and all assets are reloaded.If the user is relying on hot-reloading and does not want to reload assets every time,they may perform a check here to see if their desired assets are already on the stage,and avoid loading anything if they are.  In this case, the user would still need to addtheir assets to the World (which has low overhead).  See commented code section in this function."""# 加载ur10e模型robot_prim_path = "/ur10e"path_to_robot_usd = get_assets_root_path() + "/Isaac/Robots/UniversalRobots/ur10e/ur10e.usd"# Do not reload assets when hot reloading.  This should only be done while extension is under development.# if not is_prim_path_valid(robot_prim_path):#     create_new_stage()#     add_reference_to_stage(path_to_robot_usd, robot_prim_path)# else:#     print("Robot already on Stage")# 创建新的舞台create_new_stage()# 添加光源到舞台self._add_light_to_stage()# 将ur10e机械臂的USD参考添加到舞台add_reference_to_stage(path_to_robot_usd, robot_prim_path)# 创建固定的立方体self._cuboid = FixedCuboid("/Scenario/cuboid", position=np.array([0.3, 0.3, 0.5]), size=0.05, color=np.array([255, 0, 0]))# 实例化ur10e机械臂的Articulationself._articulation = Articulation(robot_prim_path)# 获取世界实例world = World.instance()# 添加Articulation和Cuboid到世界中world.scene.add(self._articulation)world.scene.add(self._cuboid)def _setup_scenario(self):"""This function is attached to the Load Button as the setup_post_load_fn callback.The user may assume that their assets have been loaded by their setup_scene_fn callback, thattheir objects are properly initialized, and that the timeline is paused on timestep 0.In this example, a scenario is initialized which will move each robot joint one at a time in a loop while moving theprovided prim in a circle around the robot."""self._reset_scenario()# UI managementself._scenario_state_btn.reset()self._scenario_state_btn.enabled = Trueself._reset_btn.enabled = Truedef _reset_scenario(self):self._scenario.teardown_scenario()self._scenario.setup_scenario(self._articulation, self._cuboid)def _on_post_reset_btn(self):"""This function is attached to the Reset Button as the post_reset_fn callback.The user may assume that their objects are properly initialized, and that the timeline is paused on timestep 0.They may also assume that objects that were added to the World.Scene have been moved to their default positions.I.e. the cube prim will move back to the position it was in when it was created in self._setup_scene()."""# 重置场景self._reset_scenario()# 重新设置UI并启用Run Scenario按钮self._scenario_state_btn.reset()self._scenario_state_btn.enabled = Truedef _update_scenario(self, step: float):"""This function is attached to the Run Scenario StateButton.This function was passed in as the physics_callback_fn argument.This means that when the a_text "RUN" is pressed, a subscription is made to call this function on every physics step.When the b_text "STOP" is pressed, the physics callback is removed.Args:step (float): The dt of the current physics step"""# 在按钮处于状态B(Running)时,持续更新场景self._scenario.update_scenario(step)def _on_run_scenario_a_text(self):"""This function is attached to the Run Scenario StateButton.This function was passed in as the on_a_click_fn argument.It is called when the StateButton is clicked while saying a_text "RUN".This function simply plays the timeline, which means that physics steps will start happening.  After the world is loaded or reset,the timeline is paused, which means that no physics steps will occur until the user makes it play either programmatically orthrough the left-hand UI toolbar."""# 当按钮处于状态 A 时被按下,将会调用此函数来开始播放时间轴self._timeline.play()def _on_run_scenario_b_text(self):"""This function is attached to the Run Scenario StateButton.This function was passed in as the on_b_click_fn argument.It is called when the StateButton is clicked while saying a_text "STOP"Pausing the timeline on b_text is not strictly necessary for this example to run.Clicking "STOP" will cancel the physics subscription that updates the scenario, which means thatthe robot will stop getting new commands and the cube will stop updating without needing topause at all.  The reason that the timeline is paused here is to prevent the robot being carriedforward by momentum for a few frames after the physics subscription is canceled.  Pausing here makesthis example prettier, but if curious, the user should observe what happens when this line is removed."""# 当按钮处于状态 A 时被按下,将会调用此函数来暂停时间轴self._timeline.pause()def _reset_extension(self):"""This is called when the user opens a new stage from self.on_stage_event().All state should be reset."""# 初始化self._on_init()# 重置UIself._reset_ui()def _reset_ui(self):self._scenario_state_btn.reset()self._scenario_state_btn.enabled = Falseself._reset_btn.enabled = False
scenario.py
这个文件包含一个实现示例 “Scenario” 的实现,其中包含 “teardown”、“setup” 和 “update” 函数。
选择这种结构是为了在 UI 管理和场景逻辑之间清晰分离代码。这样,ExampleScenario() 类作为 UI 的简单后端。
以下是这个模板的大概样式:
class ScenarioTemplate:def __init__(self):pass
setup_scenario 方法定义了一个用于设置场景的函数。在测试或模拟等环境中,这个函数可能被用来准备测试场景所需的各种资源和状态。
def setup_scenario(self):pass
teardown_scenario 方法定义了一个用于清理场景的函数。通常,在测试或模拟结束后,这个函数会被调用以清理和释放先前设置的资源,确保不会对其他部分产生影响。
def teardown_scenario(self):pass
update_scenario 方法定义了一个用于更新场景的函数。这个函数可能被用于在测试或模拟过程中动态修改场景的某些属性或状态,以模拟不同的条件或情境。
def update_scenario(self):pass
# Copyright (c) 2022-2023, NVIDIA CORPORATION. All rights reserved.
#
# NVIDIA CORPORATION and its licensors retain all intellectual property
# and proprietary rights in and to this software, related documentation
# and any modifications thereto. Any use, reproduction, disclosure or
# distribution of this software and related documentation without an express
# license agreement from NVIDIA CORPORATION is strictly prohibited.
## 基准场景模板
class ScenarioTemplate:def __init__(self):passdef setup_scenario(self):passdef teardown_scenario(self):passdef update_scenario(self):passimport numpy as np
from omni.isaac.core.utils.types import ArticulationAction"""
This scenario takes in a robot Articulation and makes it move through its joint DOFs.
Additionally, it adds a cuboid prim to the stage that moves in a circle around the robot.The particular framework under which this scenario operates should not be taken as a direct
recomendation to the user about how to structure their code.  In the simple example put together
in this template, this particular structure served to improve code readability and separate
the logic that runs the example from the UI design.
"""class ExampleScenario(ScenarioTemplate):def __init__(self):self._object = Noneself._articulation = Noneself._running_scenario = Falseself._time = 0.0  # sself._object_radius = 0.5  # mself._object_height = 0.5  # mself._object_frequency = 0.25  # Hzself._joint_index = 0self._max_joint_speed = 4  # rad/secself._lower_joint_limits = Noneself._upper_joint_limits = Noneself._joint_time = 0self._path_duration = 0self._calculate_position = lambda t, x: 0self._calculate_velocity = lambda t, x: 0def setup_scenario(self, articulation, object_prim):self._articulation = articulationself._object = object_primself._initial_object_position = self._object.get_world_pose()[0]self._initial_object_phase = np.arctan2(self._initial_object_position[1], self._initial_object_position[0])self._object_radius = np.linalg.norm(self._initial_object_position[:2])# 将场景状态标志设置为运行self._running_scenario = Trueself._joint_index = 0# 获取关节的上下限self._lower_joint_limits = articulation.dof_properties["lower"]self._upper_joint_limits = articulation.dof_properties["upper"]# 将关节的当前位置设置为逼近于下限的一个值epsilon = 0.001articulation.set_joint_positions(self._lower_joint_limits + epsilon)self._derive_sinusoid_params(0)def teardown_scenario(self):self._time = 0.0self._object = Noneself._articulation = Noneself._running_scenario = Falseself._joint_index = 0self._lower_joint_limits = Noneself._upper_joint_limits = Noneself._joint_time = 0self._path_duration = 0self._calculate_position = lambda t, x: 0self._calculate_velocity = lambda t, x: 0def update_scenario(self, step: float):if not self._running_scenario:returnself._time += stepx = self._object_radius * np.cos(self._initial_object_phase + self._time * self._object_frequency * 2 * np.pi)y = self._object_radius * np.sin(self._initial_object_phase + self._time * self._object_frequency * 2 * np.pi)z = self._initial_object_position[2]self._object.set_world_pose(np.array([x, y, z]))self._update_sinusoidal_joint_path(step)def _derive_sinusoid_params(self, joint_index: int):# 推导关节目标正弦曲线的参数start_position = self._lower_joint_limits[joint_index]P_max = self._upper_joint_limits[joint_index] - start_positionV_max = self._max_joint_speedT = P_max * np.pi / V_max# T is the expected time of the joint pathself._path_duration = Tself._calculate_position = (lambda time, path_duration: start_position+ -P_max / 2 * np.cos(time * 2 * np.pi / path_duration)+ P_max / 2)# 将计算出的速度赋给self._calculate_velocity 变量self._calculate_velocity = lambda time, path_duration: V_max * np.sin(2 * np.pi * time / path_duration)def _update_sinusoidal_joint_path(self, step):# 更新机器人关节的目标# 关节时间步进self._joint_time += step# 如果关节时间大于关节路径持续时间,则将关节时间重置为0,并将关节索引加1,开始下一个关节的运动if self._joint_time > self._path_duration:self._joint_time = 0self._joint_index = (self._joint_index + 1) % self._articulation.num_dofself._derive_sinusoid_params(self._joint_index)# 计算关节目标位置和速度joint_position_target = self._calculate_position(self._joint_time, self._path_duration)joint_velocity_target = self._calculate_velocity(self._joint_time, self._path_duration)# 构建关节动作action = ArticulationAction(np.array([joint_position_target]),np.array([joint_velocity_target]),joint_indices=np.array([self._joint_index]),)# 应用关节动作self._articulation.apply_action(action)
查看强化学习RL的拓展流程
对于Isaac Sim的强化学习拓展Extension可以查看这篇强化学习拓展Extension教程。
拓展练习
参考拓展案例,导入机械臂模型,并通过带有控制滑条的拓展界面对机械臂的各关节进行控制。
相关资料
拓展控制器
扩展管理器控制扩展执行流程,维护扩展注册表,并执行其他相关操作。扩展子系统是构成 Kit 应用程序的所有模块化部分的主要入口点。扩展管理器界面可以通过 Kit Core 应用程序界面访问。
Token
关于Token的讲解
在Omni kit中 “token” 是一种特殊的占位符,用于在配置文件或代码中插入动态值。这些 token 以 ${} 的形式出现,被设计用来在运行时被替换为实际的数值或路径。
其他
Nvidia: Omniverse创建拓展
Omniverse拓展Tutorial
拓展案例
强化学习拓展Extension教程
这篇关于Isaac Sim教程07 拓展编程Extension的文章就介绍到这儿,希望我们推荐的文章对编程师们有所帮助!


