本文主要是介绍封装时间轴组件 timeline,希望对大家解决编程问题提供一定的参考价值,需要的开发者们随着小编来一起学习吧!
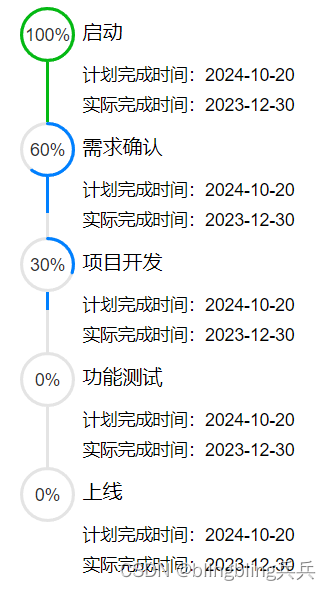
要求时间轴的点展示进度百分比,线也根据进度不同展示不同长度的颜色
实现效果:

使用的组件库是vant的circle

子组件:
<template><div class="m-timeline-area" :style="`width: ${width}px`"><div class="m-timeline"><divv-for="(item, index) in timelineDesc":key="index":class="['m-timeline-item', {'last': index === timelineDesc.length - 1}]"><div class="u-tail" /><div class="u-finish" :style="{'--rate':item.ratePercent,'--borderColor':item.rate==100?'rgb(4, 185, 19)':'rgb(0, 128, 255)'}" /><div class="u-dot"><van-circlev-model="item.currentRate"layer-color="#e4e4e4":color="item.rate==100?'rgb(4, 185, 19)':item.rate==0?'#e4e4e4':'rgb(0, 128, 255)'":stroke-width="60":rate="item.rate":speed="100"size="44px":text="item.text"/></div><div class="u-content">{{ item.title || '--' }}<div class="time"><div>计划完成时间:{{ item.planTime }}</div><div>实际完成时间:{{ item.finishTime }}</div></div></div></div></div></div>
</template>
<script>
export default {name: 'Timeline',props: {timelineDesc: { // 时间轴内容数组type: Array,default: () => {return []}},width: { // 时间轴区域总宽度type: Number,default: 360}},data() {return {currentRate: 0}},computed: {text() {return this.currentRate.toFixed(0) + '%'}}
}
</script><style lang="less" scoped>@blue: #1890ff;@green: #52c41a;@red: #f5222d;@gray: rgba(0,0,0,.25);.m-timeline-area {margin: 0 auto;.m-timeline {.m-timeline-item {position: relative;padding-bottom: 10px;.u-tail {position: absolute;top: 44px;left: 21px;height: calc(100% - 44px);border-left: 3px solid #e4e4e4; // 实线// border-left: 2px dotted #e8e8e8; // 点线// border-left: 2px dashed #e8e8e8; // 虚线}.u-finish{position: absolute;top: 44px;left: 21px;height: calc((100% - 44px)*var(--rate));border-left: 3px solid var(--borderColor); // 实线}.u-dot {position: absolute;width: 40px;height: 40px;}.u-content {position: relative;top: 8px;margin-left: 50px;word-break: break-all;word-wrap: break-word;line-height: 24px;font-size: 16px;font-weight: 500;.time{font-size: 14px;margin-top: 10px;font-weight: 400;}}}.last {.u-tail,.u-finish {display: none;}}}}</style>
父组件
 <time-line :timeline-desc="timelineDesc" :width="480" />
import TimeLine from './TimeLine'data() {return {timelineDesc: [{ title: '启动', planTime: '2024-10-20', finishTime: '2023-12-30', rate: 100, currentRate: 0, text: '100%', ratePercent: 1 },{ title: '需求确认', planTime: '2024-10-20', finishTime: '2023-12-30', rate: 60, currentRate: 0, text: '60%', ratePercent: 0.6 },{ title: '项目开发', planTime: '2024-10-20', finishTime: '2023-12-30', rate: 30, currentRate: 0, text: '30%', ratePercent: 0.3 },{ title: '功能测试', planTime: '2024-10-20', finishTime: '2023-12-30', rate: 0, currentRate: 0, text: '0%', ratePercent: 0 },{ title: '上线', planTime: '2024-10-20', finishTime: '2023-12-30', rate: 0, currentRate: 0, text: '0%', ratePercent: 0 }],}
}
这篇关于封装时间轴组件 timeline的文章就介绍到这儿,希望我们推荐的文章对编程师们有所帮助!


