本文主要是介绍pytorch 模型量化quantization,希望对大家解决编程问题提供一定的参考价值,需要的开发者们随着小编来一起学习吧!
pytorch 模型量化quantization
- 1.workflow
- 1.1 PTQ
- 1.2 QAT
- 2. demo
- 2.1 构建resnet101_quantization模型
- 2.2 PTQ
- 2.3 QAT
- 参考文献
pytorch框架提供了三种量化方法,包括:
- Dynamic Quantization
- Post-Training Static Quantization(PTQ)
- Quantization Aware Training(QAT)
此博客结合CIFAR100数据集分类任务,分别采用Post-Training Static Quantization和Quantization Aware Training对resnet101模型进行量化。
1.workflow
1.1 PTQ
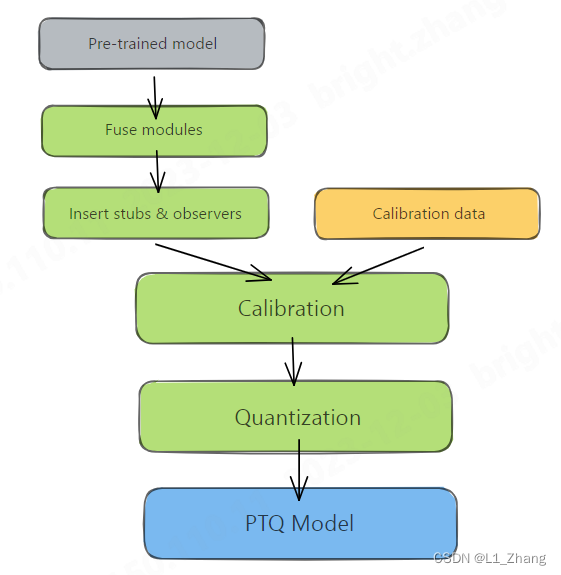
图片来自Practical Quantization in PyTorch。
1.2 QAT
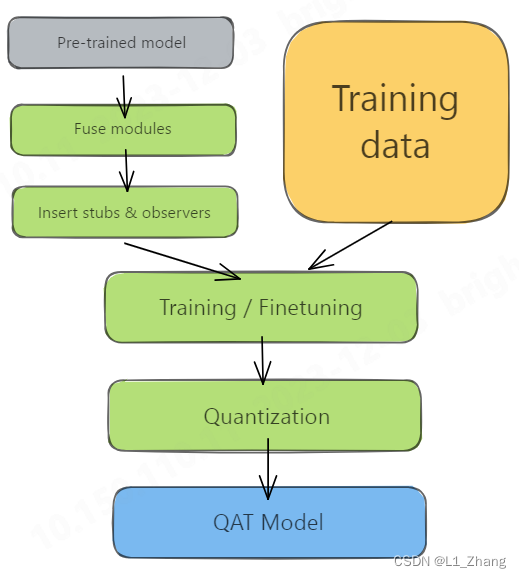
图片来自Practical Quantization in PyTorch。
从两张图片来看,PTQ和QAT的差别在于:PTQ量化前使用了calibration data,而QAT则有一个和训练阶段类似的训练过程。
2. demo
2.1 构建resnet101_quantization模型
import torch
import torch.nn as nn
from torch.ao.quantization import QuantStub, DeQuantStubclass ConvBNReLU(nn.Sequential):def __init__(self, in_planes, out_planes, kernel_size=3, stride=1, groups=1):padding = (kernel_size - 1) // 2super(ConvBNReLU, self).__init__(nn.Conv2d(in_planes, out_planes, kernel_size, stride,padding, groups=groups, bias=False),nn.BatchNorm2d(out_planes, momentum=0.1),nn.ReLU(inplace=False))class ConvBN(nn.Sequential):def __init__(self, in_planes, out_planes, kernel_size=3, stride=1, groups=1):padding = (kernel_size - 1) // 2super(ConvBN, self).__init__(nn.Conv2d(in_planes, out_planes, kernel_size, stride,padding, groups=groups, bias=False),nn.BatchNorm2d(out_planes, momentum=0.1),)class BottleNeck(nn.Module):expansion = 4def __init__(self, in_channels, out_channels, stride=1):super().__init__()self.residual_function = nn.Sequential(ConvBNReLU(in_channels, out_channels, kernel_size=1),ConvBNReLU(out_channels, out_channels, kernel_size=3),ConvBN(out_channels, out_channels *BottleNeck.expansion, kernel_size=1))self.shortcut = nn.Sequential()if stride != 1 or in_channels != out_channels * BottleNeck.expansion:self.shortcut = ConvBN(in_channels, out_channels *BottleNeck.expansion, kernel_size=1)self.skip_add = nn.quantized.FloatFunctional()def forward(self, x):return nn.ReLU(inplace=True)(self.skip_add.add(self.residual_function(x), self.shortcut(x)))class ResNet(nn.Module):def __init__(self, block, num_block, num_classes=100):super().__init__()self.in_channels = 64self.conv1 = nn.Sequential(ConvBNReLU(3, 64, kernel_size=3))self.conv2_x = self._make_layer(block, 64, num_block[0], 1)self.conv3_x = self._make_layer(block, 128, num_block[1], 2)self.conv4_x = self._make_layer(block, 256, num_block[2], 2)self.conv5_x = self._make_layer(block, 512, num_block[3], 2)self.avg_pool = nn.AdaptiveAvgPool2d((1, 1))self.fc = nn.Linear(512 * block.expansion, num_classes)self.quant = QuantStub()self.dequant = DeQuantStub()def _make_layer(self, block, out_channels, num_blocks, stride):strides = [stride] + [1] * (num_blocks - 1)layers = []for stride in strides:layers.append(block(self.in_channels, out_channels, stride))self.in_channels = out_channels * block.expansionreturn nn.Sequential(*layers)def forward(self, x):x = self.quant(x)output = self.conv1(x)output = self.conv2_x(output)output = self.conv3_x(output)output = self.conv4_x(output)output = self.conv5_x(output)output = self.avg_pool(output)output = output.view(output.size(0), -1)output = self.fc(output)x = self.dequant(x)return output# Fuse Conv+BN and Conv+BN+Relu modules prior to quantization# This operation does not change the numericsdef fuse_model(self, is_qat=False):fuse_modules = torch.ao.quantization.fuse_modules_qat if is_qat else torch.ao.quantization.fuse_modulesfor m in self.modules():if type(m) == ConvBNReLU:fuse_modules(m, ['0', '1', '2'], inplace=True)if type(m) == ConvBN:fuse_modules(m, ['0', '1'], inplace=True)
def resnet101():""" return a ResNet 101 object"""return ResNet(BottleNeck, [3, 4, 23, 3])
代码改编自https://github.com/weiaicunzai/pytorch-cifar100。
如果要使用quantization,构建的模型和常规模型差别主要在以下内容:
class BottleNeck(nn.Module):expansion = 4def __init__(self, in_channels, out_channels, stride=1):super().__init__()......self.skip_add = nn.quantized.FloatFunctional()def forward(self, x):return nn.ReLU(inplace=True)(self.skip_add.add(self.residual_function(x), self.shortcut(x)))
这是因为没有直接用于相加的算子。
如果没有这一操作,可能会报如下错误:
NotImplementedError: Could not run 'aten::add.out' with arguments from the 'QuantizedCPU' backend. This could be because the operator doesn't exist for this backend, or was omitted during the selective/custom build process (if using custom build).
另外就是:
class ResNet(nn.Module):def __init__(self, block, num_block, num_classes=100):super().__init__()......self.quant = QuantStub() #observerself.dequant = DeQuantStub()def _make_layer(self, block, out_channels, num_blocks, stride):......def forward(self, x):x = self.quant(x)......x = self.dequant(x)return output# Fuse Conv+BN and Conv+BN+Relu modules prior to quantization# This operation does not change the numericsdef fuse_model(self, is_qat=False):......
即添加observer,以及将Conv+BN 和Conv+BN+Relu 模块融合到一起。
2.2 PTQ
def print_size_of_model(model):torch.save(model.state_dict(), "temp.p")print('Size (MB):', os.path.getsize("temp.p")/1e6)os.remove('temp.p')qmodel = resnet101()
# qmodel.load_state_dict(torch.load(args.weights))qmodel = qmodel.to(device)
# # print(qmodel)
qmodel.eval()print("Size of model befor quantization")
print_size_of_model(qmodel)num_calibration_batches = 32
qmodel.eval()
# Fuse Conv, bn and relu
qmodel.fuse_model()# Specify quantization configuration
# Start with simple min/max range estimation and per-tensor quantization of weights
qmodel.qconfig = torch.ao.quantization.default_qconfig
print(qmodel.qconfig)
torch.ao.quantization.prepare(qmodel, inplace=True)# Calibrate first
print('Post Training Quantization Prepare: Inserting Observers')# Calibrate with the training set
criterion = nn.CrossEntropyLoss()
evaluate(qmodel, criterion, cifar100_test_loader,neval_batches=10)
print('Post Training Quantization: Calibration done')# Convert to quantized model
torch.ao.quantization.convert(qmodel, inplace=True)
print('Post Training Quantization: Convert done')
# print('\n Inverted Residual Block: After fusion and quantization, note fused modules: \n\n',
#       qmodel.features[1].conv)print("Size of model after quantization")
print_size_of_model(qmodel)
Size of model befor quantization
Size (MB): 171.40158Size of model after quantization
Size (MB): 42.970334
size大致缩小了四倍。
经过测试,在本地cpu上推断时间也缩小了3~4倍。
2.3 QAT
#%% QAT
float_model_file="resnet101.pt"
qat_model=resnet101()
qat_model.load_state_dict(torch.load(float_model_file))
qat_model.fuse_model(is_qat=True)optimizer = torch.optim.SGD(qat_model.parameters(), lr = 0.0001)
# The old 'fbgemm' is still available but 'x86' is the recommended default.
qat_model.qconfig = torch.ao.quantization.get_default_qat_qconfig('x86')
torch.ao.quantization.prepare_qat(qat_model, inplace=True)
# print('Inverted Residual Block: After preparation for QAT, note fake-quantization modules \n',qat_model.features[1].conv)num_train_batches,num_eval_batches = 2,2
eval_batch_size=32
criterion = nn.CrossEntropyLoss()
nepochs=10# QAT takes time and one needs to train over a few epochs.
# Train and check accuracy after each epoch
for nepoch in range(nepochs):train_one_epoch(qat_model, criterion, optimizer, cifar100_test_loader, torch.device('cpu'),  num_train_batches)if nepoch > 3:# Freeze quantizer parametersqat_model.apply(torch.ao.quantization.disable_observer)if nepoch > 2:# Freeze batch norm mean and variance estimatesqat_model.apply(torch.nn.intrinsic.qat.freeze_bn_stats)# Check the accuracy after each epochquantized_model = torch.ao.quantization.convert(qat_model.eval(), inplace=False)quantized_model.eval()top1, top5 = evaluate(quantized_model,criterion, cifar100_test_loader, neval_batches=2)print('Epoch %d :Evaluation accuracy on %d images, %2.2f'%(nepoch, num_eval_batches * eval_batch_size, top1.avg))
完整代码后续将分享在github或csdn资源中。
参考文献
[1] Introduction to Quantization on PyTorch
[2] https://github.com/pytorch/pytorch/wiki/Introducing-Quantized-Tensor
[3] tensorflow 训练后量化
[4] pytorch dynamic and static quantization 适用的算子
[5] ★★★pytorch_static quantization tutorial
[6] PyTorch Static Quantization
[7] Practical Quantization in PyTorch
[8] ★★★https://github.com/weiaicunzai/pytorch-cifar100
这篇关于pytorch 模型量化quantization的文章就介绍到这儿,希望我们推荐的文章对编程师们有所帮助!


