本文主要是介绍iPhone开发之UITableView的小试牛刀 利用MVC模式从plist文件读取数据并字典转模型的格式实现,希望对大家解决编程问题提供一定的参考价值,需要的开发者们随着小编来一起学习吧!
新建一个具有simple VIew的工程,并把相关图片拉进资源文件夹
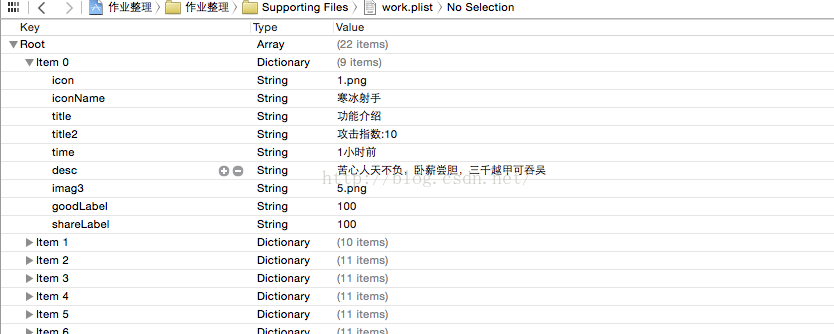
在Supporting files文件夹下新建work.plist文件,编辑内容如下图:
在工程下新建model文件夹,并在文件夹内新建model类Hero
根据文件的字典属性编辑Hero.h如下:
//
//  Hero.h
//  作业整理
//
//  Created by apple on 15/9/1.
//  Copyright (c) 2015年 LiuXun. All rights reserved.
//#import <Foundation/Foundation.h>@interface Hero : NSObject
@property (nonatomic, strong) NSString * icon;
@property (nonatomic, strong) NSString *iconName;
@property (nonatomic, strong) NSString *title;
@property (nonatomic, strong) NSString *title2;
@property (nonatomic, strong) NSString *time;
@property (nonatomic, strong) NSString *desc;
@property (nonatomic, strong) NSString *imag1;
@property (nonatomic, strong) NSString *imag2;
@property (nonatomic, strong) NSString *imag3;
@property (nonatomic, strong) NSString *goodLabel;
@property (nonatomic, strong) NSString *shareLabel;-(instancetype) initWithDict:(NSDictionary *) dict;
+(instancetype) heroWithDict:(NSDictionary *)dict;
@end
//
//  Hero.m
//  作业整理
//
//  Created by apple on 15/9/1.
//  Copyright (c) 2015年 LiuXun. All rights reserved.
//#import "Hero.h"@implementation Hero
-(instancetype) initWithDict:(NSDictionary *) dict
{if (self = [super init]) {
//        self.icon = dict[@"icon"];
//        self.iconName = dict[@"ictonName"];[self setValuesForKeysWithDictionary:dict];}return self;
}+(instancetype) heroWithDict:(NSDictionary *)dict
{return [[self alloc] initWithDict:dict];
}
@end
编辑HeroTableViewCell.h文件如下:
//
//  HeroTableViewCell.h
//  作业整理
//
//  Created by apple on 15/9/1.
//  Copyright (c) 2015年 LiuXun. All rights reserved.
//#import <UIKit/UIKit.h>#import "Hero.h"
@interface HeroTableViewCell : UITableViewCell
@property (nonatomic, strong) Hero *hero; //用来获取数据@property (nonatomic, strong) UIImageView *igvIcon;
@property (nonatomic, strong) UILabel *lblIcon;
@property (nonatomic, strong) UILabel *lblTitle;
@property (nonatomic, strong) UILabel *lblTitle2;
@property (nonatomic, strong) UILabel *lblDesc;
@property (nonatomic, strong) UILabel *lblTime;
@property (nonatomic, strong) UIImageView *imgv1;
@property (nonatomic, strong) UIImageView *imgv2;
@property (nonatomic, strong) UIImageView *imgv3;
@property (nonatomic, strong) UILabel *lblGood;
@property (nonatomic, strong) UILabel *lblShare;
@property (nonatomic, strong) UIButton *btnGood;
@property (nonatomic, strong) UIButton *btnShare;-(void)event:(UIButton *) senter;
@end
//
//  HeroTableViewCell.m
//  作业整理
//
//  Created by apple on 15/9/1.
//  Copyright (c) 2015年 LiuXun. All rights reserved.
//#import "HeroTableViewCell.h"
#define  WIDTH    [UIScreen  mainScreen].bounds.size.width
#define  HEIGHT  [UIScreen mainScreen].bounds.size.height
#define nameFont [UIFont systemFontOfSize:12]
#define textFont [UIFont systemFontOfSize:14]@implementation HeroTableViewCell- (id)initWithStyle:(UITableViewCellStyle)style reuseIdentifier:(NSString *)reuseIdentifier
{self = [super initWithStyle:style reuseIdentifier:reuseIdentifier];if (self) {// 创建10个控件// 1、设置头像UIImageView *imagViewIcon = [[UIImageView alloc] init];[self.contentView addSubview:imagViewIcon];  // 把组件加到容器,即单元格中self.igvIcon = imagViewIcon;// 2、设置昵称UILabel *nameLabel = [[UILabel alloc] init];[self.contentView addSubview:nameLabel];self.lblIcon = nameLabel;// 3、设置标题1UILabel *title = [[UILabel alloc] init];[self.contentView addSubview:title];self.lblTitle = title;// 4 设置标题2UILabel *title2 = [[UILabel alloc] init];[self.contentView addSubview:title2];self.lblTitle2 = title2;// 5、设置时间组件UILabel *time = [[UILabel alloc] init];[self.contentView addSubview:time];self.lblTime = time;//6、设置正文描述UILabel *desc = [[UILabel alloc] init];[self.contentView addSubview:desc];self.lblDesc = desc;// 7 设置三张ImageUIImageView *img1 = [[UIImageView alloc] init];[self.contentView addSubview:img1];self.imgv1 = img1;UIImageView *img2 = [[UIImageView alloc] init];[self.contentView addSubview:img2];self.imgv2 = img2;UIImageView *img3 = [[UIImageView alloc] init];[self.contentView addSubview:img3];self.imgv3 = img3;//8 、设置赞按钮UIButton *gBtn = [[UIButton alloc] init];[self.contentView addSubview:gBtn];self.btnGood = gBtn;//9、设置分享按钮UIButton *sBtn = [[UIButton alloc] init];[self.contentView addSubview:sBtn];self.btnShare = sBtn;// 10、设置赞标签UILabel *gLbl = [[UILabel alloc] init];[self.contentView addSubview:gLbl];self.lblGood = gLbl;// 11、设置分享标签UILabel *sLbl = [[UILabel alloc] init];[self.contentView addSubview:sLbl];self.lblShare = sLbl;}return self;
}// 重写Hero属性的set方法
-(void)setHero:(Hero *)hero
{_hero = hero;// 1. 设置当前单元格中的子控件的数据[self settingData];// 2、设置当前单元格中的子控件的frame[self settingFrame];}// 设置数据的方法
-(void)settingData
{Hero *model = self.hero;// 1 头像self.igvIcon.image = [UIImage imageNamed:model.icon];// 2 昵称self.lblIcon.text = model.iconName;// 3 标题1self.lblTitle.text = model.title;// 4 标题2self.lblTitle2.text = model.title2;// 5 时间self.lblTime.text = model.time;// 6 描述self.lblDesc.text = model.desc;// 7 图片1self.imgv1.image = [UIImage imageNamed:model.imag1];// 8 图片2self.imgv2.image = [UIImage imageNamed:model.imag2];// 9 图片三self.imgv3.image = [UIImage imageNamed:model.imag3];//  10 设置点赞按钮[self.btnGood setBackgroundImage:[UIImage imageNamed:@"zan.png"] forState:UIControlStateNormal];// 11 设置分享按钮[self.btnShare setBackgroundImage:[UIImage imageNamed:@"share.png"] forState:UIControlStateNormal];// 12 设置点赞标签self.lblGood.text = model.goodLabel;// 13 设置分享标签self.lblShare.text = model.shareLabel;}// 设置位置和属性的方法
-(void) settingFrame
{// 1 头像CGFloat iconW = 70;CGFloat iconH = 70;CGFloat iconX = 15;CGFloat iconY = 15;self.igvIcon.frame = CGRectMake(iconX, iconY, iconW, iconH);self.igvIcon.layer.cornerRadius = self.igvIcon.frame.size.width/2;self.igvIcon.clipsToBounds = YES;// 昵称CGFloat namX = self.igvIcon.frame.origin.x;CGFloat namW = WIDTH;CGFloat namH = WIDTH/4;CGFloat nameY = iconY+iconH- 10;self.lblIcon.frame = CGRectMake(namX, nameY, namW, namH);// 标题1CGFloat titX = iconX+iconW+5;CGFloat titY = iconY;CGFloat titW = (WIDTH - (iconW+iconX))/4+2;CGFloat titH = iconY+iconH/3;self.lblTitle.font = textFont;self.lblTitle.textAlignment = NSTextAlignmentCenter;self.lblTitle.frame = CGRectMake(titX, titY, titW, titH);// 标题2CGFloat titX2 = titX+titW;CGFloat titY2 = titY;CGFloat titW2 = titW*2;CGFloat titH2 = titH;self.lblTitle2.textColor = [UIColor blueColor];self.lblTitle2.font = textFont;self.lblTitle2.textAlignment = NSTextAlignmentLeft;self.lblTitle2.frame = CGRectMake(titX2, titY2, titW2, titH2);// 时间标题CGFloat    timX = titX2+titW2-13;CGFloat   timY = titY2;CGFloat   timW =titW2;CGFloat   timH =titH2;[self.lblTime  setFont:textFont];self.lblTime.textColor = [UIColor greenColor];self.lblTime.frame = CGRectMake(timX, timY, timW, timH);// 正文;CGFloat  desX = titX+2;CGFloat desY = titY+titH;CGFloat desW =titW*2;CGFloat desH = iconY+iconH - desY+10;[self.lblDesc  setFont:textFont];self.lblDesc.numberOfLines = 0;  // 设置描述自动换行self.lblDesc.frame = CGRectMake(desX, desY, desW, desH);// 第一张图片CGFloat imgX1 = desX;CGFloat imgY1 = desY +desH+5;CGFloat imgW1 = WIDTH/7;CGFloat imgH1 = WIDTH/7;CGRect im1 = CGRectMake(imgX1, imgY1, imgW1, imgH1);self.imgv1.frame = im1;// 第二张图片CGFloat imgX2 = imgX1 + imgW1+2;CGFloat imgY2 = imgY1;CGFloat imgW2 = WIDTH/7;CGFloat imgH2 = WIDTH/7;CGRect im2 =  CGRectMake(imgX2, imgY2, imgW2, imgH2);self.imgv2.frame = im2;// 第三张图片CGFloat imgX3 = imgX2 +imgW2+1.5;CGFloat imgY3 = imgY1;CGFloat imgW3 = WIDTH/7;CGFloat imgH3 = WIDTH/7;CGRect im3 = CGRectMake(imgX3, imgY3, imgW3, imgH3);self.imgv3.frame =  im3;id   flag1 = self.hero.imag1;id   flag2 = self.hero.imag2;id   flag3 = self.hero.imag3;if ((flag1 == nil )&& flag2 && flag3){self.imgv2.frame = im1;self.imgv3.frame = im2;}else if ((flag1 == nil) && (flag2 == nil) &&flag3){self.imgv3.frame = im1;}else if ((flag1 == nil) && flag2  && (flag3 == nil) ){self.imgv2.frame = im1;}else if (flag1 && (flag2 == nil ) && flag3){self.imgv3.frame = im2;}// 设置点赞按钮CGFloat gbX =WIDTH /2;CGFloat gbY = imgY1+imgH1+10;CGFloat gbW = 20;CGFloat gbH = 20;[self.btnGood setBackgroundImage:[UIImage imageNamed:@"8.png"]  forState:UIControlStateHighlighted];self.btnGood.frame = CGRectMake(gbX, gbY, gbW, gbH);[self.btnGood setTag:100];[self.btnGood addTarget:self action:@selector(event:) forControlEvents:UIControlEventTouchUpInside];// 设置点赞数子LabelCGFloat gLX =gbX+gbW;CGFloat gLY = gbY;CGFloat gLW = 40;CGFloat gLH = 20;self.lblGood.frame = CGRectMake(gLX, gLY, gLW, gLH);// 设置分享按钮CGFloat sBX = 0.8*WIDTH;CGFloat sBY = gLY+3.5;CGFloat sBW = 20;CGFloat sBH = 20;self.btnShare.frame = CGRectMake(sBX, sBY, sBW, sBH);[self.btnShare setTag:200];[self.btnShare addTarget:self action:@selector(event:) forControlEvents:UIControlEventTouchUpInside];// 设置分享标签CGFloat sLX = sBX+sBW;CGFloat sLY = sBY-3;CGFloat sLW = 40;CGFloat sLH = 20;self.lblShare.frame = CGRectMake(sLX, sLY, sLW, sLH);}// 按钮的监听方法
-(void)event:(UIButton *) senter
{if (senter.tag == 100) {int num1 = self.lblGood.text.intValue;self.lblGood.text = [NSString stringWithFormat:@"%d",num1+1];}else{int num2 = self.lblShare.text.intValue;self.lblShare.text =[NSString stringWithFormat:@"%d",num2+1];}}- (void)awakeFromNib
{// Initialization code
}- (void)setSelected:(BOOL)selected animated:(BOOL)animated
{[super setSelected:selected animated:animated];// Configure the view for the selected state
}@end
编辑ViewControllerDetail.h如下:
//
//  ViewControllerDetail.h
//  作业整理
//
//  Created by apple on 15/9/1.
//  Copyright (c) 2015年 LiuXun. All rights reserved.
//#import <UIKit/UIKit.h>
#import "ViewController.h"
#import "Hero.h"@interface ViewControllerDetail : UIViewController@property (nonatomic, strong) UIScrollView *scrollView;
@property (nonatomic, strong) Hero *her;
@property (nonatomic, strong) UILabel * form;
@property (nonatomic, strong) UIButton *btnReturn;-(id) initWithModel:(Hero *) h;
+(id) controlWithModel:(Hero *)h;
@end
//
//  ViewControllerDetail.m
//  作业整理
//
//  Created by apple on 15/9/1.
//  Copyright (c) 2015年 LiuXun. All rights reserved.
//#import "ViewControllerDetail.h"
#define  WIDTH    [UIScreen  mainScreen].bounds.size.width
#define  HEIGHT  [UIScreen mainScreen].bounds.size.height@interface ViewControllerDetail ()@end@implementation ViewControllerDetail-(id) initWithModel:(Hero *) h
{if (self = [super init]) {self.her = h;}return self;
}
+(id) controlWithModel:(Hero *)h
{return [[self alloc] initWithModel:h];
}- (id)initWithNibName:(NSString *)nibNameOrNil bundle:(NSBundle *)nibBundleOrNil
{self = [super initWithNibName:nibNameOrNil bundle:nibBundleOrNil];if (self) {// Custom initialization}return self;
}// 返回图片张数
-(int) num
{int count = 0; // 对图片张数进行计数if(self.her.imag1)count ++;if (self.her.imag2) {count++;}if (self.her.imag3) {count++;}if (self.her.icon) {count++;}return count;
}
- (void)viewDidLoad
{[super viewDidLoad];[self.view setBackgroundColor:[UIColor yellowColor]];// 新建UIScrollViewself.scrollView = [[UIScrollView alloc] initWithFrame:CGRectMake(0, 0, WIDTH, HEIGHT)];self.scrollView.bounces = NO;self.scrollView.pagingEnabled = YES;self.scrollView.showsHorizontalScrollIndicator = NO;int count = [self num];  // 获取图片张数for (int i=1; i<=count; i++) {UIImageView *imgv = [[UIImageView alloc] initWithFrame:CGRectMake(WIDTH*(i-1), 0, WIDTH, HEIGHT)];switch (i) {case 1:if (self.her.icon) {imgv.image = [UIImage imageNamed:self.her.icon];break;}case 2:if (self.her.imag1) {imgv.image = [UIImage imageNamed:self.her.imag1];break;}case 3:if (self.her.imag2) {imgv.image = [UIImage imageNamed:self.her.imag2];break;}case 4:if (self.her.imag3) {imgv.image = [UIImage imageNamed:self.her.imag3];break;}}[self.scrollView addSubview:imgv];}self.scrollView.contentSize = CGSizeMake(WIDTH*count, 0);[self.view addSubview:self.scrollView];// 新建一个Label  显示详细信息self.form = [[UILabel alloc] initWithFrame:CGRectMake(WIDTH/4, 0, WIDTH/2, HEIGHT/2)];self.form.backgroundColor = [UIColor clearColor];[self.form setTextAlignment:NSTextAlignmentCenter];[self.form setTextColor: [UIColor whiteColor]];self.form.numberOfLines = 0;self.form.font = [UIFont systemFontOfSize:18];NSString *detail1 = [NSString stringWithFormat:@"昵称: %@\n",self.her.iconName];NSString *detai2  = [NSString stringWithFormat:@"描述: %@\n",self.her.desc];NSString *detail =[detail1 stringByAppendingString:detai2];self.form.text = detail;[self.view addSubview:self.form];// 添加返回按钮self.btnReturn = [[UIButton alloc] initWithFrame:CGRectMake(WIDTH/2, HEIGHT*0.8, 80, 30)];[self.btnReturn setTitle:@"返回" forState:UIControlStateNormal];[self.btnReturn setTitle:@"即将返回" forState:UIControlStateHighlighted];self.btnReturn.center = CGPointMake(WIDTH/2, HEIGHT*0.8);[self.btnReturn addTarget:self action:@selector(buttonReturn) forControlEvents:UIControlEventTouchUpInside];[self.view addSubview:self.btnReturn];}// 为按钮添加监听方法
-(void)buttonReturn
{ViewController * vc = [[ViewController alloc] init];[self presentViewController:vc animated:YES completion:^{}];}- (void)didReceiveMemoryWarning
{[super didReceiveMemoryWarning];// Dispose of any resources that can be recreated.
}/*
#pragma mark - Navigation// In a storyboard-based application, you will often want to do a little preparation before navigation
- (void)prepareForSegue:(UIStoryboardSegue *)segue sender:(id)sender
{// Get the new view controller using [segue destinationViewController].// Pass the selected object to the new view controller.
}
*/@end
//
//  ViewController.h
//  作业整理
//
//  Created by apple on 15/9/1.
//  Copyright (c) 2015年 LiuXun. All rights reserved.
//#import <UIKit/UIKit.h>
#import "HeroTableViewCell.h"
#import "ViewControllerDetail.h"
@interface ViewController : UIViewController <UITableViewDataSource,UITableViewDelegate>
@property (nonatomic, strong) NSMutableArray * arrays;
@property (nonatomic, strong) UITableView * tableView;
@property (nonatomic, strong) UIScrollView *scrollView;
@property (nonatomic, strong) UIPageControl *pageControl;
@property (nonatomic, strong) NSTimer *timer;
@property (nonatomic, strong) UILabel * tail;
@end
//
//  ViewController.m
//  作业整理
//
//  Created by apple on 15/9/1.
//  Copyright (c) 2015年 LiuXun. All rights reserved.
//#import "ViewController.h"
#define  WIDTH    [UIScreen  mainScreen].bounds.size.width
#define  HEIGHT  [UIScreen mainScreen].bounds.size.height@interface ViewController ()@end@implementation ViewController- (void)viewDidLoad
{[super viewDidLoad];// ===========================创建一个headerVIew// 新建一个UIScrollView组件,作为滚动组件的头视图CGRect scrollRect  =  CGRectMake(0, 0, WIDTH, HEIGHT/3.5);self.scrollView   =  [[UIScrollView alloc] initWithFrame:scrollRect];// 因为图片比较大,所以设图片框大小与UIScrollView大小相同for (int i = 0 ; i<5 ; i++){UIImageView *image = [[UIImageView alloc] initWithFrame:CGRectMake(i*WIDTH, 0, WIDTH, HEIGHT/3.5)];image.image = [UIImage imageNamed:[NSString stringWithFormat:@"img_%02d.png",i+1]];[self.scrollView  addSubview:image];}self.scrollView.showsHorizontalScrollIndicator = NO;  // 取消UIScrollView组件的水平滚动条self.scrollView.pagingEnabled = YES; // 为UIScrollView组件滚动内容时设置分页效果self.scrollView.bounces = NO;  // 设置UIScrollView组件取消弹性设置self.scrollView.contentSize = CGSizeMake(WIDTH*5, 0);  // 将内容的大小告知UIScrollView组件self.scrollView.delegate = self;  //  设置滚动组件的代理类为当前控制器对象所属的类[self.view addSubview:self.scrollView];// 在当前控制器vew中再添加一个UIPageControl即分页指示器self.pageControl  =  [[UIPageControl alloc] initWithFrame:CGRectMake(0, 0, WIDTH/3, 20)];self.pageControl.center = CGPointMake(WIDTH/2, HEIGHT/5); // 设置分页器的位置self.pageControl.pageIndicatorTintColor = [UIColor blueColor];  // 设置其它页指示器圆点的颜色self.pageControl.currentPageIndicatorTintColor = [UIColor greenColor];  // 设置当前页指示器圆点的颜色self.pageControl.numberOfPages = 5; // 设置分页器的页数self.pageControl.currentPageIndicatorTintColor = 0; // 设置当前是第几页[self.view addSubview:self.pageControl];// 添加一个计时器self.timer = [NSTimer  scheduledTimerWithTimeInterval:1.0 target:self selector:@selector(nextImage) userInfo:nil repeats:YES];// 先获取当前的消息循环,利用消息循环设置计时器对象的优先级和控件的优先级相同NSRunLoop *runLoop = [NSRunLoop currentRunLoop];[runLoop addTimer:self.timer forMode:NSRunLoopCommonModes];//====================创建一个尾视图=========================self.tail = [[UILabel alloc] initWithFrame:CGRectMake(0, 0, WIDTH, WIDTH/5)];self.tail.text = @"正在加载......";self.tail.textColor = [UIColor whiteColor];[ self.tail setTextAlignment:NSTextAlignmentCenter];[self.tail setBackgroundColor:[UIColor grayColor]];//====================创建一个总视图即UITableView=========================// 创建UITableView属性self.tableView = [[UITableView alloc] initWithFrame:CGRectMake(0, 0, WIDTH, HEIGHT) style:UITableViewStylePlain];self.tableView.dataSource = self;self.tableView.delegate = self;self.tableView.rowHeight = 200;self.tableView.tableHeaderView = self.scrollView;self.tableView.tableFooterView = self.tail;[self.view addSubview:self.tableView];
//    [self.view bringSubviewToFront:self.pageControl]; // 后来添加的图层把前面的图层覆盖时可以把被覆盖的组件调到前面
}// 重写数组arrays的get方法实现懒加载
-(NSMutableArray *)arrays
{if (_arrays == nil) {// 获取路径NSString *path =  [[NSBundle mainBundle] pathForResource:@"work.plist" ofType:nil];// 读取文件内容NSArray *arrayDicts = [NSArray arrayWithContentsOfFile:path];// 新建一个可变数组,用来保存model对象NSMutableArray *arrayModels = [NSMutableArray array];// 遍历从文件读取的字典数组,将每一个字典转为model对象for(NSDictionary * itemDict in  arrayDicts ){Hero *hero = [Hero heroWithDict:itemDict];[arrayModels addObject:hero];}_arrays = arrayModels;}return  _arrays;
}-(NSInteger)numberOfSectionsInTableView:(UITableView *)tableView
{return 1;   // 只返回一组,此方法在只返回一组时可以不实现
}// 返回每组的行数
-(NSInteger) tableView:(UITableView *)tableView numberOfRowsInSection:(NSInteger)section
{return self.arrays.count;
}// 指定每组每行单元格的内容
-(UITableViewCell *)tableView:(UITableView *)tableView cellForRowAtIndexPath:(NSIndexPath *)indexPath
{//1 获取model数据Hero *h = self.arrays[indexPath.row];//2  重用单元格NSString *ID = @"Hero_Cell";//  从当前的缓存池中根据ID寻找单元格HeroTableViewCell *cell =[tableView dequeueReusableCellWithIdentifier:ID];if (cell == nil) {  // 创建单元格cell = [[HeroTableViewCell alloc] initWithStyle:UITableViewCellStyleDefault reuseIdentifier:ID];}//  给单元格设置数据cell.hero = h;return cell;
}// 设置单元格的选中监听方法
-(void)tableView:(UITableView *)tableView didSelectRowAtIndexPath:(NSIndexPath *)indexPath
{// 获取model 数据Hero *model = self.arrays[indexPath.row];//  新建一个跳转页的控制器,并把当前组的model传进去ViewControllerDetail *detail = [ViewControllerDetail controlWithModel: model];// 页面跳转[self presentViewController:detail animated:YES completion:^{}];}/********************************************/
// 实现滚动组件UIScrollView组件协议内的滚动方法//当开始拖动时会执行以下方法
-(void)scrollViewWillBeginDragging:(UIScrollView *)scrollView
{// 解决第一个Bug:按住滚动内容拖拽或不松手,一旦松手就会滚动好多次。解决方法当开始拖动时令计时器失效。当拖动结束后再新建一个计时器[self.timer  invalidate];// 计时器一旦失效,就不能再使用了。所以赋给它一个空指针self.timer = nil;
}//  在拖动的过程中会执行这个方法
-(void)scrollViewDidScroll:(UIScrollView *)scrollView
{//  先获根据内容的偏移位置,获取当前的页数int  page =( scrollView.contentOffset.x+scrollView.frame.size.width*0.5)/ scrollView.frame.size.width;//  在拖动的过程中把当前的页码告知分页控制器组件self.pageControl.currentPage = page;
}// 在拖动结束后会执行这个方法
-(void)scrollViewDidEndDragging:(UIScrollView *)scrollView willDecelerate:(BOOL)decelerate
{// 当拖动结束后再新建一个计时器, 第一个Bug解除了self.timer = [NSTimer scheduledTimerWithTimeInterval:1.0 target:self selector:@selector(nextImage) userInfo:nil repeats:YES];// 解决第二个BUg:当拖动点击别的控件时。将停止滚动,这是由于单线程执行,而计时器对象和网络对象的优先级小于控件的优先级,所以当拖动控件时,就不会再执行NSTimer计时器对象的操作。解决方法如下:每当新建一个NSTimer计时器,就先获取当前的消息循环,并在消息循环中设置它的优先级和控件的优先级相同,这时程序会分时间片给优先级相同的对象;NSRunLoop *runRoop = [NSRunLoop currentRunLoop];  // 获取当前的消息循环//  利用消息循环为timer对象设置优先级和控件的优先级相同[runRoop addTimer:self.timer forMode:NSRunLoopCommonModes];}//  添加计时器的监听方法
-(void)nextImage
{// 获取当前的页数int page = self.pageControl.currentPage;if (page == self.pageControl.numberOfPages-1) {page = 0;}else{page++;}// 根据当前的页数计算内容偏移量contentOffset的大小// 通过代码设置contentOffset偏移,实现自动滚动// 非动画方式//self.scrollView.contentOffset = CGPointMake(page*self.scrollView.frame.size.width, 0);// 通过动画方式[self.scrollView setContentOffset:CGPointMake(page*self.scrollView.frame.size.width, 0) animated:YES];
}/*******************向左滑动删除单元格***************************/-(UITableViewCellEditingStyle)tableView:(UITableView *)tableView editingStyleForRowAtIndexPath:(NSIndexPath *)indexPath
{return UITableViewCellEditingStyleDelete;
}/*改变删除按钮的title*/
-(NSString *)tableView:(UITableView *)tableView titleForDeleteConfirmationButtonForRowAtIndexPath:(NSIndexPath *)indexPath
{return @"删除";
}/*删除用到的函数*/
-(void)tableView:(UITableView *)tableView commitEditingStyle:(UITableViewCellEditingStyle)editingStyle forRowAtIndexPath:(NSIndexPath *)indexPath
{if (editingStyle == UITableViewCellEditingStyleDelete){/*此处处理自己的代码,如删除数据*//*删除tableView中的一行*/[self.arrays removeObjectAtIndex:indexPath.row];  // 删除从文件读取数组中的当前项[tableView deleteRowsAtIndexPaths:[NSMutableArray arrayWithObject:indexPath] withRowAnimation:UITableViewRowAnimationFade];// 为彻底清除本地文件plist文件中的数据,需要将修改后的数组读进原先的plist文件//         // 获取文件的沙盒路径
//        NSArray *patharray = NSSearchPathForDirectoriesInDomains(NSDocumentDirectory, NSUserDomainMask, YES);
//
//            // 2、新建一个可变数组,用来保存将每一个对象转化后的字典
//        NSMutableArray  *dictArrays = [NSMutableArray array];
//        for (Hero * hero in self.arrays)
//        {
//            NSMutableDictionary *dict = [NSMutableDictionary  dictionary];
//            [dict setObject:hero.icon forKey:@"icon"];
//            [dict setObject:hero.iconName forKey:@"iconName"];
//            [dict setObject:hero.title forKey:@"title"];
//            [dict setObject:hero.title2 forKey:@"title2"];
//            [dict setObject:hero.time forKey:@"time"];
//            [dict setObject:hero.desc forKey:@"desc"];
//            [dict setObject:hero.imag1 forKey:@"imag1"];
//            [dict setObject:hero.imag2 forKey:@"imag2"];
//            [dict setObject:hero.imag3 forKey:@"imag3"];
//            [dict setObject:hero.goodLabel forKey:@"goodLabel"];
//            [dict setObject:hero.shareLabel forKey:@"shareLabel"];
//
//          //  [dictArrays addObject:dict];
//        }
//      // [dictArrays writeToFile:[NSString stringWithFormat:@"%@",patharray] atomically:YES];
//        }
}- (void)didReceiveMemoryWarning
{[super didReceiveMemoryWarning];// Dispose of any resources that can be recreated.
}@end
大概文件分布如下图:
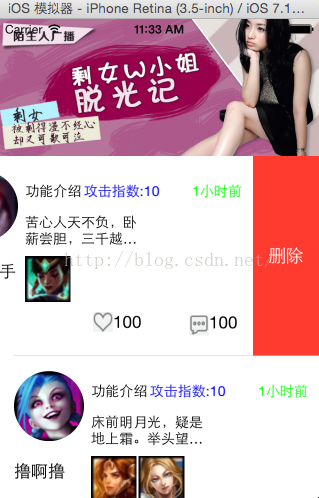
运行结果如下所示:

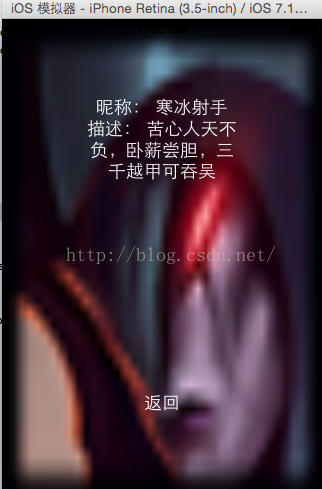
点击单元格进入如下视图:
这篇关于iPhone开发之UITableView的小试牛刀 利用MVC模式从plist文件读取数据并字典转模型的格式实现的文章就介绍到这儿,希望我们推荐的文章对编程师们有所帮助!


