本文主要是介绍无后修改教学_如何在无后端的情况下将带有条带化的卡付款集成到您的Web应用程序中,希望对大家解决编程问题提供一定的参考价值,需要的开发者们随着小编来一起学习吧!
无后修改教学
As my first #100DaysOfCode challenge with my friend Dejan, we decided to create three products within 100 days with a running cost of less than $10/month for each of them. The first product we created is an EIOPA rates API. If you are interested to see our progress and the code of each product, welcome to follow us on Twitter (Ying, Dejan).
作为与朋友Dejan进行的第一个#100DaysOfCode挑战,我们决定在100天内创建三种产品,每种产品的运行成本均低于$ 10 /月。 我们创建的第一个产品是EIOPA费率API 。 如果您有兴趣查看我们的进度和每个产品的代码,欢迎在Twitter( Ying , Dejan )上关注我们。
One important part of creating a sell-able product is to integrate card payment into your website.
创建可销售产品的重要部分是将卡付款集成到您的网站中。
In this article, I will show you how to integrate Stripe into your React app.
在本文中,我将向您展示如何将Stripe集成到您的React应用程序中。
An overview of the topics covered:
涵盖的主题概述:
- How are payments processed online 如何在线处理付款
- Why we choose Stripe 为什么我们选择条纹
- How to integrate Stripe API 如何整合Stripe API
- How to test Stripe API 如何测试Stripe API
It represents our experience and our reasoning of choice, and it by no means is the only good solution. With this blog post I would like to share with you how to replicate the smooth integration we experienced.
它代表了我们的经验和选择的理由,但绝不是唯一的好解决方案。 在此博客文章中,我想与您分享如何复制我们经历的平滑集成。
如何在线处理付款 (How are payments processed online)
As a web development newbie, I have many questions to start with. First and foremost, how does payment happen on your website?
作为一个网络开发新手,我有很多问题要开始。 首先,付款如何在您的网站上发生?

It turns out the answer to this question is the key to understand how to integrate payment into the website too. (This covers the API pattern only and there are other patterns of integrating payment [1])
事实证明,这个问题的答案也是了解如何将付款集成到网站中的关键。 (这仅涵盖API模式,还有其他集成付款[1]的模式)
So first of all, a client comes to your website and selects a product. By clicking onto the link of the product, the service information can be stored by the browser.
因此,首先 ,一个客户来到您的网站并选择一种产品。 通过单击产品链接,浏览器可以存储service信息。
Then, this information is sent to the server via a Checkout Form, and the server processes this information with the secret key stored on it.
然后 ,此信息通过Checkout Form发送到服务器,服务器使用存储在其中的密钥处理此信息。
Lastly, the payment is further forwarded to a PSP. A PSP is a payment service provider who handles the payment and clearing with banks.
最后 ,付款将进一步转发给PSP 。 PSP是付款服务提供商,负责与银行进行付款和清算。
What the above process suggests is that:
以上过程表明:
- You need a product online 您需要在线产品
- You need to build a Checkout Form (which is triggered via purchase link) 您需要构建一个Checkout表单(通过购买链接触发)
- You need a server (or use a Function-as-a-Service to go server-less) 您需要一台服务器(或使用“功能即服务”来减少服务器)
The focus of this tutorial is on the 2nd and 3rd point. I will write a separate tutorial of how to make the payment form beautiful once we have finished building up the foundation.
本教程的重点是第二点和第三点。 一旦完成基础的建立,我将编写一个单独的教程,介绍如何使付款表格漂亮。
为什么我们选择Stripe (Why we chose Stripe)
Before going into the implementation mode, I would like to share with you the reason why we choose Stripe. There are four main considerations:
在进入实施模式之前,我想与大家分享我们选择Stripe的原因。 有四个主要注意事项:
Suitability: Our website is selling financial product and we are not an online shop, therefore we didn’t choose the online shopping platforms such as Shopify or Amazon Payment. On the other hand, Stripe is suitable for businesses in general.
适用性 :我们的网站出售金融产品,我们不是在线商店,因此我们没有选择Shopify或Amazon Payment这样的在线购物平台。 另一方面, Stripe适用于一般企业。
Costs: As our goal is to have a fixed running cost of <$10/month, the products with fixed monthly fees + variable cost per product is eliminated (PayPal, Authorize.net). Stripe requires 2.9% + 30cc variable fees per transaction.
成本 :由于我们的目标是使固定运行成本小于$ 10 /月,因此将消除具有固定月费+每个产品可变成本的产品( PayPal , Authorize.net )。 Stripe每笔交易需要2.9%+ 30cc可变费用。
Ease of integration: Stripe has a really nice documentation of how to integrate the payment API.
易于集成 : Stripe提供了有关如何集成支付API的非常好的文档 。
Dashboard: Stripe’s dashboard offers possibility to monitor transactions and analyze business easily.
仪表板 : Stripe的仪表板提供了监视交易和轻松分析业务的可能性。
如何整合Stripe API (How to integrate Stripe API)
So we choose to go with Stripe. Next question is how to embed it into our web app? The GIF below shows how it looks likes when we first integrated into our website.
因此,我们选择使用Stripe。 下一个问题是如何将其嵌入到我们的Web应用程序中? 下面的GIF显示了当我们首次集成到我们的网站时的外观。

You can find the documentation of Stripe API in its website and I will use the same example illustrated by Stripe to avoid additional information for you to swallow. You can also find all the code in our GitHub repo.
您可以在其网站上找到Stripe API的文档,我将使用Stripe所示的示例来避免其他信息供您吞咽。 您还可以在我们的GitHub存储库中找到所有代码。
第1部分:创建React应用 (Part 1: Create the React App)
The front-end includes three files:
前端包括三个文件:
Checkout.jsx: This is the content of the checkout page
Checkout.jsx :这是结帐页面的内容
App.jsx: This is where you call the Checkout page
App.jsx :您可以在此处调用Checkout页面
Checkout.css: This is the default style sheet included
Checkout.css :这是默认的样式表
To run them, you will need to have your React App set up and install the necessary Stripe libraries as mentioned in the documentation.
要运行它们,您需要设置React App并安装文档中提到的必要的Stripe库。
1.创建结帐表格 (1. Create Checkout Form)
The documentation includes all the code to get started, this example below is the section where CheckoutForm interacts with back-end server to request a clientSecret.
该文档包含所有入门代码,下面的示例是CheckoutForm与后端服务器交互以请求clientSecret 。
Line 19–24: Go to the server and make a POST request. The body of this request is a json format containing a service element, with a list of dictionaries: first pair has the key
idand the valuexl-tshirt.第19–24行:转到服务器并发出POST请求。 该请求的主体是一个json格式,其中包含一个service元素,并带有一个词典列表:第一个具有键
id和值xl-tshirt。Line 30: Receive the client secret value which is the required key to continue processing payment
第30行 :接收客户机密值,这是继续处理付款所需的密钥
Once this step was successful, the rest of the CheckoutForm module uses stripe package to handle different scenarios such as submit, Change of details, etc.
成功完成此步骤后, CheckoutForm模块的其余部分将使用Stripe包来处理不同的场景,例如submit , Change of details等。
2. Use Checkout Form in App.jsx
2.在App.jsx中使用Checkout表单
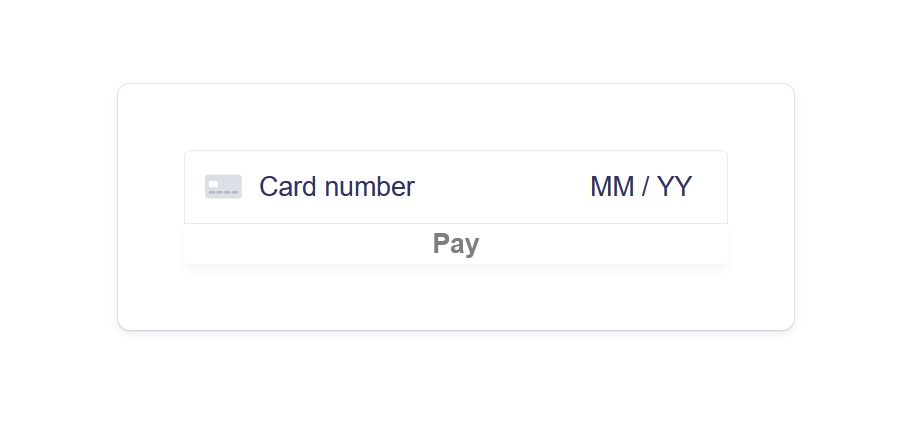
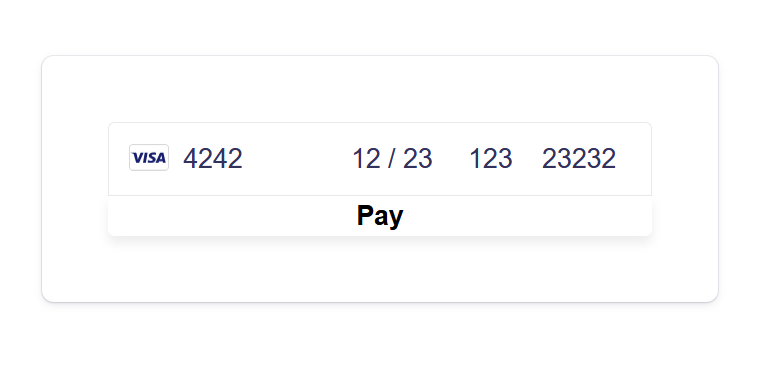
Using exactly the same code from the documentation, you should be able to have the React App running for the CheckoutForm. Now let’s go npm start and you should see the simple checkout form below in your browser.
使用文档中完全相同的代码,您应该能够为CheckoutForm运行React App。 现在让我们npm start ,您应该在浏览器中看到下面的简单结帐表格。
第2部分:为后端实现创建Azure函数 (Part 2: Create Azure Function for Back-end Implementation)
1. What happens without a back-end
1.没有后端会发生什么
With the checkout form above, you can enter test card information (Stripe test card number: 4242 4242 4242 4242 with any future expiry date, any CVC code and any post code), but this will only lead you to an error.
使用上面的结帐表格,您可以输入测试卡信息(条纹测试卡号: 4242 4242 4242 4242以及将来的任何到期日期,任何CVC代码和任何邮政编码),但这只会导致您出错。
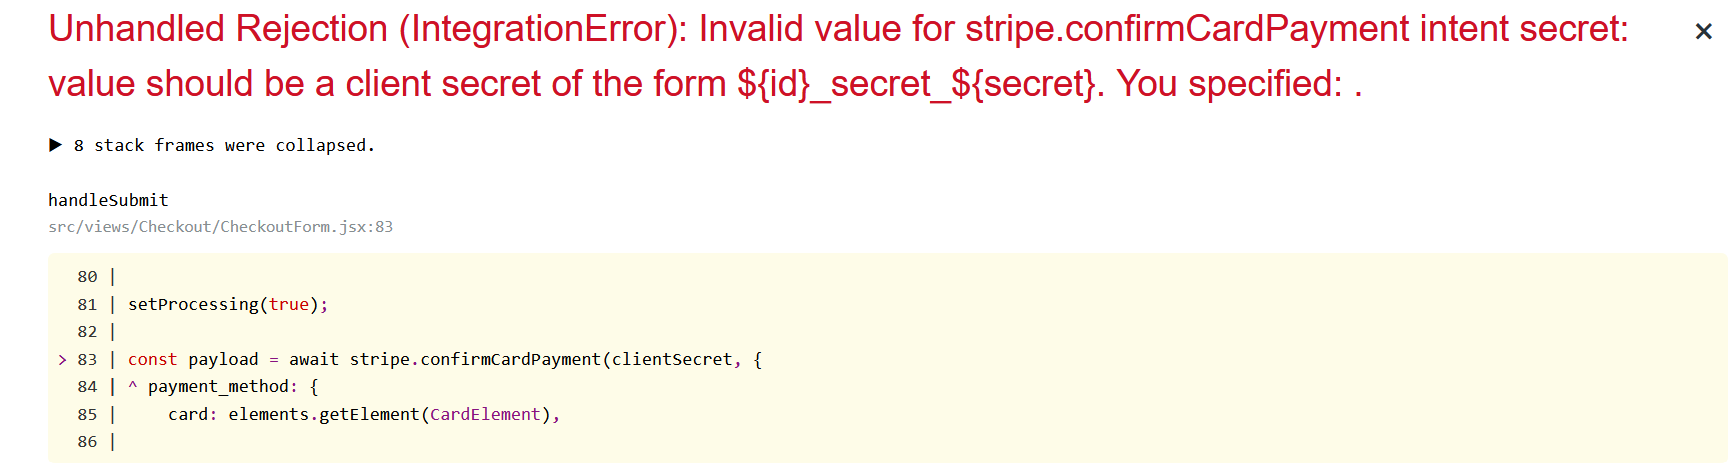
The browser did not receive a clientSecret which is required for it to continue processing the transaction. And why is that? Where was it supposed to get the clientSecret from?
浏览器没有收到clientSecret ,它是继续处理事务所必需的。 那为什么呢? 应该从哪里获得clientSecret ?
Remember in the section above we mentioned that the React App needs to raise a request to the server for getting a clientSecret as response. This error message inevitably appears because we have no back-end for the REST API call yet.
请记住,在以上部分中,我们提到过React App需要向服务器提出一个请求以获取clientSecret作为响应。 由于我们还没有REST API调用的后端,因此不可避免地会出现此错误消息。
2. Choice of back-end server
2.后端服务器的选择
For us, having our own server running at all time simply does not make sense. The only purpose of having a server is to trigger the POST request for generating a client secret whenever a client enters the payment page.
对于我们来说,让我们的服务器一直运行根本没有意义。 拥有服务器的唯一目的是每当客户进入付款页面时触发POST请求以生成客户机密。
Therefore, we picked Azure cloud service for this task. Azure Functions consumption plan pricing includes a monthly free grant of 1 million requests and 400,000 GB-s of resource consumption per month per subscription which is a perfect plan for us especially in the beginning when our client base is small.
因此,我们为此任务选择了Azure云服务。 Azure Functions 消费计划的定价包括每月免费授予100万个请求,每个订阅每月每个月40万GB-s的资源消耗,这对我们来说是一个完美的计划,尤其是在客户群小的时候。
3. Background of Azure Function
3. Azure功能的背景
Essentially what Azure Function does is to allow you to run a piece of code on the Azure cloud infrastructure and it is consumed only when the function is called. This means you don’t need to have your own server running all the time and you don’t need to worry about infrastructure.
本质上, Azure Function的作用是允许您在Azure云基础结构上运行一段代码,并且仅在调用该函数时才使用它。 这意味着您不需要一直运行自己的服务器,也不必担心基础架构。
In our case, we used Azure Function to write our Rest API to support the React App’s request. This is used only when a client intends to make a purchase.
在我们的案例中,我们使用Azure函数编写了Rest API以支持React App的请求。 仅当客户打算购买时才使用此功能。
4. How to set up Azure Function
4.如何设置Azure功能
You need to set up an account on Azure portal, create a resource group and create a local Azure Function in Visual Studio Code as prerequisite. This is well documented in Microsoft Azure’s documentation and I will not expand into much detail here.
您需要先在Azure门户上设置一个帐户,创建一个资源组并在Visual Studio Code中创建一个本地Azure函数。 在Microsoft Azure的文档中对此进行了很好的记录,在此不再赘述。
5. How to create a Python Azure Function as Stripe back-end
5.如何创建Python Azure函数作为Stripe后端
Creating a REST API with Azure Functions is quite simple. In a few lines of code, you can create what is required for Stripe Payment. I will walk you through the code line by line.
使用Azure Functions创建REST API非常简单。 在几行代码中,您可以创建Stripe Payment所需的内容。 我将逐步引导您完成代码。
Line 1–5: Import all the libraries needed
第1至5行 :导入所有需要的库
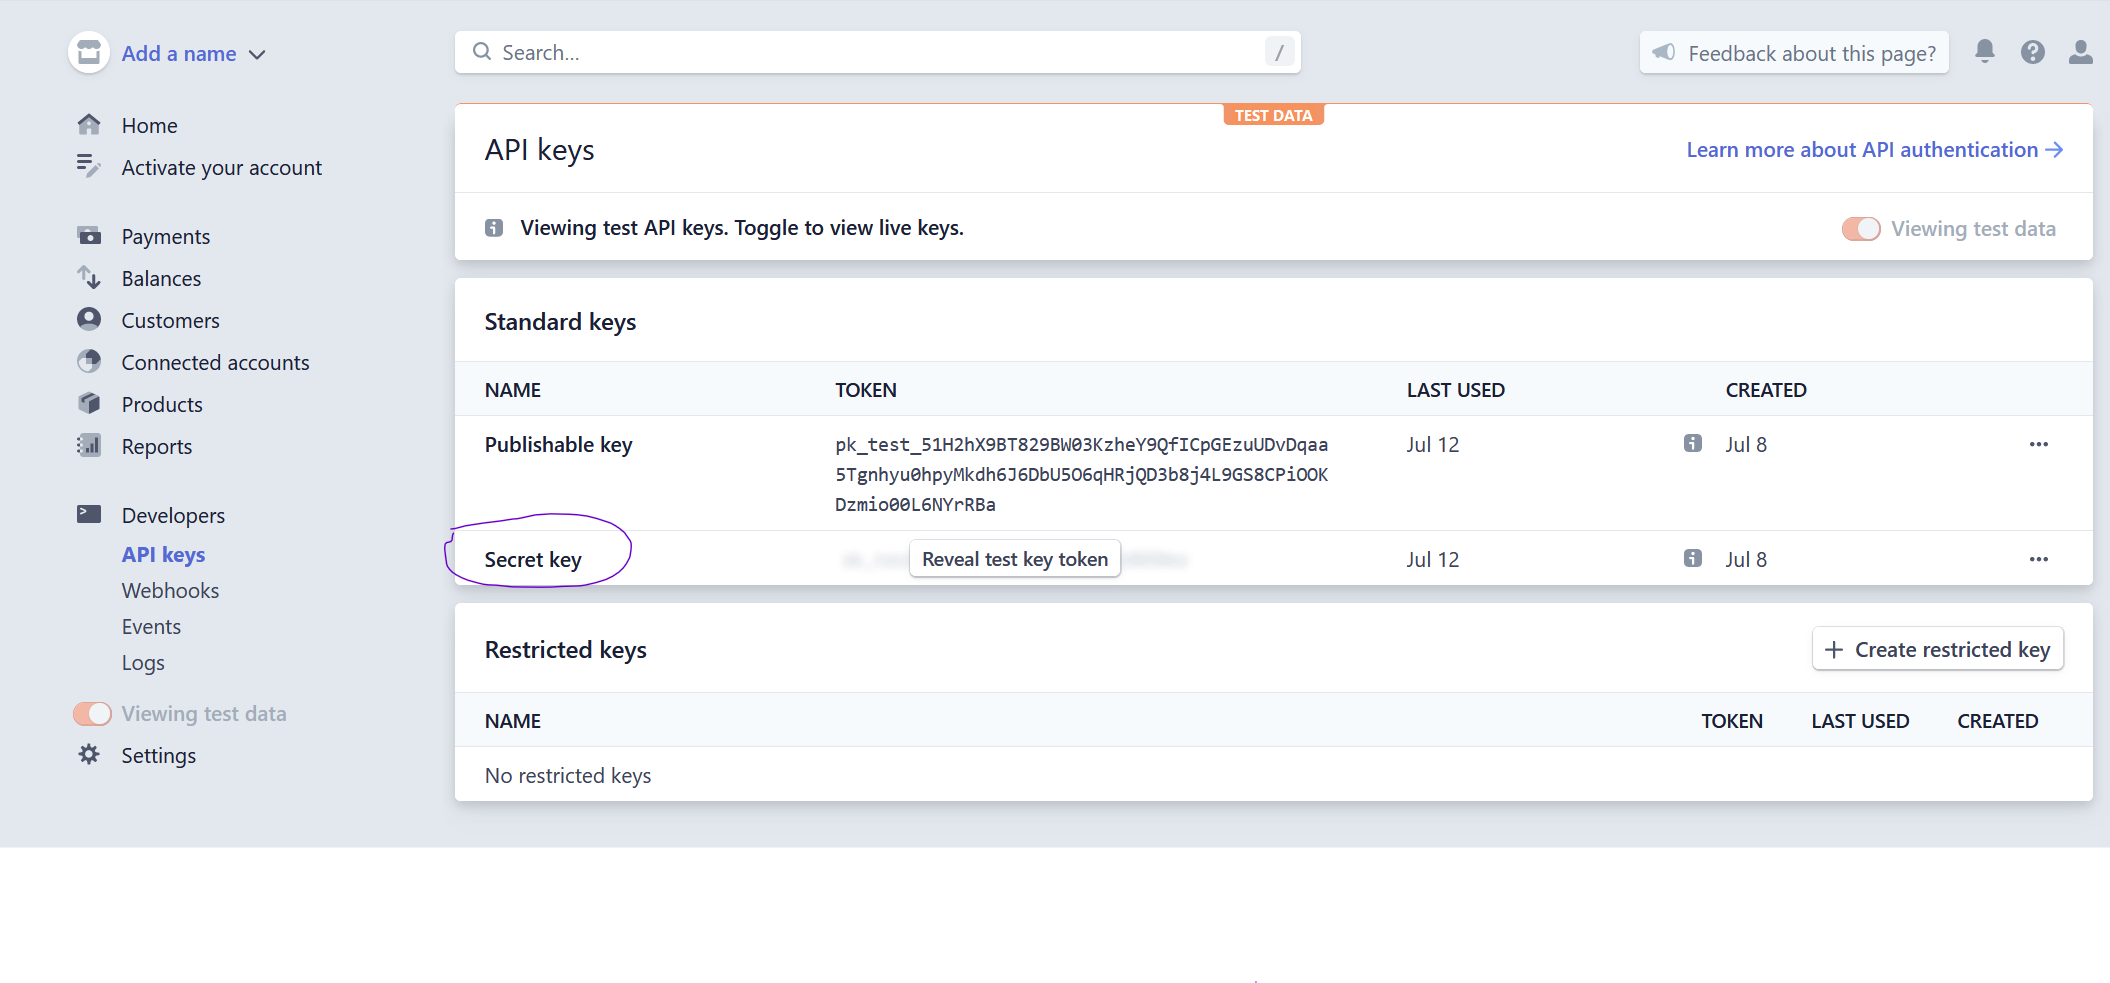
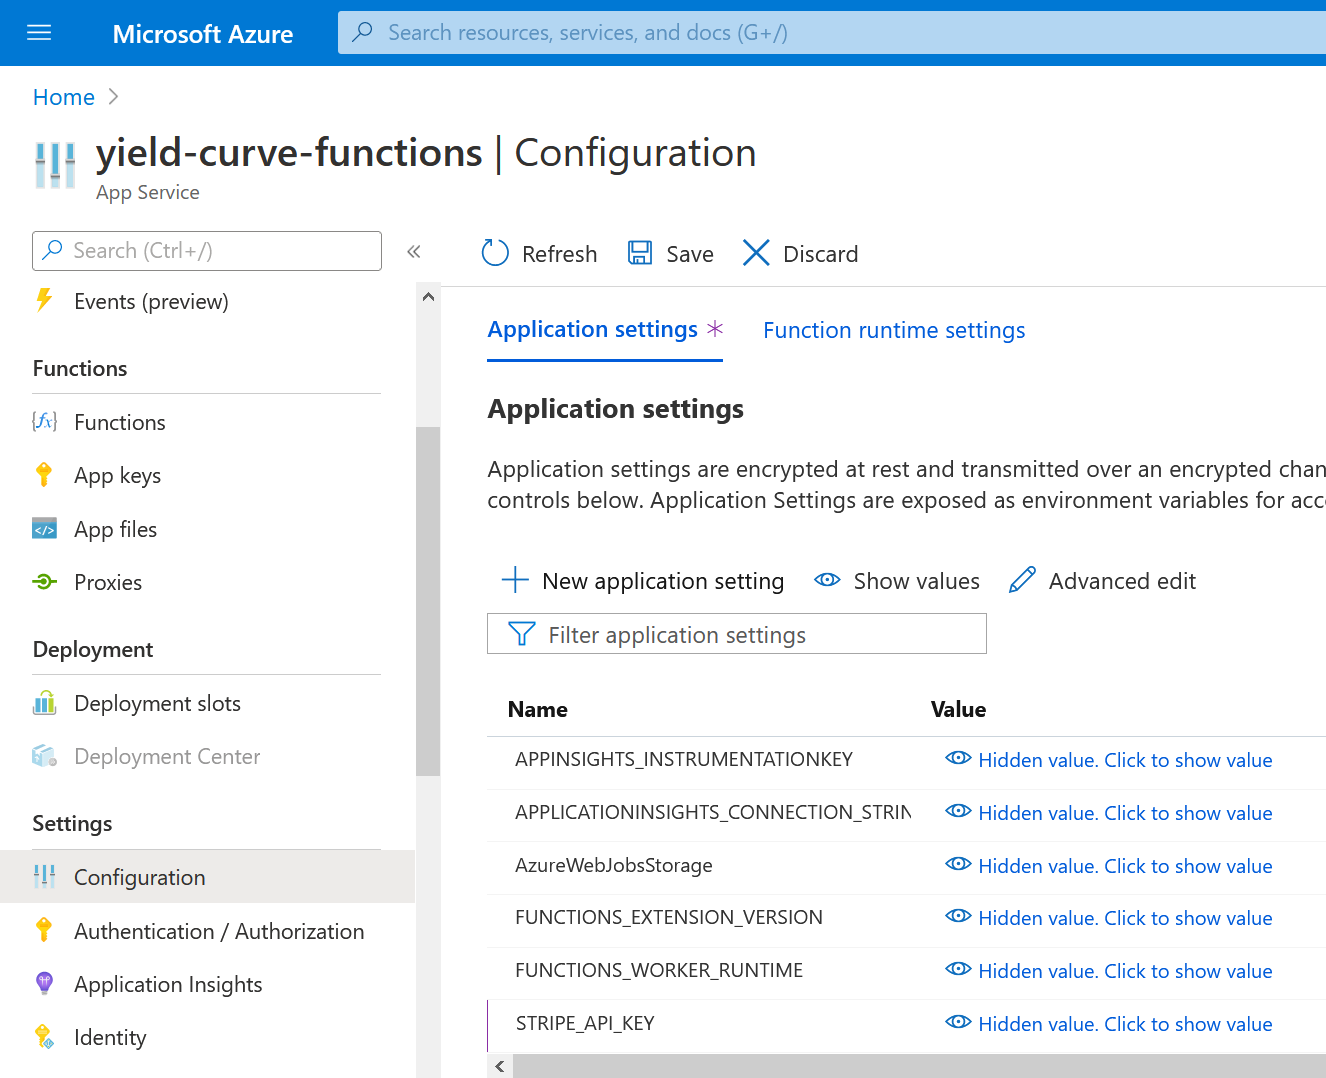
Line 9: Stripe API key is the secret key for the website owner (you) to be able to validate and process the transactions. The key can be found in your Stripe dashboard under Developers — API keys:
第9行 :Stripe API密钥是网站所有者(您)能够验证和处理交易的秘密密钥。 可以在您的Stripe仪表板的“开发人员-API密钥”下找到该密钥:
For local testing, you can include this key in the
local.settings.jsonfile对于本地测试,您可以将此密钥包含在
local.settings.json文件中
{
  "Values": {
    "STRIPE_API_KEY":  "your secret stripe API key"
  }
}
For running on the server, you can include this key in the Configuration section in Azure Functions by
+ New application setting要在服务器上运行,可以将此键包括在Azure Functions by
+ New application settingsettings的Configuration部分中
The way to refer to the API key in your code is simply
os.environ[STRIPE_API_KEY]在代码中引用API密钥的方法只是
os.environ[STRIPE_API_KEY]
Line 11–21: This is a function to calculate the price on the server depending on which item is bought. The reason to calculate price on the server is to avoid manipulation from the client-side.
第11–21行 :此功能可根据购买的商品来计算服务器上的价格。 在服务器上计算价格的原因是为了避免从客户端进行操纵。
Line 24–40: Here is where the REST API is constructed. It is essentially saying: Pick the id of the service information received from the browser, and get the price of this item and instantiate a PaymentIntent. PaymentIntent is an object from stripe library for collecting the payment information. The response sent back to the browser is clientSecret.
第24-40行 :这是REST API的构建位置。 本质上是这样说的:选择从浏览器接收到的service信息的id ,并获取该商品的价格并实例化PaymentIntent 。 PaymentIntent是来自条带库的对象,用于收集付款信息。 发送回浏览器的响应是clientSecret 。
To test whether the REST API works, let’s go cd azure-function to where your azure functions are saved. func start to check the information. If it is the first time you initialize Azure Functions, you need to func init before func start. Once the function ran through, you will see in the console the localhost ports running.
要测试REST API是否有效,我们将cd azure-function转到保存您的azure函数的位置。 func start检查信息。 如果是第一次初始化Azure Functions,则需要在func start之前进行func init 。 函数运行完成后,您将在控制台中看到正在运行的localhost端口。

The
localhost:7071/api/stripe-paymentis the one we are interested in, we can also use Postman to interact with our REST API.localhost:7071/api/stripe-payment是我们感兴趣的一种,我们也可以使用Postman与我们的REST API进行交互。Postman is a great platform to test your API. You can insert the localhost location into the path and select the type of request to make (POST, GET etc.). In this case, the REST API expects to get some information from the browser via body. We can therefore insert the Body
{"service": {"id": "xl-tshirts"}}in the same way we wrote in the React App. If everything works fine, we should get theclientSecretback as shown below with a status code 200 (status OK).邮递员是测试您的API的绝佳平台。 您可以将本地主机位置插入路径,然后选择要发出的请求的类型(POST,GET等)。 在这种情况下,REST API希望通过正文从浏览器获取一些信息。 因此,我们可以像在React App中编写的一样插入主体
{"service": {"id": "xl-tshirts"}}。 如果一切正常,我们应该如下所示用状态代码200(状态为OK)恢复clientSecret。

6. Update the path in the React App for making the request
6.更新React App中的路径以发出请求
As we are not running on the real domain yet, the React App and Azure Functions are running in different localhost ports. That means to test, we need to specify where the REST API is running in the React App. In our case, we have changed it to http://127.0.0.1:7071/api/strip-payment.
由于我们尚未在真实域上运行,因此React App和Azure Functions在不同的localhost端口上运行。 这意味着要进行测试,我们需要指定REST API在React App中的运行位置。 在我们的情况下,我们将其更改为http://127.0.0.1:7071/api/strip-payment 。
useEffect(() => {
window
.fetch("http://127.0.0.1:7071/api/stripe-payment", {
 method: "POST",
 headers: {
    "Content-Type": "application/json"                               },
 body: JSON.stringify({service: [{ id: "xl-tshirt" }]})                             })
7. Configure CORS setting
7.配置CORS设置
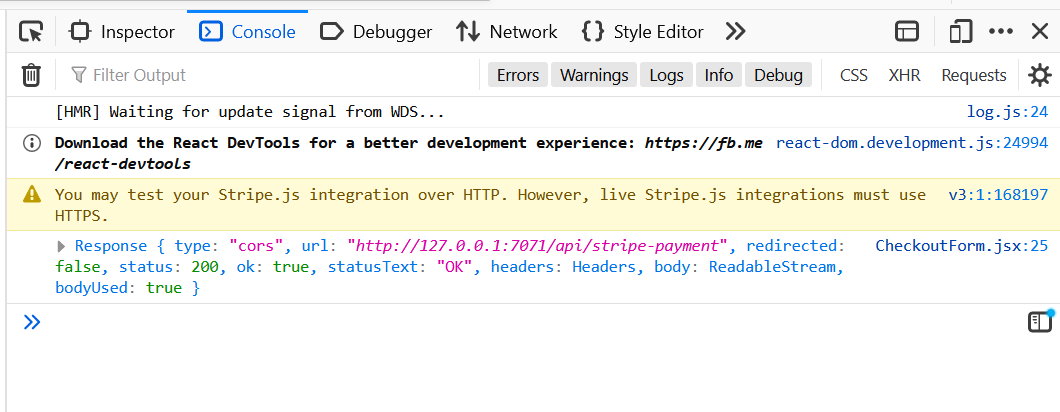
Cross-Origin Resource Sharing (CORS) is a mechanism that uses additional HTTP headers to tell browsers to give a web application running at one origin, access to selected resources from a different origin. For security reasons, browsers restrict cross-origin HTTP requests initiated from scripts. [1]
跨域资源共享(CORS)是一种机制,该机制使用附加的HTTP标头来告诉浏览器使在一个来源运行的Web应用程序可以访问来自另一个来源的选定资源。 出于安全原因,浏览器限制了从脚本发起的跨域HTTP请求。 [1]
As we are running React App and Azure Functions in different ports, it would throw us an CORS error.
当我们在不同的端口中运行React App和Azure Functions时,将引发CORS错误。

This would not happen when the web app is up and running when we set the front-end and back-end to run on the same domain. However, for local testing, it needs an additional setting in the local.settings.json file.
当我们将前端和后端设置为在同一域上运行时,如果Web应用程序启动并运行,则不会发生这种情况。 但是,对于本地测试,它需要在local.settings.json文件中进行其他设置。
{
  "Host":{
    "LocalHttpPort": 7071,
    "CORS": "*",
    "CORSCredentials": false
  }
}
Once the setting is done, we can run it again and now we get a status ok response!
设置完成后,我们可以再次运行它,现在我们收到状态确定的响应!
- Note: You need to re-start the Azure Function for the changes in local settings to be applied 注意:您需要重新启动Azure功能,才能应用本地设置中的更改
第3部分:运行React App测试 (Part 3: Run the React App Testing)
Now we are all set for testing! Let’s try npm start again and put in the test number again.
现在我们已经准备好进行测试! 让我们尝试再次npm start并再次输入测试编号。
This time, when we click on Pay we are at the next page: Success!
这次,当我们单击“ Pay我们将进入下一页:成功!
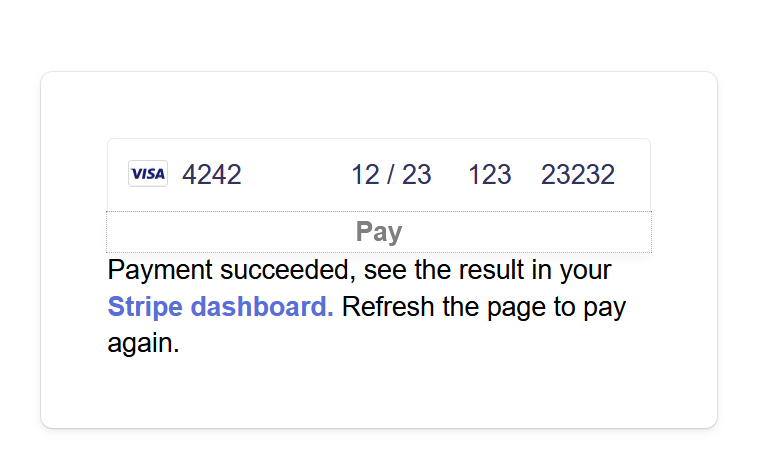
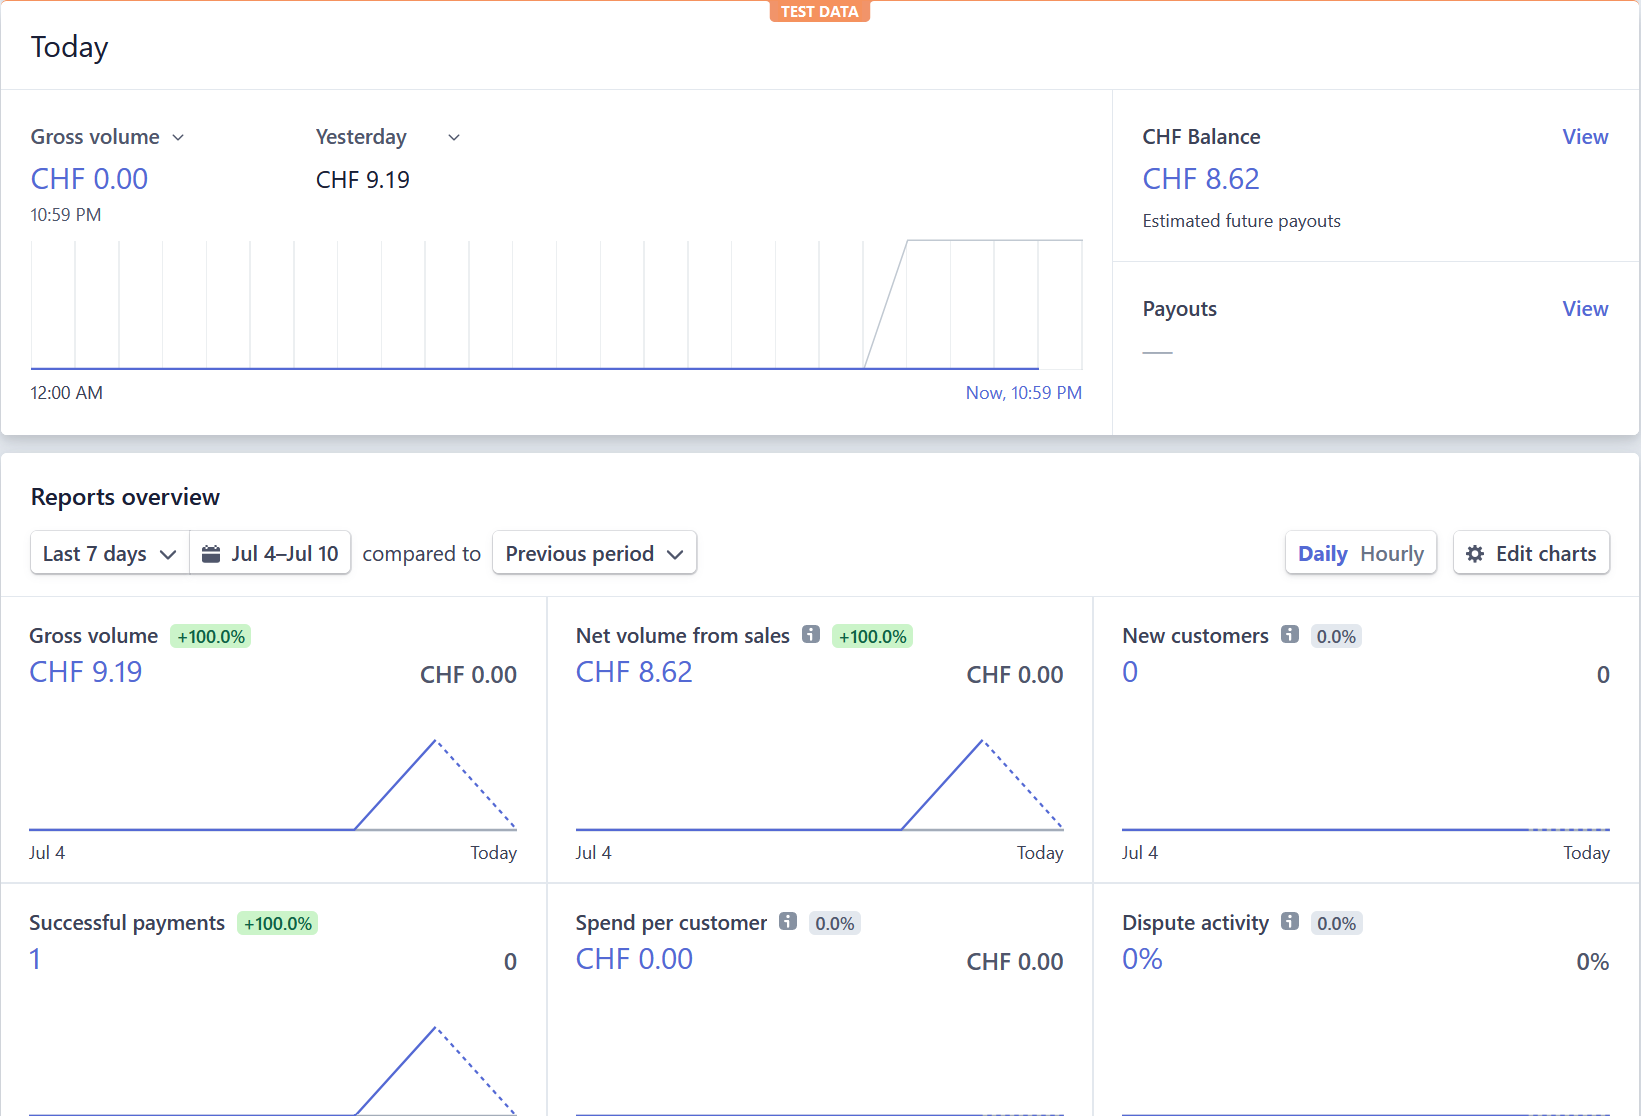
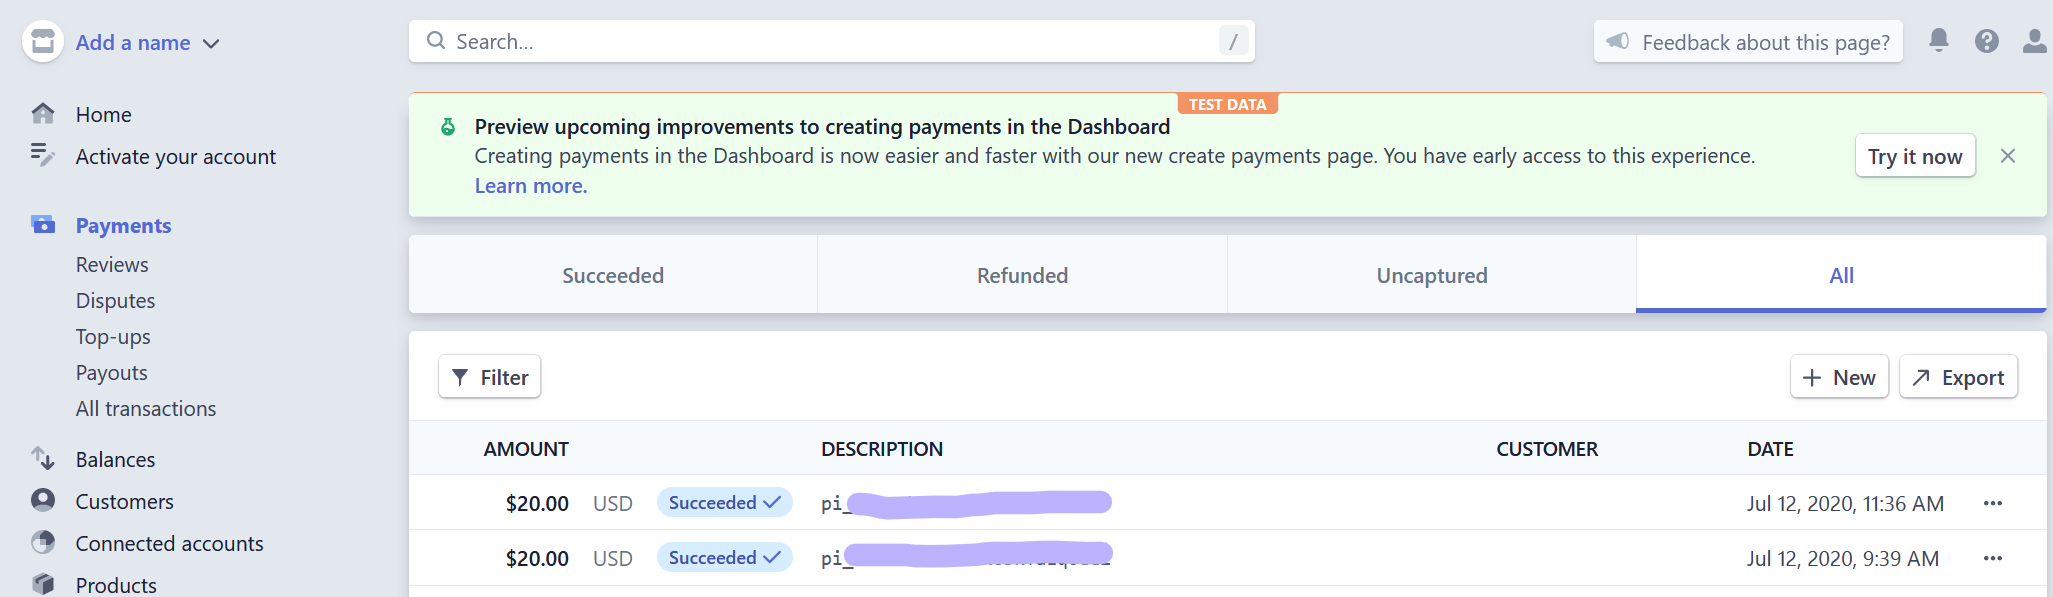
When we head over to the dashboard, we will see that the test payment has come through!
当我们转到仪表板时,我们会看到测试付款已经完成!
结束语 (Closing words)
I hope the step-by-step guide can help you set up Stripe payment for your website. What we have found most challenging is the connection between the React App and the back-end server. Luckily, Azure Functions offer extremely neat solution for us to be able to accomplish this.
我希望分步指南可以帮助您为您的网站设置Stripe付款。 我们发现最具挑战性的是React App与后端服务器之间的连接。 幸运的是,Azure Functions为我们提供了极为整洁的解决方案,以实现这一目标。
Please let us know in case you have questions or encountered situations that are not covered in this tutorial, we will try to update the tutorial to include your questions too.
如果您有本教程未涵盖的问题或遇到的情况,请告知我们,我们将尝试更新本教程以包含您的问题。
未来的话题 (Future topics)
For me as a web development newbie, the learning curve has been steep to understand how everything works and fits together, but I am convinced that with the right guidance, everyone can do it.
对于作为Web开发新手的我来说,学习曲线非常艰辛,无法理解一切工作原理和融合在一起,但是我坚信,只要有正确的指导,每个人都可以做到。
Next we will continue on this topic to make the payment form look beautiful with tailwindcss, stay tuned.
接下来,我们将继续讨论该主题,以使付款表格看起来更加美观,敬请期待。
The following topics are all important part of our app and I believe you will go through similar steps during your development:
以下主题都是我们应用程序的重要组成部分,我相信您在开发过程中将经历类似的步骤:
- Create the yield curve product 创建收益曲线产品
- Create a beautiful website with React and tailwindcss 使用React和tailwindcss创建一个漂亮的网站
- Set up Azure Function 设置Azure功能
- Integrate Google Analytics into the web app 将Google Analytics(分析)集成到网络应用中
We will write about each topic as we go, and you are more than welcome to join us on Twitter (Ying, Dejan) to checkout our progress and code.
我们将在进行过程中写出每个主题,非常欢迎您加入Twitter (Ying , Dejan )上的我们,以查看我们的进度和代码。
翻译自: https://medium.com/javascript-in-plain-english/how-to-integrate-card-payment-with-stripe-into-your-web-app-6bf17e0108ef
无后修改教学
相关文章:
这篇关于无后修改教学_如何在无后端的情况下将带有条带化的卡付款集成到您的Web应用程序中的文章就介绍到这儿,希望我们推荐的文章对编程师们有所帮助!


