本文主要是介绍这是一篇让人脸红的python数据分析,嘿嘿嘿嘿嘿,希望对大家解决编程问题提供一定的参考价值,需要的开发者们随着小编来一起学习吧!

我的分析分为核心的三步:
**第一步:**爬取商品排名和详情页链接,需要的字段为:排名、商品名、详情页链接
**第二步:**爬取商品详情,需要的信息为:
- 店家:这不就是竞争对手吗?分析其爆品情况,保留店家链接,后续可针对性挖掘分析
- 价格:分析爆品价格区间,对商品定价、切分市场有帮助
- 上架时间:新品?爆了多久?
- 星级、评论数、评论标签、所有评论链接:进一步爬取评论内容,来分析爆品的优劣势
- 尺寸、颜色:也是非常有价值的参考数据,但在实际爬取过程中遇到问题,后面会提到
- 图片链接:难道你不想看看商品长啥样吗?
**第三步:**数据转化为可视化图表,并做分析。
是不是迫不及待想要看过程了,来吧~

如何爬取内衣数据
爬取过程分为三步
1、爬取商品排名和详情页链接

需要爬取的具体字段:排名(Rank),商品名(item_name),商品详情页链接(item_link)、商品图片链接(img_src)
2、在商品详情页爬取更多商品信息

核心事项:
1)构建函数来获取单个商品的详细信息;
2)利用for循环,遍历商品详情页链接列表,来获取每个商品的详细信息
3、爬取评论

核心事项:
1)从上一步的csv文件中,读取Rank , item_name , reviews , reviews_link字段
2)构建函数读取每个商品的所有评论
3)利用for循环,获取所有商品的所有评论
4)存储到数据库和csv文件中
4、爬取size和color数据
和第三步基本一样,代码基本一样,主要在于要确认每页评论的size&color个数。
数据清洗与预处理
1、读取、清洗数据
从csv文件读取100个商品的数据,筛选出所需要的字段,进行数据清洗
- 部分读取的数据,看似是数值,实际是字符,因此需要进行类型转换(如price拆分后,还需要转为float型)
- 需要参与数值计算的NaN,使用平均值进行替换

2、以商家维度处理数据
获取所需的数据:商家的星级、评论数总和、评论数均值、最低价均值、最高价均值、价格均值、商品数量、占比。针对星级、评论数均值、价格均值、商品数量做标准化处理,并计算加权分。

歪果情趣内衣哪家强?
① 不同商家的星级排名

- 平均星级达4.15分,高于平均分的商家超过一半(17/32)
- Top1的LALAVAVA高达4.9分,紧随其后也有5家达到4.5分。
- 倒数第一N-pearI只有3.2分
让我看看LALAVAVA长什么样。亚马逊上的商品,看上去就是普通泳衣,米国人还是很保守的嘛~

但评分高真的就说明产品好吗?不如来看看评论数吧——
②不同商家的平均评论数排名

- 首先平均评论数只有193条,而且高于平均线的只有不到三成(12/32),想想淘宝动辄上万,我们的人口优势让米国人羡慕呀;
- 再来看星级Top1的LALAVAVA,评论数少得可怜,那么对其商品真实质量就要存疑了;
- 而星级倒数的N-pear I,同样评论数很少,那大概率其商品其实不咋地;
- 反观评论数Top1的Garmol,其星级评价4.4,口碑佳评论也多,看来是不错的商品;
- 紧随其后的几家,其星级分数就低于平均分了
那么,亚马逊的星级评价难道就只受评论数的几颗星比例影响吗?我查阅了网上的一些资料,发现亚马逊评价星级评定的三个重要因素:评论距离现在的时间,评论被买家投票采纳数,评论是否有verified purchase标志(意指真实买家)。此外,评论的字符数,被点击次数等因素也可能会对评论星级有影响。
看来,亚马逊对评论的监控和管理是非常严格而复杂的!当然,最重要的还是看看评论第一名的Garmol长什么样:

比上边的泳衣更点题了,大家说好才是真的好,very sexy!

③不同商家的价格区间排名(按均价)

- 从图上来看,明显ELOVER锁定的是高端市场,定价区间在49刀左右;相反,Goddessvan定价仅0.39刀,还只有一款,猜测可能是亏本冲量,提高商家曝光,抢夺低端市场
- 从均价来看,基本分布在10-20刀间,说明这是情趣内衣市场的主要价格区间;但20-40刀区间居然没有任何商家,可以在这一块深入研究,看能不能找到证据说明该区间是蓝海,有更大的市场潜力
- 而从每个商家的价格区间来看,大多数都是采取多颜色或款式的策略,一方面为用户提供更多选择,另一方面也体现了商家的上新能力;而仅有少数几家采取了单一爆款的策略
最奢华的ELOVER看上去果然比较女神,缩略图都比别家更用心。

那么,到底哪个商家的策略更靠谱,市场份额更大呢?
④商家的商品数量饼图

- 在Top100的商品占比中,Avidlove以28%的巨大优势称霸
- 而其他商家基本都是个位数的占比,没有很明显的优劣势
Avidlove的内衣是酷酷风的,我喜欢。

单一方面毕竟还是很难衡量哪家商家更优秀,不如综合多个指标来分析吧~
⑤不同商家的加权分排名

将星级、平均评论数、商品均价、商品数量进行标准化处理后,因为不好拍定加权的比例,便将4项的归一化结果x10后直接累加得到总分,并制作成堆积图。
而每个商家的4项指标的占比,则侧面反映其自身的优劣势。
- Avidlove,刚刚的酷酷风内衣,在其他三项中规中矩的情况下,以商品数量优势夺得综合分第一,有种农村包围城市的感觉
- Garmol,主要依靠口碑(星级、平均评论数)的优势,夺得了第二名
- ELOVER,主要依靠精准切分高端市场,夺得了第三名
- N-pearI,没有任何优势,不出意料的光荣垫底
口碑最差的N-pearI,能搜到的商品也最少,不过图很劲爆……就不放出来,太劲爆了~
粗略来看的话,想要排名靠前,口碑一定不能太差,至少要保持在平均水平及以上!
⑥不同商家的星级/价格散点图

x轴为商家的商品均价,y轴为商家的星级,点大小为商品数量,商品数量越大,点越大,点颜色为评论均值,评论均值越大,颜色越深红。
利用价格均值和星级均值,将图切分为四个象限:
①左上象限:实惠好评的商家
②右上象限:有点贵,但一分钱一分货的商家
③右下象限:贵,但质量不咋地的商家
④左下象限:便宜没好货的商家
所以借助这张散点图,挑商家买东西就容易多啦:
- 追求性价比,可选择Avidlove,而且商品多,任君挑选 (图中圆圈最大的浅红色商家);
- 追求高端,可选择ELOVER,它贵有它的道理 (图中最左侧且落在左上象限的商家);
- 追求大众,可选择Garmol,评论数最多,而且好评居多 (图中颜色最红的商家)
顾客可以根据自己的喜好挑选合适的商家,那么作为商家如何改进自己呢?
⑦词频分析
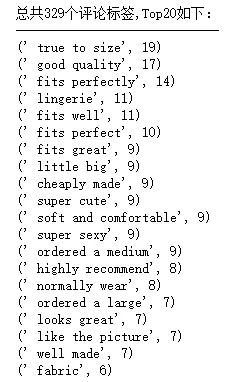
前面在爬取的过程中,同样爬取了评论标签,通过对此进行词频分析,可以发现顾客最关心的依次是:
1.是否合身:size、fit等相关字眼多次出现且排位靠前
2.质量:good quality、well made;soft and comfortable、fabric是对材质的肯定
3.款式:cute、sexy、like the picture你懂的
4.价格:cheaply made勉强算价格吧,但更多是对商品质量的怀疑
5.口碑:highly recommend,评论的还是非常有参考价值的
评论标签的数量较少,进一步对2.4w条评论进行词频分析,并制作成词云:

最直观的,仍然是跟“是否合身”以及质量或款式有关。那么我们就从顾客购买商品的Size&Color继续分析
Size&Color的词频数据存在几点问题:
1、数据量较少,仅有约6000条
2、Size&Color无法较好的区分开,因此一起分析
3、商家的命名规则不同,比如同样是黑色款,有个商家会命名black,而有的可能是style1(所以一些奇怪的数字编号其实是商家的款式编号)
4、有些奇怪的字眼如trim可能是爬虫时爬错了或者导出csv时的格式错乱

可以明显看出:
Size方面:large、medium、small肯定均有涵盖,但另外还有xlarge、xxlarge、xxxlarge,亚马逊主要是欧美顾客,可能体型相对较大,所以商家应该多研发以及备货针对体型较大的顾客的商品。
Color方面:非常直观:Black > red > blue > green > white > purple…所以黑色、红色永远不会错;绿色是出乎我意料的,商家也可以大胆尝试。
Style方面:词频中出现trim、lace字眼,蕾丝最高!!!

完整代码
商品评论
# 0、导入模块
from bs4 import BeautifulSoup
import requests
import random
import time
from multiprocessing import Pool
import csv
import pymongo
'''
python学习交流群:1136201545更多学习资料可以加群获取
'''
# 0、创建数据库
client = pymongo.MongoClient('localhost', 27017)
Amazon = client['Amazon']
reviews_info_M = Amazon['reviews_info_M']# 0、反爬措施
headers  = {'User-Agent':'Mozilla/5.0 (Windows NT 10.0; Win64; x64) AppleWebKit/537.36 (KHTML, like Gecko) Chrome/72.0.3626.109 Safari/537.36'
}# http://cn-proxy.com/
proxy_list = ['http://117.177.250.151:8081','http://111.85.219.250:3129','http://122.70.183.138:8118',]
proxy_ip = random.choice(proxy_list) # 随机获取代理ip
proxies = {'http': proxy_ip}# 1、读取csv中的'Rank','item_name','reviews','reviews_link'
csv_file = csv.reader(open('C:/Users/zbd/Desktop/3.csv','r'))
reviews_datalst = []
for i in csv_file:reviews_data = {'Rank':i[10],'item_name':i[8],'reviews':i[6],'reviews_link':i[5]}reviews_datalst.append(reviews_data)
del reviews_datalst[0]    # 删除表头
#print(reviews_datalst)
reviews_links = list(i['reviews_link'] for i in reviews_datalst)  # 将评论详情页链接存储到列表reviews_links# 清洗reviews,其中有空值或者“1,234”样式
reviews = []
for i in reviews_datalst:if i['reviews']:reviews.append(int(i['reviews'].replace(',','')))else:reviews.append(0)
print(reviews_links)
print(reviews)# 2、抓取每个商品的评论页链接
# 商品 1
# 第1页:https://www.amazon.com/Avidlove-Lingerie-Babydoll-Sleepwear-Chemise/product-reviews/B0712188H2/ref=cm_cr_dp_d_show_all_btm?ie=UTF8&reviewerType=all_reviews
# 第2页:https://www.amazon.com/Avidlove-Lingerie-Babydoll-Sleepwear-Chemise/product-reviews/B0712188H2/ref=cm_cr_arp_d_paging_btm_next_2?ie=UTF8&reviewerType=all_reviews&pageNumber=2
# 第3页:https://www.amazon.com/Avidlove-Lingerie-Babydoll-Sleepwear-Chemise/product-reviews/B0712188H2/ref=cm_cr_getr_d_paging_btm_next_3?ie=UTF8&reviewerType=all_reviews&pageNumber=3
# 商品 2
# 第1页:https://www.amazon.com/Avidlove-Women-Lingerie-Babydoll-Bodysuit/product-reviews/B077CLFWVN/ref=cm_cr_dp_d_show_all_btm?ie=UTF8&reviewerType=all_reviews'
# 第2页:https://www.amazon.com/Avidlove-Women-Lingerie-Babydoll-Bodysuit/product-reviews/B077CLFWVN/ref=cm_cr_arp_d_paging_btm_next_2?ie=UTF8&reviewerType=all_reviews&pageNumber=2
# 每页有8个评论,pages = reviews // 8 + 1
# 目标格式:https://www.amazon.com/Avidlove-Lingerie-Babydoll-Sleepwear-Chemise/product-reviews/B0712188H2/pageNumber=1
url = 'https://www.amazon.com/Avidlove-Lingerie-Babydoll-Sleepwear-Chemise/product-reviews/B0712188H2/ref=cm_cr_dp_d_show_all_btm?ie=UTF8&reviewerType=all_reviews'
counts = 0
def get_item_reviews(reviews_link,reviews):if reviews_link:pages = reviews // 8  # 每页有8个评论,pages = reviews // 8 ,最后一页不爬取for i in range(1,pages+1):full_url = reviews_link.split('ref=')[0] + '?pageNumber={}'.format(i)#full_url = 'https://www.amazon.com/Avidlove-Lingerie-Babydoll-Sleepwear-Chemise/product-reviews/B0712188H2/?pageNumber=10'wb_data = requests.get(full_url, headers=headers, proxies=proxies)soup = BeautifulSoup(wb_data.text, 'lxml')every_page_reviews_num = len(soup.select('div.a-row.a-spacing-small.review-data > span'))for j in range(every_page_reviews_num):reviews_info ={'customer_name' : soup.select('div:nth-child(1) > a > div.a-profile-content > span')[j].text,'star'          : soup.select('div.a-row>a.a-link-normal > i > span')[j].text.split('out')[0],'review_date'   : soup.select('div.a-section.review >div>div>  span.a-size-base.a-color-secondary.review-date')[j].text,'review_title'  : soup.select('a.a-size-base.a-link-normal.review-title.a-color-base.a-text-bold')[j].text,'review_text'   : soup.select('div.a-row.a-spacing-small.review-data > span')[j].text,'item_name'     : soup.title.text.split(':')[-1]}yield reviews_inforeviews_info_M.insert_one(reviews_info)global  countscounts +=1print('第{}条评论'.format(counts),reviews_info)else:pass'''
# 这边主要是爬取size和color,因为其数据大量缺失,所以另外爬取
# 与上一步的代码基本一样,主要在于要确认每页评论的size&color个数
# 写入数据库和csv也需要作相应修改,但方法相同def get_item_reviews(reviews_link,reviews):if reviews_link:pages = reviews // 8  # 每页有8个评论,pages = reviews // 8 ,最后一页不爬取,要做一个小于8个评论的判断for i in range(1,pages+1):full_url = reviews_link.split('ref=')[0] + '?pageNumber={}'.format(i)#full_url = 'https://www.amazon.com/Avidlove-Lingerie-Babydoll-Sleepwear-Chemise/product-reviews/B0712188H2/?pageNumber=10'wb_data = requests.get(full_url, headers=headers, proxies=proxies)soup = BeautifulSoup(wb_data.text, 'lxml')every_page_reviews_num = len(soup.select('div.a-row.a-spacing-mini.review-data.review-format-strip > a'))   # 每页的size&color个数for j in range(every_page_reviews_num):reviews_info ={'item_name'     : soup.title.text.split(':')[-1],'size_color'    : soup.select('div.a-row.a-spacing-mini.review-data.review-format-strip > a')[j].text,}yield reviews_infoprint(reviews_info)reviews_size_color.insert_one(reviews_info)else:pass
'''# 3、开始爬取和存储数据
all_reviews = []
def get_all_reviews(reviews_links,reviews):for i in range(100):for n in get_item_reviews(reviews_links[i],reviews[i]):all_reviews.append(n)get_all_reviews(reviews_links,reviews)
#print(all_reviews)# 4、写入csv
headers = ['_id','item_name', 'customer_name', 'star', 'review_date', 'review_title', 'review_text']
with open('C:/Users/zbd/Desktop/4.csv','w',newline='',encoding='utf-8') as f:f_csv = csv.DictWriter(f, headers)f_csv.writeheader()f_csv.writerows(all_reviews)
print('写入完毕!')
商品信息
# 0、导入模块
from bs4 import BeautifulSoup
import requests
import random
import time
from multiprocessing import Pool
import pymongo
'''
python学习交流群:1136201545更多学习资料可以加群获取
'''
# 0、创建数据库
client = pymongo.MongoClient('localhost', 27017)
Amazon = client['Amazon']
item_info_M = Amazon['item_info_M']# 0、反爬措施
headers  = {'User-Agent':'Mozilla/5.0 (Windows NT 10.0; Win64; x64) AppleWebKit/537.36 (KHTML, like Gecko) Chrome/72.0.3626.109 Safari/537.36'
}
# http://cn-proxy.com/
proxy_list = ['http://117.177.250.151:8081','http://111.85.219.250:3129','http://122.70.183.138:8118',]
proxy_ip = random.choice(proxy_list) # 随机获取代理ip
proxies = {'http': proxy_ip}# 1、爬取商品排名和详情页链接
url_page1 = 'https://www.amazon.com/Best-Sellers-Womens-Chemises-Negligees/zgbs/fashion/1044968/ref=zg_bs_pg_1?_encoding=UTF8&pg=1'  # 01-50名商品
url_page2 = 'https://www.amazon.com/Best-Sellers-Womens-Chemises-Negligees/zgbs/fashion/1044968/ref=zg_bs_pg_2?_encoding=UTF8&pg=2'  # 51-100名商品item_info = []    # 存储商品详细信息的列表
item_links = []   # 存储商品详情页链接的列表
def get_item_info(url):wb_data = requests.get(url,headers=headers,proxies=proxies)soup = BeautifulSoup(wb_data.text,'lxml')for i in range(50):data = {'Rank': soup.select('span.zg-badge-text')[i].text.strip('#'),'item_name' : soup.select('#zg-ordered-list > li > span > div > span > a > div')[i].text.strip(),'item_link' : 'https://www.amazon.com' + soup.select('#zg-ordered-list > li > span > div > span > a')[i].get('href'),'img_src' :soup.select('#zg-ordered-list > li> span > div > span > a > span > div > img')[i].get('src')}item_info.append(data)item_links.append(data['item_link'])print('finish!')get_item_info(url_page1)
get_item_info(url_page2)# 2、在商品详情页爬取更多商品信息
#item_url = 'https://www.amazon.com/Avidlove-Lingerie-Babydoll-Sleepwear-Chemise/dp/B0712188H2/ref=zg_bs_1044968_1?_encoding=UTF8&refRID=MYWGH1W2P3HNS58R4WES'
def get_item_info_2(item_url,data):wb_data = requests.get(item_url, headers=headers, proxies=proxies)soup = BeautifulSoup(wb_data.text, 'lxml')#获取price(需要判断)price = soup.select('#priceblock_ourprice')data['price'] = price[0].text if price else None# 获取star和reviews(需要判断)star = soup.select('div>div>span>span>span>a>i>span.a-icon-alt')if star:data['star'] = star[0].text.split(' ')[0]data['reviews'] = soup.select('#reviews-medley-footer > div.a-row.a-spacing-large > a')[0].text.split(' ')[2]data['Read reviews that mention'] = list(i.text.strip('\n').strip() for i in soup.select('span.cr-lighthouse-term'))else:data['star'] = Nonedata['reviews'] = Nonedata['Read reviews that mention'] = Nonedata['Date_first_listed_on_Amazon'] = soup.select('#detailBullets_feature_div > ul > li> span > span:nth-child(2)')[-1].text# 获取reviews_link(需要判断)reviews_link = soup.select('#reviews-medley-footer > div.a-row.a-spacing-large > a')if reviews_link:data['reviews_link'] = 'https://www.amazon.com' + reviews_link[0].get('href')else:data['reviews_link'] = None# 获取store和store_link (需要判断)store = soup.select('#bylineInfo')if store:data['store'] = store[0].textdata['store_link'] = 'https://www.amazon.com' + soup.select('#bylineInfo')[0].get('href')else:data['store'] = Nonedata['store_link'] = Noneitem_info_M.insert_one(data)   # 存入MongoDB数据库print(data)# 3、将商品详情写入csv文件
for i in range(100):get_item_info_2(item_links[i],item_info[i])print('已写入第{}个商品'.format(i+1))import csv
headers = ['_id','store', 'price', 'Date_first_listed_on_Amazon', 'item_link', 'reviews_link', 'reviews', 'store_link', 'item_name', 'img_src', 'Rank', 'Read reviews that mention', 'star']
with open('C:/Users/zbd/Desktop/3.csv','w',newline='',encoding='utf-8') as f:f_csv = csv.DictWriter(f,headers)f_csv.writeheader()f_csv.writerows(item_info)print('写入完毕!')
词云
path = 'C:/Users/zbd/Desktop/Amazon/fenci/'# 读取文件、分词
def get_text():f = open(path+'reviews.txt','r',encoding = 'utf-8')text = f.read().lower()                                        # 统一改为小写for i in '!@#$%^&*()_¯+-;:`~\'"<>=./?,':                       # 替换英文符号为空格text = text.replace(i,'') return text.split()                                            # 返回分词结果lst_1= get_text()  # 分词
print('总共有{}个词'.format(len(lst_1)))   # 统计总词数# 去除stop_word(常见词)stop_word_text = open(path+'stop_word.txt','r',encoding = 'utf-8')  # 读取下载的stop_word表
stop_word = stop_word_text.read().split()
stop_word_add = ['a','i','im','it鈥檚','i鈥檓','\\u0026','5鈥','reviewdate']                                                 # 可在该列表中继续添加stop_word
stop_word_new = stop_word + stop_word_add
#print(stop_word_new)
lst_2 =list(word for word in lst_1 if word not in stop_word_new)
print('去除后总共有{}个词'.format(len(lst_2)))# 统计词频
counts = {}
for i in lst_2:counts[i] = counts.get(i,0) + 1
#print(counts)word_counts = list(counts.items())
#print(word_counts)word_counts.sort(key = lambda x:x[1],reverse = True)  # 按词频降序排列# 输出结果
for i in word_counts[0:50]:print(i)# 制作词云
from scipy.misc import imread
import matplotlib.pyplot as plt
import jieba
from wordcloud import WordCloud, ImageColorGeneratorstopwords = {}
# isCN = 0 # 0:英文分词  1:中文分词
path = 'C:/Users/zbd/Desktop/Amazon/fenci/'
back_coloring_path = path + 'img.jpg'          # 设置背景图片路径
text_path = path +  'reviews.txt'               # 设置要分析的文本路径
stopwords_path = path + 'stop_word.txt'        # 停用词词表
imgname1 = path + 'WordCloudDefautColors.png'  # 保存的图片名字1(只按照背景图片形状)
imgname2 = path + 'WordCloudColorsByImg.png'   # 保存的图片名字2(颜色按照背景图片颜色布局生成)
#font_path = r'./fonts\simkai.ttf'             # 为matplotlib设置中文字体路径  ----- 主要是中文时使用back_coloring = imread(back_coloring_path)     # 设置背景图片 ---- back_coloring为3维数组wc = WordCloud(#font_path = font_path          # 设置字体background_color = 'white',    # 设置背景颜色max_words = 3000,              # 设置显示的最大词数mask = back_coloring,          # 设置背景图片max_font_size = 200,           # 设置字体最大值min_font_size = 5,             # 设置字体最小值random_state = 42,             # 随机有N种配色方案width = 1000 , height = 860 ,margin = 2 # 设置图片默认的大小,但是如果使用背景图片的话# 那么保存的图片大小会按照其大小保存,margin为词语边缘距离)#wc.generate(text)
words = {}
for i in word_counts:words['{}'.format(i[0])] = i[1]wc.generate_from_frequencies(words)
# txt_freq例子为 { word1: fre1, word2: fre2,  word3: fre3,......,  wordn: fren }plt.figure() # 以下代码只显示--------形状与背景图片一致,颜色为默认颜色的词云
plt.imshow(wc)
plt.axis("off")
plt.show()             # 绘制词云
wc.to_file(imgname1)   # 保存图片# 以下代码显示--------形状与背景图片一致,颜色也与背景图颜色一致的词云
image_colors = ImageColorGenerator(back_coloring)      # 从背景图片生成颜色值
plt.imshow(wc.recolor(color_func=image_colors))
plt.axis("off")
plt.show()
wc.to_file( imgname2) # 显示原图片
plt.figure()
plt.imshow(back_coloring, cmap=plt.cm.gray)
plt.axis("off")
plt.show() # 保存图片
数据分析部分
import pandas as pd
import numpy as np
import matplotlib.pyplot as plt
import matplotlib.colors
'''
python学习交流群:1136201545更多学习资料可以加群获取
'''
get_ipython().magic('matplotlib inline')# 0、数据读取item_info = pd.read_csv('C:/Users/zbd/Desktop/Amazon/item_info.csv', engine = 'python')
reviews_new = pd.read_csv('C:/Users/zbd/Desktop/Amazon/reviews_new.csv', engine = 'python')
print(item_info.head())
print(len(item_info))
#print(reviews_new.head())# 1、清洗数据
# 筛选出需要的列
item_info_c = item_info[['Rank','item_name','store','price','Date_first_listed_on_Amazon','star','reviews','Read reviews that mention']]# 清洗列:price
item_info_c['price'] = item_info_c['price'].str.replace('$','')
item_info_c['min_price'] = item_info_c['price'].str.split('-').str[0].astype('float')
item_info_c['max_price'] = item_info_c['price'].str.split('-').str[-1].astype('float')
item_info_c['mean_price'] = (item_info_c['max_price']+item_info_c['min_price'])/2# 清洗NaN值
def f_na(data,cols):for i in cols:data[i].fillna(data[i].mean(),inplace = True)return dataitem_info_c = f_na(item_info_c,['star','reviews','min_price','max_price','mean_price'])
item_info_c.head(5)# 2、以商家维度处理数据
a = item_info_c.groupby('store')['star'].mean().sort_values(ascending=False)                     # 商家星级均值
b = item_info_c.groupby('store')['reviews'].agg({'reviews_sum':np.sum,'reviews_mean':np.mean})    # 商家评论数总和、均值
c = item_info_c.groupby('store')['min_price'].mean()    # 商家最低价均值
d = item_info_c.groupby('store')['max_price'].mean()    # 商家最高价均值
e = item_info_c.groupby('store')['mean_price'].mean()   # 商家价格均值
e.name = 'price_mean'
f = item_info_c.groupby('store')['star'].count()        # 商家商品数量
f.name = 'item_num'
#print(a,b,c,d,e,f)df = pd.concat([a,b,e,f],axis=1)                        # 商家商品数量百分比
df['per'] = df['item_num']/100
df['per%'] = df['per'].apply(lambda x: '%.2f%%' % (x*100))# 标准化处理
def data_nor(df, *cols):for col in cols:colname = col + '_nor'df[colname] = (df[col]-df[col].min())/(df[col].max()-df[col].min()) * 10return df
# 创建函数,结果返回标准化取值,新列列名df_re = data_nor(df, 'star','reviews_mean','price_mean','item_num')
print(df_re.head(5))# 3、绘制图表fig,axes = plt.subplots(4,1,figsize = (10,15))
plt.subplots_adjust(wspace =0, hspace =0.5)# 不同商家的星级排名
df_star = df['star'].sort_values(ascending = False)
df_star.plot(kind = 'bar',color = 'yellow',grid = True,alpha = 0.5,ax =axes[0],width =0.7,ylim = [3,5],title = '不同商家的星级排名')
axes[0].axhline(df_star.mean(),label = '平均星级%.2f分' %df_star.mean() ,color = 'r' ,linestyle = '--',)
axes[0].legend(loc = 1)# 不同商家的平均评论数排名
df_reviews_mean = df['reviews_mean'].sort_values(ascending = False)
df_reviews_mean.plot(kind = 'bar',color = 'blue',grid = True,alpha = 0.5,ax =axes[1],width =0.7,title = '不同商家的平均评论数排名')
axes[1].axhline(df_reviews_mean.mean(),label = '平均评论数%i条' %df_reviews_mean.mean() ,color = 'r' ,linestyle = '--',)
axes[1].legend(loc = 1)# 不同商家的价格区间(按均价)
avg_price = (d-c)/2
avg_price.name = 'avg_price'
max_price = avg_price.copy()
max_price.name = 'max_price'df_price = pd.concat([c,avg_price,max_price,df_re['price_mean']],axis=1)
df_price = df_price.sort_values(['price_mean'],ascending = False)
df_price.drop(['price_mean'],axis =1,inplace = True)
df_price.plot(kind = 'bar',grid = True,alpha = 0.5 , ax =axes[2],width =0.7,stacked = True,color= ['white','red','blue'],ylim = [0,55],title = '不同商家的价格区间')# 不同商家的加权分排名
df_nor = pd.concat([df_re['star_nor'],df_re['reviews_mean_nor'],df_re['price_mean_nor'],df_re['item_num_nor']],axis =1)
df_nor['nor_total'] = df_re['star_nor'] + df_re['reviews_mean_nor'] + df_re['price_mean_nor'] + df_re['item_num_nor']
df_nor = df_nor.sort_values(['nor_total'],ascending = False)
df_nor.drop(['nor_total'],axis = 1,inplace = True)
df_nor.plot(kind = 'bar',grid = True,alpha = 0.5 , ax =axes[3],width =0.7,stacked = True,title = '不同商家的加权分排名')# 商家数量饼图
colors = ['aliceblue','antiquewhite','beige','bisque','blanchedalmond','blue','blueviolet','brown','burlywood','cadetblue','chartreuse','chocolate','coral','cornflowerblue','cornsilk','crimson','cyan','darkblue','darkcyan','darkgoldenrod','darkgreen','darkkhaki','darkviolet','deeppink','deepskyblue','dimgray','dodgerblue','firebrick','floralwhite','forestgreen','gainsboro','ghostwhite','gold','goldenrod']df_per = df_re['item_num']
fig,axes = plt.subplots(1,1,figsize = (8,8))
plt.axis('equal') #保证长宽相等
plt.pie(df_per , labels = df_per.index , autopct = '%.2f%%',pctdistance = 1.05 , #shadow = True ,startangle = 0 ,radius = 1.5 , colors = colors,frame = False)# 不同商家的星级/价格散点图
plt.figure(figsize=(13,8))
x = df_re['price_mean']       # x轴为均价
y = df_re['star']             # y轴为星级
s = df_re['item_num']*100     # 点大小为商品数量,商品数量越大,点越大
c = df_re['reviews_mean']*10  # 点颜色为评论均值,评论均值越大,颜色越深红
plt.scatter(x,y,marker='.',cmap='Reds',alpha=0.8,s = s,c = c)
plt.grid()
plt.title('不同商家的星级/价格散点图')
plt.xlim([0,50])
plt.ylim([3,5])
plt.xlabel('price')
plt.ylabel('star')# 绘制平均线、图例
p_mean = df_re['price_mean'].mean()
s_mean = df_re['star'].mean()
plt.axvline(p_mean,label = '平均价格%.2f$' %p_mean ,color = 'r' ,linestyle = '--',)
plt.axhline(s_mean,label = '平均星级%.2f' %s_mean ,color = 'g' ,linestyle = '-.')
plt.axvspan(p_mean, 50, ymin= (s_mean-3)/(5-3), ymax=1,alpha = 0.1,color = 'g')
plt.axhspan(0, s_mean, xmin= 0 , xmax=p_mean/50,alpha = 0.1,color = 'grey')
plt.legend(loc = 2)# 添加商家标签
for x,y,name in zip(df_re['price_mean'],df_re['star'],df_re.index):plt.annotate(name, xy=(x,y),xytext = (0, -5), textcoords = 'offset points',ha = 'center', va = 'top',fontsize = 9)# 清洗列:Read reviews that mention
df_rrtm = item_info_c['Read reviews that mention'].fillna('缺失数据',inplace =False)
df_rrtm = df_rrtm.str.strip('[')
df_rrtm = df_rrtm.str.rstrip(']')
df_rrtm = df_rrtm.str.replace('\'','')reviews_labels = []
for i in df_rrtm:reviews_labels = reviews_labels+i.split(',')
#print(reviews_labels)labels = []
for j in reviews_labels:if j != '缺失数据':labels.append(j)
#print(labels)# 统计标签词频
counts = {}
for i in labels:counts[i] = counts.get(i,0) + 1
#print(counts)label_counts = list(counts.items())
#print(word_counts)label_counts.sort(key = lambda x:x[1],reverse = True)  # 按词频降序排列print('总共%i个评论标签,Top20如下:'%len(label_counts))
print('-----------------------------')
# 输出结果
for i in label_counts[:20]:print(i)
这篇关于这是一篇让人脸红的python数据分析,嘿嘿嘿嘿嘿的文章就介绍到这儿,希望我们推荐的文章对编程师们有所帮助!


