本文主要是介绍【Proteus仿真】【Arduino单片机】RGB彩灯,希望对大家解决编程问题提供一定的参考价值,需要的开发者们随着小编来一起学习吧!
文章目录
- 一、功能简介
- 二、软件设计
- 三、实验现象
- 联系作者
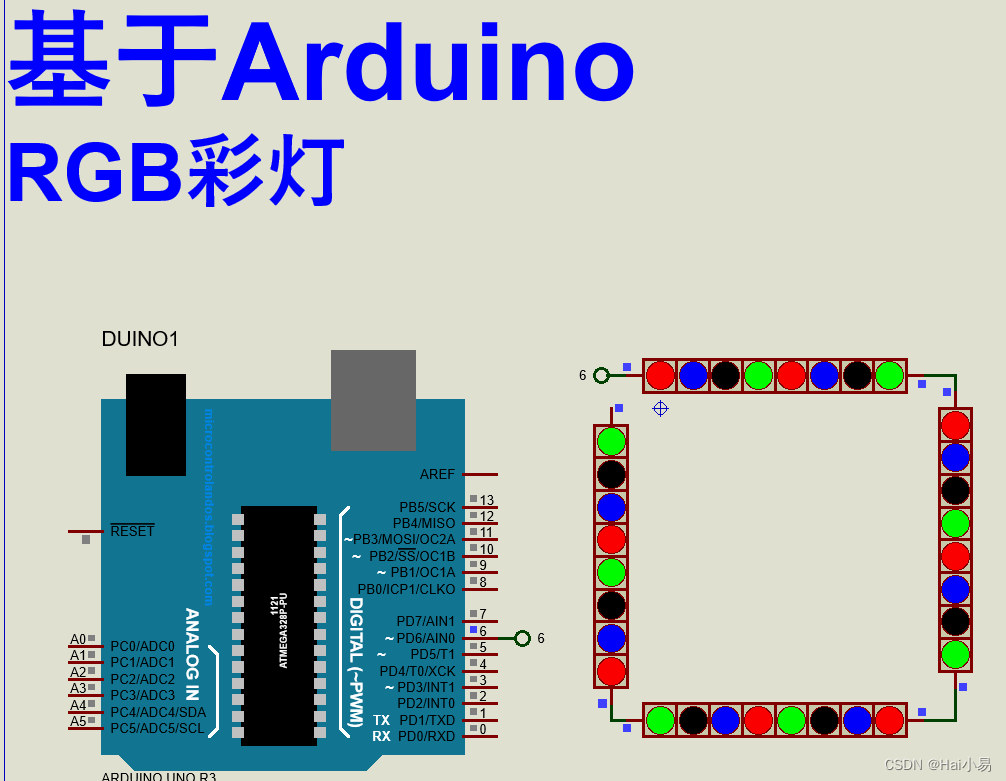
一、功能简介
本项目使用Proteus8仿真Arduino单片机控制器,使用WS2812 RGB彩灯等。
主要功能:
系统运行后,RGB彩灯花样显示。
二、软件设计
/*
作者:嗨小易(QQ:3443792007)*/#include "public.h"
#include <Adafruit_NeoPixel.h>// Which pin on the Arduino is connected to the NeoPixels?
// On a Trinket or Gemma we suggest changing this to 1:
#define LED_PIN     6// How many NeoPixels are attached to the Arduino?
#define LED_COUNT  32// NeoPixel brightness, 0 (min) to 255 (max)
#define BRIGHTNESS 250 // Set BRIGHTNESS to about 1/5 (max = 255)// Declare our NeoPixel strip object:
Adafruit_NeoPixel strip(LED_COUNT, LED_PIN, NEO_GRBW + NEO_KHZ800);
// Argument 1 = Number of pixels in NeoPixel strip
// Argument 2 = Arduino pin number (most are valid)
// Argument 3 = Pixel type flags, add together as needed:
//   NEO_KHZ800  800 KHz bitstream (most NeoPixel products w/WS2812 LEDs)
//   NEO_KHZ400  400 KHz (classic 'v1' (not v2) FLORA pixels, WS2811 drivers)
//   NEO_GRB     Pixels are wired for GRB bitstream (most NeoPixel products)
//   NEO_RGB     Pixels are wired for RGB bitstream (v1 FLORA pixels, not v2)
//   NEO_RGBW    Pixels are wired for RGBW bitstream (NeoPixel RGBW products)void setup() {strip.begin();           // INITIALIZE NeoPixel strip object (REQUIRED)strip.show();            // Turn OFF all pixels ASAPstrip.setBrightness(BRIGHTNESS);
}void loop() {// Fill along the length of the strip in various colors...colorWipe(strip.Color(255,   0,   0)     , 50); // RedcolorWipe(strip.Color(  0, 255,   0)     , 50); // GreencolorWipe(strip.Color(  0,   0, 255)     , 50); // BluecolorWipe(strip.Color(  0,   0,   0, 255), 50); // True white (not RGB white)whiteOverRainbow(75, 5);pulseWhite(5);rainbowFade2White(3, 3, 1);
}// Fill strip pixels one after another with a color. Strip is NOT cleared
// first; anything there will be covered pixel by pixel. Pass in color
// (as a single 'packed' 32-bit value, which you can get by calling
// strip.Color(red, green, blue) as shown in the loop() function above),
// and a delay time (in milliseconds) between pixels.
void colorWipe(uint32_t color, int wait) {for(int i=0; i<strip.numPixels(); i++) { // For each pixel in strip...strip.setPixelColor(i, color);         //  Set pixel's color (in RAM)strip.show();                          //  Update strip to matchdelay(wait);                           //  Pause for a moment}
}void whiteOverRainbow(int whiteSpeed, int whiteLength) {if(whiteLength >= strip.numPixels()) whiteLength = strip.numPixels() - 1;int      head          = whiteLength - 1;int      tail          = 0;int      loops         = 3;int      loopNum       = 0;uint32_t lastTime      = millis();uint32_t firstPixelHue = 0;for(;;) { // Repeat forever (or until a 'break' or 'return')for(int i=0; i<strip.numPixels(); i++) {  // For each pixel in strip...if(((i >= tail) && (i <= head)) ||      //  If between head & tail...((tail > head) && ((i >= tail) || (i <= head)))) {strip.setPixelColor(i, strip.Color(0, 0, 0, 255)); // Set white} else {                                             // else set rainbowint pixelHue = firstPixelHue + (i * 65536L / strip.numPixels());strip.setPixelColor(i, strip.gamma32(strip.ColorHSV(pixelHue)));}}strip.show(); // Update strip with new contents// There's no delay here, it just runs full-tilt until the timer and// counter combination below runs out.firstPixelHue += 40; // Advance just a little along the color wheelif((millis() - lastTime) > whiteSpeed) { // Time to update head/tail?if(++head >= strip.numPixels()) {      // Advance head, wrap aroundhead = 0;if(++loopNum >= loops) return;}if(++tail >= strip.numPixels()) {      // Advance tail, wrap aroundtail = 0;}lastTime = millis();                   // Save time of last movement}}
}void pulseWhite(uint8_t wait) {for(int j=0; j<256; j++) { // Ramp up from 0 to 255// Fill entire strip with white at gamma-corrected brightness level 'j':strip.fill(strip.Color(0, 0, 0, strip.gamma8(j)));strip.show();delay(wait);}for(int j=255; j>=0; j--) { // Ramp down from 255 to 0strip.fill(strip.Color(0, 0, 0, strip.gamma8(j)));strip.show();delay(wait);}
}void rainbowFade2White(int wait, int rainbowLoops, int whiteLoops) {int fadeVal=0, fadeMax=100;// Hue of first pixel runs 'rainbowLoops' complete loops through the color// wheel. Color wheel has a range of 65536 but it's OK if we roll over, so// just count from 0 to rainbowLoops*65536, using steps of 256 so we// advance around the wheel at a decent clip.for(uint32_t firstPixelHue = 0; firstPixelHue < rainbowLoops*65536;firstPixelHue += 256) {for(int i=0; i<strip.numPixels(); i++) { // For each pixel in strip...// Offset pixel hue by an amount to make one full revolution of the// color wheel (range of 65536) along the length of the strip// (strip.numPixels() steps):uint32_t pixelHue = firstPixelHue + (i * 65536L / strip.numPixels());// strip.ColorHSV() can take 1 or 3 arguments: a hue (0 to 65535) or// optionally add saturation and value (brightness) (each 0 to 255).// Here we're using just the three-argument variant, though the// second value (saturation) is a constant 255.strip.setPixelColor(i, strip.gamma32(strip.ColorHSV(pixelHue, 255,255 * fadeVal / fadeMax)));}strip.show();delay(wait);if(firstPixelHue < 65536) {                              // First loop,if(fadeVal < fadeMax) fadeVal++;                       // fade in} else if(firstPixelHue >= ((rainbowLoops-1) * 65536)) { // Last loop,if(fadeVal > 0) fadeVal--;                             // fade out} else {fadeVal = fadeMax; // Interim loop, make sure fade is at max}}for(int k=0; k<whiteLoops; k++) {for(int j=0; j<256; j++) { // Ramp up 0 to 255// Fill entire strip with white at gamma-corrected brightness level 'j':strip.fill(strip.Color(0, 0, 0, strip.gamma8(j)));strip.show();}delay(1000); // Pause 1 secondfor(int j=255; j>=0; j--) { // Ramp down 255 to 0strip.fill(strip.Color(0, 0, 0, strip.gamma8(j)));strip.show();}}delay(500); // Pause 1/2 second
}
三、实验现象
B站演示视频:https://space.bilibili.com/444388619
联系作者
视频地址:https://space.bilibili.com/444388619/video
专注于51单片机、STM32、国产32、DSP、Proteus、arduino、ESP32、物联网软件开发,PCB设计,视频分享,技术交流。
这篇关于【Proteus仿真】【Arduino单片机】RGB彩灯的文章就介绍到这儿,希望我们推荐的文章对编程师们有所帮助!


