本文主要是介绍suid/sgid标记位_如何在Linux上使用SUID,SGID和粘性位,希望对大家解决编程问题提供一定的参考价值,需要的开发者们随着小编来一起学习吧!

suid/sgid标记位
SUID, SGID, and Sticky Bits are powerful special permissions you can set for executables and directories on Linux. We’ll share the benefits—and potential pitfalls—of using them.
SUID,SGID和粘性位是功能强大的特殊权限,您可以在Linux上为可执行文件和目录设置这些权限。 我们将分享使用它们的好处以及潜在的陷阱。
他们已经在使用中 (They’re Already in Use)
Building security into a multiuser operating system presents several quandaries. Take the (seemingly) basic concept of passwords, for example. They all have to be stored so each time someone logs in, the system can compare the password he types to the stored copy. Obviously, as passwords are the keys to the kingdom, they must be safeguarded.
将安全性构建到多用户操作系统中会带来一些难题。 以(貌似)密码的基本概念为例。 它们都必须存储,以便每次有人登录时,系统都可以将他键入的密码与存储的副本进行比较。 显然,由于密码是通向王国的钥匙,因此必须加以保护。
On Linux, stored passwords are protected in two ways: they’re encrypted, and only someone with root privileges can access the file that contains the passwords. That might sound fine, but it presents a quandary: If only people with root privileges can access stored passwords, how do those who don’t have that access change their passwords?
在Linux上,存储的密码有两种保护方式:加密的密码,只有具有root特权的人才能访问包含密码的文件。 听起来不错,但是却带来了一个难题:如果只有具有root特权的人才能访问存储的密码,那么那些没有访问权限的人如何更改他们的密码?
提升您的地位 (Elevating Your Status)
Usually, Linux commands and programs run with the same set of permissions as the person who launches the program. When root runs the passwd command to change a password, it runs with root’s permissions. That means the passwd command can freely access the stored passwords in the /etc/shadow file.
通常,Linux命令和程序以与启动程序的人相同的权限集运行。 当root运行passwd命令更改密码时 ,它将以root的权限运行。 这意味着passwd命令可以自由访问/etc/shadow文件中存储的密码。
What would be ideal is a scheme in which anyone on the system could launch the passwd program, but have the passwd program retain root’s elevated privileges. This would empower anyone to change her own password.
理想的方案是,系统上的任何人都可以启动passwd程序,但让passwd程序保留root的提升特权。 这将使任何人都可以更改自己的密码。
The above scenario is precisely what the Set User ID bit (SUID) does. It runs programs and commands with the permissions of the file owner, rather than the permissions of the person who launches the program.
上面的情况正是“设置用户ID”位( SUID )的作用。 它以文件所有者的权限而不是启动程序的人的权限运行程序和命令 。
您正在提升程序的状态 (You’re Elevating the Program’s Status)
There is another quandary, though. The person has to be prevented from meddling with anyone else’s password. Linux incorporates the SUID scheme which allows it to run applications with a set of temporarily borrowed permissions—but that’s only half of the security story.
但是,还有另一个难题。 必须防止此人干预其他人的密码。 Linux包含SUID方案,该方案允许它使用一组临时借用的权限运行应用程序-但这仅仅是安全性的一半。
The control mechanism that prevents someone from working with another person’s password is contained within the passwd program, not the operating system and the SUID scheme.
防止某人使用他人密码的控制机制包含在passwd程序中,而不是操作系统和SUID方案中。
Programs that run with elevated privileges can pose security risks if they’re not created with a “security by design” mindset. That means security is the first thing you consider, and then you build on that. Don’t write your program, and then try to give it a coat of security afterward.
如果没有以“设计安全”的思想来创建以提升的特权运行的程序,则可能会带来安全风险。 这意味着您首先要考虑安全性,然后再以此为基础。 不要编写您的程序,然后再尝试对其进行保护。
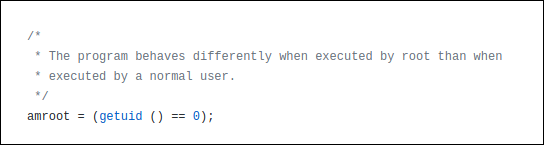
The biggest advantage of open source software is you can look at the source code yourself or refer to trusted peer-reviews of it. In the source code for the passwd program, there are checks, so you can see whether the person running the program is root. Different capabilities are allowed if someone is root (or someone using sudo).
开源软件的最大优点是您可以自己查看源代码,也可以参考受信任的同行评审。 在passwd程序的源代码中,进行了检查,因此您可以查看运行该程序的人员是否是root 。 如果某人是root (或某人使用sudo ),则允许使用不同的功能。
This is the code that detects whether someone is root.
这是检测某人是否为root的代码。
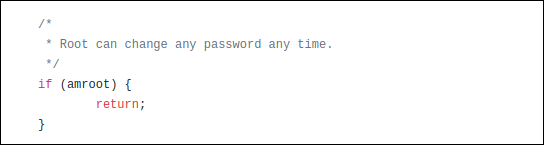
The following is an example in which that’s taken into account. Because root can change any password, the program doesn’t have to bother with the checks it usually performs to see which passwords the person has permission change. So, for root, it skips those checks and exits the checking function.
以下是考虑了该示例的示例。 由于root可以更改任何密码,因此该程序不必费心通常检查以查看该人具有更改权限的密码。 因此,对于root ,它将跳过那些检查并退出检查功能 。
With the core Linux commands and utilities, you can be confident they’ve got security baked into them and that the code has been reviewed many times. Of course, there’s always the threat of as-yet-unknown exploits. However, patches or updates are quick to appear to counter any newly identified vulnerabilities.
借助核心的Linux命令和实用程序,您可以确信它们已经融入了安全性,并且代码已被多次审查。 当然,总是存在尚未被利用的威胁。 但是,修补程序或更新很快就会出现,以应对任何新发现的漏洞。
It’s third-party software—especially any that isn’t open-source—you need to be extremely careful about using SUID with. We’re not saying don’t do it, but, if you do, you want to make sure it won’t expose your system to risk. You don’t want to elevate the privileges of a program that isn’t going to correctly self-govern itself and the person running it.
它是第三方软件(尤其是非开源软件),在使用SUID时需要格外小心。 我们并不是说不要这样做,但是,如果您这样做,则要确保它不会使系统面临风险。 您不想提升某个程序的特权,而该特权将无法正确地自我管理自己和运行该程序的人。
使用SUID的Linux命令 (Linux Commands That Use SUID)
The following are a few of the Linux commands that use the SUID bit to give the command elevated privileges when run by a regular user:
以下是一些Linux命令,这些命令在普通用户运行时使用SUID位赋予命令提升的特权:
ls -l /bin/su
ls -l /bin/ping
ls -l /bin/mount
ls -l /bin/umount
ls -l /usr/bin/passwd
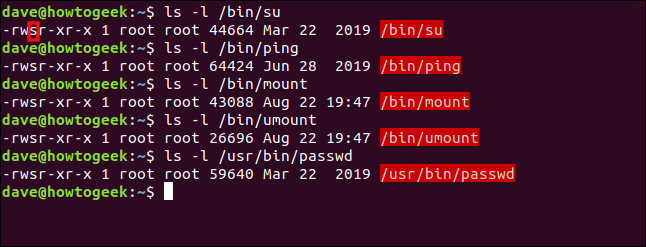
Note the filenames are highlighted in red, which indicates the SUID bit is set.
请注意,文件名以红色突出显示,表明SUID位置1。
The permissions on a file or directory are usually represented by three groups of three characters: rwx. These stand for read, write and execute. If the letters are present, that permission has been granted. If a hyphen (-) instead of a letter is present, though, that permission hasn’t been given.
文件或目录的权限通常由三个字符的三个组表示:rwx。 这些代表读取,写入和执行。 如果出现字母,则表示已授予该权限。 但是,如果出现连字符( - )而不是字母,则未授予该权限。
There are three groups of these permissions (from left to right): those for the owner of the file, for members of the file’s group, and for others. When the SUID bit is set on a file, an “s” represents the owner’s execute permission.
这些权限分为三组(从左到右):文件所有者,文件组成员和其他人。 当文件上的SUID位置1时,“ s”表示所有者的执行许可。
If the SUID bit is set on a file that doesn’t have executable capabilities, an uppercase “S” denotes this.
如果在没有可执行功能的文件上设置了SUID位,则大写的“ S”表示这一点。
We’ll take a look at an example. Regular user dave types the passwd command:
我们来看一个例子。 普通用户dave键入passwd命令:
passwd

The passwd command prompts dave for his new password. We can use the ps command to see the details of running processes.
passwd命令提示dave输入新密码。 我们可以使用ps命令查看正在运行的进程的详细信息 。
We’ll use ps with grep in a different terminal window and look for the passwd process. We’ll also use the -e (every process) and -f (full-format) options with ps.
我们将在另一个终端窗口中将ps与grep 一起使用,并查找passwd进程。 我们还将在ps使用-e (每个进程)和-f (完整格式)选项。
We type the following command:
我们输入以下命令:
ps -e -f | grep passwd
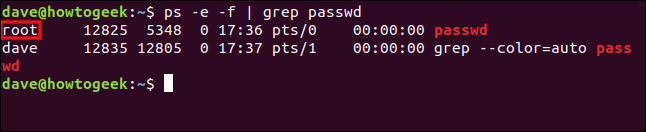
Two lines are reported, the second of which is the grep process looking for commands with the string “passwd” in them. It’s the first line that interests us, though, because that’s the one for the passwd process dave launched.
报告了两行,第二行是grep进程,在其中查找带有字符串“ passwd”的命令。 但是,这是我们感兴趣的第一行,因为那是dave发起的passwd进程的那一行。
We can see the passwd process runs the same as it would if root had launched it.
我们可以看到passwd进程的运行与root启动时的运行相同。
设置SUID位 (Setting the SUID Bit)
It’s easy to change the SUID bit with chmod. The u+s symbolic mode sets the SUID bit and the u-s symbolic mode clears the SUID bit.
使用chmod更改SUID位很容易。 u+s符号模式将SUID位置1,而us符号模式将SUID位清零。
To illustrate some of the concepts of the SUID bit, we created a small program called htg. It’s in the root directory of the dave user, and it doesn’t have the SUID bit set. When it’s executed, it displays the real and effective user IDs (UID).
为了说明SUID位的一些概念,我们创建了一个名为htg的小程序。 它在dave用户的根目录中,并且没有设置SUID位。 执行后,它会显示真实和有效的用户ID( UID )。
The real UID belongs to the person who launched the program. The effective ID is the account the program is behaving as though it had been launched by.
真正的UID属于启动程序的人。 有效ID是该程序被启动时所执行的帐户。
We type the following:
我们输入以下内容:
ls -lh htg
./htg
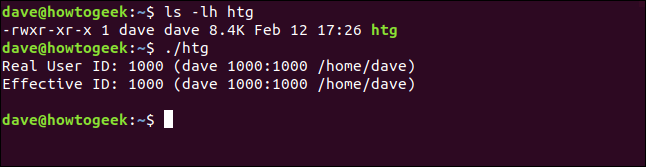
When we run the local copy of the program, we see the real and effective IDs are both set to dave. So, it’s behaving just as a normal program should.
当我们运行程序的本地副本时,我们看到实际ID和有效ID都设置为dave 。 因此,它的行为就像普通程序一样。
Let’s copy it to the /usr/local/bin directory so others can use it.
让我们将其复制到/usr/local/bin目录,以便其他人可以使用它。
We type the following, using chmod to set the SUID bit, and then check that it’s been set:
我们使用chmod设置SUID位,键入以下内容,然后检查是否已设置:
sudo cp htg /usr/local/bin
sudo chmod u+s /usr/local/bin/htg
ls -hl /usr/local/bin/htg
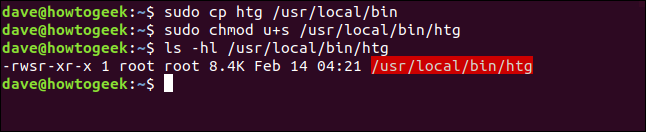
So, the program is copied, and the SUID bit is set. We’ll run it again, but this time we’ll run the copy in the /usr/local/bin folder:
因此,将程序复制,并将SUID位置1。 我们将再次运行它,但是这次我们将在/usr/local/bin文件夹中运行副本:
htg

Even though dave launched the program, the effective ID is set to the root user. So, if mary launches the program, the same thing happens, as shown below:
即使dave启动了该程序,有效ID仍设置为root用户。 因此,如果mary启动该程序,则会发生相同的情况,如下所示:
htg

The real ID is mary, and the effective ID is root. The program runs with the permissions of the root user.
真实ID为mary ,有效ID为root 。 该程序在root用户的权限下运行。
SGID位 (The SGID Bit)
The Set Group ID (SGID) bit is very similar to the SUID bit. When the SGID bit is set on an executable file, the effective group is set to the group of the file. The process runs with the permissions of the members of the file’s group, rather than the permissions of the person who launched it.
设置组ID( SGID )位与SUID位非常相似。 当在可执行文件上将SGID位置1时,有效组将设置为文件的组。 该过程以文件组成员的权限而不是启动文件的人的权限运行。
We tweaked our htg program so it shows the effective group, too. We’ll change the group of the htg program to be user mary‘s default group, mary. We’ll also use the u-s and g+s symbolic modes with chown to remove the SUID bit and set the SGID.
我们调整了htg程序,使其也显示了有效的分组。 我们将htg程序的组更改为用户mary的默认组mary 。 我们还将使用带有chown的us和g+s符号模式来删除SUID位并设置SGID 。
To do so, we type the following:
为此,我们键入以下内容:
sudo chown root:mary /usr/local/bin/htg
sudo chmod u-s,g+s /usr/local/bin/htg
ls -lh /usr/local/bin/htg
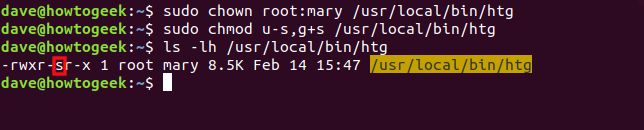
You can see the SGID bit denoted by the “s” in the group permissions. Also, note the group is set to mary and the file name is now highlighted in yellow.
您可以在组权限中看到由“ s”表示的SGID位。 另外,请注意,该组设置为mary ,文件名现在以黄色突出显示。
Before we run the program, let’s establish which groups dave and mary belong to. We’ll use the id command with the -G (groups) option, to print all group IDs. Then, we’ll run the htg program as dave.
在运行程序之前,让我们确定dave和mary属于哪个组。 我们将id命令与-G (组)选项一起使用, 以打印所有组ID 。 然后,我们将把htg程序作为dave运行。
We type the following commands:
我们键入以下命令:
id -G dave
id -G mary
htg
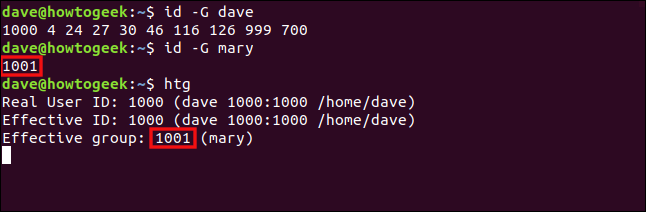
The ID of the default group for mary is 1001, and the effective group of the htg program is 1001. So, although it was launched by dave, it’s running with the permissions of the members in the mary group. It’s the same as if dave had joined the mary group.
mary的默认组的ID是1001,而htg程序的有效组是1001。因此,尽管它是由dave启动的,但它正在mary组中的成员的权限下运行。 就像dave加入了mary小组一样。
Let’s apply the SGID bit to a directory. First, we’ll create a directory called “work,” and then change its group to “geek.” We’ll then set the SGID bit on the directory.
让我们将SGID位应用于目录。 首先,我们将创建一个名为“ work”的目录,然后将其组更改为“ geek”。 然后,我们将目录上的SGID位置1。
When we use ls to check the settings of the directory, we’ll also use the -d (directory) option so we see the details of the directory, not its contents.
当使用ls检查目录的设置时,我们还将使用-d (目录)选项,以便我们看到目录的详细信息,而不是目录的内容。
We type the following commands:
我们键入以下命令:
sudo mkdir work
sudo chown dave:geek work
sudo chmod g+s work
ls -lh -d work
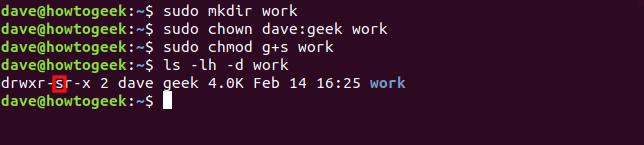
The SGID bit and “geek” group are set. These will affect any items created within the work directory.
SGID位和“怪胎”组已设置。 这些将影响在work目录中创建的所有项目。
We type the following to enter the work directory, create a directory called “demo,” and check its properties:
我们输入以下内容进入work目录,创建一个名为“ demo”的目录,并检查其属性:
cd work
mkdir demo
ls -lh -d demo

The SGID bit and “geek” group are automatically applied to the “demo” directory.
SGID位和“怪胎”组自动应用于“ demo”目录。
Let’s type the following to create a file with the touch command and check its properties:
让我们键入以下内容以使用touch命令创建文件并检查其属性:
touch useful.sh
ls -lh useful.sh

The group of the new file is automatically set to “geek.”
新文件的组自动设置为“极客”。
粘性位 (The Sticky Bit)
The sticky bit gets its name from its historical purpose. When set on an executable, it flagged to the operating system that the text portions of the executable should be held in swap, making their re-use faster. On Linux, the sticky bit only affects a directory—setting it on a file wouldn’t make sense.
粘性位源于其历史目的。 当在可执行文件上设置该文件时,它会向操作系统发出标记,指出可执行文件的文本部分应保持交换状态 ,从而使它们的重用速度更快。 在Linux上,粘滞位仅影响目录-将其设置在文件上没有意义。
When you set the sticky bit on a directory, people can only delete files that belong to them within that directory. They can’t delete files that belong to someone else, no matter which combination of file permissions are set on the files.
当您在目录上设置粘性位时,人们只能删除该目录内属于它们的文件。 无论文件上设置了哪种文件权限,他们都无法删除属于他人的文件。
This allows you to create a directory that everyone—and the processes they launch—can use as shared file storage. The files are protected because, again, no one can delete anyone else’s files.
这使您可以创建一个目录,每个人及其启动的进程都可以用作共享文件存储。 这些文件受到保护,因为没有人可以删除其他任何人的文件。
Let’s create a directory called “shared.” We’ll use the o+t symbolic mode with chmod to set the sticky bit on that directory. We’ll then look at the permissions on that directory, as well as the /tmp and /var/tmp directories.
让我们创建一个名为“共享”的目录。 我们将使用带有chmod的o+t符号模式在该目录上设置粘性位。 然后,我们将查看该目录以及/tmp和/var/tmp目录的权限。
We type the following commands:
我们键入以下命令:
mkdir shared
sudo chmod o+t shared
ls -lh -d shared
ls -lh -d /tmp
ls -lh -d /var/tmp
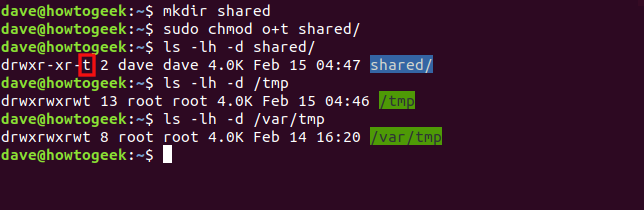
If the sticky bit is set, the executable bit of the “other” set of file permissions is set to “t.” The file name is also highlighted in blue.
如果设置了sticky位,则“其他”文件权限集的可执行位将设置为“ t”。 文件名也以蓝色突出显示。
The /tmp and /var/tmp folders are two examples of directories that have all the file permissions set for the owner, group, and others (that’s why they’re highlighted in green). They’re used as shared locations for temporary files.
/tmp和/var/tmp文件夹是目录的两个示例,这些目录具有为所有者,组和其他所有者设置的所有文件权限(这就是为什么它们以绿色突出显示的原因)。 它们用作临时文件的共享位置。
With those permissions, anyone should, theoretically, be able to do anything. However, the sticky bit overrides them, and no one can delete a file that doesn’t belong to him.
有了这些许可,理论上任何人都应该能够做任何事情。 但是,粘性位会覆盖它们,并且没有人可以删除不属于他的文件。
提醒事项 (Reminders)
The following is a quick checklist of what we covered above for future reference:
以下是我们上面介绍的内容的快速清单,以供将来参考:
SUIDonly works on files.SUID仅适用于文件。You can apply
SGIDto directories and files.您可以将
SGID应用于目录和文件。- You can only apply the sticky bit to directories. 您只能将粘性位应用于目录。
If the “
s“, “g“, or “t” indicators appear in uppercase, the executable bit (x) hasn’t been set.如果“
s”,“g”或“t”指示符以大写字母出现,则说明可执行位(x)未设置。
翻译自: https://www.howtogeek.com/656646/how-to-use-suid-sgid-and-sticky-bits-on-linux/
suid/sgid标记位
这篇关于suid/sgid标记位_如何在Linux上使用SUID,SGID和粘性位的文章就介绍到这儿,希望我们推荐的文章对编程师们有所帮助!


