本文主要是介绍Vue源码分析4 ---- depend和watcher数据监听,希望对大家解决编程问题提供一定的参考价值,需要的开发者们随着小编来一起学习吧!
前面Array数据帧检测说完,下面接着说Vue数据侦测具体实现过程。下面我们说depend和watcher数据监听。
注意,本教程源码接着下面这个链接数据侦测变化继续写
Watcher和 Dep 定义
Watcher类是用来实时检测数据变化,并且通知dom变化。Watcher是一个中介,数据变化时通过Watcher中转,通知组件
Dep用来管理所有依赖
设计思路

看到这里,估计大都数小伙伴雾里看花。下面我们用代码手把手实现上面步骤。
1.实现 Dep 和Watcher类
把依赖手机的代码封装成一个Dep类,它专门用于管理依赖,每个Observer的实例,成员中都有一个Dep的实例
先创建 dep.js 文件
class Dep{constructor(arg) {console.log("I am Dep");}
}
然后在创建 Watcher.js 文件
class Watcher{constructor(arg) {console.log("I am watcher");}
}
修改index.html文件
<!DOCTYPE html>
<html><head><meta charset="utf-8"><title></title><script src="./index.js" type="text/javascript" charset="utf-8"></script><script src="arry.js" type="text/javascript" charset="utf-8"></script><script src="dep.js" type="text/javascript" charset="utf-8"></script><script src="watcher.js" type="text/javascript" charset="utf-8"></script></head><body></body><script type="text/javascript">var Student ={name:"Tony",year:20,grade:{math:100,chinese:45},number:[12,23,23,[123,4324,423423]]}// defineReactive(Student,"name");observe(Student);console.log(Student);// console.log(Student.number[0]);// console.log(Student.number.splice(1,0,"213"));// console.log("Student.number.pop",Student.number.push([1,2,3]));// Student.name ="Janny";// console.log(Student.name);// Student.grade.math =20;// console.log(arrayMethods)</script>
</html>
在这里插入代码片
接着修改index.js 里面 defineReactive 函数, 源码下载地址
function defineReactive(obj, key, val) {console.log("我是defineReactive", obj, key);const dep = new Dep();if (arguments.length == 2) {val = obj[key];}var childOb = observe(val);Object.defineProperty(obj, key, {enumerable: true,configurable: true,get(){console.log('%s 属性被读取了', key);return val;},set(newVal) {console.log('%s 属性被写入', key, newVal);if (val === newVal) {return;}val = newVal;childOb = observe(val);//发布订阅模式dep.notify();}})
};
在 Observer 类 constructor 函数里面我们添加一行
this.dep=new Dep();
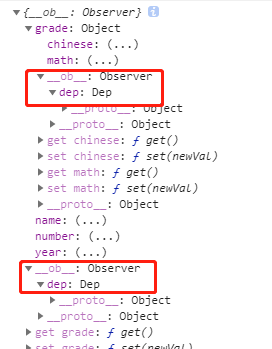
然后执行以上代码在浏览器console可以看到,每一层 Object.__ob__ 都包含dep属性

我们再看流程图,我们当数据更新时,需要通知依赖,因此我们这里添加Dep.notify方法,并且在setter里面调用通知
先修改 dep.js文件夹,添加notify属性
class Dep{constructor(arg) {console.log("I am Dep");}notify(){console.log("I am Dep notify");}
}
然后修改index.js文件,修改defineReactive 方法,在set添加调用notify方法
function defineReactive(obj, key, val) {console.log("我是defineReactive", obj, key);const dep = new Dep();if (arguments.length == 2) {val = obj[key];}var childOb = observe(val);Object.defineProperty(obj, key, {enumerable: true,configurable: true,get(){console.log('%s 属性被读取了', key);return val;},set(newVal) {console.log('%s 属性被写入', key, newVal);if (val === newVal) {return;}val = newVal;childOb = observe(val);//发布订阅模式dep.notify();}})
};
然后在浏览器console输入 Student.name="GoGo",发现成功调用notify。说明object类通知依赖成功。

同样,我们在数组 array.js文件 Object.defineProperty 方法添加 ob.dep.notify(); 实现数组通知
methodToPatch.forEach(function(method) {console.log("forEach", method);const original = arrayProto[method];Object.defineProperty(arrayMethods, method, {emumerable: false,configurable: true,writable: true,value: function mutor(...args) {console.log("...args", ...args);const ob = this.__ob__;let inserted = [];switch (method) {case "push":case "unshift":inserted = args;break;case "splice":inserted =args.slice(2);//取splice第二个参数console.log("args:",args)console.log("inserted:",inserted)break;}if(inserted){ob.obserArray(inserted);}const result = original.apply(this, args);ob.dep.notify();return result;}})
})
到此为止我们大概写了Dep和Watcher核心框架,下面我们开始实现这两个类的核心代码。
然后我们继续写在Watcher 在Dep中读取数据,所以在原来 dep.js文件中添加以下代码
var uid = 0;
class Dep{constructor(arg) {console.log("I am Dep");this.id=uid++;this.subs = [];//这个数组里面放watcher实例}addSub(sub){this.subs.push(sub);}depend(){console.log("depend被调用了")if(Dep.target){console.log("Dep.target");this.addSub(Dep.target);}}notify(){console.log("I am Dep notify");}
}
在上面代码钟,我们在Dep内放一个subs属性,用于存watcher属性。
然后depend函数,用于watcher读取数据。
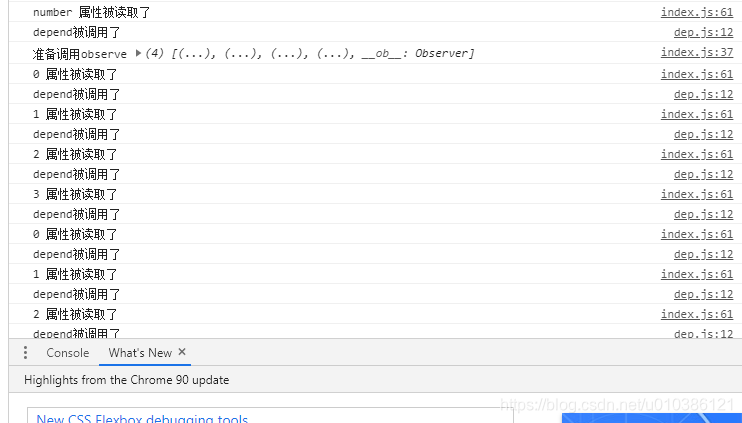
执行以上代码,我们发现每次getter读取数据,都会depend一次

接着我们在 Watcher 类继续添加源码。
首先我们先了解 parsePath 函数,改函数源码是,目的是获取相对于object对象的值。
function parsePath(str){var segments=str.split('.');console.log(segments,segments.length);return (obj)=>{for(let i=0;i<segments.length;i++){if(!obj) return;obj = obj[segments[i]]console.log("obj",obj);}return obj;};}
例如,想看以下代码,创建一个parsePath.html文件,输入以下代码
<!DOCTYPE html>
<html><head><meta charset="utf-8"><title></title></head><body></body><script type="text/javascript">var str='grade.math';var student={name:"fyy",age:14,grade:{Chinese:100,math:90},sanwei:{heigh:30,weigh:40}}var fn =parsePath(str);console.log(fn)fn(student)function parsePath(str){var segments=str.split('.');console.log(segments,segments.length);return (obj)=>{for(let i=0;i<segments.length;i++){if(!obj) return;obj = obj[segments[i]]console.log("obj",obj);}return obj;};}</script>
</html>
执行以上程序,可以看到运行结果是

说明可以得到strudent.grade.math的参数为90,填入parsePath位字符串。
下面我们具体写Watcher 类,
var uid = 0;
class Watcher{constructor(target,expression,callback) {console.log("I am watcher");this.id= uid++;this.target = target;this.getter = parsePath(expression);this.callback=callback;this.value = this.get();//触发上面this.getter}get(){console.log("I am Watcher get");//进入依赖收集阶段,让全局Dep.target 设置为Watcher本身,那么就是进入依赖收集阶段Dep.target=this;console.log("开始传递参数 Dep.target");const obj =this.target;console.log("this.target",obj);var value;try{value =this.getter(obj);console.log("get value",value);}catch(e){//TODO handle the exceptionconsole.log("can not find",obj,e)}finally{Dep.target=null;}}return value
}function parsePath(str){var segements =str.split('.');return (obj)=>{for(let i =0 ; i < segements.length; i++){if(!obj)return;obj = obj[segements[i]]}console.log("parsePath",obj)return obj;}}
然后我们在index.html代码改成
<!DOCTYPE html>
<html><head><meta charset="utf-8"><title></title><script src="./index.js" type="text/javascript" charset="utf-8"></script><script src="arry.js" type="text/javascript" charset="utf-8"></script><script src="dep.js" type="text/javascript" charset="utf-8"></script><script src="watcher.js" type="text/javascript" charset="utf-8"></script></head><body></body><script type="text/javascript">var Student ={name:"Tony",year:20,grade:{math:100,chinese:45},number:[12,23,23,[123,4324,423423]]}// defineReactive(Student,"name");observe(Student);console.log(Student);new Watcher(Student,'grade.math',(val,oldValue)=>{console.log("五星好评")console.log("watching",val,oldValue);});</script>
</html>
执行以上代码,可以得到

可以看到,当我们创建Watcher类的时候,参数输入需要监听的对象,参数和方法。实际上会调用Watcher.get()方法,该方法会触发对应属性 Object.defineProperty 的get方法,从而收集依赖,下面这张图可以说明Watcher如何读取数据。
这里Dep.target就是图中Window.target。

另外我们可以看到Dep.targe 是一个全局变量,存储Watcher.constructor属性。

到此为止,我们把依赖收集,依赖通知,还有Watcher读取数据已经实现了,剩下是依赖通知Watcher更新数据(notify)。
然后我们在 Wathcer类添加 update,run和getAndInvoke方法。其中getAndInvoke是核心,用于或者object对象的值并且调用callback回调函数
update(){console.log("I am watcher update ");this.run();}run(){this.getAndInvoke(this.callback);}getAndInvoke(cb){console.log("getAndInvoke");const value =this.get();if(value!==this.value || typeof value == 'object'){const oldValue = this.value;this.value=value;cb.callback(this.target,value,oldValue)}console.log(value);}
然后我们完善Dep类notify函数。
notify(){console.log("I am Dep notify");const subs= this.subs.slice();//浅克隆一份;for(let i=0,l=subs.length;i<l;i++){subs[i].update();console.log("subs[i]",i,subs[i]);}该函数是通过Dep.notify通知Wathcer更新。
最后我们开始执行以下html代码
<!DOCTYPE html>
<html><head><meta charset="utf-8"><title></title><script src="./index.js" type="text/javascript" charset="utf-8"></script><script src="arry.js" type="text/javascript" charset="utf-8"></script><script src="dep.js" type="text/javascript" charset="utf-8"></script><script src="watcher.js" type="text/javascript" charset="utf-8"></script></head><body></body><script type="text/javascript">var Student ={name:"Tony",year:20,grade:{math:100,chinese:45},number:[12,23,23,[123,4324,423423]]}// defineReactive(Student,"name");observe(Student);console.log(Student);new Watcher(Student,'grade.math',(val,oldValue)=>{console.log("五星好评")console.log("watching",val,oldValue);});Student.grade.math=300;</script>
</html>
最后查看执行结果:

以上就是Dep和watcher实现方法,估计看到这里读者依然不懂,在这里我只是提供思路还有重写步骤方法,建议您自己重写一次,再次看这篇教程才会深有体会。
结论
依赖就是Wather。只有Watcher触发的getter才会收集依赖,哪个Watcher触发了getter,就把哪个watcher收集到Dep中。
Dep使用发布订阅模式,当数据发生变化时,会循环依赖列表,把所有的Watcher都通知一遍。
Watcher 把自己设置到全局的一个指定文职,然后读取数据,因为读取了数据,所以会触发这个数据的getter。在getter中就能得到当前正在读取数据watcher,并把这个Watcher收集到Dep 中
以下链接是本教程所有源码 dep和watcher源码地址
这篇关于Vue源码分析4 ---- depend和watcher数据监听的文章就介绍到这儿,希望我们推荐的文章对编程师们有所帮助!


