本文主要是介绍css3flexbox布局_使用CSS网格和Flexbox构建Trello布局,希望对大家解决编程问题提供一定的参考价值,需要的开发者们随着小编来一起学习吧!
css3flexbox布局
In this tutorial, I’ll walk you through an implementation of the basic layout of a Trello board screen (see example here). This is a responsive, CSS-only solution, and only the structural features of the layout will be developed.
在本教程中,我将引导您实现Trello面板屏幕的基本布局的实现( 请参见此处的示例 )。 这是一个仅CSS的响应式解决方案,将仅开发布局的结构特征。
For a preview, here is a CodePen demo of the final result.
要进行预览,请参见最终结果的CodePen演示 。
Besides Grid Layout and Flexbox, the solution employs calc and viewport units. To make the code more readable and efficient, I’ll also take advantage of Sass variables.
除了Grid Layout和Flexbox之外 ,该解决方案还使用calc和viewport单位 。 为了使代码更具可读性和效率,我还将利用Sass变量 。
No fallbacks are provided, so make sure to run the code in a supporting browser. Without further ado, let’s dive in, developing the screen components one by one.
没有提供任何备用,因此请确保在支持的浏览器中运行代码。 事不宜迟,让我们开始深入研究,一步一步地开发屏幕组件。
屏幕布局 (The Screen Layout)
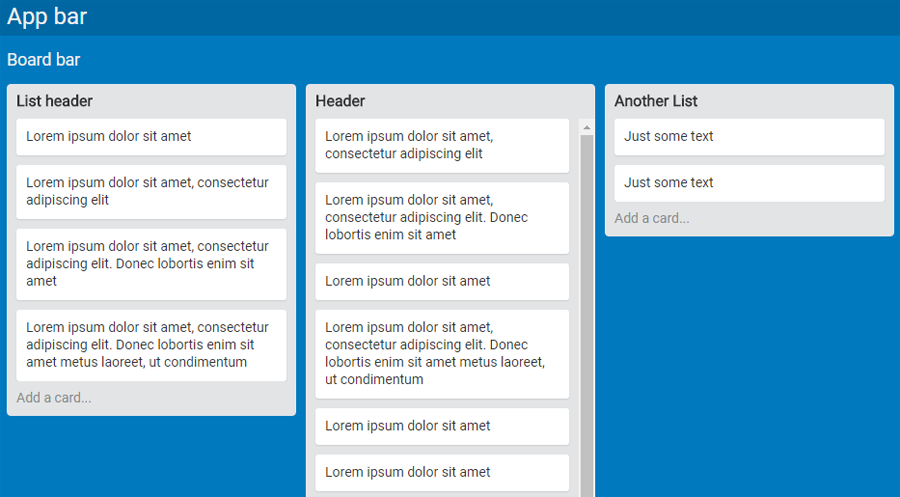
The screen of a Trello board consists of an app bar, a board bar, and a section containing the card lists. I’ll build this structure with the following markup skeleton:
Trello面板的屏幕包括一个应用程序栏,一个面板栏和一个包含卡列表的部分。 我将使用以下标记框架构建此结构:
<div class="ui">
<nav class="navbar app">...</nav>
<nav class="navbar board">...</nav>
<div class="lists">
<div class="list">
<header>...</header>
<ul>
<li>...</li>
...
<li>...</li>
</ul>
<footer>...</footer>
</div>
</div>
</div>
This layout will be achieved with a CSS Grid. Specifically, a 3×1 grid (that is, one column and three rows). The first row will be for the app bar, the second for the board bar, and the third for the .lists element.
此布局将通过CSS网格实现。 具体而言,是3×1的网格(一列三行)。 第一行用于应用程序栏,第二行用于开发板栏,第三行用于.lists元素。
The first two rows each have a fixed height, while the third row will span the rest of the available viewport height:
前两行各有一个固定的高度,而第三行将跨越其余可用视口的高度:
.ui {
height: 100vh;
display: grid;
grid-template-rows: $appbar-height $navbar-height 1fr;
}
Viewport units ensure that the .ui container will always be as tall as the browser’s viewport.
视口单位可确保.ui容器始终与浏览器的视口一样高。
A grid formatting context is assigned to the container, and the grid rows and columns specified above are defined. To be more precise, only the rows are defined because there is no need to declare the unique column. The sizing of the rows is done with a couple of Sass variables for the height of the bars and the fr unit to make the height of the .lists element span the rest of the available viewport height.
将网格格式设置上下文分配给容器,并定义了上面指定的网格行和列。 更准确地说,仅定义行,因为无需声明唯一列。 行的大小是通过几个Sass变量来实现的,它们分别是条形的高度和fr单位,以使.lists元素的高度跨越其余可用视口高度。
卡清单部分 (The Card Lists Section)
As mentioned, the third row of the screen grid hosts the container for the card lists. Here’s the outline of its markup:
如前所述,屏幕网格的第三行托管卡片列表的容器。 这是其标记的概述:
<div class="lists">
<div class="list">
...
</div>
...
<div class="list">
...
</div>
</div>
I’m using a full viewport-width Flexbox single-line row container to format the lists:
我正在使用完整的视口宽度Flexbox单行行容器来格式化列表:
.lists {
display: flex;
overflow-x: auto;
> * {
flex: 0 0 auto; // 'rigid' lists
margin-left: $gap;
}
&::after {
content: '';
flex: 0 0 $gap;
}
}
Assigning the auto value to the overflow-x property tells the browser to display a horizontal scrollbar at the bottom of the screen when the lists don’t fit in the width provided by the viewport.
将自动值分配给overflow-x属性,可以使浏览器在列表不适合视口提供的宽度时在屏幕底部显示水平滚动条。
The flex shorthand property is used on the flex items to make the lists rigid. The auto value for flex-basis (used in the shorthand) instructs the layout engine to read the size from the .list element’s width property, and the zero values for flex-grow and flex-shrink prevent the alteration of this width.
flex速记属性用于flex项目以使列表变硬 。 flex-basis的自动值(用于简写)指示布局引擎从.list元素的width属性读取大小,而flex-grow和flex-shrink的零值可防止更改此宽度。
Next I’ll need to add a horizontal separation between the lists. If a right margin on the lists is set, then the margin after the last list in a board with horizontal overflowing is not rendered. To fix this, the lists are separated by a left margin and the space between the last list and the right viewport edge is handled by adding an ::after pseudo-element to each .lists element. The default flex-shrink: 1 must be overridden otherwise the pseudo-element ‘absorbs’ all the negative space and it vanishes.
接下来,我需要在列表之间添加水平分隔。 如果在列表上设置了右边距,则不会呈现具有水平溢出的电路板中最后一个列表之后的边距。 为了解决这个问题,列表由左边缘隔开,最后一个列表和右视口边缘之间的空间通过向每个.lists元素添加::after伪元素来.lists 。 默认的flex-shrink: 1必须被覆盖flex-shrink: 1否则伪元素会“吸收”所有负空间并消失。
Note that on Firefox < 54 an explicit width: 100% on .lists is needed to ensure the correct layout rendering.
请注意,在<54的Firefox上,显式width: 100%在.lists上需要width: 100%以确保正确的布局呈现。
卡清单 (The Card List)
Each card list is made up of a header bar, a sequence of cards, and a footer bar. The following HTML snippet captures this structure:
每个卡列表由一个标题栏,一系列卡和一个页脚栏组成。 以下HTML代码段捕获了此结构:
<div class="list">
<header>List header</header>
<ul>
<li>...</li>
...
<li>...</li>
</ul>
<footer>Add a card...</footer>
</div>
The crucial task here is how to manage the height of a list. The header and footer have fixed heights (not necessarily equal). Then there are a variable number of cards, each one with a variable amount of content. So the list grows and shrinks vertically as cards are added or removed.
这里的关键任务是如何管理列表的高度。 页眉和页脚具有固定的高度(不一定相等)。 然后有可变数量的卡,每张卡具有不同的内容量。 因此,随着卡片的添加或移除,列表会垂直增加和缩小。
But the height cannot grow indefinitely, it needs to have an upper limit that depends on the height of the .lists element. Once this limit is reached, I want a vertical scrollbar to appear to allow access to the cards that overflow the list.
但是高度不能无限增长,它需要有一个上限,该上限取决于.lists元素的高度。 一旦达到此限制,我希望出现一个垂直滚动条,以允许访问溢出列表的卡。
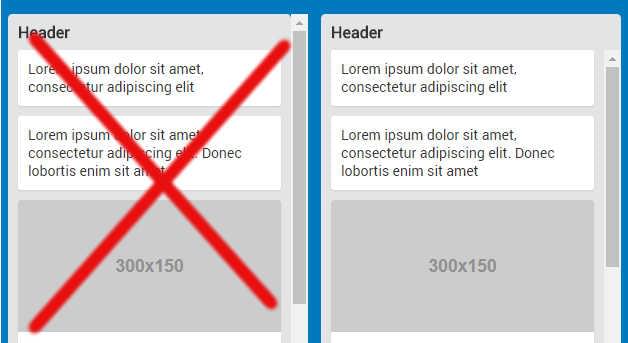
This sounds like a job for the max-height and overflow properties. But if these properties are applied to the root container .list, then, once the list reaches its maximum height, the scrollbar appears for all .list elements, header and footer included. The following illustration shows the wrong sidebar on the left and the correct one on the right:
这听起来像是max-height和overflow属性的工作。 但是,如果将这些属性应用于根容器.list ,则一旦列表达到其最大高度,就会为所有.list元素(包括页眉和页脚)显示滚动条。 下图在左侧显示了错误的侧边栏,在右侧显示了正确的侧边栏:
So, let’s instead apply the max-height constraint to the inner <ul>. Which value should be used? The heights of the header and the footer must be subtracted from the height of the list parent container (.lists):
因此,让我们将max-height约束应用于内部<ul> 。 应该使用哪个值? 必须从列表父容器( .lists )的高度中减去页眉和页脚的高度:
ul {
max-height: calc(100% - #{$list-header-height} - #{$list-footer-height});
}
But there is a problem. The percentage value doesn’t refer to .lists but to the <ul> element’s parent, .list, and this element doesn’t have a definite height and so this percentage cannot be resolved. This can be fixed by making .list as tall as .lists:
但有一个问题。 百分比值并不是指.lists但对<ul>元素的父, .list ,而这个元素没有一个明确的高度,所以这个比例不能得到解决。 可以通过使.list和.lists一样高来.lists :
.list {
height: 100%;
}
This way, since .list is always as high as .lists, regardless of its content, its background-color property cannot be used for the list background color, but it is possible to use its children (header, footer, cards) for this purpose.
这样,由于.list始终与.lists一样高, .lists无论其内容如何,其background-color属性都不能用作列表背景色,但是可以为此使用其子级(页眉,页脚,卡片)目的。
One last adjustment to the height of the list is necessary, to account for a bit of space ($gap) between the bottom of the list and the bottom edge of the viewport:
必须对列表的高度做最后一次调整,以在列表底部和视口底部边缘之间$gap出一些空间( $gap ):
.list {
height: calc(100% - #{$gap} - #{$scrollbar-thickness});
}
A further $scrollbar-thickness amount is subtracted to prevent the list from touching the .list element’s horizontal scrollbar. In fact, on Chrome this scrollbar ‘grows’ inside the .lists box. That is, the 100% value refers to the height of .lists, scrollbar included.
减去另外的$scrollbar-thickness量,以防止列表接触.list元素的水平滚动条。 实际上,在Chrome上,此滚动条在.lists框内“增长”。 也就是说,100%值是指.lists的高度,包括滚动条。
On Firefox instead, the scrollbar is ‘appended’ outside the .lists height, i.e, the 100% refers to the height of .lists not including the scrollbar. So this subtraction would not be necessary. As a result, when the scrollbar is visible, on Firefox the visual space between the bottom border of a list that has reached its maximum height and the top of the scrollbar is slightly larger.
相反,在Firefox上,滚动条“附加”在之外。 lists高度,即100%表示的高度。 lists不包括滚动条。 因此,该减法将是不必要的。 结果,当滚动条可见时,在Firefox上,已达到最大高度的列表底部边框和滚动条顶部之间的可视空间会稍大。
Here are the relevant CSS rules for this component:
以下是此组件的相关CSS规则:
.list {
width: $list-width;
height: calc(100% - #{$gap} - #{$scrollbar-thickness});
> * {
background-color: $list-bg-color;
color: #333;
padding: 0 $gap;
}
header {
line-height: $list-header-height;
font-size: 16px;
font-weight: bold;
border-top-left-radius: $list-border-radius;
border-top-right-radius: $list-border-radius;
}
footer {
line-height: $list-footer-height;
border-bottom-left-radius: $list-border-radius;
border-bottom-right-radius: $list-border-radius;
color: #888;
}
ul {
list-style: none;
margin: 0;
max-height: calc(100% - #{$list-header-height} - #{$list-footer-height});
overflow-y: auto;
}
}
As mentioned, the list background color is rendered by assigning the $list-bg-color value to the background-color property of each .list element’s children. overflow-y shows the cards scrollbar only when needed. Finally, some simple styling is added to the header and the footer.
如前所述,列表背景色是通过将$list-bg-color值分配给每个.list元素的子级元素的background-color属性来呈现的。 overflow-y仅在需要时显示卡滚动条。 最后,一些简单的样式添加到页眉和页脚。
画龙点睛 (Finishing Touches)
The HTML for a single card simply consists of a list item:
单张卡片HTML仅包含一个列表项:
<li>Lorem ipsum dolor sit amet, consectetur adipiscing elit</li>Or, if the card has a cover image:
或者,如果卡片有封面图像:
<li>
<img src="..." alt="...">
Lorem ipsum dolor sit amet
</li>
This is the relevant CSS:
这是相关CSS:
li {
background-color: #fff;
padding: $gap;
&:not(:last-child) {
margin-bottom: $gap;
}
border-radius: $card-border-radius;
box-shadow: 0 1px 1px rgba(0,0,0, 0.1);
img {
display: block;
width: calc(100% + 2 * #{$gap});
margin: -$gap 0 $gap (-$gap);
border-top-left-radius: $card-border-radius;
border-top-right-radius: $card-border-radius;
}
}
After having set a background, padding, and bottom margins, the cover image layout is ready. The image width must span the entire card from the left padding edge to the right padding edge:
设置背景,边距和底部边距后,封面图像布局已准备就绪。 图像宽度必须从左填充边缘到右填充边缘跨越整个卡:
width: calc(100% + 2 * #{$gap});Then, negative margins are assigned to align the image horizontally and vertically:
然后,分配负边距以使图像水平和垂直对齐:
margin: -$gap 0 $gap (-$gap);The third positive margin value takes care of the space between the cover image and the card text.
第三个正的页边空白值应考虑封面图像和卡片文本之间的间隔。
Finally, I’ve added a flex formatting context to the two bars that occupy the first rows of the screen layout. But they are only sketched. Feel free to build your own implementation of this by expanding on the demo.
最后,我在占据屏幕布局第一行的两个栏中添加了flex格式设置上下文。 但是它们只是草绘的。 通过扩展演示,可以随意构建自己的实现。
结论 (Conclusion)
This is only one possible way to accomplish this design and it would be interesting to see other approaches. Also, it would be nice to finalize the layout, for instance completing the two screen bars.
这只是完成此设计的一种可能方法,看到其他方法将很有趣。 另外,最好完成布局,例如完成两个屏幕栏。
Another potential enhancement could be the implementation of custom scrollbars for the card lists.
另一个潜在的增强功能可能是实现卡片列表的自定义滚动条。
So, feel free to fork the demo and post a link in the discussion below.
因此,请随意进行演示并在下面的讨论中发布链接。
翻译自: https://www.sitepoint.com/building-trello-layout-css-grid-flexbox/
css3flexbox布局
这篇关于css3flexbox布局_使用CSS网格和Flexbox构建Trello布局的文章就介绍到这儿,希望我们推荐的文章对编程师们有所帮助!


