本文主要是介绍【环境配置】YOLOX-华为Ascend-Pytorch模型离线推理【项目复盘】,希望对大家解决编程问题提供一定的参考价值,需要的开发者们随着小编来一起学习吧!
文章目录
- 推理流程
- 导出ONNX文件
- 转换om模型
- 测试集预处理
- 前处理脚本
- 生成预处理数据,得到对应的info文件
- 离线推理
- 精度统计
- 后处理脚本
- 性能对比
- npu
- gpu
前言
本文基于下面的参考
Ascend PyTorch模型离线推理指导
推理流程
导出ONNX文件
这一步参考官方教程
转换om模型
-
激活环境
source env.sh
env.sh内容见下# export install_path=/usr/local/Ascend/ascend-toolkit/latest # export install_path=/home/wgzheng/envs/Ascend/ascend-toolkit/latest export install_path=/home/wgzheng/packages/Ascend/ascend-toolkit/latest export PATH=/usr/local/python3.7.5/bin:${install_path}/atc/ccec_compiler/bin:${install_path}/atc/bin:$PATH export PYTHONPATH=${install_path}/atc/python/site-packages export LD_LIBRARY_PATH=${install_path}/atc/lib64:${install_path}/acllib/lib64 export ASCEND_OPP_PATH=${install_path}/opp export ASCEND_AICPU_PATH=${install_path} export ASCEND_SLOG_PRINT_TO_STDOUT=0 export ASCEND_GLOBAL_LOG_LEVEL=0 # export DUMP_GE_GRAPH=2 # export DUMP_GRAPH_LEVEL=2 -
执行下面的转换命令
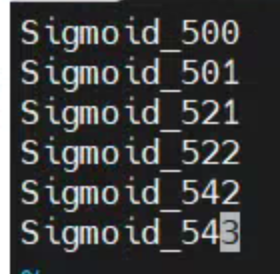
atc --framework=5 --model=yolox_x.onnx -output=yolox_x_fix --input_shape="images:1,3,640,640" --input_format=ND --soc_version=Ascend310 --keep_dtype=execeptionlist.cfgexeceptionlist.cfg内容见下图
测试集预处理
前处理脚本
preprocess.py
import os
import sys
import argparse
from tqdm import tqdm
import torch
from torch.utils.data import DataLoader
from yolox.data import COCODataset, ValTransform
sys.path.append('../YOLOX-main')def main():parser = argparse.ArgumentParser(description='YOLOX Preprocess')parser.add_argument('--dataroot', dest='dataroot',help='data root dirname', default='./datasets/COCO',type=str)parser.add_argument('--output', dest='output',help='output for prepared data', default='prep_data',type=str)parser.add_argument('--batch',help='validation batch size',type=int)opt = parser.parse_args()valdataset = COCODataset(data_dir=opt.dataroot,json_file='instances_val2017.json',name="val2017",img_size = (640,640),preproc=ValTransform(legacy=False),)sampler = torch.utils.data.SequentialSampler(valdataset)dataloader_kwargs = {"num_workers": 8, "pin_memory": True, "sampler": sampler, "batch_size": opt.batch}val_loader = torch.utils.data.DataLoader(valdataset, **dataloader_kwargs)for idx, data in tqdm(enumerate(val_loader)):inps = data[0].numpy()output_name = "{:0>12d}.bin".format(idx)output_path = os.path.join('/home/wxd/CODE/YOLOX/prep_data/', output_name)inps.tofile(output_path)if __name__ == "__main__":main()
执行python preprocess.py
生成预处理数据,得到对应的info文件
gen_dataset_info.py
# Copyright 2020 Huawei Technologies Co., Ltd
#
# Licensed under the Apache License, Version 2.0 (the "License");
# you may not use this file except in compliance with the License.
# You may obtain a copy of the License at
#
#     http://www.apache.org/licenses/LICENSE-2.0
#
# Unless required by applicable law or agreed to in writing, software
# distributed under the License is distributed on an "AS IS" BASIS,
# WITHOUT WARRANTIES OR CONDITIONS OF ANY KIND, either express or implied.
# See the License for the specific language governing permissions and
# limitations under the License.import os
import sys
import cv2
from glob import globdef get_bin_info(file_path, info_name, width, height):bin_images = glob(os.path.join(file_path, '*.bin'))with open(info_name, 'w') as file:for index, img in enumerate(bin_images):content = ' '.join([str(index), img, width, height])file.write(content)file.write('\n')def get_jpg_info(file_path, info_name):extensions = ['jpg', 'jpeg', 'JPG', 'JPEG']image_names = []for extension in extensions:image_names.append(glob(os.path.join(file_path, '*.' + extension)))  with open(info_name, 'w') as file:for image_name in image_names:if len(image_name) == 0:continueelse:for index, img in enumerate(image_name):img_cv = cv2.imread(img)shape = img_cv.shapewidth, height = shape[1], shape[0]content = ' '.join([str(index), img, str(width), str(height)])file.write(content)file.write('\n')if __name__ == '__main__':file_type = sys.argv[1]file_path = sys.argv[2]info_name = sys.argv[3]if file_type == 'bin':width = sys.argv[4]height = sys.argv[5]assert len(sys.argv) == 6, 'The number of input parameters must be equal to 5'get_bin_info(file_path, info_name, width, height)elif file_type == 'jpg':assert len(sys.argv) == 4, 'The number of input parameters must be equal to 3'get_jpg_info(file_path, info_name)
执行python gen_dataset_info.py bin ./prep_data ./prep_bin.info 640 640
离线推理
./benchmark.x86_64 -model_type=vision -device_id=0 -batch_size=1 -om_path=yolox_x_fix.om -input_text_path=../prep_bin.info -input_width=640 -input_height=640 -output_binary=True -useDvpp=False
精度统计
后处理脚本
postprocess.py
import os
import sys
import argparse
from tqdm import tqdm
import torch
from torch.utils.data import DataLoader
from yolox.data import COCODataset, ValTransform
from yolox.evaluators import COCOEvaluator
from yolox.utils.boxes import postprocessfrom yolox.utils.demo_utils import demo_postprocess,multiclass_nms
import numpy as np
sys.path.append('../YOLOX-main')def get_output_data(dump_dir,idx,dtype=np.float32):output_shape = [1,8400,85]input_file = os.path.join(dump_dir, "{:0>12d}_1.bin".format(idx))input_data = np.fromfile(input_file, dtype=dtype).reshape(output_shape)return torch.from_numpy(input_data)def main():parser = argparse.ArgumentParser(description='YOLOX Postprocess')parser.add_argument('--dataroot', dest='dataroot',help='data root dirname', default='./datasets/COCO',type=str)parser.add_argument('--dump_dir', dest='dump_dir',help='dump dir for bin files', default='./result/dumpOutput_device0/',type=str)parser.add_argument('--batch', dest='batch',help='batch for dataloader',default=1,type=int)opt = parser.parse_args()valdataset = COCODataset(data_dir=opt.dataroot,json_file='instances_val2017.json',name="val2017",img_size = (640,640),preproc=ValTransform(legacy=False),)sampler = torch.utils.data.SequentialSampler(valdataset)dataloader_kwargs = {"num_workers": 8, "pin_memory": True, "sampler": sampler, "batch_size": opt.batch}val_loader = torch.utils.data.DataLoader(valdataset, **dataloader_kwargs)data_list = []coco_evaluator = COCOEvaluator(val_loader,img_size=(640,640),confthre=0.001,nmsthre=0.65,num_classes=80)for cur_iter, (imgs, _, info_imgs, ids) in enumerate(tqdm(val_loader)):outputs = get_output_data(opt.dump_dir,cur_iter)outputs = demo_postprocess(outputs,[640,640])outputs = postprocess(outputs, num_classes=80, conf_thre=0.001, nms_thre=0.65)data_list.extend(coco_evaluator.convert_to_coco_format(outputs,info_imgs,ids))results = coco_evaluator.evaluate_prediction(data_list)print(results)if __name__ == "__main__":main()
执行python postprocess.py
性能对比
由于310上无法导出yolox在batch=16的onnx,以下是基于batch=1多脚本。
npu
/benchmark.x86_64 -round=20 -om_path=yolox_x_fix.om -device_id=0 -batch_size=1
gpu
trtexec --onnx=yolox_x.onnx --fp16 --shapes=images:1x3x640x640
这篇关于【环境配置】YOLOX-华为Ascend-Pytorch模型离线推理【项目复盘】的文章就介绍到这儿,希望我们推荐的文章对编程师们有所帮助!


