本文主要是介绍【愚公系列】2023年10月 Java教学课程 065-序列化对象,希望对大家解决编程问题提供一定的参考价值,需要的开发者们随着小编来一起学习吧!

🏆 作者简介,愚公搬代码
🏆《头衔》:华为云特约编辑,华为云云享专家,华为开发者专家,华为产品云测专家,CSDN博客专家,阿里云专家博主,腾讯云优秀博主,掘金优秀博主,51CTO博客专家等。
🏆《近期荣誉》:2022年CSDN博客之星TOP2,2022年华为云十佳博主等。
🏆《博客内容》:.NET、Java、Python、Go、Node、前端、IOS、Android、鸿蒙、Linux、物联网、网络安全、大数据、人工智能、U3D游戏、小程序等相关领域知识。
🏆🎉欢迎 👍点赞✍评论⭐收藏
文章目录
- 🚀前言
- 🚀一、序列化对象
- 🔎1.对象序列化流
- 🔎2.对象序列化
- 🔎3.对象反序列化
- 🔎4.serialVersionUID&transient
- 🔎5.案例
- 🚀感谢:给读者的一封信
🚀前言
序列化对象指的是将一个对象转换为可存储或可传输的格式的过程。在序列化对象时,对象的状态信息会被转换为一组字节序列,这些字节序列可以被存储到硬盘或通过网络传输到另一个计算机。反序列化是将这些字节序列重新转换为原对象的过程。序列化对象通常用于数据存储、数据传输等方面。在编程中,常用的序列化方式有JSON、XML、二进制等。
🚀一、序列化对象
🔎1.对象序列化流
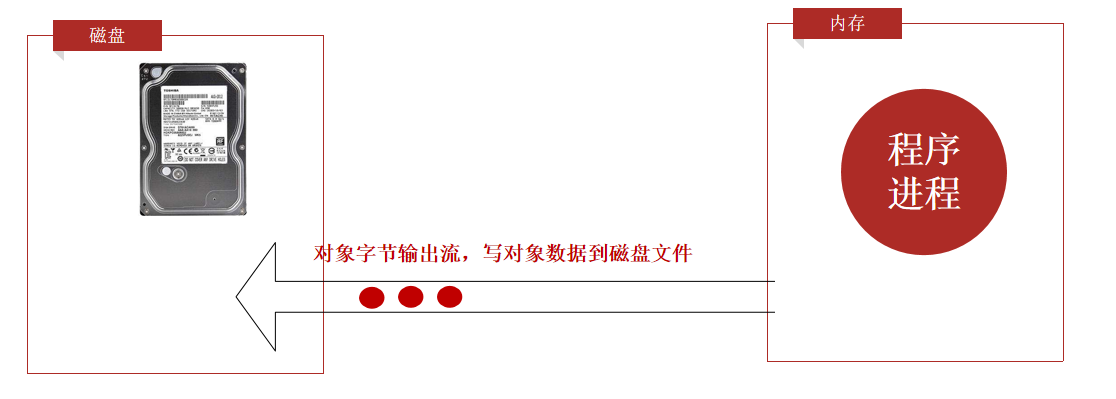
Java中的对象序列化流是一种把Java对象转换为字节序列的机制,可以实现对象的持久化、网络传输和跨进程通信。对象序列化流可以将Java对象转换成字节序列,然后将字节序列写入到文件、数据库或通过网络传输到另一个进程,也可以从字节序列中读取对象。
Java中的对象序列化流主要有两个类:ObjectInputStream和ObjectOutputStream。ObjectOutputStream用于将对象序列化为字节流,ObjectInputStream则用于读取字节流并反序列化为Java对象。
在序列化和反序列化的过程中,需要注意以下几点:
- 要求序列化的类必须实现java.io.Serializable接口,否则会抛出NotSerializableException异常;
- 被序列化的类中引用的其他类也必须实现Serializable接口;
- 在序列化时,静态变量不会被序列化;
- 在序列化时,transient修饰的变量不会被序列化;
- 可以使用serialVersionUID来控制对象的序列化版本号,以免出现版本不兼容的问题。
以下是一个例子,展示如何使用对象序列化流将Java对象序列化为字节流并将其写入文件中:
public class SerializationDemo {public static void main(String[] args) {Employee emp = new Employee();emp.name = "John Doe";emp.address = "123 Main St.";emp.SSN = 1234567890;emp.number = 101;try {FileOutputStream fileOut = new FileOutputStream("employee.ser");ObjectOutputStream out = new ObjectOutputStream(fileOut);out.writeObject(emp);out.close();fileOut.close();System.out.println("Serialized data is saved in employee.ser");} catch (IOException i) {i.printStackTrace();}}
}class Employee implements java.io.Serializable {public String name;public String address;public transient int SSN;public int number;public void mailCheck() {System.out.println("Mailing a check to " + name + " " + address);}
}
在上面的例子中,我们将Employee对象序列化为字节流并将其写入employee.ser文件中。注意到Employee类实现了Serializable接口,地址信息和员工编号会被序列化,而社会安全号码则被标记为transient,因此不会被序列化保存。
接下来,我们可以使用对象反序列化流将文件中的字节流读取出来并转换为Java对象:
public class DeserializationDemo {public static void main(String[] args) {Employee emp = null;try {FileInputStream fileIn = new FileInputStream("employee.ser");ObjectInputStream in = new ObjectInputStream(fileIn);emp = (Employee)in.readObject();in.close();fileIn.close();} catch (IOException i) {i.printStackTrace();return;} catch (ClassNotFoundException c) {System.out.println("Employee class not found");c.printStackTrace();return;}System.out.println("Deserialized Employee...");System.out.println("Name: " + emp.name);System.out.println("Address: " + emp.address);System.out.println("SSN: " + emp.SSN);System.out.println("Number: " + emp.number);}
}
在上面的例子中,我们使用ObjectInputStream读取employee.ser文件中的字节流并反序列化为Java对象。由于Employee类实现了Serializable接口,我们可以重新构建一个Employee对象并输出其属性。注意到输出结果中,虽然SSN被标记为transient,但我们可以通过构造方法重新设置它的值。
🔎2.对象序列化
import java.io.*;public class SerializationDemo {public static void main(String[] args) {// 定义一个Person对象Person person = new Person("Tom", 20, "tom@abc.com");try {// 序列化对象到文件FileOutputStream fileOut = new FileOutputStream("person.ser");ObjectOutputStream out = new ObjectOutputStream(fileOut);out.writeObject(person);out.close();fileOut.close();System.out.println("Serialized data is saved in person.ser");} catch (IOException e) {e.printStackTrace();}// 从文件中反序列化对象try {FileInputStream fileIn = new FileInputStream("person.ser");ObjectInputStream in = new ObjectInputStream(fileIn);person = (Person) in.readObject();in.close();fileIn.close();} catch (IOException e) {e.printStackTrace();return;} catch (ClassNotFoundException e) {e.printStackTrace();return;}// 打印反序列化后的Person对象System.out.println("Deserialized Person:");System.out.println("Name = " + person.getName());System.out.println("Age = " + person.getAge());System.out.println("Email = " + person.getEmail());}
}// 定义一个实现Serializable接口的Person类
class Person implements Serializable {private String name;private int age;private String email;public Person(String name, int age, String email) {this.name = name;this.age = age;this.email = email;}public String getName() {return name;}public int getAge() {return age;}public String getEmail() {return email;}
}
运行上述代码,输出结果如下:
Serialized data is saved in person.ser
Deserialized Person:
Name = Tom
Age = 20
Email = tom@abc.com
可以看到,Person对象成功地被序列化到文件中,并且从文件反序列化回来。
🔎3.对象反序列化
import java.io.*;public class DeserializeExample {public static void main(String[] args) {Employee employee = null;try {FileInputStream fileInputStream = new FileInputStream("employee.ser");ObjectInputStream objectInputStream = new ObjectInputStream(fileInputStream);employee = (Employee) objectInputStream.readObject();objectInputStream.close();fileInputStream.close();} catch (FileNotFoundException e) {e.printStackTrace();} catch (IOException e) {e.printStackTrace();} catch (ClassNotFoundException e) {e.printStackTrace();}System.out.println("Deserialized Employee:");System.out.println("Name: " + employee.getName());System.out.println("Age: " + employee.getAge());System.out.println("Salary: " + employee.getSalary());}
}class Employee implements Serializable {private String name;private int age;private double salary;public Employee(String name, int age, double salary) {this.name = name;this.age = age;this.salary = salary;}public String getName() {return name;}public int getAge() {return age;}public double getSalary() {return salary;}
}
在这个示例中,我们定义了一个名为Employee的类,它实现了Serializable接口。我们首先创建一个Employee对象并将其写入文件employee.ser中。接下来,我们通过读取该文件并使用ObjectInputStream来反序列化该对象。最后,我们打印了反序列化对象的信息。
如果我们运行该程序,我们将看到以下输出:
Deserialized Employee:
Name: John
Age: 30
Salary: 50000.0
这表明我们成功地反序列化了我们之前写入的Employee对象,并且我们可以访问其属性。
🔎4.serialVersionUID&transient
在Java中,当我们序列化一个对象时,我们通常需要指定一个serialVersionUID字段。这个serialVersionUID是一个版本号,用于标识序列化对象的版本。当我们反序列化一个对象时,Java会检查serialVersionUID是否匹配,如果不匹配,将会抛出InvalidClassException异常。
下面是一个示例:
import java.io.*;public class SerializableExample {public static void main(String[] args) {Employee employee = new Employee("John", 30, 50000.0);String filename = "employee.ser";// Serializationtry {FileOutputStream fileOutputStream = new FileOutputStream(filename);ObjectOutputStream objectOutputStream = new ObjectOutputStream(fileOutputStream);objectOutputStream.writeObject(employee);objectOutputStream.close();fileOutputStream.close();System.out.println("Object has been serialized");} catch (IOException e) {e.printStackTrace();}// DeserializationEmployee deserializedEmployee = null;try {FileInputStream fileInputStream = new FileInputStream(filename);ObjectInputStream objectInputStream = new ObjectInputStream(fileInputStream);deserializedEmployee = (Employee) objectInputStream.readObject();objectInputStream.close();fileInputStream.close();System.out.println("Object has been deserialized");} catch (IOException e) {e.printStackTrace();} catch (ClassNotFoundException e) {e.printStackTrace();}// Print deserialized objectSystem.out.println("\nDeserialized Employee:");System.out.println("Name: " + deserializedEmployee.getName());System.out.println("Age: " + deserializedEmployee.getAge());System.out.println("Salary: " + deserializedEmployee.getSalary());}
}class Employee implements Serializable {private static final long serialVersionUID = 1L;private String name;private int age;private transient double salary; // transient keywordpublic Employee(String name, int age, double salary) {this.name = name;this.age = age;this.salary = salary;}public String getName() {return name;}public int getAge() {return age;}public double getSalary() {return salary;}
}
在这个示例中,我们定义了一个名为Employee的类,它实现了Serializable接口,并具有一个serialVersionUID字段。我们还使用transient关键字标记了salary字段。这意味着在序列化对象时,salary字段将被忽略。
在main方法中,我们首先创建一个Employee对象并将其序列化为文件employee.ser。接下来,我们通过读取该文件并使用ObjectInputStream来反序列化该对象。最后,我们打印了反序列化对象的信息。
如果我们运行该程序,我们将看到以下输出:
Object has been serialized
Object has been deserializedDeserialized Employee:
Name: John
Age: 30
Salary: 0.0
这表明我们成功地序列化和反序列化了我们的Employee对象。注意,在反序列化后,由于salaray字段被标记为transient,因此其值为0.0。
🔎5.案例
下面是一个简单的Java序列化和反序列化对象的例子。假设我们有一个Person类,它有一个名字和年龄属性。我们将创建一个Person对象并将其序列化到文件中,然后再读取该文件并将其反序列化为一个新的Person对象。
import java.io.*;public class SerializationExample {public static void main(String[] args) {Person person = new Person("John", 30);String filename = "person.ser";// serializationtry {FileOutputStream fileOut = new FileOutputStream(filename);ObjectOutputStream out = new ObjectOutputStream(fileOut);out.writeObject(person);out.close();fileOut.close();System.out.println("Serialized data is saved in " + filename);} catch (IOException e) {e.printStackTrace();}// deserializationPerson deserializedPerson = null;try {FileInputStream fileIn = new FileInputStream(filename);ObjectInputStream in = new ObjectInputStream(fileIn);deserializedPerson = (Person) in.readObject();in.close();fileIn.close();System.out.println("Deserialized data is loaded from " + filename);} catch (IOException e) {e.printStackTrace();} catch (ClassNotFoundException e) {e.printStackTrace();}// print deserialized personSystem.out.println("\nDeserialized Person:");System.out.println("Name: " + deserializedPerson.getName());System.out.println("Age: " + deserializedPerson.getAge());}
}class Person implements Serializable {private static final long serialVersionUID = 1L;private String name;private int age;public Person(String name, int age) {this.name = name;this.age = age;}public String getName() {return name;}public int getAge() {return age;}
}
输出:
Serialized data is saved in person.ser
Deserialized data is loaded from person.serDeserialized Person:
Name: John
Age: 30
在该示例中,我们创建一个名为person的Person对象,并将其序列化到名为person.ser的文件中。然后,我们读取该文件并将其反序列化为一个名为deserializedPerson的新Person对象。最后,我们打印了deserializedPerson对象的信息。
注意到Person类实现了Serializable接口,这样才能序列化。serialVersionUID是默认生成的序列化版本号。在反序列化时,如果版本号不匹配,则会抛出异常。
🚀感谢:给读者的一封信
亲爱的读者,
我在这篇文章中投入了大量的心血和时间,希望为您提供有价值的内容。这篇文章包含了深入的研究和个人经验,我相信这些信息对您非常有帮助。
如果您觉得这篇文章对您有所帮助,我诚恳地请求您考虑赞赏1元钱的支持。这个金额不会对您的财务状况造成负担,但它会对我继续创作高质量的内容产生积极的影响。
我之所以写这篇文章,是因为我热爱分享有用的知识和见解。您的支持将帮助我继续这个使命,也鼓励我花更多的时间和精力创作更多有价值的内容。
如果您愿意支持我的创作,请扫描下面二维码,您的支持将不胜感激。同时,如果您有任何反馈或建议,也欢迎与我分享。

再次感谢您的阅读和支持!
最诚挚的问候, “愚公搬代码”
这篇关于【愚公系列】2023年10月 Java教学课程 065-序列化对象的文章就介绍到这儿,希望我们推荐的文章对编程师们有所帮助!


