本文主要是介绍Unity3D学习(12)之粒子光环,希望对大家解决编程问题提供一定的参考价值,需要的开发者们随着小编来一起学习吧!
这是师兄的博客,写得很棒,所以转载和大家分享,心中万分膜拜,参考网站首页的光环效果:http://i-remember.fr/en
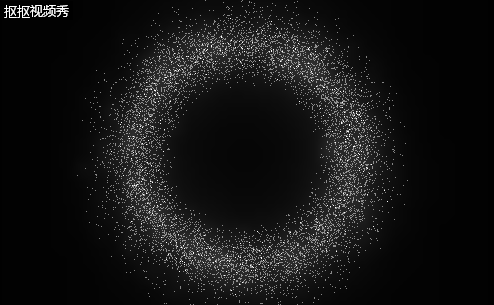
利用Unity做了一个类似的光环:(后面还有进阶效果哦~)
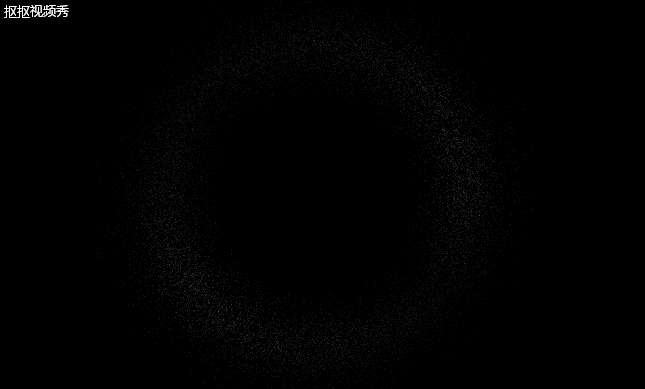
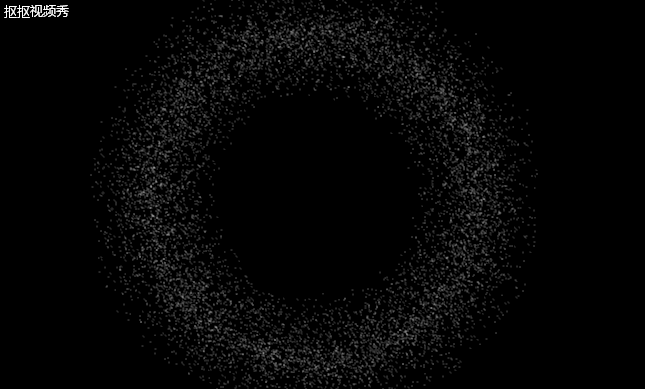
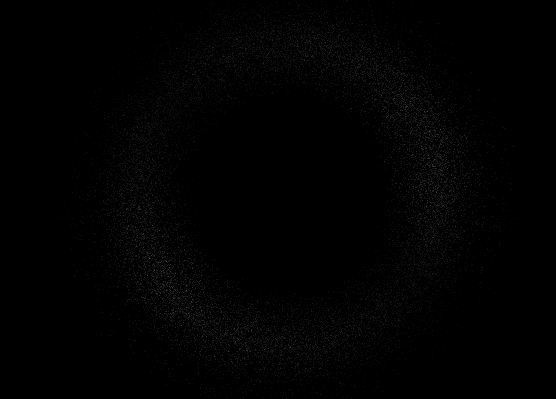
可以观察到光环有最小半径和最大半径,并且光环的中间部分比边缘有更多的粒子。眼尖的可以发现这个光环至少有2层,外环顺时针旋转,内环逆时针旋转。除此以外,每个粒子都会游离,并不是规规矩矩地转圈。
我是这么设计的:
1. 所有粒子运动由程序控制。
2. 使用参数方程 x = cos(t), y = sin(t) 计算粒子位置,其中t是角度。
3. 使用PingPong函数让粒子在半径方向上游离。
步骤一
新建一个空对象,重命名为ParticleHalo,然后在其下面新建一个空的子对象,重命名为Clockwise_outer。
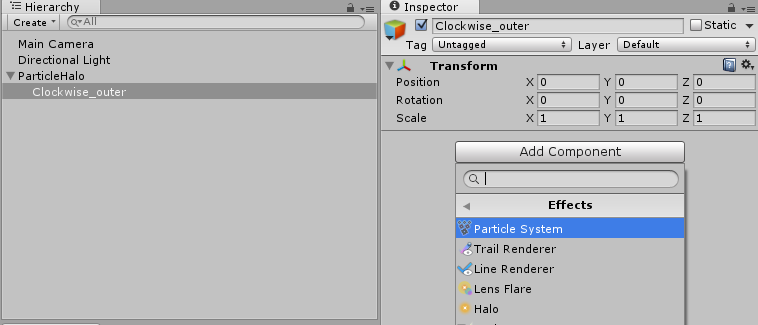
选择子对象,添加组件->Effects->Particle System。
步骤二
新建C#脚本,命名为ParticleHalo。
- using UnityEngine;
- using System.Collections;
- public class ParticleHalo : MonoBehaviour
- {
- void Start ()
- {
- }
- void Update ()
- {
- }
- }

using UnityEngine;
using System.Collections;public class ParticleHalo : MonoBehaviour
{void Start (){}void Update (){}
}
步骤三
定义新的结构CirclePosition,用来记录每个粒子的当前半径、角度和时间,其中时间是做游离运动需要的。
- public class CirclePosition
- {
- public float radius = 0f, angle = 0f, time = 0f;
- public CirclePosition(float radius, float angle, float time)
- {
- this.radius = radius; // 半径
- this.angle = angle; // 角度
- this.time = time; // 时间
- }
- }
public class CirclePosition
{public float radius = 0f, angle = 0f, time = 0f;public CirclePosition(float radius, float angle, float time){this.radius = radius;   // 半径this.angle = angle;     // 角度this.time = time;       // 时间}
}- private ParticleSystem particleSys; // 粒子系统
- private ParticleSystem.Particle[] particleArr; // 粒子数组
- private CirclePosition[] circle; // 极坐标数组
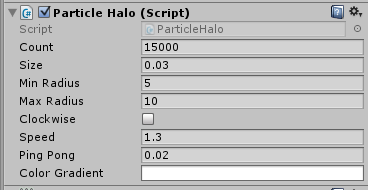
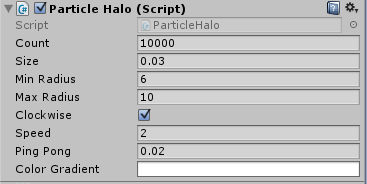
private ParticleSystem particleSys; // 粒子系统private ParticleSystem.Particle[] particleArr; // 粒子数组private CirclePosition[] circle; // 极坐标数组- public int count = 10000; // 粒子数量
- public float size = 0.03f; // 粒子大小
- public float minRadius = 5.0f; // 最小半径
- public float maxRadius = 12.0f; // 最大半径
- public bool clockwise = true; // 顺时针|逆时针
- public float speed = 2f; // 速度
- public float pingPong = 0.02f; // 游离范围
public int count = 10000; // 粒子数量public float size = 0.03f; // 粒子大小public float minRadius = 5.0f; // 最小半径public float maxRadius = 12.0f; // 最大半径public bool clockwise = true; // 顺时针|逆时针public float speed = 2f; // 速度public float pingPong = 0.02f; // 游离范围- void Start ()
- { // 初始化粒子数组
- particleArr = new ParticleSystem.Particle[count];
- circle = new CirclePosition[count];
- // 初始化粒子系统
- particleSys = this.GetComponent<ParticleSystem>();
- particleSys.startSpeed = 0; // 粒子位置由程序控制
- particleSys.startSize = size; // 设置粒子大小
- particleSys.loop = false;
- particleSys.maxParticles = count; // 设置最大粒子量
- particleSys.Emit(count); // 发射粒子
- particleSys.GetParticles(particleArr);
- RandomlySpread(); // 初始化各粒子位置
- }
void Start (){ // 初始化粒子数组particleArr = new ParticleSystem.Particle[count];circle = new CirclePosition[count];// 初始化粒子系统particleSys = this.GetComponent<ParticleSystem>();particleSys.startSpeed = 0; // 粒子位置由程序控制particleSys.startSize = size; // 设置粒子大小particleSys.loop = false;particleSys.maxParticles = count; // 设置最大粒子量particleSys.Emit(count); // 发射粒子particleSys.GetParticles(particleArr);RandomlySpread(); // 初始化各粒子位置}RandomlySpread将所有的粒子随机分布在圆圈轨道上。
- void RandomlySpread()
- {
- for (int i = 0; i < count; ++i)
- { // 随机每个粒子距离中心的半径,同时希望粒子集中在平均半径附近
- float midRadius = (maxRadius + minRadius) / 2;
- float minRate = Random.Range(1.0f, midRadius / minRadius);
- float maxRate = Random.Range(midRadius / maxRadius, 1.0f);
- float radius = Random.Range(minRadius * minRate, maxRadius * maxRate);
- // 随机每个粒子的角度
- float angle = Random.Range(0.0f, 360.0f);
- float theta = angle / 180 * Mathf.PI;
- // 随机每个粒子的游离起始时间
- float time = Random.Range(0.0f, 360.0f);
- circle[i] = new CirclePosition(radius, angle, time);
- particleArr[i].position = new Vector3(circle[i].radius * Mathf.Cos(theta), 0f, circle[i].radius * Mathf.Sin(theta));
- }
- particleSys.SetParticles(particleArr, particleArr.Length);
- }
void RandomlySpread(){for (int i = 0; i < count; ++i){ // 随机每个粒子距离中心的半径,同时希望粒子集中在平均半径附近float midRadius = (maxRadius + minRadius) / 2;float minRate = Random.Range(1.0f, midRadius / minRadius);float maxRate = Random.Range(midRadius / maxRadius, 1.0f);float radius = Random.Range(minRadius * minRate, maxRadius * maxRate);// 随机每个粒子的角度float angle = Random.Range(0.0f, 360.0f);float theta = angle / 180 * Mathf.PI;// 随机每个粒子的游离起始时间float time = Random.Range(0.0f, 360.0f);circle[i] = new CirclePosition(radius, angle, time);particleArr[i].position = new Vector3(circle[i].radius * Mathf.Cos(theta), 0f, circle[i].radius * Mathf.Sin(theta));}particleSys.SetParticles(particleArr, particleArr.Length);}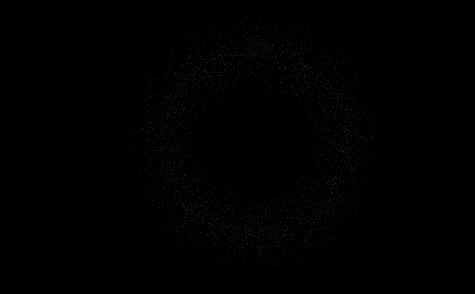
步骤四
嗯,怎么让粒子旋转起来呢?简单的想法是在Update函数里逐渐改变粒子的角度:
- void Update ()
- {
- for (int i = 0; i < count; i++)
- {
- if (clockwise) // 顺时针旋转
- circle[i].angle -= 0.1f;
- else // 逆时针旋转
- circle[i].angle += 0.1f;
- // 保证angle在0~360度
- circle[i].angle = (360.0f + circle[i].angle) % 360.0f;
- float theta = circle[i].angle / 180 * Mathf.PI;
- particleArr[i].position = new Vector3(circle[i].radius * Mathf.Cos(theta), 0f, circle[i].radius * Mathf.Sin(theta));
- }
- particleSys.SetParticles(particleArr, particleArr.Length);
- }
void Update (){for (int i = 0; i < count; i++){if (clockwise) // 顺时针旋转circle[i].angle -= 0.1f;else // 逆时针旋转circle[i].angle += 0.1f;// 保证angle在0~360度circle[i].angle = (360.0f + circle[i].angle) % 360.0f;float theta = circle[i].angle / 180 * Mathf.PI;particleArr[i].position = new Vector3(circle[i].radius * Mathf.Cos(theta), 0f, circle[i].radius * Mathf.Sin(theta));}particleSys.SetParticles(particleArr, particleArr.Length);}
为解决这个问题,我让粒子角度的增量不全部一样,需要添加一个差分层变量tier:
- private int tier = 10; // 速度差分层数
- void Update ()
- {
- for (int i = 0; i < count; i++)
- {
- if (clockwise) // 顺时针旋转
- circle[i].angle -= (i % tier + 1) * (speed / circle[i].radius / tier);
- else // 逆时针旋转
- circle[i].angle += (i % tier + 1) * (speed / circle[i].radius / tier);
- // 保证angle在0~360度
- circle[i].angle = (360.0f + circle[i].angle) % 360.0f;
- float theta = circle[i].angle / 180 * Mathf.PI;
- particleArr[i].position = new Vector3(circle[i].radius * Mathf.Cos(theta), 0f, circle[i].radius * Mathf.Sin(theta));
- }
- particleSys.SetParticles(particleArr, particleArr.Length);
- }
private int tier = 10; // 速度差分层数void Update (){for (int i = 0; i < count; i++){if (clockwise) // 顺时针旋转circle[i].angle -= (i % tier + 1) * (speed / circle[i].radius / tier);else // 逆时针旋转circle[i].angle += (i % tier + 1) * (speed / circle[i].radius / tier);// 保证angle在0~360度circle[i].angle = (360.0f + circle[i].angle) % 360.0f;float theta = circle[i].angle / 180 * Mathf.PI;particleArr[i].position = new Vector3(circle[i].radius * Mathf.Cos(theta), 0f, circle[i].radius * Mathf.Sin(theta));}particleSys.SetParticles(particleArr, particleArr.Length);}
步骤五
现在粒子已经可以旋转了,但是还是感觉有点死板,为什么呢?原来是因为粒子只在角度变化上有了区分,在半径方向上还是很统一。有什么办法能令到粒子的半径在允许的波动范围内移动呢?非常幸运的是,Unity的Mathf类提供了方法PingPong。PingPong顾名思义就是乒乓球的意思,乒乓球是来回运动的,因此PingPong函数就是使得值在范围内来回变动,使用方法具体参考 API。把下面的程序添加到Update方法中:
- // 粒子在半径方向上游离
- circle[i].time += Time.deltaTime;
- circle[i].radius += Mathf.PingPong(circle[i].time / minRadius / maxRadius, pingPong) - pingPong / 2.0f;
// 粒子在半径方向上游离circle[i].time += Time.deltaTime;circle[i].radius += Mathf.PingPong(circle[i].time / minRadius / maxRadius, pingPong) - pingPong / 2.0f;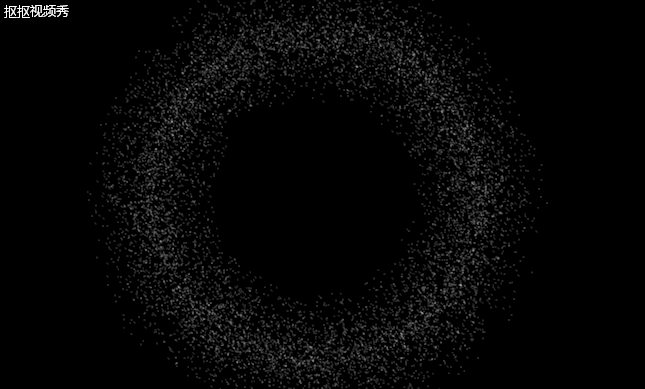
步骤六
现在的粒子已经近乎独立运动了,运动没问题了,接下来就是光效了。光效怎么体现?透明度是一个不错的方法。使用透明度可以使用Gradient类。在ParticleHalo类里添加新的私有变量,并在Start里面初始化Gradient对象。
- public Gradient colorGradient;
- void Start ()
- { // 初始化粒子数组
- particleArr = new ParticleSystem.Particle[count];
- circle = new CirclePosition[count];
- // 初始化粒子系统
- particleSys = this.GetComponent<ParticleSystem>();
- particleSys.startSpeed = 0; // 粒子位置由程序控制
- particleSys.startSize = size; // 设置粒子大小
- particleSys.loop = false;
- particleSys.maxParticles = count; // 设置最大粒子量
- particleSys.Emit(count); // 发射粒子
- particleSys.GetParticles(particleArr);
- // 初始化梯度颜色控制器
- GradientAlphaKey[] alphaKeys = new GradientAlphaKey[5];
- alphaKeys[0].time = 0.0f; alphaKeys[0].alpha = 1.0f;
- alphaKeys[1].time = 0.4f; alphaKeys[1].alpha = 0.4f;
- alphaKeys[2].time = 0.6f; alphaKeys[2].alpha = 1.0f;
- alphaKeys[3].time = 0.9f; alphaKeys[3].alpha = 0.4f;
- alphaKeys[4].time = 1.0f; alphaKeys[4].alpha = 0.9f;
- GradientColorKey[] colorKeys = new GradientColorKey[2];
- colorKeys[0].time = 0.0f; colorKeys[0].color = Color.white;
- colorKeys[1].time = 1.0f; colorKeys[1].color = Color.white;
- colorGradient.SetKeys(colorKeys, alphaKeys);
- RandomlySpread(); // 初始化各粒子位置
- }
public Gradient colorGradient;void Start (){ // 初始化粒子数组particleArr = new ParticleSystem.Particle[count];circle = new CirclePosition[count];// 初始化粒子系统particleSys = this.GetComponent<ParticleSystem>();particleSys.startSpeed = 0; // 粒子位置由程序控制particleSys.startSize = size; // 设置粒子大小particleSys.loop = false;particleSys.maxParticles = count; // 设置最大粒子量particleSys.Emit(count); // 发射粒子particleSys.GetParticles(particleArr);// 初始化梯度颜色控制器GradientAlphaKey[] alphaKeys = new GradientAlphaKey[5];alphaKeys[0].time = 0.0f; alphaKeys[0].alpha = 1.0f;alphaKeys[1].time = 0.4f; alphaKeys[1].alpha = 0.4f;alphaKeys[2].time = 0.6f; alphaKeys[2].alpha = 1.0f;alphaKeys[3].time = 0.9f; alphaKeys[3].alpha = 0.4f;alphaKeys[4].time = 1.0f; alphaKeys[4].alpha = 0.9f;GradientColorKey[] colorKeys = new GradientColorKey[2];colorKeys[0].time = 0.0f; colorKeys[0].color = Color.white;colorKeys[1].time = 1.0f; colorKeys[1].color = Color.white;colorGradient.SetKeys(colorKeys, alphaKeys);RandomlySpread(); // 初始化各粒子位置}- particleArr[i].color = colorGradient.Evaluate(circle[i].angle / 360.0f);
particleArr[i].color = colorGradient.Evaluate(circle[i].angle / 360.0f);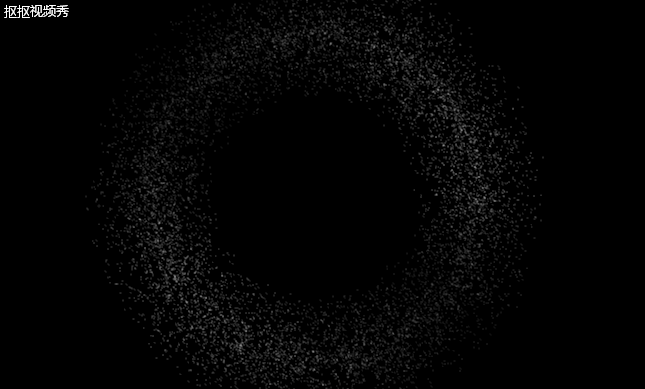
步骤七
最后一步了,我们只做了外环,内环和外环的脚本是一样的,只是需要调整一下参数。首先回到对象层次树,在ParticleHalo下再新建空对象,命名为Anticlockwise_inner。同样添加脚本ParticleHalo.cs和粒子系统AddComponent->Effects->Particle System。
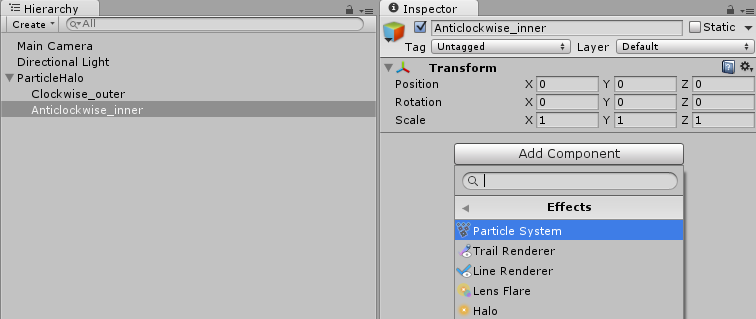
内环是逆时针旋转的,因此把clockwise的勾去掉,同时修改参数直到效果满意。事实上,还可以添加一个顺时针的内环,让圆圈更明显。
进阶
Unity自带的粒子不太给力,比如不够亮!不会发光!当粒子比较小的时候会变得很暗,相信你们也发现了。这时候有两个选择,要么自己写shader,要么使用第三方插件。介于目前水平和时间有限,我使用了第三方插件Glow11,在制作太阳系的章节中也有提到过。
首先导入Glow11插件,Assets->Import Package->Custom Package->Glow11。
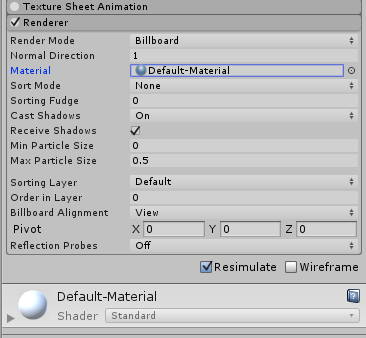
给Main Camera添加Glow11组件(发现了吧,其实发光效果是产生在摄像机上的),修改粒子系统的材质 Particle System->Render->Material->Default-Material。

现在看看效果怎样:
闪瞎了…果然太亮了也不是很好…还是喜欢朦胧美。
这篇关于Unity3D学习(12)之粒子光环的文章就介绍到这儿,希望我们推荐的文章对编程师们有所帮助!