本文主要是介绍使用java代码调用超融合登录接口,跟着敲就完事,官方文档也没有的资源~,希望对大家解决编程问题提供一定的参考价值,需要的开发者们随着小编来一起学习吧!
一、准备工作
接口地址:
登陆接口和 API 调用说明:
这部分步骤均为官网文档,最后步骤则是本地测试用户列表接口
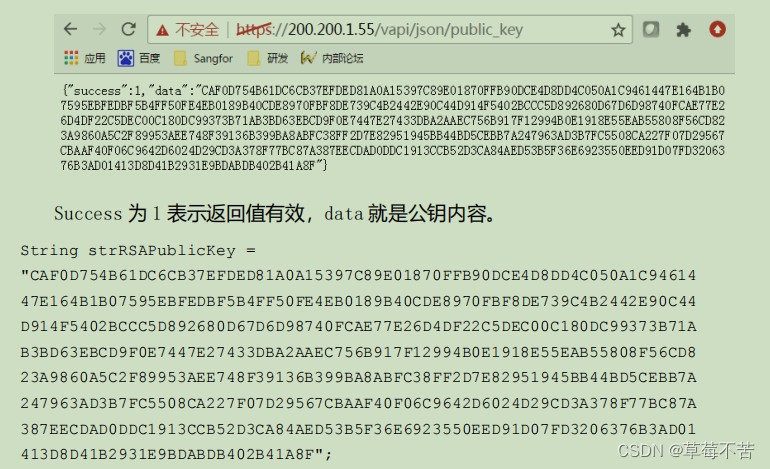
1、第一步:获取公钥
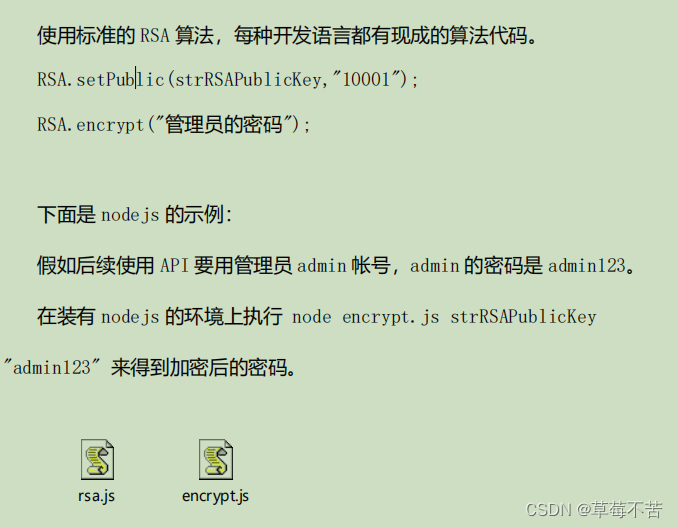
2、第二步:用公钥把管理员密码加密
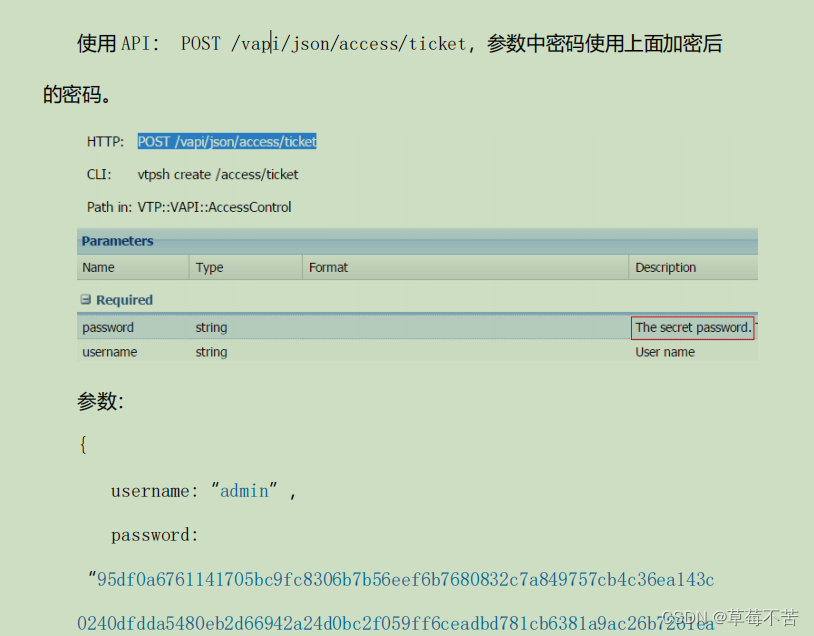
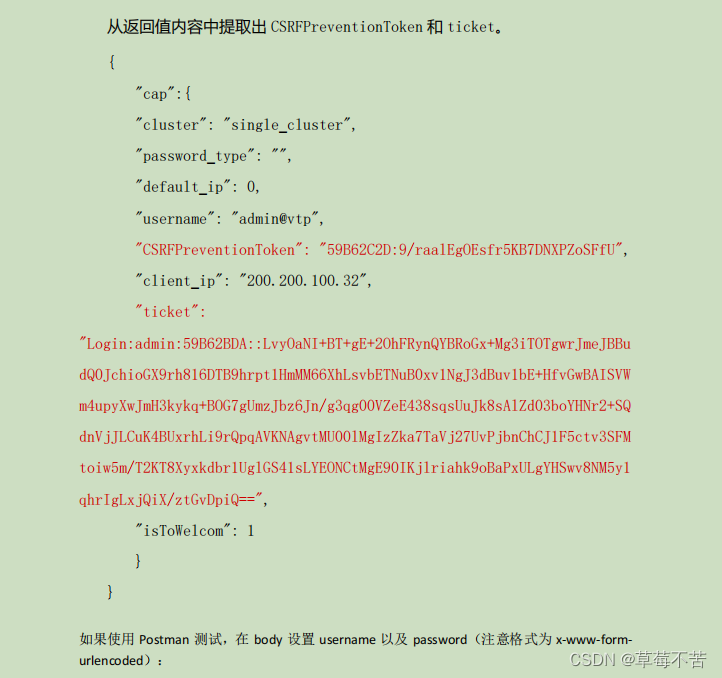
3、第三步:登录拿到 token 和 ticker
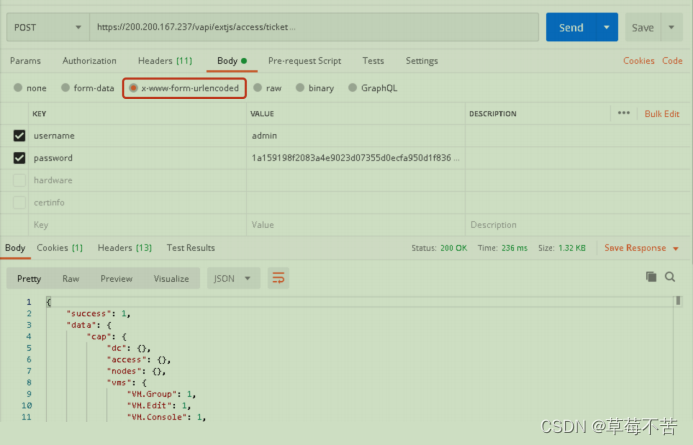
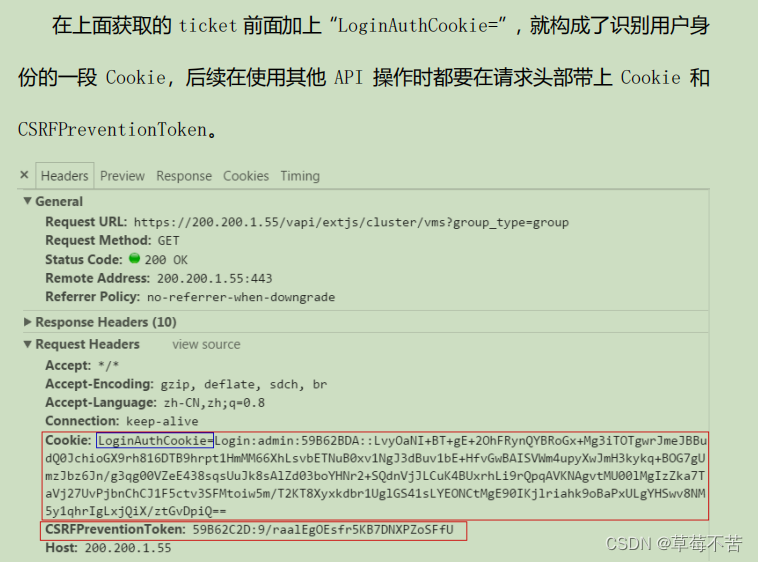
4、第四步:设置请求头部的 cookie
5、第五步:调用 API 发送请求

6、第六步:解析输出结果
二、java代码实现
1、pom部分
<dependency><groupId>org.mozilla</groupId><artifactId>rhino</artifactId><version>1.7.13</version> <!-- 推荐版本 -->
</dependency>
<dependency><groupId>com.google.code.gson</groupId><artifactId>gson</artifactId><version>2.8.6</version>
</dependency>
2、java代码创建Uint8Array部分
import org.mozilla.javascript.*;
import org.mozilla.javascript.annotations.JSFunction;public class Uint8ArraySimulator extends ScriptableObject {private byte[] buffer;public Uint8ArraySimulator() {buffer = new byte[0];}@Overridepublic String getClassName() {return "Uint8Array";}@JSFunctionpublic static Scriptable createObject(Context cx, Scriptable scope, Object[] args, Function ctorObj) {if (args.length > 0 && args[0] instanceof Number) {int length = ((Number) args[0]).intValue();Uint8ArraySimulator arr = new Uint8ArraySimulator();arr.buffer = new byte[length];arr.setParentScope(scope);arr.setPrototype((Scriptable) ctorObj.get("prototype", ctorObj));return arr;} else {// 处理其他情况,或者返回一个默认的 Uint8ArraySimulator 对象return new Uint8ArraySimulator();}}@JSFunctionpublic byte get(int index) {return buffer[index];}@JSFunctionpublic void set(int index, byte value) {buffer[index] = value;}// Add other methods as neededpublic static void init(Context cx, Scriptable scope) throws NoSuchMethodException {Scriptable constructor = cx.newObject(scope);constructor.setPrototype(scope);constructor.setParentScope(null);// 在创建 Uint8Array 构造函数时FunctionObject ctor = new FunctionObject("Uint8Array", Uint8ArraySimulator.class.getDeclaredMethod("createObject", Context.class, Scriptable.class, Object[].class, Function.class), scope);// 将构造函数设置为全局变量scope.put("Uint8Array", scope, ctor);ctor.addAsConstructor(scope, constructor);}
}
3、测试类主程序部分
 private static final String PUBLIC_KEY_URL = "https://1***/vapi/json/public_key";private static final String TICKET_URL = "https://1***/vapi/json/access/ticket";public static void main(String[] args) throws NoSuchAlgorithmException, KeyManagementException {long startTime = System.currentTimeMillis(); // 记录开始时间try {OkHttpClient client = disableSSLClient();// 第一步:获取public keyRequest request1 = new Request.Builder().url(PUBLIC_KEY_URL).get().build();Response response1 = client.newCall(request1).execute();long endTime1 = System.currentTimeMillis(); // 记录结束时间System.out.println("request1 执行时间: "+(endTime1 - startTime) + "ms");if (response1.isSuccessful()) {String public_key = JsonParser.parseString(response1.body().string()).getAsJsonObject().get("data").getAsString();
//                System.out.println("hcicloud-yf, public_key: " + public_key);// 第二步:加密passwdString passwd1 = "123456";  // 你的密码long endTime2 = System.currentTimeMillis(); // 记录结束时间System.out.println("request1逻辑 执行时间: "+(endTime2 - endTime1) + "ms");String encryptedPasswd = callEncode2(public_key, passwd1);
//                System.out.println("hcicloud-yf 加密后密码: " + encryptedPasswd);long endTime3 = System.currentTimeMillis(); // 记录结束时间System.out.println("callEncode2 执行时间: "+(endTime3 - endTime2) + "ms");// 第三步:获取ticketRequestBody requestBody2 = new FormBody.Builder().add("username", "admin").add("password", encryptedPasswd).build();Request request2 = new Request.Builder().url(TICKET_URL).post(requestBody2).build();Response response2 = client.newCall(request2).execute();if (response2.isSuccessful()) {JsonObject responseJson2 = JsonParser.parseString(response2.body().string()).getAsJsonObject().getAsJsonObject("data");String CSRFPreventionToken = responseJson2.get("CSRFPreventionToken").getAsString();String ticket1 = responseJson2.get("ticket").getAsString();System.out.println("CSRFPreventionToken: " + CSRFPreventionToken);System.out.println("ticket1: " + "LoginAuthCookie=".concat(ticket1));}long endTime4 = System.currentTimeMillis(); // 记录结束时间System.out.println("request2执行时间: "+(endTime4 - endTime3) + "ms");} else {
//                System.out.println("HTTP GET request to get public key failed. Error code: " + response1.code());}} catch (IOException e) {e.printStackTrace();}long endTime = System.currentTimeMillis(); // 记录结束时间System.out.println("程序执行时间(毫秒): " + (endTime - startTime));}public static String callEncode2(String publicKey, String password) {String jsFilePath = "D:\\project\\superfusion_rsa.js"; // 指定你的JavaScript文件路径String result = null;try {Context context = Context.enter();context.setOptimizationLevel(-1); // 禁用优化以提高兼容性ScriptableObject scope = context.initStandardObjects();Uint8ArraySimulator.init(context, scope);// 添加全局变量ScriptableObject.putProperty(scope, "public_key", publicKey); // 替换为实际的公钥// 读取并执行JavaScript文件String script = readFile(jsFilePath);context.evaluateString(scope, script, jsFilePath, 1, null);// 获取JavaScript函数对象// 这里假设你的JavaScript文件中有一个名为"encode2"的函数Object encode2Function = scope.get("encode2", scope);// 调用JavaScript函数Object javaScriptResult = Context.call(null, (Function) encode2Function, scope, scope, new Object[]{publicKey, password}); // 替换为实际的密码result = Context.toString(javaScriptResult);} catch (Exception e) {e.printStackTrace();} finally {Context.exit();}return result;}private static String readFile(String filePath) throws Exception {StringBuilder content = new StringBuilder();try (BufferedReader reader = new BufferedReader(new FileReader(filePath))) {String line;while ((line = reader.readLine()) != null) {content.append(line).append("\n");}}return content.toString();}private static OkHttpClient disableSSLClient() throws KeyManagementException, NoSuchAlgorithmException {TrustManager[] trustAllCertificates = new TrustManager[]{new X509TrustManager() {public X509Certificate[] getAcceptedIssuers() {return new X509Certificate[0];}public void checkClientTrusted(X509Certificate[] certs, String authType) {}public void checkServerTrusted(X509Certificate[] certs, String authType) {}}};SSLContext sslContext = SSLContext.getInstance("TLS");sslContext.init(null, trustAllCertificates, new java.security.SecureRandom());OkHttpClient client = new OkHttpClient.Builder().sslSocketFactory(sslContext.getSocketFactory(), (X509TrustManager) trustAllCertificates[0]).hostnameVerifier((hostname, session) -> true).build();return client;}
4、结果输出
com.vcom.pmfr.superfusion.RSAEncryptionExample
request1 执行时间: 1164ms
request1逻辑 执行时间: 21ms
callEncode2 执行时间: 737ms
CSRFPreventionToken: 6***62:COMo0***sMWbo+rkmVBU
ticket1: LoginAuthCookie=Login:YW***W4=:6****62::vAXN0CC1LEz*****m5WDAAwTR/BKfPit60dW00eaLzcPAcQ5Hz/zK7EgTzDutZuizdxsCy1mgevvpHjwr5Mim7xdEZKuE3cCBteBc22+kTWo3h7Vkfs2y7lwVz+UDuSfAfy2zJ6n1iYUhZx1txHad74nOOd36iN605sJNeYa4KkC7fAejLVD/oTIM2yjRR9vVfKPwC4SJDy7uZJ1Mxz/Qr5muTo4kvMDVdySH/VKf5ME6pe1bAMypdlSkl84NAuX6ghIkJk3O9rLUZG/a2At/qTL788ldsN/Sip/aNvyHMA9ueoF/R4pJUaIUdo4O1g0mRbmAb7nRr+orb8shnw==
request2执行时间: 1645ms
程序执行时间(毫秒): 3567
5、接口测试
这篇关于使用java代码调用超融合登录接口,跟着敲就完事,官方文档也没有的资源~的文章就介绍到这儿,希望我们推荐的文章对编程师们有所帮助!


