本文主要是介绍【三】kubernetes kuboard部署分布式系统,希望对大家解决编程问题提供一定的参考价值,需要的开发者们随着小编来一起学习吧!
#服务器 #部署 #云原生 #k8s
目录
- 一、前言
- 二、搭建docker私有仓库
- 三、系统搭建
- 1、NFS部署
- 1)部署nfs server (192.168.16.200)
- 2)部署nfs client (全部节点)
- 3)在Kuboard中创建 NFS 存储类
- 2、创建命名空间
- 3、添加docker密文
- 4、创建工作负载(workload)
- 1)部署中间件
- 2)部署API网关
- 3) 部署持久层
- 4)部署微服务层
- 5)部署展示层
- 5、验证web-example部署情况
本系列文章:
一、ubuntu20.04上搭建containerd版( 1.2.4 以上)k8s及kuboard V3
二、kubernetes master单节点拓展为集群
一、前言
接上文,我们已经部署了k8s集群,本文将讲解如何利用kuboard部署完整的微服务系统。具体包括docker私有仓库的搭建、工作负载的创建、配置中心、存储挂载、负载均衡等内容。
二、搭建docker私有仓库
- 选取任意有docker的主机搭建私有仓库 例如我选取200作为私仓
#拉取私有仓库的镜像
docker pull registry
- 为docker registry增加用户密码
安装Apache的htpasswd工具。使用htpasswd生成密钥:
sudo apt-get install apache2-utils
mkdir auth
#"username"和"password"分别是你要设置的用户名和密码
htpasswd -Bc ./auth/htpasswd username
#输入密码
password
#再次确认密码
password
- 保存为启动脚本,并执行
vim docker-registry-init.sh
docker run -d \
-p 5000:5000 \
-v ./data:/var/lib/registry \
-v ./auth:/auth \
-e "REGISTRY_AUTH=htpasswd" \
-e "REGISTRY_AUTH_HTPASSWD_REALM=Registry Realm" \
-e "REGISTRY_AUTH_HTPASSWD_PATH=/auth/htpasswd" \
--restart=always \
registry
chmod 777 docker-registry-init.sh
./docker-registry-init.sh
- 允许不安全访问
先使用docker login 登录
docker login 192.168.16.200:5000
docker login 之后,会在 /root/.docker/config.json 中保存base64编码后的用户名和密码信息。
执行 sudo cat /root/.docker/config.json 打印文件内容,如下:
{"auths": {"192.168.16.200:5000": {"auth": "Y2p4OnJvb3Q="}}允许不安全访问
vim /etc/docker/daemon.json{ "registry-mirrors": ["https://your.mirror.aliyuncs.com"],
"insecure-registries":["http://192.168.16.200:5000"]#允许不安全访问
}- 重启docker服务
systemctl restart docker
5.拉取测试用例用到的镜像,并上传到私库
docker pull swr.cn-east-2.myhuaweicloud.com/kuboard-dependency/example-cloud-eureka:v1.0.0-alpha.1
docker pull swr.cn-east-2.myhuaweicloud.com/kuboard-dependency/example-db-example:v1.0.0-alpha.1
docker pull swr.cn-east-2.myhuaweicloud.com/kuboard-dependency/example-gateway-example:v1.0.0-alpha.1
docker pull swr.cn-east-2.myhuaweicloud.com/kuboard-dependency/example-svc-example:v1.0.0-alpha.1
docker pull swr.cn-east-2.myhuaweicloud.com/kuboard-dependency/example-web-example:v1.0.0-alpha.1docker tag swr.cn-east-2.myhuaweicloud.com/kuboard-dependency/example-cloud-eureka:v1.0.0-alpha.1 192.168.16.200:5000/kuboard-dependency/example-cloud-eureka:v1.0.0-alpha.1
docker tag swr.cn-east-2.myhuaweicloud.com/kuboard-dependency/example-db-example:v1.0.0-alpha.1 192.168.16.200:5000/kuboard-dependency/example-db-example:v1.0.0-alpha.1
docker tag swr.cn-east-2.myhuaweicloud.com/kuboard-dependency/example-gateway-example:v1.0.0-alpha.1 192.168.16.200:5000/kuboard-dependency/example-gateway-example:v1.0.0-alpha.1
docker tag swr.cn-east-2.myhuaweicloud.com/kuboard-dependency/example-svc-example:v1.0.0-alpha.1 192.168.16.200:5000/kuboard-dependency/example-svc-example:v1.0.0-alpha.1
docker tag swr.cn-east-2.myhuaweicloud.com/kuboard-dependency/example-web-example:v1.0.0-alpha.1 192.168.16.200:5000/kuboard-dependency/example-web-example:v1.0.0-alpha.1docker push 192.168.16.200:5000/kuboard-dependency/example-cloud-eureka:v1.0.0-alpha.1
docker push 192.168.16.200:5000/kuboard-dependency/example-db-example:v1.0.0-alpha.1
docker push 192.168.16.200:5000/kuboard-dependency/example-gateway-example:v1.0.0-alpha.1
docker push 192.168.16.200:5000/kuboard-dependency/example-svc-example:v1.0.0-alpha.1
docker push 192.168.16.200:5000/kuboard-dependency/example-web-example:v1.0.0-alpha.1
6.查看是否上传成功
#docker push 192.168.16.200:5000/{hubname}/{docker_name}:{docker_version}curl -u username:password -XGET http://192.168.16.200:5000/v2/_catalog
7.containerd中配置允许不安全访问
新版k8s使用containerd去拉取镜像,如果不在containerd中配置registry,k8s会默认使用https拉取镜像,就会出现以下错误:
Failed to pull image "192.168.16.200:5000/kuboard-dependency/example-gateway-example:v1.0.0-alpha.1": failed to pull and unpack image "192.168.16.200:5000/kuboard-dependency/example-gateway-example:v1.0.0-alpha.1": failed to resolve reference "192.168.16.200:5000/kuboard-dependency/example-gateway-example:v1.0.0-alpha.1": failed to do request: Head "https://192.168.16.200:5000/v2/kuboard-dependency/example-gateway-example/manifests/v1.0.0-alpha.1": http: server gave HTTP response to HTTPS client
修改containerd的配置文件(注意!!每个节点上的containerd的配置都要修改)
vim /etc/containerd/config.toml
[plugins."io.containerd.grpc.v1.cri".registry]config_path = ""[plugins."io.containerd.grpc.v1.cri".registry.auths][plugins."io.containerd.grpc.v1.cri".registry.configs][plugins."io.containerd.grpc.v1.cri".registry.configs."192.168.16.200:5000".tls]insecure_skip_verify = true[plugins."io.containerd.grpc.v1.cri".registry.headers][plugins."io.containerd.grpc.v1.cri".registry.mirrors][plugins."io.containerd.grpc.v1.cri".registry.mirrors."192.168.16.200:5000"]endpoint = ["http://192.168.16.200:5000"]sudo systemctl restart containerd
三、系统搭建
本次实战准备了一个最简单的微服务 example 作为例子,该 example 只实现了对一张简单数据库表执行 CRUD 操作的功能,该 example 的部署架构如下图所示,源代码请参考 kuboard-example (opens new window),也可以直接通过 Kuboard 导入 example 微服务
架构如下:
![![[Pasted image 20230905210612.png]]](https://img-blog.csdnimg.cn/18e69329ebfc44bba60d9ee400dcf1f0.png)
yaml 下载地址:
https://kuboard.cn/kuboard_example_v3_119.yaml
本文主要的目的是为了让读者能更好地熟悉kuboard中创建工作负载时需要填写的参数与yaml中的参数的映射关系,故不会对容器中所使用到的环境变量、环境变量的值进行详细的讲解。截图中填写的参数值均能从yaml中找到。
1、NFS部署
Kubernetes 对 Pod 进行调度时,以当时集群中各节点的可用资源作为主要依据,自动选择某一个可用的节点,并将 Pod 分配到该节点上。在这种情况下,Pod 中容器数据的持久化如果存储在所在节点的磁盘上,就会产生不可预知的问题,例如,当 Pod 出现故障,Kubernetes 重新调度之后,Pod 所在的新节点上,并不存在上一次 Pod 运行时所在节点上的数据。
为了使 Pod 在任何节点上都能够使用同一份持久化存储数据,我们需要使用网络存储的解决方案为 Pod 提供数据卷。常用的网络存储方案有:NFS/cephfs/glusterfs。
1)部署nfs server (192.168.16.200)
- 安装nfs服务
#安装nfs服务
sudo apt install nfs-kernel-server
#创建共享目录
sudo mkdir -p /nfs-data
- 编辑配置文件,添加共享目录
#设置共享目录
sudo vim /etc/exports
#添加以下内容
/nfs-data *(rw,sync,no_subtree_check,no_root_squash)
- 重启服务
sudo service nfs-kernel-server restart
sudo service nfs-kernel-server status
#校验配置
showmount -e
- 创建测试文件
vim test.txt
2)部署nfs client (全部节点)
#安装连接客户端
apt install nfs-common -y#挂载
mkdir /nfs-data
mount 192.168.16.200:/nfs-data /nfs-data#查看测试文件是否存在
ls /nfs-data
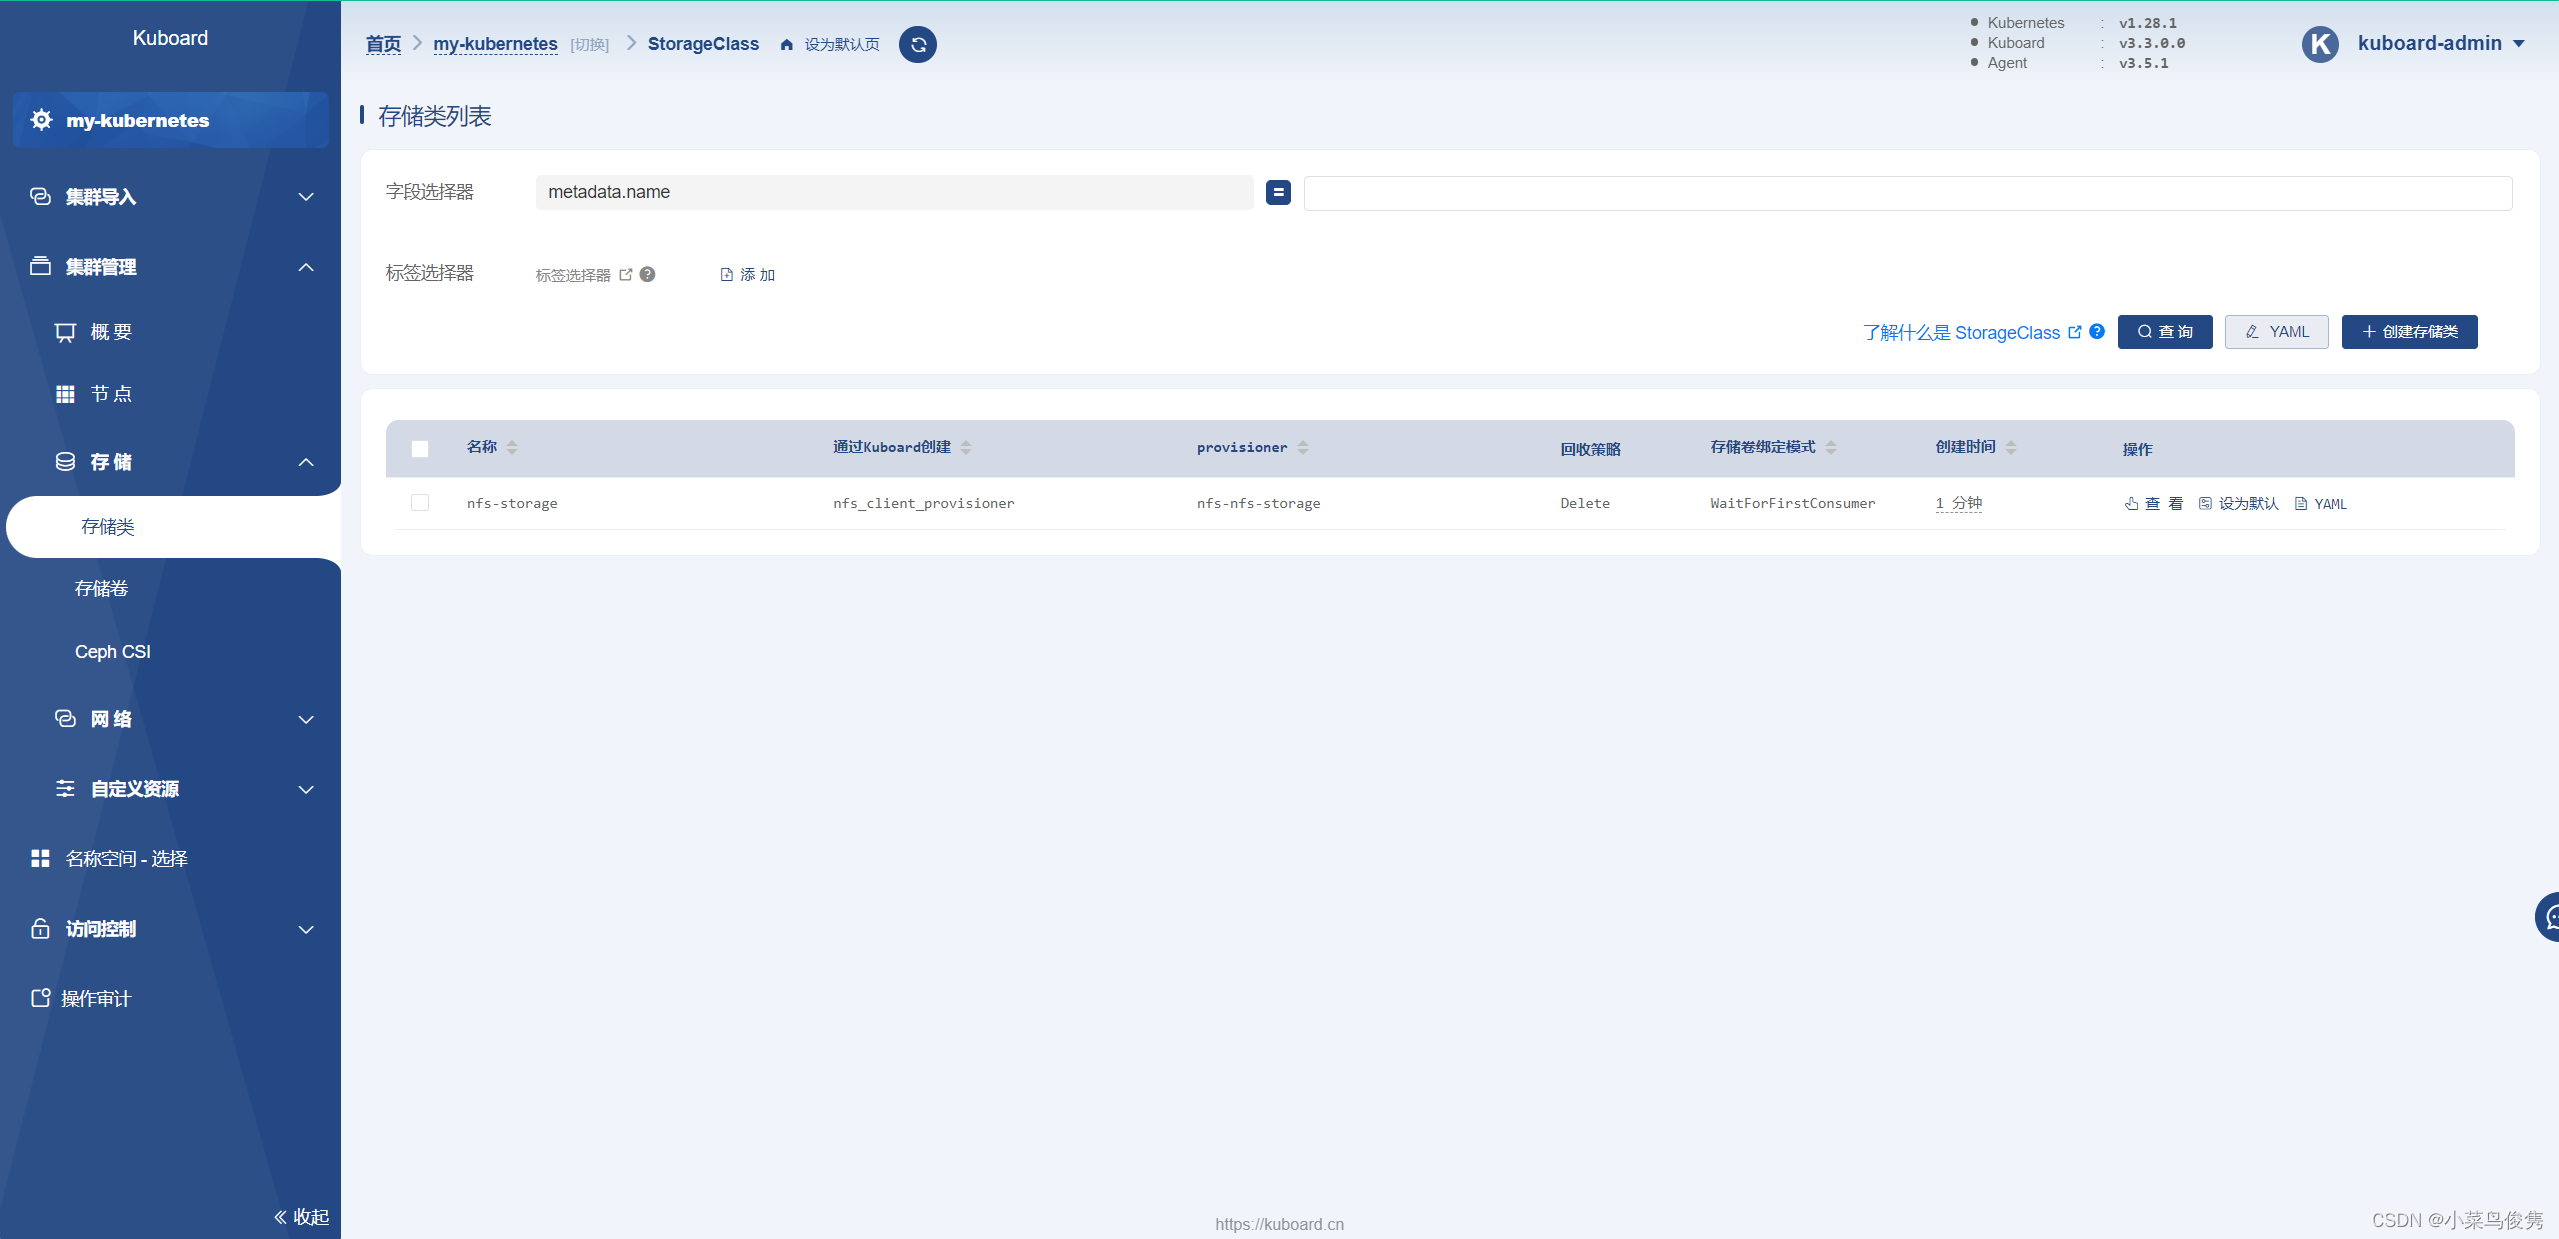
3)在Kuboard中创建 NFS 存储类
进入集群管理—存储类,创建存储类,将nfs的信息填写到相应参数位置,点击确定。
![![[../../../附件/Pasted image 20230925185516.png]]](https://img-blog.csdnimg.cn/a7fb3d9b535e4dc0be6c761125591543.png)
点击应用
![![[../../../附件/Pasted image 20230925185630.png]]](https://img-blog.csdnimg.cn/346a1f0e8e2843dcacef99b772629d59.png)
nfs已添加
2、创建命名空间
点击编辑命名空间
点击创建、填写命名空间,比如我这里就起名为example
![![[Pasted image 20230904202145.png]]](https://img-blog.csdnimg.cn/b80e6fc4c7914edeb7ddfe4547d5b953.png)
3、添加docker密文
填写上面registry的账号密码
配置中心—密文—创建Secret
![![[../../../附件/Pasted image 20231010212924.png]]](https://img-blog.csdnimg.cn/33c2d8bdb7f9464995e0f528cef7406a.png)
命名为registry-200
4、创建工作负载(workload)
Kubernetes 中,与 Workload 相关的概念非常多,Kuboard 从微服务部署的实际需要出发,按照下图所示的方式理解这些相关概念:
![![[../../../附件/Pasted image 20230925211427.png]]](https://img-blog.csdnimg.cn/2c1070903b3348be85b9d587e957818b.png)
Kuboard 工作负载视图中,关联的 Kubernetes 中如下几个重要的概念:
- Label / Label Selector
- Workload Controller 工作负载控制器(Deployment / StatefulSet / DaemonSet)
- Volume 数据卷
- ImagePullSecrets (Docker 仓库用户名密码,用于访问私有 docker 镜像仓库)
- ServiceAccount
- Container 容器
- Service 访问方式
- Ingress 互联网入口
以上摘自:Kuboard控制台官网
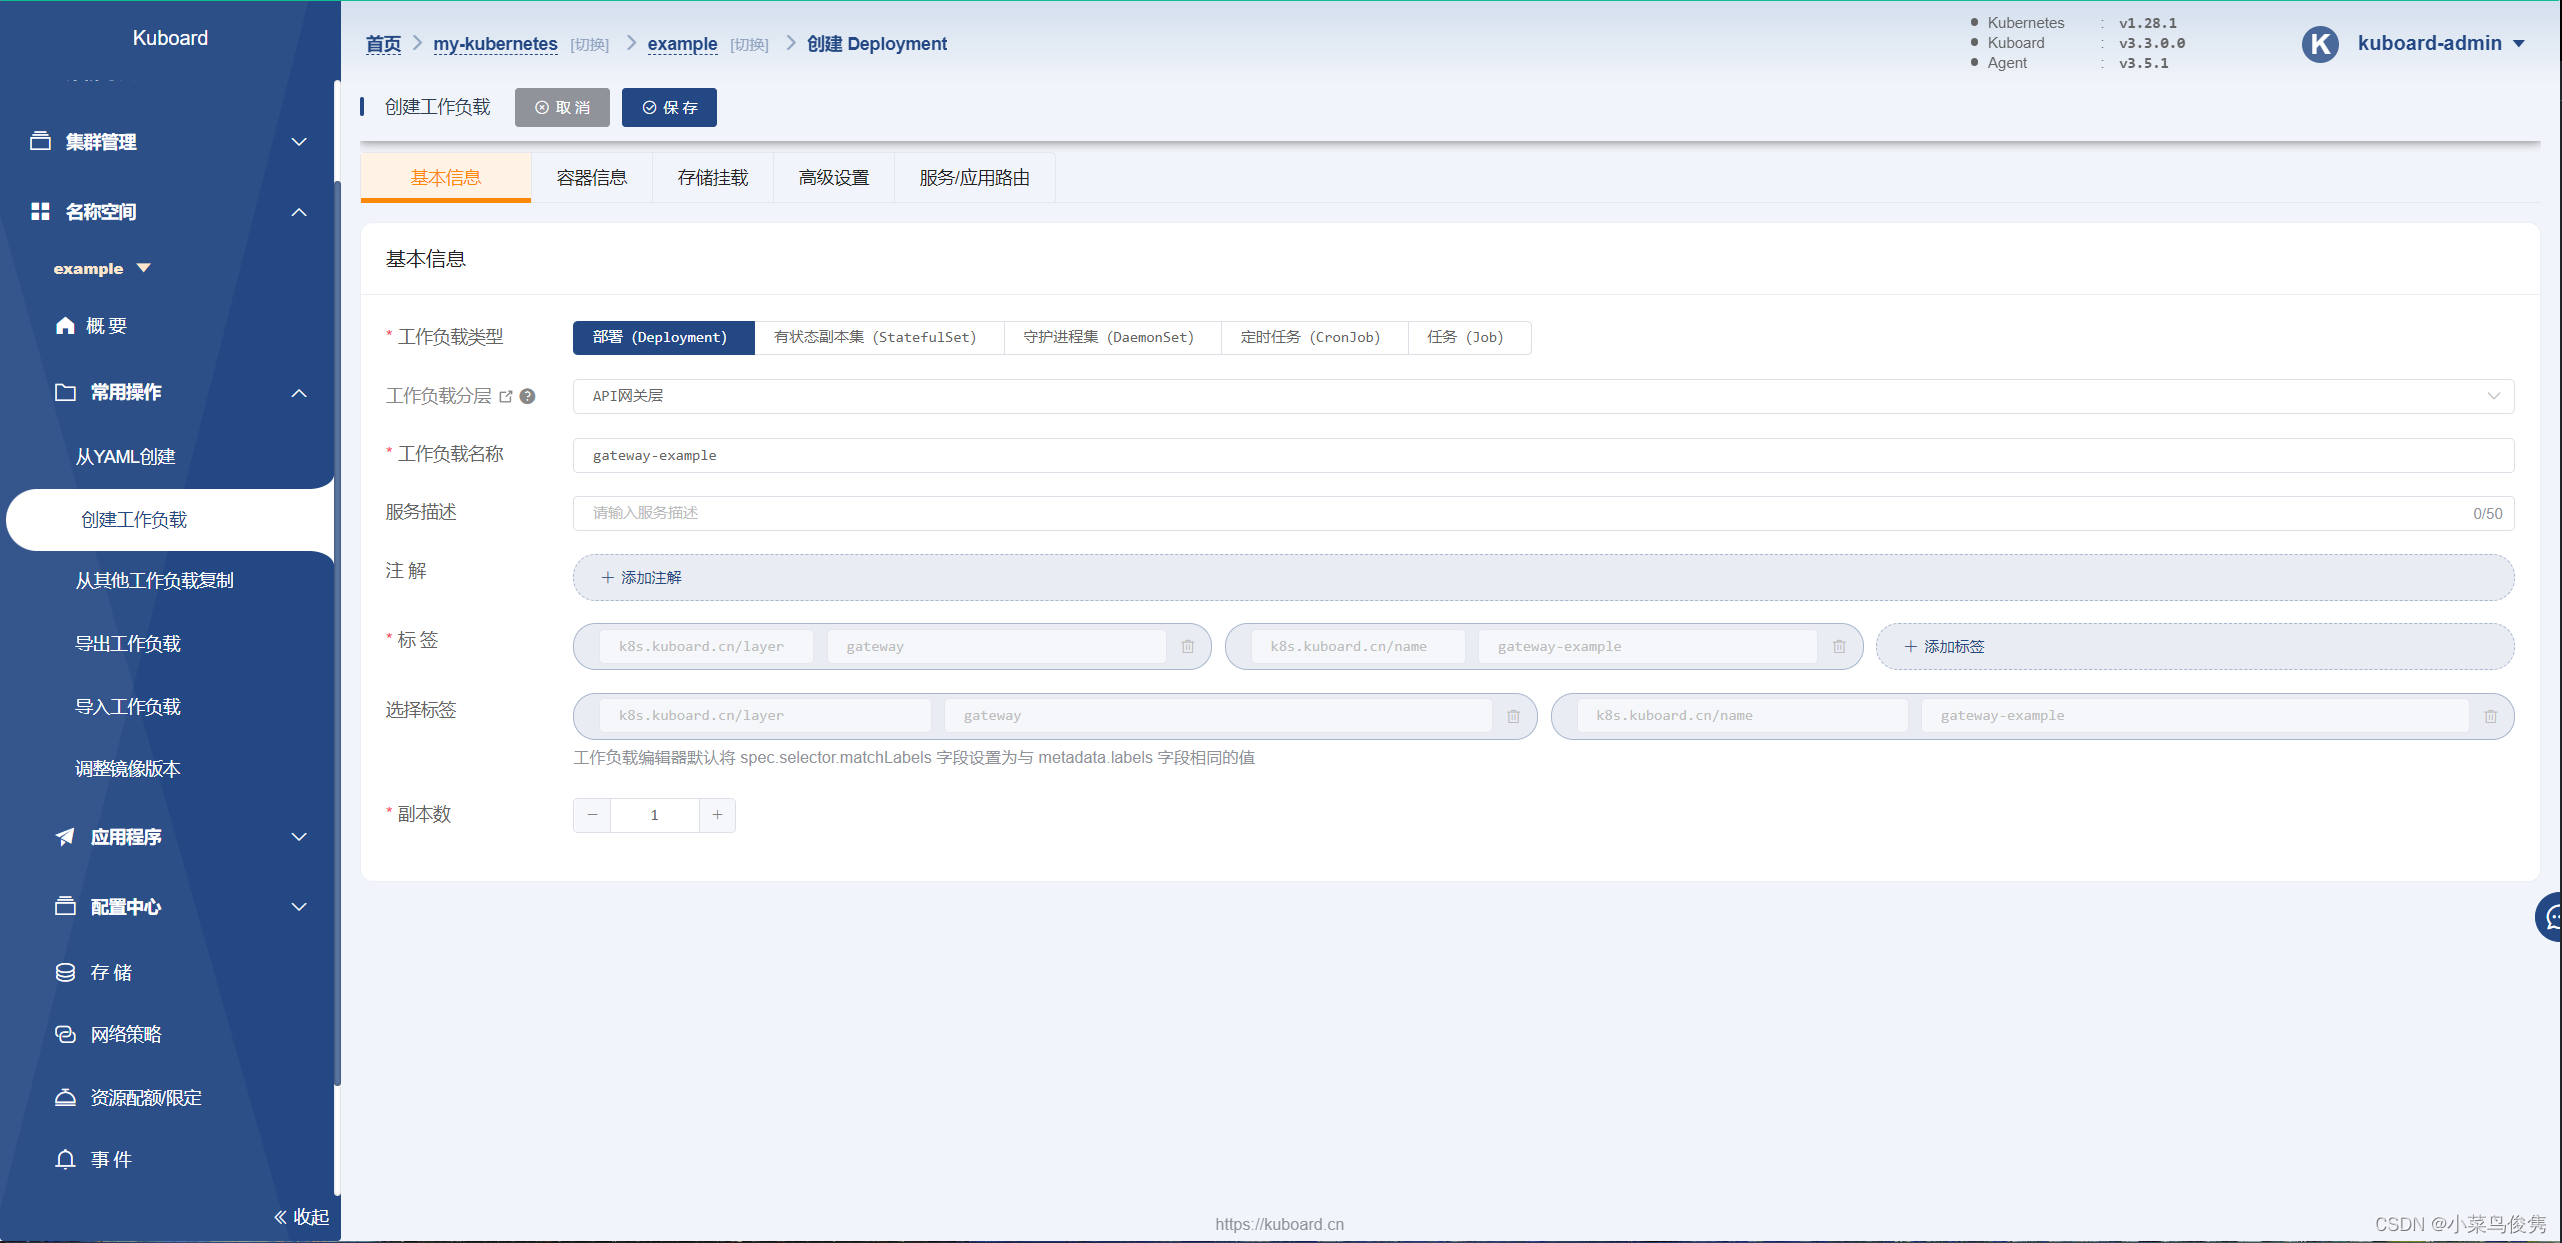
1)部署中间件
- 基本信息填写
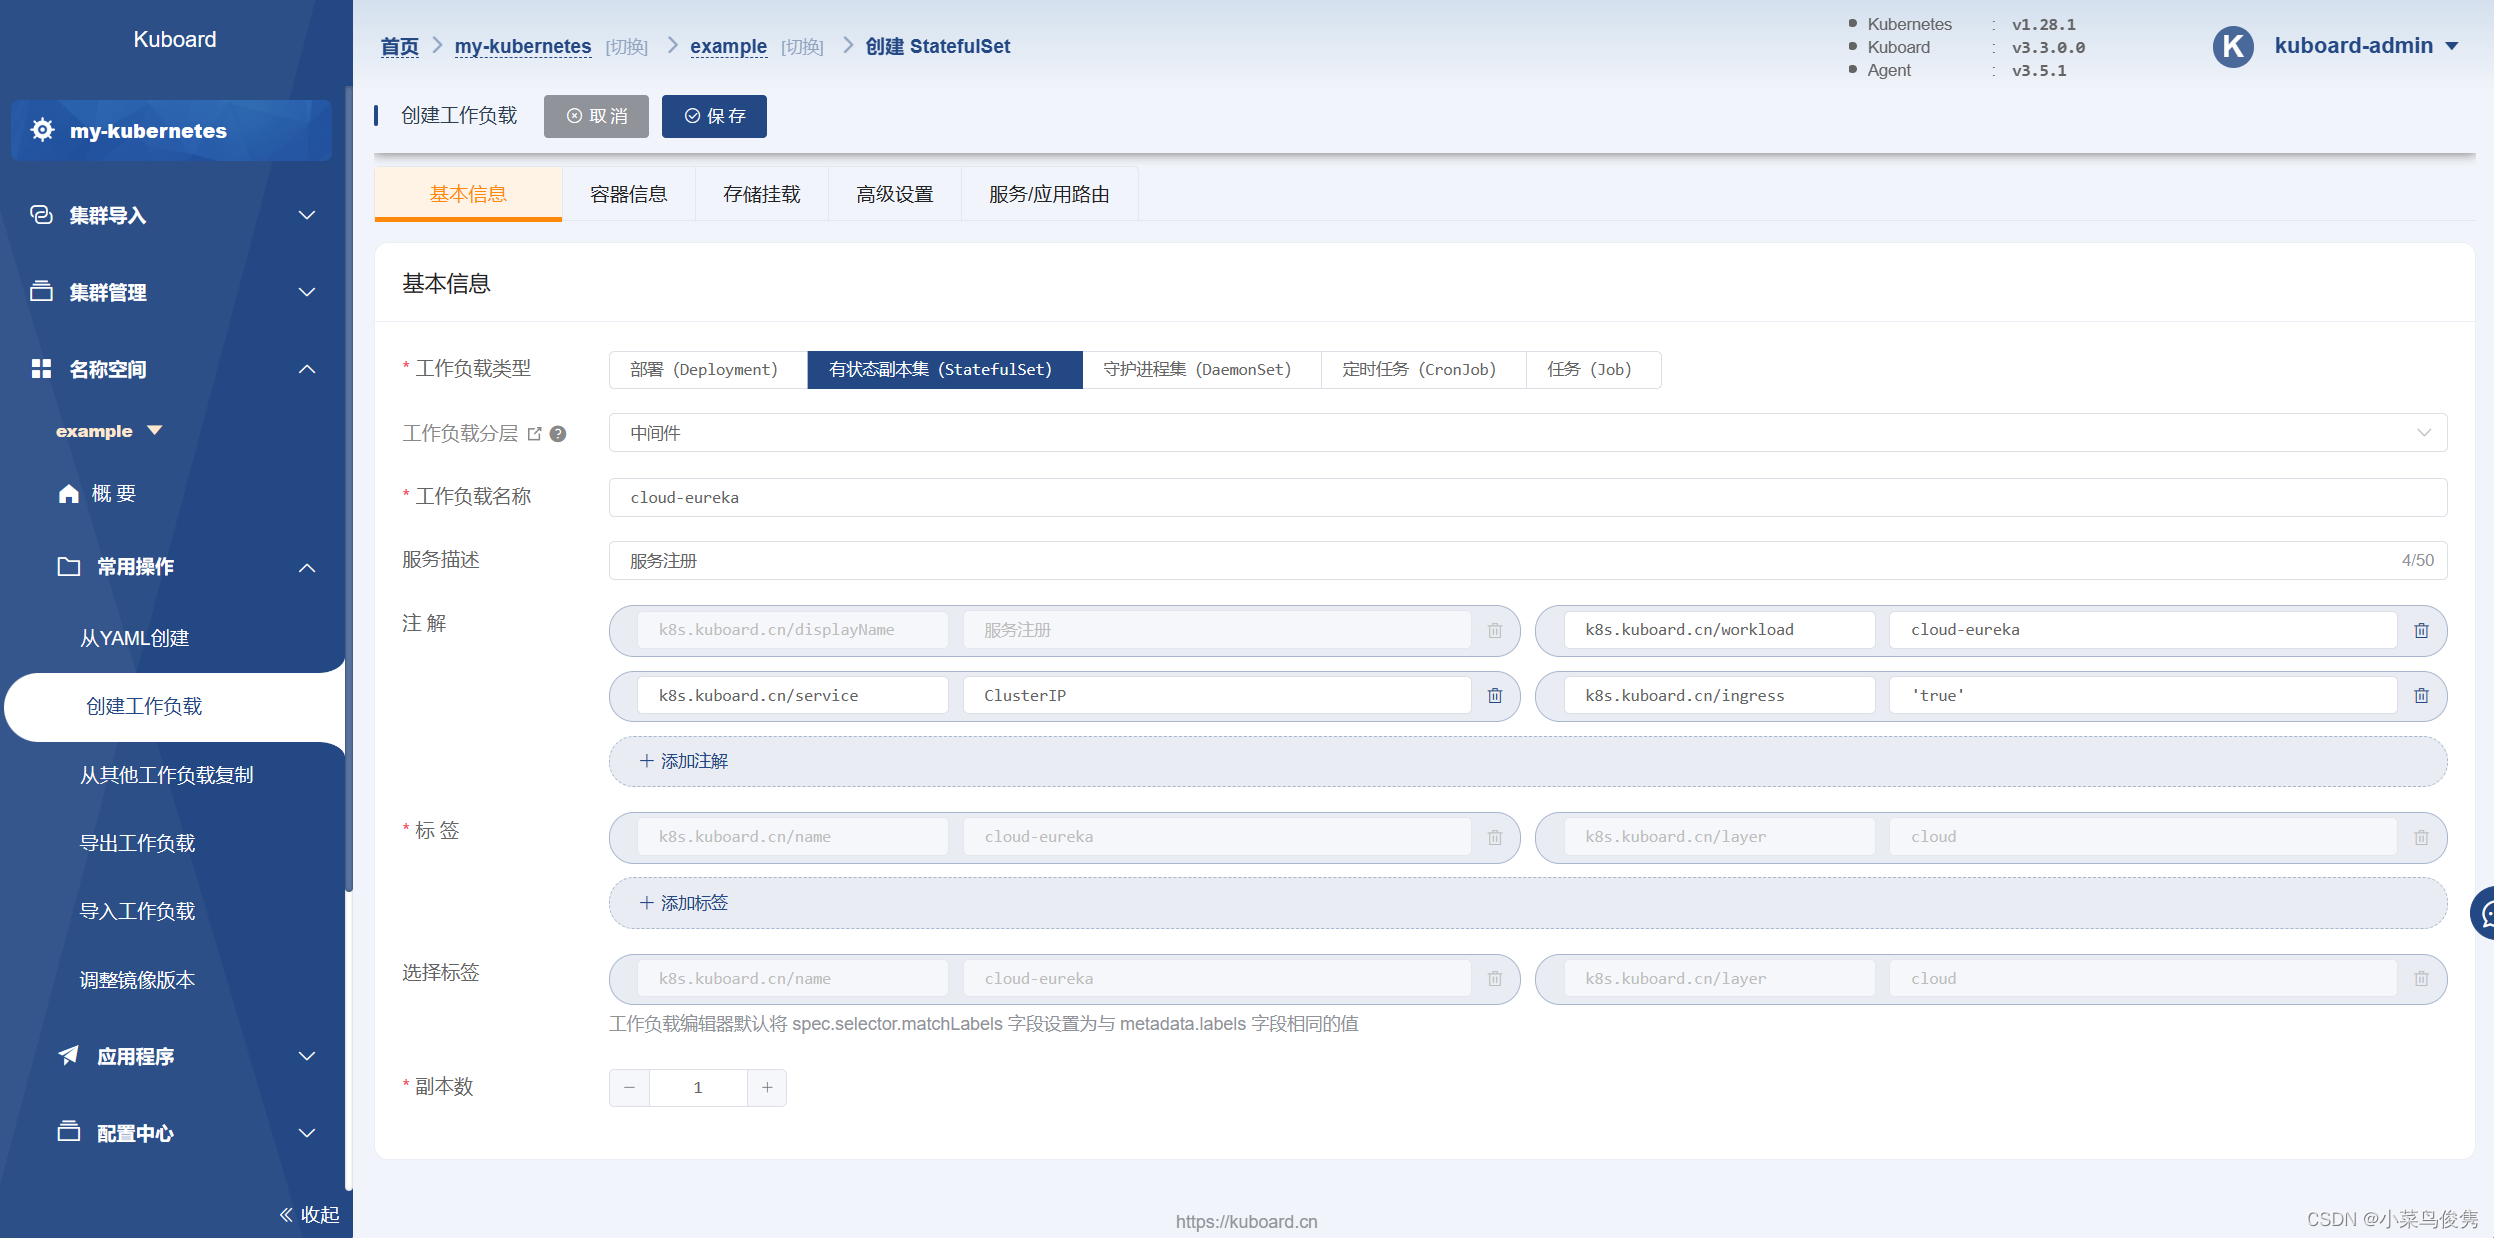
2.添加容器信息
添加工作容器
![![[../../../附件/Pasted image 20231011170758.png]]](https://img-blog.csdnimg.cn/d4847aaf3bd542f8ae6d6500e0d99bb9.png)
添加服务
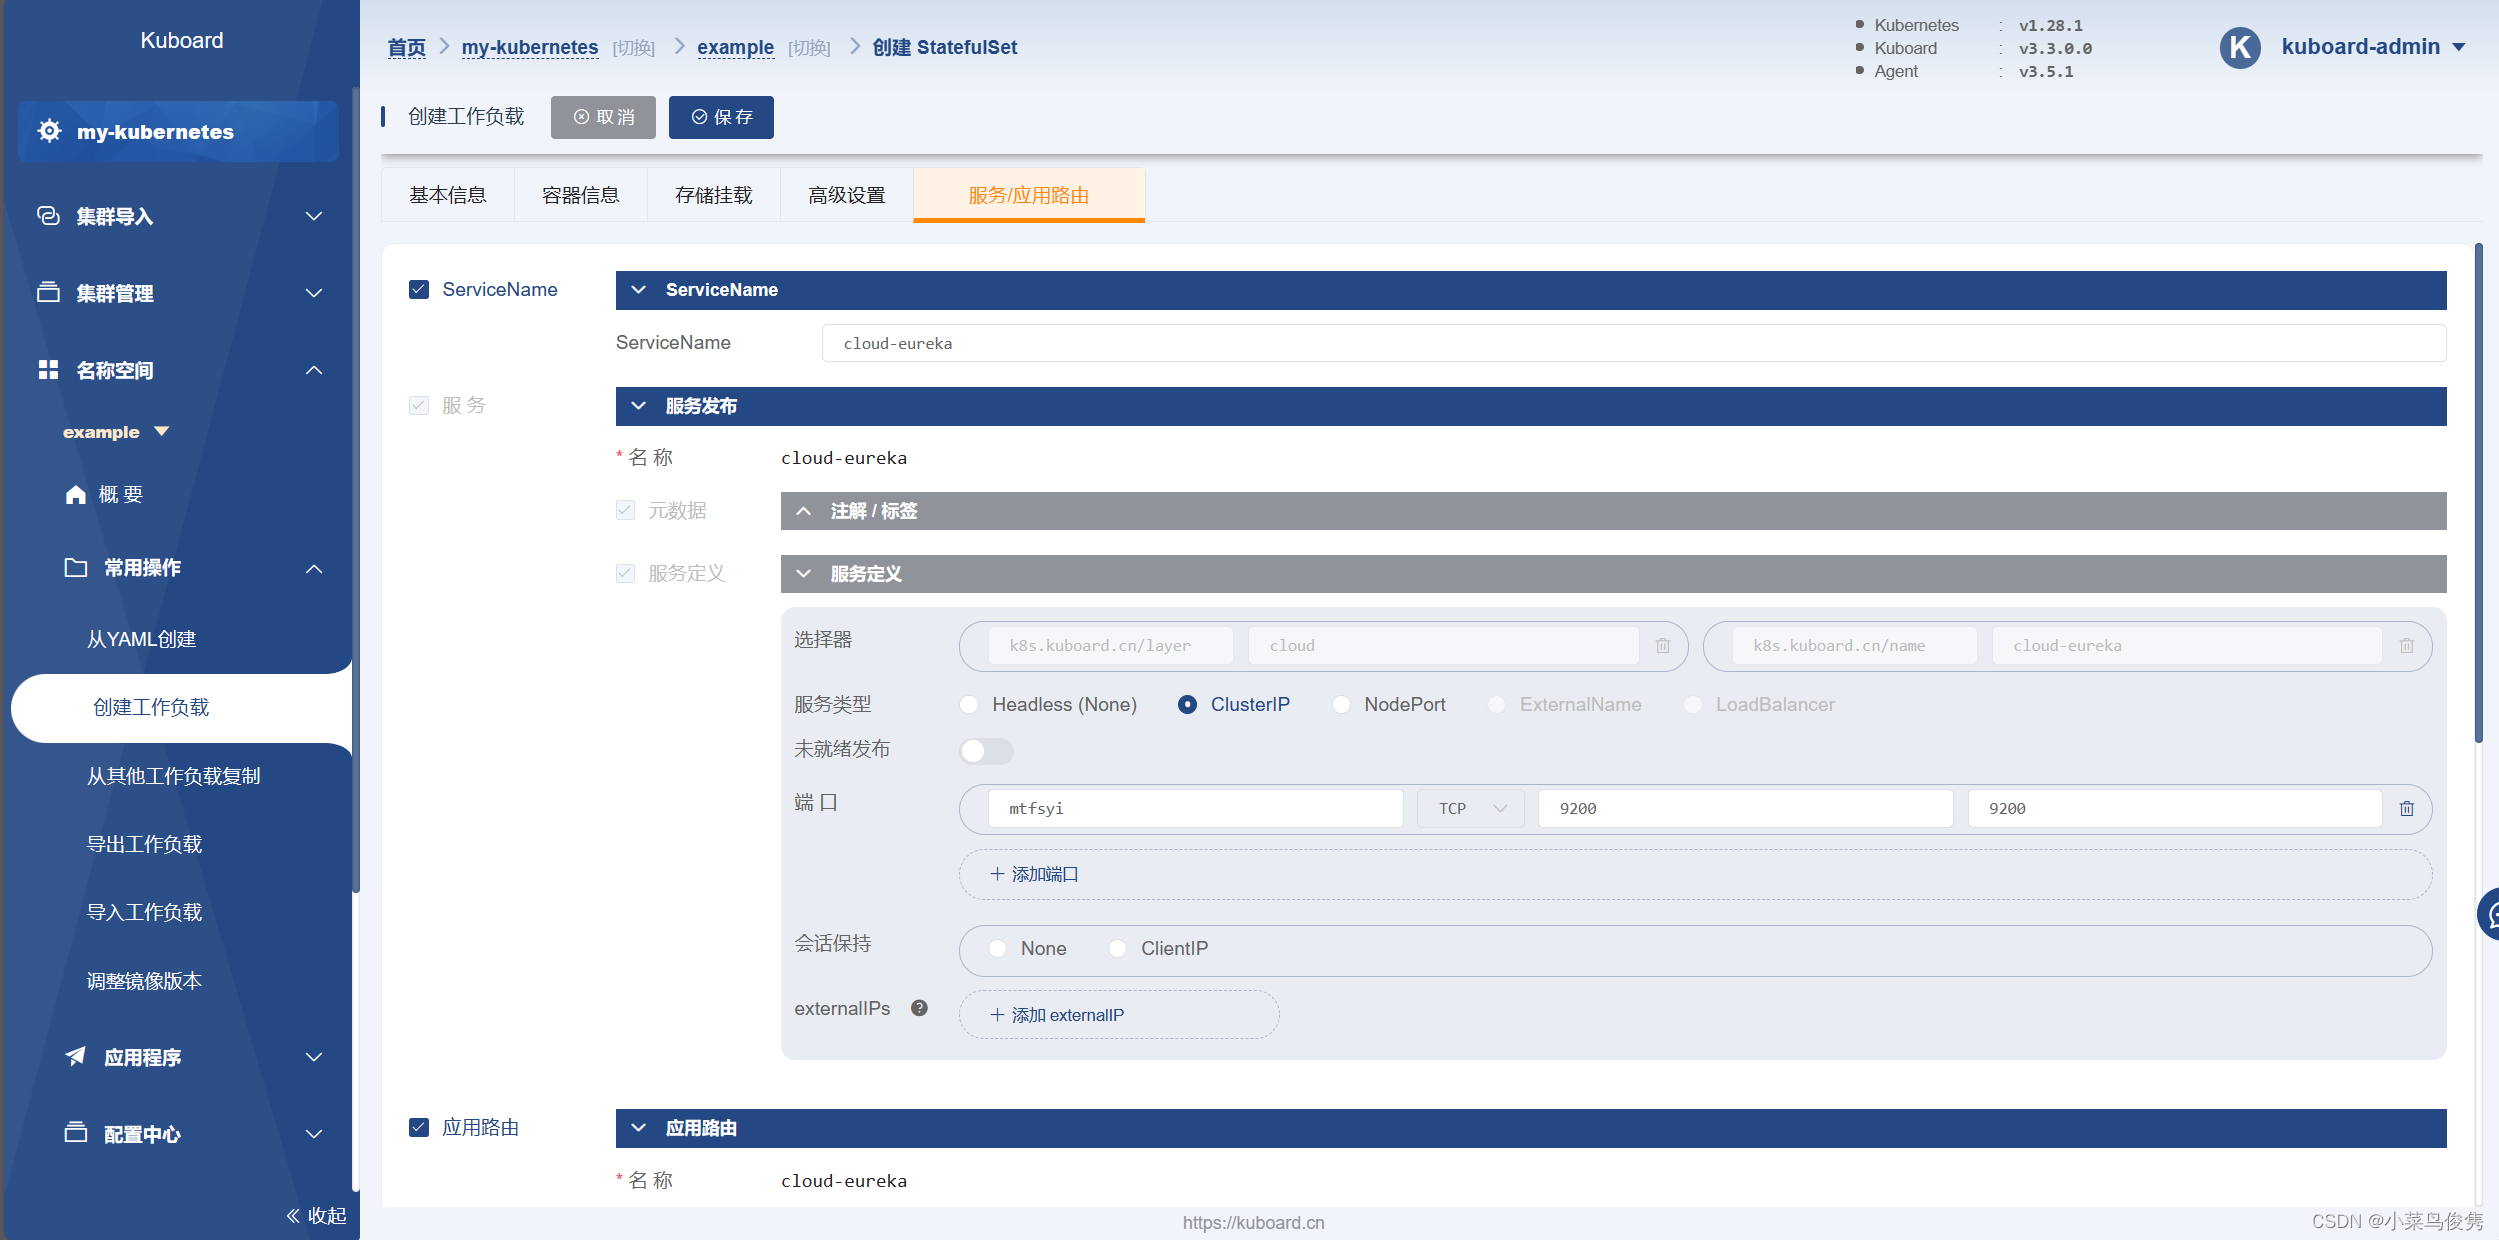
添加应用路由
![![[../../../附件/Pasted image 20231011170900.png]]](https://img-blog.csdnimg.cn/ea8bba182941436f977b1c77dcc835a0.png)
3.应用 并预览yaml
yaml:
---
apiVersion: apps/v1
kind: StatefulSet
metadata:annotations:k8s.kuboard.cn/displayName: 服务注册k8s.kuboard.cn/ingress: 'true'k8s.kuboard.cn/service: ClusterIPk8s.kuboard.cn/workload: cloud-eurekalabels:k8s.kuboard.cn/layer: cloudk8s.kuboard.cn/name: cloud-eurekaname: cloud-eurekanamespace: exampleresourceVersion: '274940'
spec:persistentVolumeClaimRetentionPolicy:whenDeleted: RetainwhenScaled: RetainpodManagementPolicy: OrderedReadyreplicas: 1revisionHistoryLimit: 10selector:matchLabels:k8s.kuboard.cn/layer: cloudk8s.kuboard.cn/name: cloud-eurekaserviceName: cloud-eurekatemplate:metadata:creationTimestamp: nulllabels:k8s.kuboard.cn/layer: cloudk8s.kuboard.cn/name: cloud-eurekaspec:containers:- env:- name: CLOUD_EUREKA_DEFAULT_ZONEvalue: 'http://cloud-eureka-0:9200/eureka'image: >-192.168.16.200:5000/kuboard-dependency/example-cloud-eureka:v1.0.0-alpha.1imagePullPolicy: IfNotPresentname: cloud-eurekaresources: {}terminationMessagePath: /dev/termination-logterminationMessagePolicy: FilednsPolicy: ClusterFirstimagePullSecrets:- name: registry-200restartPolicy: AlwaysschedulerName: default-schedulersecurityContext: {}terminationGracePeriodSeconds: 30updateStrategy:rollingUpdate:partition: 0type: RollingUpdate
status:availableReplicas: 1collisionCount: 0currentReplicas: 1currentRevision: cloud-eureka-66bd975b65observedGeneration: 1readyReplicas: 1replicas: 1updateRevision: cloud-eureka-66bd975b65updatedReplicas: 1---
apiVersion: v1
kind: Service
metadata:annotations: {}labels:k8s.kuboard.cn/layer: cloudk8s.kuboard.cn/name: cloud-eurekaname: cloud-eurekanamespace: exampleresourceVersion: '274926'
spec:clusterIP: 10.102.213.170clusterIPs:- 10.102.213.170internalTrafficPolicy: ClusteripFamilies:- IPv4ipFamilyPolicy: SingleStackports:- name: mtfsyiport: 9200protocol: TCPtargetPort: 9200selector:k8s.kuboard.cn/layer: cloudk8s.kuboard.cn/name: cloud-eurekasessionAffinity: Nonetype: ClusterIP
status:loadBalancer: {}
2)部署API网关
- 基本信息填写
- 添加容器信息
添加工作容器
![![[../../../附件/Pasted image 20230925212014.png]]](https://img-blog.csdnimg.cn/21a88179e38748e9a2b35ed55abbacf6.png)
- 添加服务/应用路由
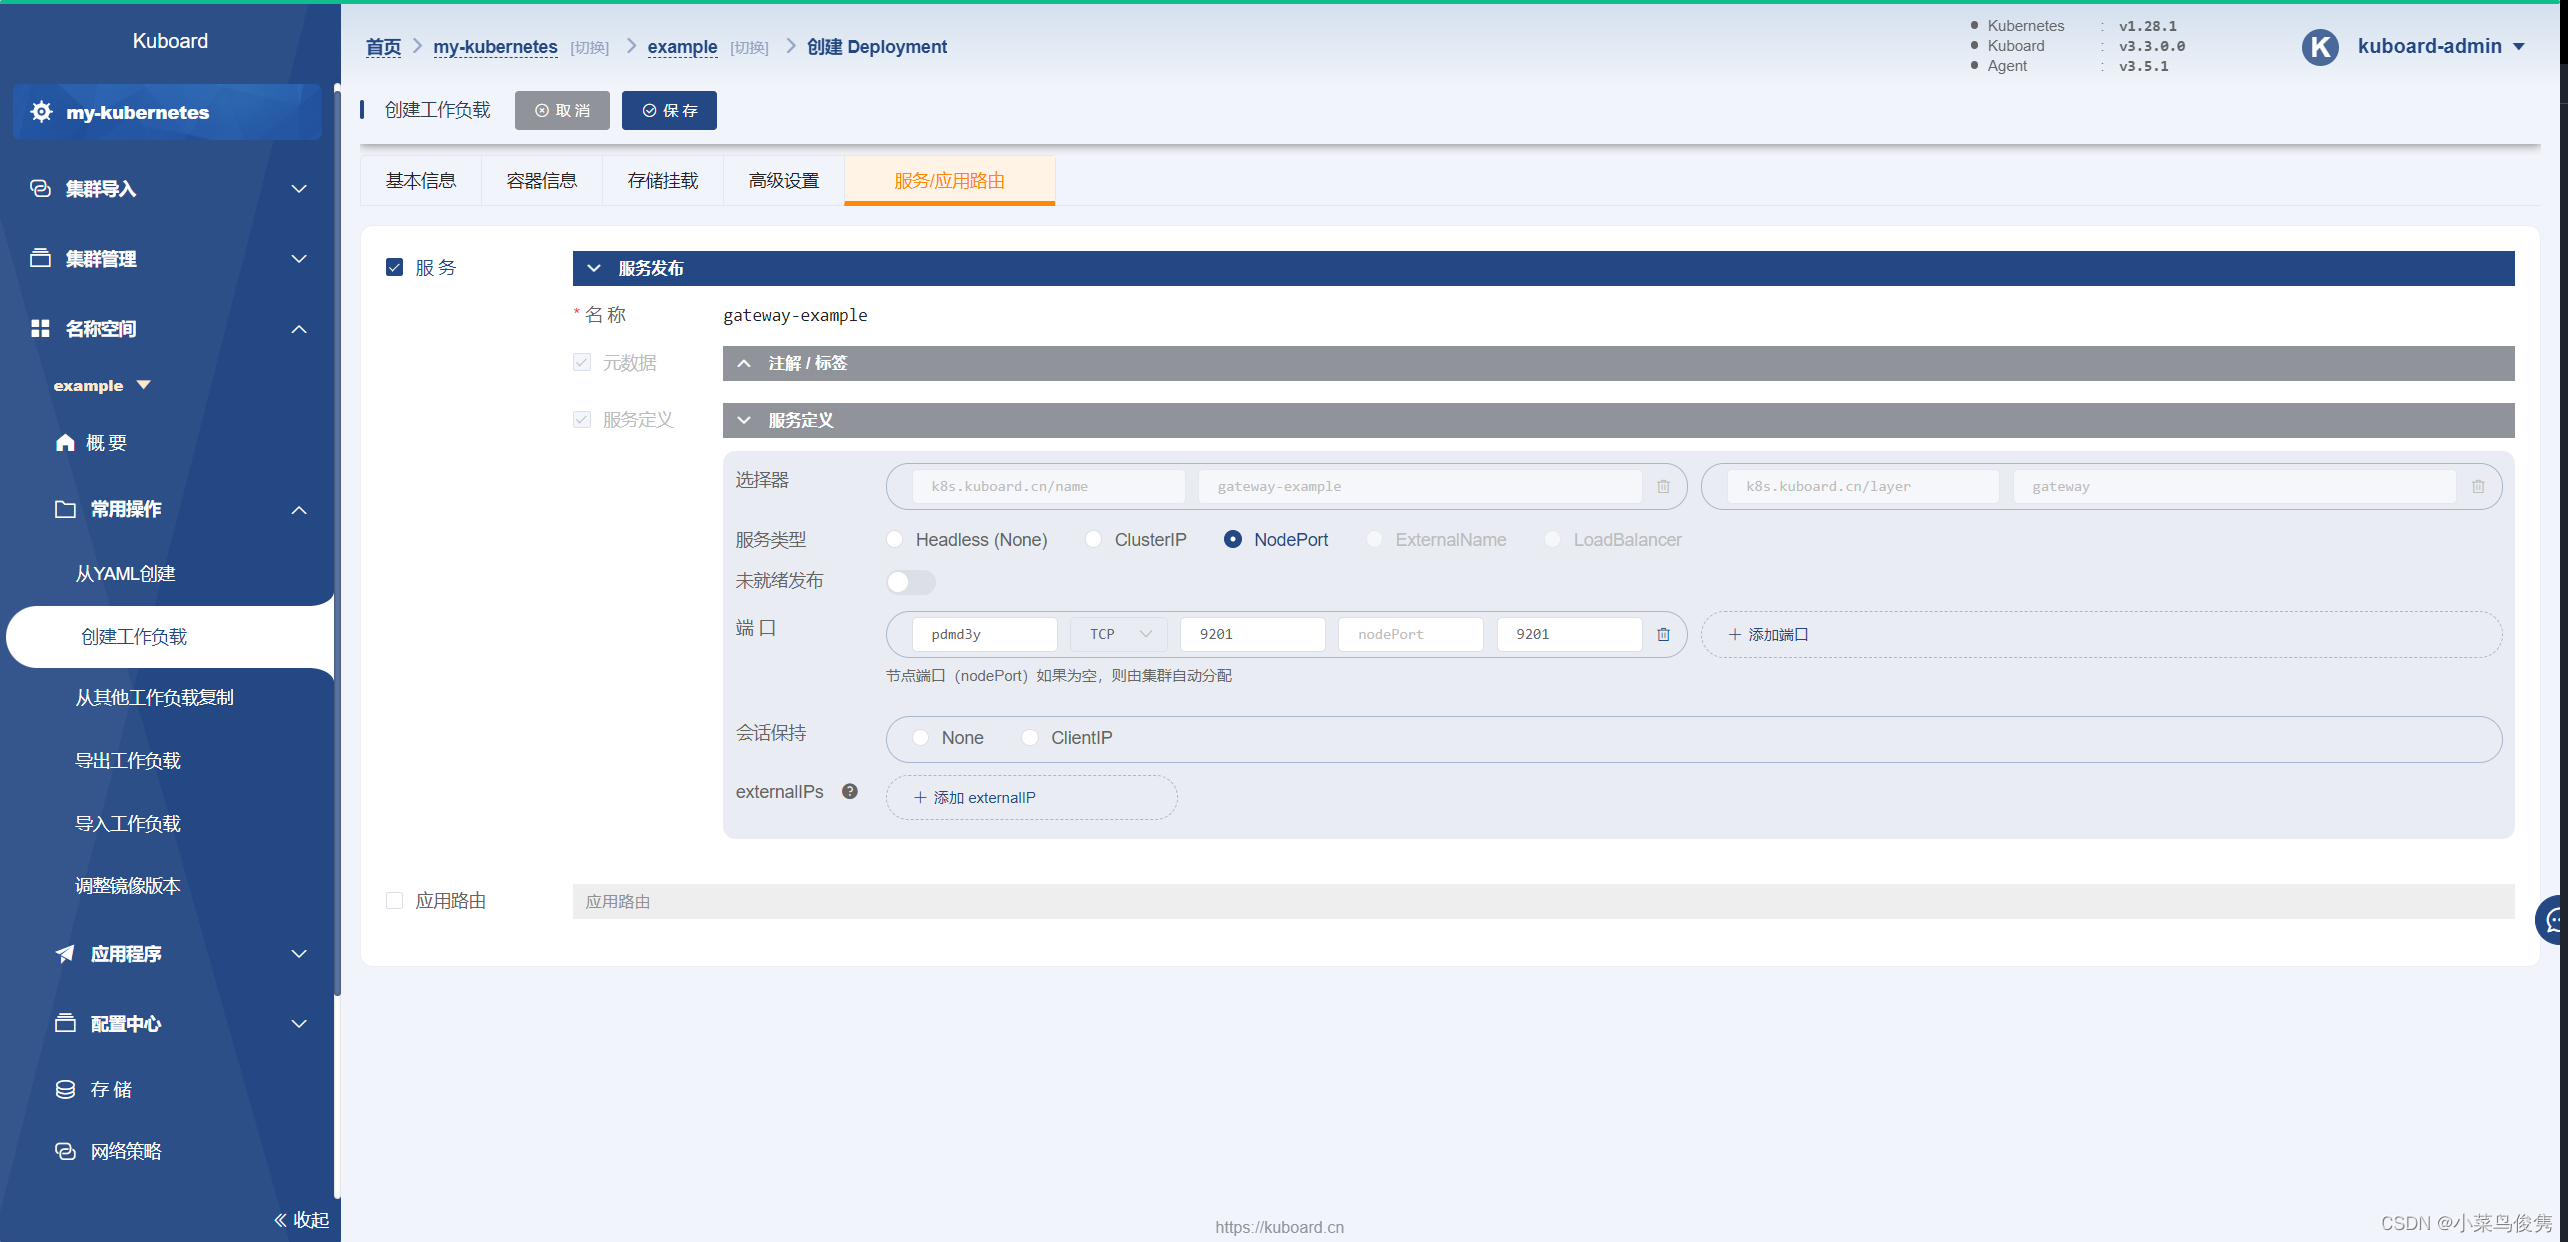
- 预览yaml
![![[../../../附件/Pasted image 20230925212421.png]]](https://img-blog.csdnimg.cn/3bd1c90ea58343b6ad2510c59a70d4fc.png)
yaml:
---
apiVersion: apps/v1
kind: Deployment
metadata:annotations: {}labels:k8s.kuboard.cn/layer: gatewayk8s.kuboard.cn/name: gateway-examplename: gateway-examplenamespace: exampleresourceVersion: '214775'
spec:progressDeadlineSeconds: 600replicas: 1revisionHistoryLimit: 10selector:matchLabels:k8s.kuboard.cn/layer: gatewayk8s.kuboard.cn/name: gateway-examplestrategy:rollingUpdate:maxSurge: 25%maxUnavailable: 25%type: RollingUpdatetemplate:metadata:creationTimestamp: nulllabels:k8s.kuboard.cn/layer: gatewayk8s.kuboard.cn/name: gateway-examplespec:containers:- env:- name: CLOUD_EUREKA_DEFAULT_ZONEvalue: 'http://cloud-eureka:9200/eureka'- name: SPRING_PROFILES_ACTIVEvalue: exampleimage: >-192.168.16.200:5000/kuboard-dependency/example-gateway-example:v1.0.0-alpha.1imagePullPolicy: Alwaysname: gateway-exampleresources: {}terminationMessagePath: /dev/termination-logterminationMessagePolicy: FilednsPolicy: ClusterFirstimagePullSecrets:- name: registry-200restartPolicy: AlwaysschedulerName: default-schedulersecurityContext: {}terminationGracePeriodSeconds: 30
status:conditions:- lastTransitionTime: '2023-09-26T03:13:54Z'lastUpdateTime: '2023-10-10T13:22:14Z'message: ReplicaSet "gateway-example-5bd6ccb5f8" has successfully progressed.reason: NewReplicaSetAvailablestatus: 'True'type: Progressing- lastTransitionTime: '2023-10-10T13:22:43Z'lastUpdateTime: '2023-10-10T13:22:43Z'message: Deployment does not have minimum availability.reason: MinimumReplicasUnavailablestatus: 'False'type: AvailableobservedGeneration: 14replicas: 1unavailableReplicas: 1updatedReplicas: 1---
apiVersion: v1
kind: Service
metadata:annotations: {}labels:k8s.kuboard.cn/layer: gatewayk8s.kuboard.cn/name: gateway-examplename: gateway-examplenamespace: exampleresourceVersion: '163120'
spec:clusterIP: 10.105.223.231clusterIPs:- 10.105.223.231internalTrafficPolicy: ClusteripFamilies:- IPv4ipFamilyPolicy: SingleStackports:- name: pdmd3yport: 9201protocol: TCPtargetPort: 9201selector:k8s.kuboard.cn/layer: gatewayk8s.kuboard.cn/name: gateway-examplesessionAffinity: Nonetype: ClusterIP
status:loadBalancer: {}- 解决warning
1)使用configmap给容器挂载ca证书
参考:Managing Service Accounts | Kubernetes
![![[../../../附件/Pasted image 20231011115528.png]]](https://img-blog.csdnimg.cn/7cf07058997a4af8bfb6c228d82b413f.png)
点击编辑-存储挂载-配置字典
数据卷名称填写warning中的名称
configMap为kube-root-ca.crt
其他内容如图下所示:
![![[../../../附件/Pasted image 20231011120602.png]]](https://img-blog.csdnimg.cn/e32ed8b89c59462b95c742c765eef35e.png)
3) 部署持久层
-
基本信息填写
![![[../../../附件/Pasted image 20231011173810.png]]](https://img-blog.csdnimg.cn/128aa8b6a7714d4abc24bd56b051fd13.png)
-
添加容器信息
添加工作容器
![![[../../../附件/Pasted image 20231011174437.png]]](https://img-blog.csdnimg.cn/9dafaa05f57d45508c814746f11546d4.png)
添加存储挂载
添加存储声明
![![[../../../附件/Pasted image 20231011184705.png]]](https://img-blog.csdnimg.cn/98ea341e711342288da8c3786747e3e0.png)
添加存储挂载信息
![![[../../../附件/Pasted image 20231011184854.png]]](https://img-blog.csdnimg.cn/046ef48658d14da6a836fa8f3e81cd19.png)
这里的/var/lib/mysql是容器内的路径。
-
添加Service
![![[../../../附件/Pasted image 20231011174502.png]]](https://img-blog.csdnimg.cn/8b4d4fb58c62489795a34aed6c78e687.png)
-
应用并预览yaml
yaml:
---
apiVersion: apps/v1
kind: Deployment
metadata:annotations:k8s.kuboard.cn/displayName: db-examplek8s.kuboard.cn/ingress: 'false'k8s.kuboard.cn/service: ClusterIPk8s.kuboard.cn/workload: db-examplelabels:k8s.kuboard.cn/layer: dbk8s.kuboard.cn/name: db-examplename: db-examplenamespace: exampleresourceVersion: '285120'
spec:progressDeadlineSeconds: 600replicas: 1revisionHistoryLimit: 10selector:matchLabels:k8s.kuboard.cn/layer: dbk8s.kuboard.cn/name: db-examplestrategy:rollingUpdate:maxSurge: 25%maxUnavailable: 25%type: RollingUpdatetemplate:metadata:creationTimestamp: nulllabels:k8s.kuboard.cn/layer: dbk8s.kuboard.cn/name: db-examplespec:containers:- image: >-192.168.16.200:5000/kuboard-dependency/example-gateway-example:v1.0.0-alpha.1imagePullPolicy: Alwaysname: db-exampleresources: {}terminationMessagePath: /dev/termination-logterminationMessagePolicy: FilevolumeMounts:- mountPath: /var/lib/mysqlname: db-example-storagesubPath: mysqldnsPolicy: ClusterFirstimagePullSecrets:- name: registry-200restartPolicy: AlwaysschedulerName: default-schedulersecurityContext: {}terminationGracePeriodSeconds: 30volumes:- name: db-example-storagepersistentVolumeClaim:claimName: db-example-storage
status:availableReplicas: 1conditions:- lastTransitionTime: '2023-10-11T09:45:54Z'lastUpdateTime: '2023-10-11T09:45:54Z'message: Deployment has minimum availability.reason: MinimumReplicasAvailablestatus: 'True'type: Available- lastTransitionTime: '2023-10-11T09:45:54Z'lastUpdateTime: '2023-10-11T10:45:32Z'message: ReplicaSet "db-example-d765d8978" has successfully progressed.reason: NewReplicaSetAvailablestatus: 'True'type: ProgressingobservedGeneration: 3readyReplicas: 1replicas: 1updatedReplicas: 1---
apiVersion: v1
kind: Service
metadata:labels:k8s.kuboard.cn/layer: dbk8s.kuboard.cn/name: db-examplename: db-examplenamespace: exampleresourceVersion: '277172'
spec:clusterIP: 10.98.171.57clusterIPs:- 10.98.171.57internalTrafficPolicy: ClusteripFamilies:- IPv4ipFamilyPolicy: SingleStackports:- name: fp6kswport: 3306protocol: TCPtargetPort: 3306selector:k8s.kuboard.cn/layer: dbk8s.kuboard.cn/name: db-examplesessionAffinity: Nonetype: ClusterIP
status:loadBalancer: {}
4)部署微服务层
- 基本信息填写
添加工作负载基本信息
![![[../../../附件/Pasted image 20231019153259.png]]](https://img-blog.csdnimg.cn/509f4d7ac2324dbeaeedfab7d04ee070.png)
2.添加工作容器
![![[../../../附件/Pasted image 20231019153642.png]]](https://img-blog.csdnimg.cn/91161f95128f46ce8cf497a52e372486.png)
CLOUD_EUREKA_DEFAULT_ZONE和DB_EXAMPLE_URL中的cloud-eureka和db-example都是之前创建的Service的name属性,以实现pod之间的通信。
3.应用并预览yaml
---
apiVersion: apps/v1
kind: Deployment
metadata:annotations:k8s.kuboard.cn/displayName: svc-examplek8s.kuboard.cn/ingress: 'false'k8s.kuboard.cn/service: nonek8s.kuboard.cn/workload: svc-examplelabels:k8s.kuboard.cn/layer: svck8s.kuboard.cn/name: svc-examplename: svc-examplenamespace: example
spec:replicas: 1selector:matchLabels:k8s.kuboard.cn/layer: svck8s.kuboard.cn/name: svc-exampletemplate:metadata:labels:k8s.kuboard.cn/layer: svck8s.kuboard.cn/name: svc-examplespec:containers:- env:- name: CLOUD_EUREKA_DEFAULT_ZONEvalue: 'http://cloud-eureka:9200/eureka'- name: DB_EXAMPLE_URLvalue: >-jdbc:mysql://db-example:3306/eip_db_example?characterEncoding=utf8&useSSL=false- name: DB_EXAMPLE_USERNAMEvalue: eip_user- name: DB_EXAMPLE_PASSWORDvalue: 1qaz2wsx- name: snowflake.dataCenterIdvalue: '1'- name: csp.sentinel.dashboard.servervalue: monitor-sentinelimage: >-192.168.16.200:5000/kuboard-dependency/example-svc-example:v1.0.0-alpha.1name: svc-exampleimagePullSecrets:- name: registry-200initContainers: []
5)部署展示层
-
基本信息填写
添加工作负载基本信息
![![[../../../附件/Pasted image 20231019154343.png]]](https://img-blog.csdnimg.cn/2dcdfe755d374460ac82a89286b106e9.png)
-
添加工作容器信息
![![[../../../附件/Pasted image 20231019160140.png]]](https://img-blog.csdnimg.cn/4af5fbcb2990470f8a7a49e1196907e8.png)
-
添加服务与路由
服务配置
![![[../../../附件/Pasted image 20231019163408.png]]](https://img-blog.csdnimg.cn/e702e427112d444cb533f83ab3dad461.png)
路由配置
![![[../../../附件/Pasted image 20231019161421.png]]](https://img-blog.csdnimg.cn/47b90264996e47f7b6fb12ad08703bb1.png)
4.应用并预览yaml
---
apiVersion: apps/v1
kind: Deployment
metadata:annotations:k8s.kuboard.cn/displayName: ''k8s.kuboard.cn/ingress: 'true'k8s.kuboard.cn/service: ClusterIPk8s.kuboard.cn/workload: web-examplelabels:k8s.kuboard.cn/layer: webk8s.kuboard.cn/name: web-examplename: web-examplenamespace: exampleresourceVersion: '331193'
spec:replicas: 1selector:matchLabels:k8s.kuboard.cn/layer: webk8s.kuboard.cn/name: web-exampletemplate:metadata:labels:k8s.kuboard.cn/layer: webk8s.kuboard.cn/name: web-examplespec:containers:- args: []command:- nginx- '-g'- daemon off;image: >-192.168.16.200:5000/kuboard-dependency/example-web-example:v1.0.0-alpha.1imagePullPolicy: Alwaysname: web-exampleimagePullSecrets:- name: registry-200initContainers: []---
apiVersion: v1
kind: Service
metadata:annotations: {}labels:k8s.kuboard.cn/layer: webk8s.kuboard.cn/name: web-examplename: web-examplenamespace: example
spec:ports:- name: mawfrpnodePort: 30090port: 80protocol: TCPtargetPort: 80selector:k8s.kuboard.cn/layer: webk8s.kuboard.cn/name: web-exampletype: NodePort---
apiVersion: networking.k8s.io/v1
kind: Ingress
metadata:annotations:k8s.kuboard.cn/displayName: we-examplek8s.kuboard.cn/workload: web-examplelabels:k8s.kuboard.cn/layer: webk8s.kuboard.cn/name: web-examplename: web-examplenamespace: exampleresourceVersion: '270483'
spec:rules:- host: web-example.example.demo.kuboard.cnhttp:paths:- backend:service:name: web-exampleport:name: mawfrppath: /pathType: Prefix
status:loadBalancer: {}
5、验证web-example部署情况
在浏览器地址栏中输入 http://任意节点IP:30090,将打开如下页面:
![![[../../../附件/Pasted image 20231019170245.png]]](https://img-blog.csdnimg.cn/1d9c65fa50be4a5e8a80354f91680a97.png)
点击创建
![![[../../../附件/Pasted image 20231019170329.png]]](https://img-blog.csdnimg.cn/2a7d322f530445c29c660b1538c53adb.png)
可以看到已经新增一条条目
![![[../../../附件/Pasted image 20231019170421.png]]](https://img-blog.csdnimg.cn/8d5f953acf3f4e56af562de7e249926d.png)
🎉🎉🎉
这篇关于【三】kubernetes kuboard部署分布式系统的文章就介绍到这儿,希望我们推荐的文章对编程师们有所帮助!


