本文主要是介绍移动端签名组件封装 借用插件 vue-esign,希望对大家解决编程问题提供一定的参考价值,需要的开发者们随着小编来一起学习吧!
目录
- 需求
- 实现讲解
- 工具 - 图片旋转、base64 转换为 file 对象
- 组件封装
- 组件全局注册
- 组件使用
- 效果展示
需求
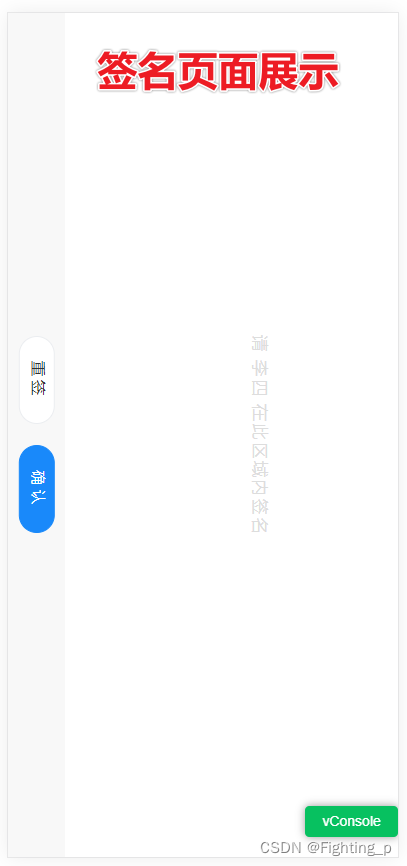
移动端需要实现手机横屏手写签名并上传签名图片功能。
实现讲解
vue-esign插件文档地址 https://www.npmjs.com/package/vue-esign
SignCanvas组件封装原理:
- 页面分为左右两部分:左-按钮区域,右-签名区域
- 按钮区域:将按钮进行旋转,视觉上制造手机横屏的效果
- 签名区域:由于是横屏签名,所以在签名结束提交签名时需要将签名图片进行逆时针90°旋转
工具 - 图片旋转、base64 转换为 file 对象
@/utils/index
/*** 图片旋转*/
export function rotateBase64Img(src, edg, fileName, fileType, callback) {var canvas = document.createElement('canvas')var ctx = canvas.getContext('2d')var imgW // 图片宽度var imgH // 图片高度var size // canvas初始大小if (edg % 90 !== 0) {console.error('旋转角度必须是90的倍数!')return '旋转角度必须是90的倍数!'}edg < 0 && (edg = (edg % 360) + 360)const quadrant = (edg / 90) % 4 // 旋转象限const cutCoor = { sx: 0, sy: 0, ex: 0, ey: 0 } // 裁剪坐标var image = new Image()image.crossOrigin = 'Anonymous'image.src = srcimage.onload = () => {imgW = image.widthimgH = image.heightsize = imgW > imgH ? imgW : imgHcanvas.width = size * 2canvas.height = size * 2switch (quadrant) {case 0:cutCoor.sx = sizecutCoor.sy = sizecutCoor.ex = size + imgWcutCoor.ey = size + imgHbreakcase 1:cutCoor.sx = size - imgHcutCoor.sy = sizecutCoor.ex = sizecutCoor.ey = size + imgWbreakcase 2:cutCoor.sx = size - imgWcutCoor.sy = size - imgHcutCoor.ex = sizecutCoor.ey = sizebreakcase 3:cutCoor.sx = sizecutCoor.sy = size - imgWcutCoor.ex = size + imgHcutCoor.ey = size + imgWbreak}ctx.translate(size, size)ctx.rotate((edg * Math.PI) / 180)ctx.drawImage(image, 0, 0)var imgData = ctx.getImageData(cutCoor.sx, cutCoor.sy, cutCoor.ex, cutCoor.ey)if (quadrant % 2 === 0) {canvas.width = imgWcanvas.height = imgH} else {canvas.width = imgHcanvas.height = imgW}ctx.putImageData(imgData, 0, 0)callback(dataURLtoFile(canvas.toDataURL(), fileName, fileType))// callback(canvas.toDataURL())}
}
/*** 将 base64 转换为 file 对象*    dataURL:base64 格式*    fileName:文件名*    fileType:文件格式*/
export function dataURLtoFile(dataURL, fileName, fileType) {const arr = dataURL.split(',')const mime = arr[0].match(/:(.*?);/)[1]const bstr = atob(arr[1])let n = bstr.lengthconst u8arr = new Uint8Array(n)while (n--) {u8arr[n] = bstr.charCodeAt(n)}return new File([u8arr], fileName, { type: fileType || 'image/jpg' })
}
组件封装
@/components/SignCanvas.vue
<!-- 签名组件 -->
<template><div class="signContainer"><div class="btns"><van-button type="default" round @click="resetHandler" class="reset">重签</van-button><van-button type="info" round @click="sureHandler">确认</van-button></div><vue-esignref="VueEsignRef"class="vue-esign":width="width":height="height":lineWidth="lineWidth":lineColor="lineColor":bgColor="bgColor":isCrop="isCrop":isClearBgColor="isClearBgColor":format="format":quality="quality"/><div :style="{ '--width': height + 'px' }" class="tipText">请<span v-if="signName">{{ ` ${signName} ` }}</span>在此区域内签名</div></div>
</template><script>
import { rotateBase64Img } from '@/utils/index'export default {name: 'SignCanvas',components: {},props: {// 画布宽度,即导出图片的宽度width: {type: Number,default: () => {const dom = document.querySelector('#app')const width = dom && dom.offsetWidthreturn width ? width - 60 : 300 // 减去按钮区域的宽度}},// 画布高度,即导出图片的高度height: {type: Number,default: () => {const dom = document.querySelector('#app')return (dom && dom.offsetHeight) || 800}},// 画笔粗细lineWidth: {type: Number,default: 6},// 画笔颜色lineColor: {type: String,default: '#000'},// 画布背景色,为空时画布背景透明,支持多种格式 '#ccc','#E5A1A1','rgb(229, 161, 161)','rgba(0,0,0,.6)','red'bgColor: {type: String,default: ''},// 是否裁剪,在画布设定尺寸基础上裁掉四周空白部分isCrop: {type: Boolean,default: false},// 清空画布时(reset)是否同时清空设置的背景色(bgColor)isClearBgColor: {type: Boolean,default: true},// 生成图片格式 image/jpeg(jpg格式下生成的图片透明背景会变黑色请慎用或指定背景色)、 image/webpformat: {type: String,default: 'image/png'},// 生成图片质量;在指定图片格式为 image/jpeg 或 image/webp的情况下,可以从 0 到 1 的区间内选择图片的质量。如果超出取值范围,将会使用默认值 0.92。其他参数会被忽略。quality: {type: Number,default: 1},// 未签名时提示信息noSignTipText: {type: String,default: '请确保已签名!'},// 需要签名的姓名signName: {type: String,default: ''}},methods: {resetHandler() {this.$refs.VueEsignRef.reset() // 清空画布},sureHandler() {// 可选配置参数 ,在未设置format或quality属性时可在生成图片时配置 例如: {format:'image/jpeg', quality: 0.5}// this.$refs.esign.generate({format:'image/jpeg', quality: 0.5})this.$refs.VueEsignRef.generate().then(res => {/*** res:base64图片*/rotateBase64Img(res, 270, `${this.signName ? this.signName + '-签名.jpg' : 'sign.jpg'}`, '', data => {this.$emit('sureHandler', data)})}).catch(err => {console.log('err----', err)this.$dialog.alert({message: this.noSignTipText})})}}
}
</script><style lang='scss' scoped>
.signContainer {width: 100%;height: 100vh;display: flex;background-color: #fff;.btns {width: 55px;background-color: #f8f8f8;display: flex;flex-direction: column;justify-content: center;.reset {margin-bottom: 70px;}}.vue-esign {z-index: 2;}.tipText {position: absolute;top: 50%;width: var(--width);left: calc(50% + 55px);transform: translateX(-50%) translateY(-50%) rotateZ(90deg);text-align: center;color: #ddd;letter-spacing: 2px;}
}
::v-deep .van-button {width: 85px !important;height: 35px;transform: rotate(90deg) translateY(15px);text-align: center;.van-button__text {letter-spacing: 5px;}
}
</style>
组件全局注册
main.js
import vueEsign from 'vue-esign' // 需要 npm 包下载 npm install vue-esign
Vue.use(vueEsign)import SignCanvas from '@/components/SignCanvas'
Vue.component('SignCanvas', SignCanvas)
// ...
组件使用
<!-- XXXX签名 -->
<template><SignCanvas ref="SignCanvasRef" :signName="nameList[nameIndex]" @sureHandler="sureSignHandler" />
</template><script>
export default {name: 'BloodRegisterSign',components: {},data() {return {// ...inputData: {}, // 该数据中 cxmjView 为需要签名的人员姓名nameIndex: 0, // 当前签名为第几个人签名signFileList: [] // 签名图片列表}},computed: {nameList() {return this.inputData.cxmjView ? this.inputData.cxmjView.split(',') : [] // 需要有多个签名}},watch: {},created() {console.log('this.$route----', this.$route)this.inputData = JSON.parse(this.$route.query.inputData || '{}')// ...},methods: {sureSignHandler(data) {this.signFileList.push(data)if (this.nameIndex < this.nameList.length - 1) {this.nameIndex++this.$refs.SignCanvasRef.resetHandler()} else {this.submitHandler()}},submitHandler() {// TODO:调用接口,提交签名图片等数据}}
}
</script><style lang='scss' scoped>
</style>
效果展示

这篇关于移动端签名组件封装 借用插件 vue-esign的文章就介绍到这儿,希望我们推荐的文章对编程师们有所帮助!


