本文主要是介绍LayoutInflater—— 你可能对它并不了解甚至错误使用,希望对大家解决编程问题提供一定的参考价值,需要的开发者们随着小编来一起学习吧!
今天,看到了一篇文章讲LayoutInflater的用法,瞬间感觉自己对这个类确实不够了解,于是简单的看了下LayoutInflater类的源代码,对这个类有了新的认识。
首先,LayoutInflater这个类是用来干嘛的呢?
我们最常用的便是LayoutInflater的inflate方法,这个方法重载了四种调用方式,分别为:
1. public View inflate(int resource, ViewGroup root)
2. public View inflate(int resource, ViewGroup root, boolean attachToRoot)
3.public View inflate(XmlPullParser parser, ViewGroup root)
4.public View inflate(XmlPullParser parser, ViewGroup root, boolean attachToRoot)
这四种使用方式中,我们最常用的是第一种方式,inflate方法的主要作用就是将xml转换成一个View对象,用于动态的创建布局。虽然重载了四个方法,但是这四种方法最终调用的,还是第四种方式。第四种方式也很好理解,内部实现原理就是利用Pull解析器,对Xml文件进行解析,然后返回View对象。
我们以我们经常使用的第一种形式为例,你在重写BaseAdapter的getView方法的时候是否这样做过
public View getView(int position, View convertView, ViewGroup parent) {if (convertView == null) {convertView = inflate(R.layout.item_row, null);}return convertView;
}1.resource布局的资源id
2.root填充的根视图
3.attachToRoot是否将载入的视图绑定到根视图中
在这个例子中,我们将root参数设为空,功能确实实现了,但是这里还隐藏着一个隐患,这种方式并不是inflate正确的使用姿势,下面我们通过一个Demo,来说一下这样使用造成的弊端。
首先,我们建立一个这样的项目
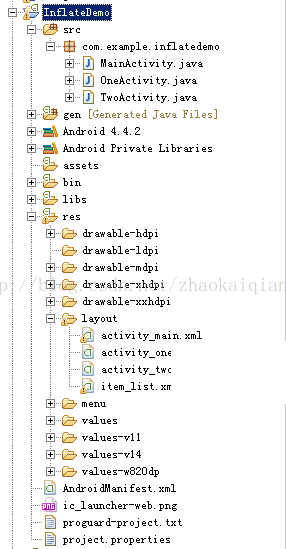
这里三个界面,一个主界面,两个测试界面,布局文件中,主界面只负责界面跳转,两个测试界面都是一个简单的Listview,item布局显示效果如下
对应的布局文件如下
<?xml version="1.0" encoding="utf-8"?>
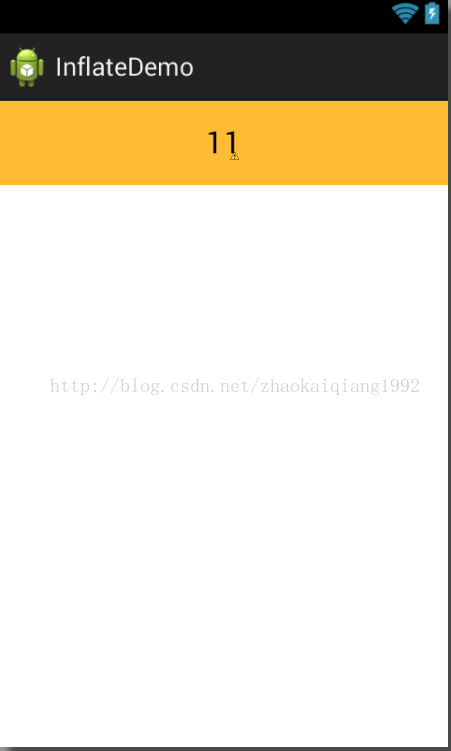
<LinearLayout xmlns:android="http://schemas.android.com/apk/res/android"android:layout_width="match_parent"android:layout_height="60dp"android:background="@android:color/holo_orange_light"android:gravity="center"android:orientation="vertical" ><TextViewandroid:id="@+id/tv"android:layout_width="wrap_content"android:layout_height="wrap_content"android:text="11"android:textColor="@android:color/black"android:textSize="22sp" /></LinearLayout>OneActivity的代码如下
public class OneActivity extends Activity {private ListView list1;@Overrideprotected void onCreate(Bundle savedInstanceState) {super.onCreate(savedInstanceState);setContentView(R.layout.activity_one);list1 = (ListView) findViewById(R.id.list1);list1.setAdapter(new MyAdapter(this));}private class MyAdapter extends BaseAdapter {private LayoutInflater inflater;MyAdapter(Context context) {inflater = LayoutInflater.from(context);}@Overridepublic int getCount() {return 20;}@Overridepublic Object getItem(int position) {return position;}@Overridepublic long getItemId(int position) {return position;}@Overridepublic View getView(int position, View convertView, ViewGroup parent) {if (convertView == null) {convertView = inflater.inflate(R.layout.item_list, null);}TextView tv = (TextView) convertView.findViewById(R.id.tv);tv.setText(position+"");return convertView;}}}TwoActivity的代码如下
public class TwoActivity extends Activity {private ListView list2;@Overrideprotected void onCreate(Bundle savedInstanceState) {super.onCreate(savedInstanceState);setContentView(R.layout.activity_two);list2 = (ListView) findViewById(R.id.list2);list2.setAdapter(new MyAdapter(this));}private class MyAdapter extends BaseAdapter {private LayoutInflater inflater;MyAdapter(Context context) {inflater = LayoutInflater.from(context);}@Overridepublic int getCount() {return 20;}@Overridepublic Object getItem(int position) {return position;}@Overridepublic long getItemId(int position) {return position;}@Overridepublic View getView(int position, View convertView, ViewGroup parent) {if (convertView == null) {convertView = inflater.inflate(R.layout.item_list, parent,false);}TextView tv = (TextView) convertView.findViewById(R.id.tv);tv.setText(position + "");return convertView;}}}两个文件最关键的区别就一句话,
在getView方法中,OneActivity是
convertView = inflater.inflate(R.layout.item_list, null);
在getView方法中,TwoActivity是
convertView = inflater.inflate(R.layout.item_list, parent,false);
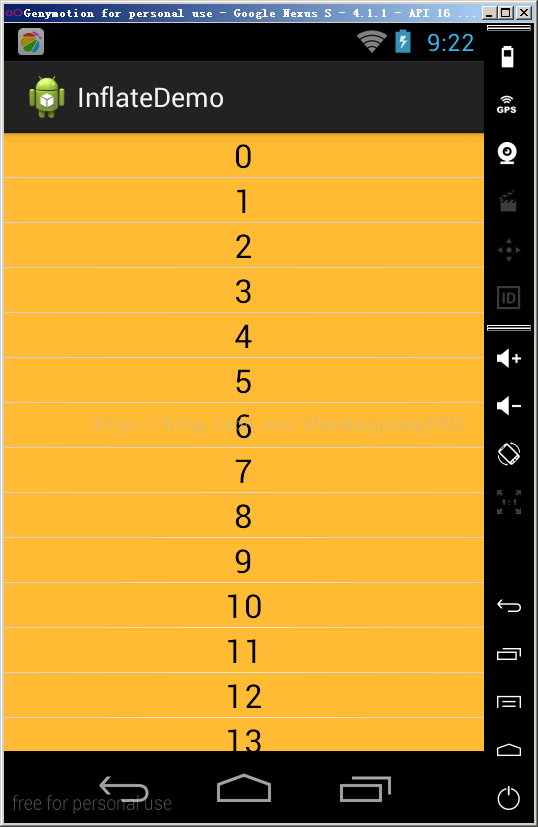
我们先看一下显示效果,再说两者的区别
OneActivity效果
TwoActivity的显示效果
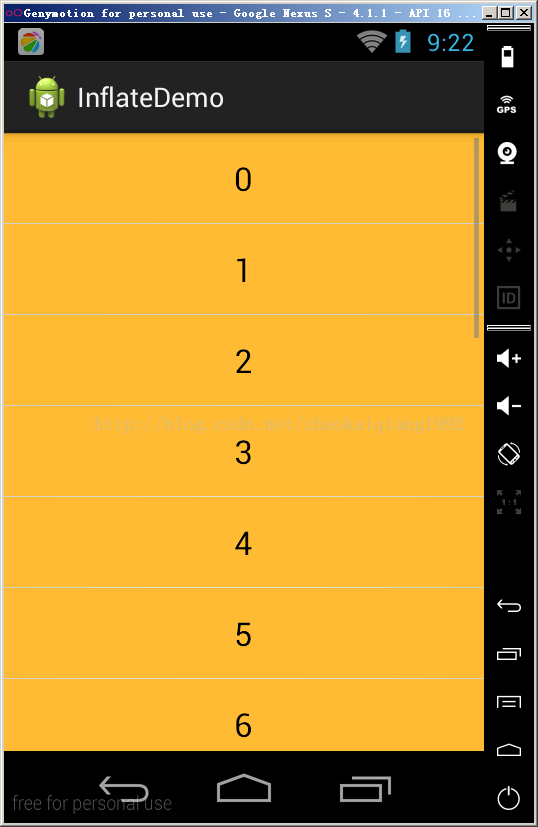
我们可以很明显的看出来,使用第一种方式,根布局的高度设置60dp没有起作用,系统还是按照包裹内容的方式加载的,为什么会产生这种效果呢?我们从需要inflate方法的源代码中找一下答案。
首先,方式一的源代码实现
public View inflate(XmlPullParser parser, ViewGroup root) {return inflate(parser, root, root != null);}当我们使用方式一,并且第二个参数传入null的时候,默认调用的是下面的方法,并且attachToRoot是false
public View inflate(int resource, ViewGroup root, boolean attachToRoot) {if (DEBUG) System.out.println("INFLATING from resource: " + resource);XmlResourceParser parser = getContext().getResources().getLayout(resource);try {return inflate(parser, root, attachToRoot);} finally {parser.close();}}在这一个方法中,pull解析器将资源id转化成XmlResourceParser对象,又传给了第四种方式,所以我们需要重点看的还是第四种方式是如何实现的
public View inflate(XmlPullParser parser, ViewGroup root, boolean attachToRoot) {synchronized (mConstructorArgs) {Trace.traceBegin(Trace.TRACE_TAG_VIEW, "inflate");final AttributeSet attrs = Xml.asAttributeSet(parser);Context lastContext = (Context)mConstructorArgs[0];mConstructorArgs[0] = mContext;View result = root;try {// Look for the root node.int type;while ((type = parser.next()) != XmlPullParser.START_TAG &&type != XmlPullParser.END_DOCUMENT) {// Empty}if (type != XmlPullParser.START_TAG) {throw new InflateException(parser.getPositionDescription()+ ": No start tag found!");}final String name = parser.getName();if (DEBUG) {System.out.println("**************************");System.out.println("Creating root view: "+ name);System.out.println("**************************");}if (TAG_MERGE.equals(name)) {if (root == null || !attachToRoot) {throw new InflateException("<merge /> can be used only with a valid "+ "ViewGroup root and attachToRoot=true");}rInflate(parser, root, attrs, false);} else {// Temp is the root view that was found in the xmlView temp;if (TAG_1995.equals(name)) {temp = new BlinkLayout(mContext, attrs);} else {temp = createViewFromTag(root, name, attrs);}ViewGroup.LayoutParams params = null;if (root != null) {if (DEBUG) {System.out.println("Creating params from root: " +root);}// Create layout params that match root, if suppliedparams = root.generateLayoutParams(attrs);if (!attachToRoot) {// Set the layout params for temp if we are not// attaching. (If we are, we use addView, below)temp.setLayoutParams(params);}}if (DEBUG) {System.out.println("-----> start inflating children");}// Inflate all children under temprInflate(parser, temp, attrs, true);if (DEBUG) {System.out.println("-----> done inflating children");}// We are supposed to attach all the views we found (int temp)// to root. Do that now.if (root != null && attachToRoot) {root.addView(temp, params);}// Decide whether to return the root that was passed in or the// top view found in xml.if (root == null || !attachToRoot) {result = temp;}}} catch (XmlPullParserException e) {InflateException ex = new InflateException(e.getMessage());ex.initCause(e);throw ex;} catch (IOException e) {InflateException ex = new InflateException(parser.getPositionDescription()+ ": " + e.getMessage());ex.initCause(e);throw ex;} finally {// Don't retain static reference on context.mConstructorArgs[0] = lastContext;mConstructorArgs[1] = null;}Trace.traceEnd(Trace.TRACE_TAG_VIEW);return result;}}代码比较长,我们重点关注下面的代码
if (root != null) {if (DEBUG) {System.out.println("Creating params from root: " +root);}// Create layout params that match root, if suppliedparams = root.generateLayoutParams(attrs);if (!attachToRoot) {// Set the layout params for temp if we are not// attaching. (If we are, we use addView, below)temp.setLayoutParams(params);}}这些代码的意思就是,当我们传进来的root参数不是空的时候,并且attachToRoot是false的时候,也就是上面的TwoActivity的实现方式的时候,会给temp设置一个LayoutParams参数。那么这个temp又是干嘛的呢?
<pre name="code" class="java">// We are supposed to attach all the views we found (int temp)// to root. Do that now.if (root != null && attachToRoot) {root.addView(temp, params);}// Decide whether to return the root that was passed in or the// top view found in xml.if (root == null || !attachToRoot) {result = temp;}现在应该明白了吧,当我们传进来的root不是null,并且第三个参数是false的时候,这个temp就被加入到了root中,并且把root当作最终的返回值返回了。而当我们设置root为空的时候,没有设置LayoutParams参数的temp对象,作为返回值返回了。
因此,我们可以得出下面的结论:
1.若我们采用convertView = inflater.inflate(R.layout.item_list, null);方式填充视图,item布局中的根视图的layout_XX属性会被忽略掉,然后设置成默认的包裹内容方式
2.如果我们想保证item的视图中的参数不被改变,我们需要使用convertView = inflater.inflate(R.layout.item_list, parent,false);这种方式进行视图的填充
3.除了使用这种方式,我们还可以设置item布局的根视图为包裹内容,然后设置内部控件的高度等属性,这样就不会修改显示方式了。
最后,给出那篇文章的链接http://blog.jobbole.com/72156/大家可以去看看
这篇关于LayoutInflater—— 你可能对它并不了解甚至错误使用的文章就介绍到这儿,希望我们推荐的文章对编程师们有所帮助!


