本文主要是介绍RT-AK DEMO 实战教程,教你实现单个人像识别~,希望对大家解决编程问题提供一定的参考价值,需要的开发者们随着小编来一起学习吧!

让 AI 在你的板子上尽情舞蹈~
本次实验的是识别摄像头中的人,就一个人,而不是多个。
从多类别检测模型改编而来,只保留 person 这个类别,根据各位看官的能力完全可以改成识别多类
项目开源地址:
https://github.com/EdgeAIWithRTT/Project4-Person_detection_RT-AK
本次项目的篇幅将会较长,请各位看官耐心看完
整体分为三部分:
模型
RT-AK 使用
板子上的应用层代码实现
硬件平台 ART-Pi, 50M FLOPS。
我的模型(删减后的模型)最终部署在板子上是推理时间是56ms,不包括数据处理时间。
pc 端推理一张图片:
1$ pip install -r requirements.txt
2$ python inference_yolo-s.py

以下是在 ART-PI 上的模型推理实现:
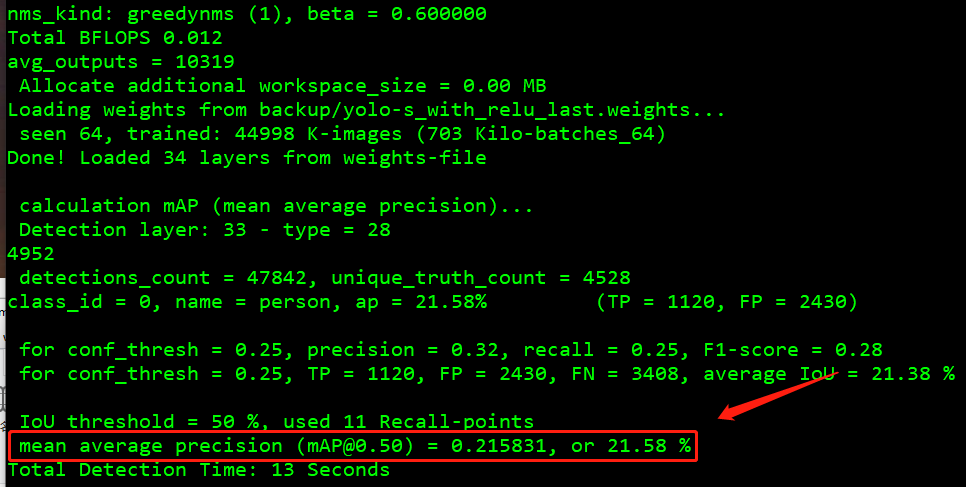
我的模型数据:map 21.58%
1 模型
1.1 参考项目
参考项目:
Yolo-Fastest https://github.com/dog-qiuqiu/Yolo-Fastest
keras-YOLOv3-model-set
https://github.com/david8862/keras-YOLOv3-model-set
原因:目前了解的全网最轻量级的目标检测网络,没有之一
现在不是了,出现了一个 ppyolo,百度产

当然,Yolo Fastest 最小的模型也有 0.23 Bflops,想要在 ART-Pi 上顺利的跑起来,肉眼可见的丝滑程度,我是在做梦。
这时候有两个办法:
换一块板子,换一块算力更大的板子。
将模型改的小一点,能够在 ART-PI 上丝滑的跑起来。
这里我选择的是后者。
我改动的很简单,去掉特征金字塔输出,只保留一个输出,保证对大物体检测友好即可。同时删减网络结构。原来是109层,我是20+层网络结构。
纠正一个思想误区,由于一些很神奇的存在,网络并不是越深,FLOPS 就会越大,比如 DSCNN。
第二个参考项目的意义是在于:将模型转变为 tflite 可食用模型
1.2 模型文件
我改动的模型配置文件:
./model/yolo-s_with_lrelu.cfg
原模型配置文件:
./model/VOC为了防止在后期模型转换的过程中遇到不支持的算子:
leakyrelu,我这里提供了一份relu的模型训练配置文件
预先训练好的模型:
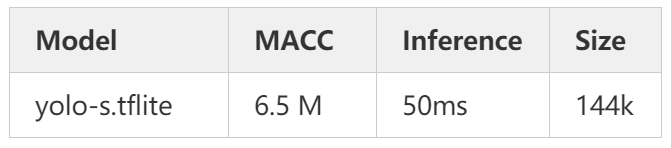
./model/yolo-s.h5507 k,量化的tflite模型文件:./model/yolo-s.tflite144 k
1.3 自己训练模型
请参考:dog-qiuqiu/Yolo-Fastest 项目
我自己也写过一份 快速上手 yolo-fastest 教程:
https://blog.csdn.net/weixin_37598106/article/details/112544854?spm=1001.2014.3001.5501
但是由于 up 主更新的比较快,可能有一些版本落后,仅供参考。
需要配置
darknet训练环境,然后根据需求修改下cfg文件即可准备数据集:
VOC 2007 + VOC 20121wget https://pjreddie.com/media/files/VOCtrainval_11-May-2012.tar2wget https://pjreddie.com/media/files/VOCtrainval_06-Nov-2007.tar3wget https://pjreddie.com/media/files/VOCtest_06-Nov-2007.tar4tar xf VOCtrainval_11-May-2012.tar5tar xf VOCtrainval_06-Nov-2007.tar6tar xf VOCtest_06-Nov-2007.tar78wget https://pjreddie.com/media/files/voc_label.py9# 修改文件,将里面的类别只保留 person 类别 10python voc_label.py 11 12cat 2007_train.txt 2007_val.txt 2012_*.txt > train.txt
修改 ./model/voc_person.data 中的 train 和 valid 路径,注意,如果你不是训练 person 单类别,请一并修改 voc_person.names 文件
3.训练
1$ ./darknet detector train <data_path> <cfg_path>
2
3# 举例, -dont_show 是不显示图片, -gpus 是指定 gpu 训练
4$ ./darknet detector train voc_person.data yolo-s.cfg -dont_show -gpus 0, 1
4.测试
perons.jpg位于./imgs
1# test 1 image
2./darknet detector test voc_person.data yolo-s.cfg yolo-s_last.weights person.jpg -thresh 0.5 -dont_show
3
4# mAP
5./darknet detector map voc_person.data yolo-s.cfg yolo-s_last.weights -points 11
模型转换成 keras,最后转成 tflite
对应的代码仓库:
Lebhoryi/keras-YOLOv3-model-set
https://github.com/Lebhoryi/keras-YOLOv3-model-set
转自
david8862/keras-YOLOv3-model-set
https://github.com/david8862/keras-YOLOv3-model-set,我做了一些修改,请按照我的来,否则出错请自负????????????
yolo-fastest to keras
python tools/model_converter/convert.py cfg/yolo-s.cfg weights/yolo-s_last.weights weights/yolo-s.h5 -f -ckeras to tflite
python tools/model_converter/custom_tflite_convert.py --keras_model_file ./weights/yolo-s.h5 --output_file ./weights/yolo-s.tflite# keras to tflite; quantize
python tools/model_converter/post_train_quant_convert.py --keras_model_file ./weights/yolo-s.h5 --annotation_file /home/lebhoryi/Data/VOC/2007_test.txt --model_input_shape 160x160 --sample_num 30 --output_file ./weights/yolo-s.tflite -c
```
2 RT-AK 使用
具体使用请查阅 RT-Thread/RT-AK https://github.com/RT-Thread/RT-AK 相关文档
准备:
ART-PI bsp
模型
RT-AK
使用:
1$ git clone https://github.com/RT-Thread/RT-AK
2
3$ cd RT-AK/RT-AK/rt_ai_tools
4
5# 只需要改动 --model、--project、--ext_tools 三个参数的路径即可
6$ python aitools.py --model=./yolo-s.h5 --model_name=person_yolo --project=D:\RT-ThreadStudio\workspace\art-pi --platform stm32 --ext_tools="D:\Program Files (x86)\stm32ai-windows-5.2.0\windows" --clear
3 应用代码
我的输入是 160x160x1,为了减小模型参数大小,
先在 pc 端实现应用层的代码
图片预处理:尺度缩放+灰度转化+归一化
yolo 解码
nms 处理
代码都在 inference_yolo-s.py 中。
手边没有 usb 摄像头,也就没有写视频的推理代码,只有图片的推理代码。
功能实现:
1.图片预处理
python 里头就很简单,调用 opencv 库,几行代码搞定
1img_raw = cv2.imread(str(img_path))
2img = cv2.cvtColor(img_raw, cv2.COLOR_BGR2GRAY)
3img = cv2.resize(img, (160, 160), interpolation=cv2.INTER_LINEAR)
4img = img / 255.0
5img = np.asarray(img).astype('float32')
2.yolo 解码
inference_yolo-s.py 中的 yolo_decode 函数
模型推理的是检测目标的 xywh 的偏移量,目的是将模型输出结果转换成真实世界的 xywh
这部分呢,我也写了一篇文章,感兴趣的可以看一下:
掌握 yolo - 解码核心思想 https://blog.csdn.net/weixin_37598106/article/details/113058426?spm=1001.2014.3001.5501
3.nms
inference_yolo-s.py 中的 non_max_suppress 函数,这个函数针对的是单类别的
c 代码的实现比较痛苦(痛苦面具 x3)
✔灰度转换
✔尺度缩放
✔yolo 解码
⚪nms (可能五一节后实现)
1、灰度转换
RGB转灰度,通常会使用下面的一个心理学公式:(Matlab和OpenCV中使用的也是该公式)
1Gray = 0.2989*R + 0.5870*G + 0.1140*B
2# 优化
3Gray = (2989*R + 5870*G + 1140*B)/ 10000
4# 移位
5Gray = (4898*R + 9618*G + 1868*B)>> 14
6# 8位精度
7Gray = (76*R + 150*G + 30*B)>> 8
 1// c 代码实现2void rgb2gray(unsigned char *src,unsigned char *dst, int width,int height)3{4   int r, g, b;5   for (int i=0; i<width*height; ++i)6  {7       r = *src++; // load red8       g = *src++; // load green9       b = *src++; // load blue
10       // build weighted average:
11       *dst++ = (r * 76 + g * 150 + b * 30) >> 8;
12  }
13}
 1# python 代码实现2# val_c_gray_scaling.py3def img2gray(img_path):4   # 读取第一张图像5   img = cv2.imread(img_path)6   # 获取图像尺寸7   h, w = img.shape[0:2]8   # 自定义空白单通道图像,用于存放灰度图9   gray = np.zeros((h, w), dtype=img.dtype)
10   # 对原图像进行遍历,然后分别对B\G\R按比例灰度化
11   for i in range(h):
12       for j in range(w):
13           gray[i, j] = 0.11 * img[i, j, 0] + 0.59 * img[i, j, 1] + 0.3 * img[i, j, 2]  # Y=0.3R+0.59G+0.11B
14   show_img(gray)
15   return gray
2.尺度缩放
此处用的是双线性插值
 1int is_in_array(short x, short y, short height, short width)2{3   if (x >= 0 && x < width && y >= 0 && y < height)4       return 1;5   else6       return 0;7}89void bilinera_interpolation(rt_uint8_t* in_array, short height, short width,
10                           rt_uint8_t* out_array, short out_height, short out_width)
11{
12   double h_times = (double)out_height / (double)height,
13          w_times = (double)out_width / (double)width;
14   short  x1, y1, x2, y2, f11, f12, f21, f22;
15   double x, y;
16
17   for (int i = 0; i < out_height; i++){
18       for (int j = 0; j < out_width; j++){
19           x = j / w_times;
20           y = i / h_times;
21
22           x1 = (short)(x - 1);
23           x2 = (short)(x + 1);
24           y1 = (short)(y + 1);
25           y2 = (short)(y - 1);
26           f11 = is_in_array(x1, y1, height, width) ? in_array[y1*width+x1] : 0;
27           f12 = is_in_array(x1, y2, height, width) ? in_array[y2*width+x1] : 0;
28           f21 = is_in_array(x2, y1, height, width) ? in_array[y1*width+x2] : 0;
29           f22 = is_in_array(x2, y2, height, width) ? in_array[y2*width+x2] : 0;
30           out_array[i*out_width+j] = (rt_uint8_t)(((f11 * (x2 - x) * (y2 - y)) +
31                                      (f21 * (x - x1) * (y2 - y)) +
32                                      (f12 * (x2 - x) * (y - y1)) +
33                                      (f22 * (x - x1) * (y - y1))) / ((x2 - x1) * (y2 - y1)));
34      }
35  }
36}
python 代码实现:val_c_gray_scaling.py 中的 bilinera_interpolation 函数
3.yolo 解码
 1// c 代码实现2// applications/yolo.c3int yolo_decode(float *out_data)4{5 int j=0,k=0,l=0;6 for(int i=0; i<5*5*5; i++)7{8   float x_tmp = 1 / (1 + exp(-out_data[i*6+0]));9   float y_tmp = 1 / (1 + exp(-out_data[i*6+1]));
10   float box_x = (x_tmp + k) / 5;
11   float box_y = (y_tmp + l) / 5;
12
13   float box_w = (exp(out_data[i*6+2])*anchor[j][0])/ input_dims[0];
14   float box_h = (exp(out_data[i*6+3])*anchor[j][1])/ input_dims[1];
15
16   float objectness = 1 / (1 + exp(-out_data[i*6+4]));
17
18   float class_scores = 1 / (1 + exp(-out_data[i*6+5]));
19
20//   printf("%d %d %d %f %f, %f %f, %f %f\n", j,k,l, box_x, box_y, box_w, box_h, objectness, class_scores);
21
22   out_data[i*6+0] = box_x;
23   out_data[i*6+1] = box_y;
24   out_data[i*6+2] = box_w;
25   out_data[i*6+3] = box_h;
26   out_data[i*6+4] = objectness;
27   out_data[i*6+5] = class_scores;
28
29   if(j++>=4)
30  {
31     j = 0;
32     if(k++>=4)
33    {
34       k = 0;
35       if(l++>=4)
36      {
37         l = 0;
38      }
39    }
40  }
41}
42 return 0;
43}
python 代码实现:inference_yolo-s.py 中的 yolo_decode 函数
4.nms
没有 nms 的目标检测工程就等于没有灵魂,等后期来实现
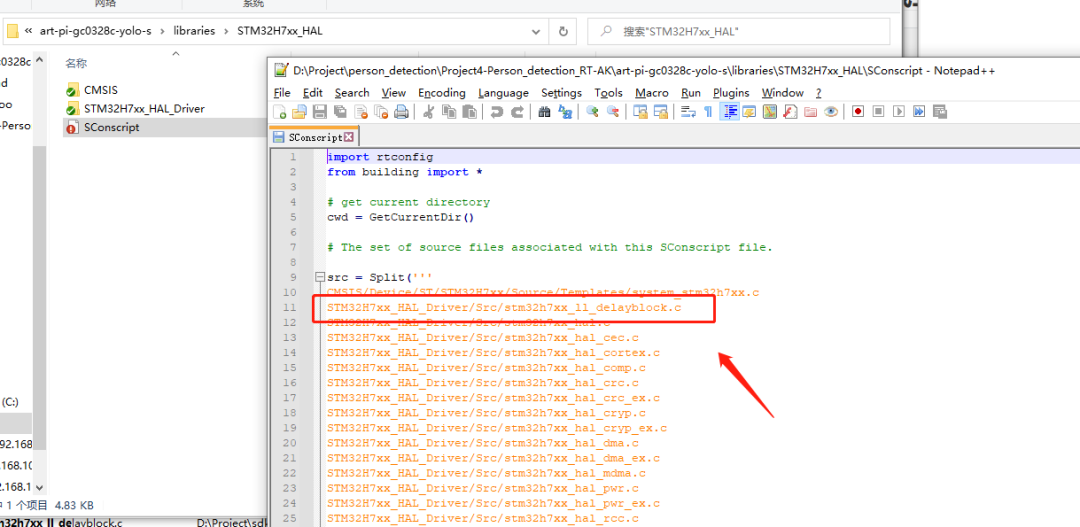
编译报错以及解决
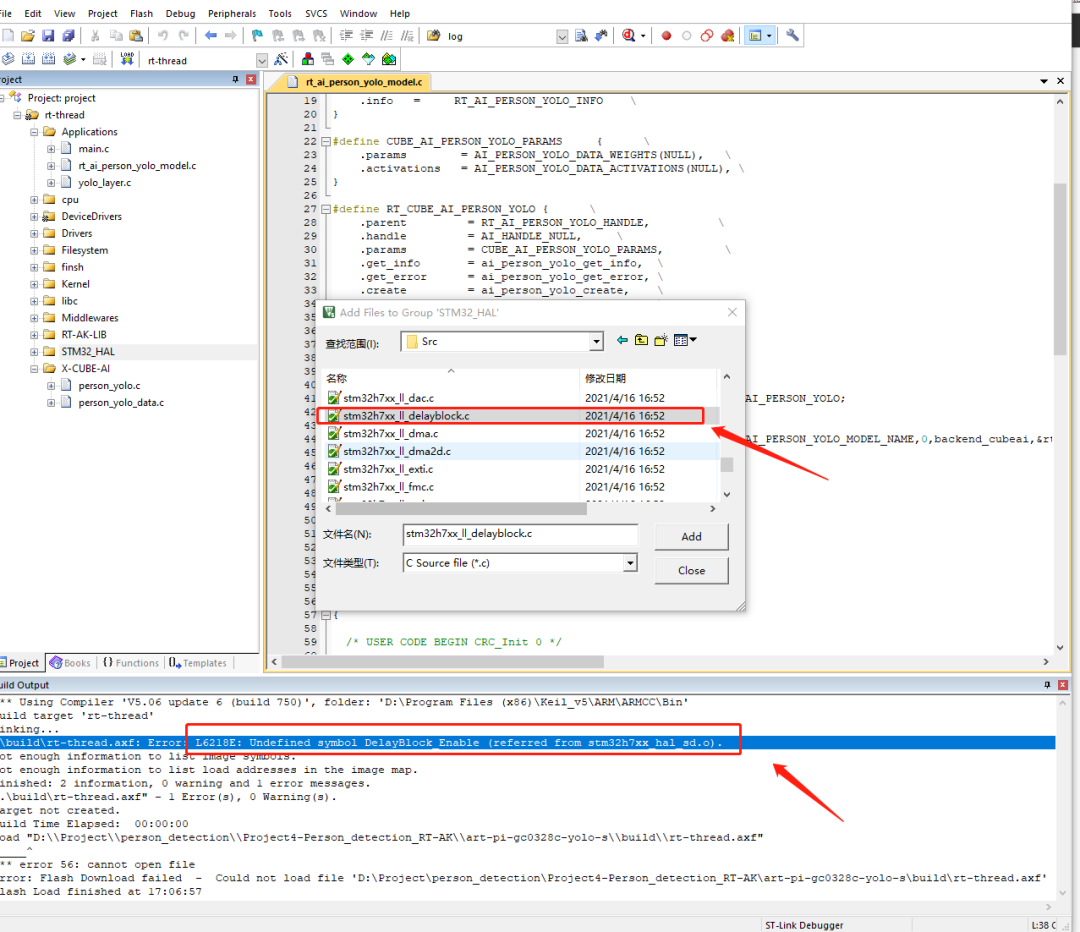
第二种解决方式:
4. 参考链接
C++ RGB转灰度图像 https://blog.csdn.net/martinkeith/article/details/104185635
GBeetle/c_image_processing https://github.com/GBeetle/c_image_processing/blob/4ceabf4959f455f5b7d1ee419aac25eccf231b3b/scaling/scaling.c#L155
https://github.com/dog-qiuqiu/Yolo-Fastest
https://github.com/david8862/keras-YOLOv3-model-set

你可以添加微信17775982065为好友,注明:公司+姓名,拉进 RT-Thread 官方微信交流群!

???????????? 点击阅读原文进入官网
这篇关于RT-AK DEMO 实战教程,教你实现单个人像识别~的文章就介绍到这儿,希望我们推荐的文章对编程师们有所帮助!


