本文主要是介绍图像语义分割 pytorch复现U2Net图像分割网络详解,希望对大家解决编程问题提供一定的参考价值,需要的开发者们随着小编来一起学习吧!
图像语义分割 pytorch复现U2Net图像分割网络详解
- 1、U2Net网络模型结构
- 2、block模块结构解析
- RSU-7模块
- RSU-4F
- saliency map fusion module
- U2Net网络结构详细参数配置
- RSU模块代码实现
- RSU4F模块代码实现
- u2net_full与u2net_lite模型配置函数
- U2Net网络整体定义类
- 损失函数计算
- 评价指标
- 数据集
- pytorch训练U2Net图像分割模型

U2-Net: Going Deeper with Nested U-Structure for Salient Object Detection
1、U2Net网络模型结构
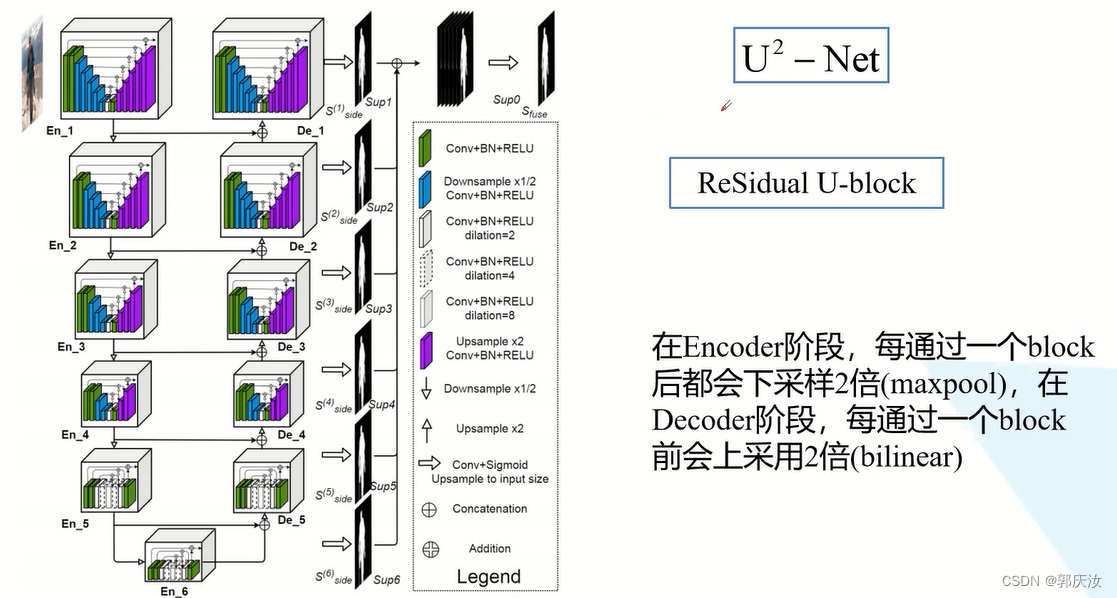
网络的主体类似于U-Net的网络结构,在大的U-Net中,每一个小的block都是一个小型的类似于U-Net的结构,因此作者取名U2Net
仔细观察,可以将网络中的block分成两类:
第一类:En_1 ~ En_4 与 De_1 ~ De_4这8个block采用的block其实是一样的,只不过模块的深度不同。
第二类:En_5、En_6、De_5
- 在整个U2Net网络中,在Encoder阶段,每通过一个block都会进行一次下采样操作(下采样2倍,maxpool)
- 在Decoder阶段,在每个block之间,都会进行一次上采样(2倍,bilinear)
2、block模块结构解析
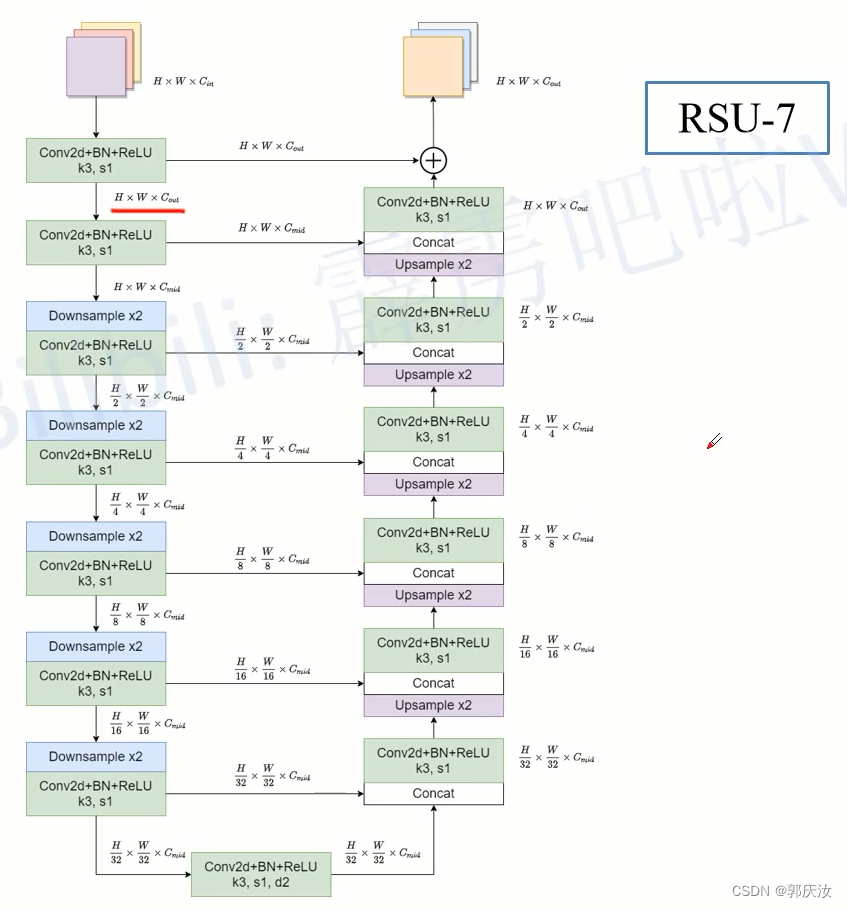
在 En_1 与 De_1 模块中,采用的 block 是RSU-7;
En_2 与 De_2采用的 block 是RSU-6(RSU-6相对于RSU-7 就是少了一个下采样卷积以及上采样卷积的部分,RSU-6 block只会下采样16倍,RSU-7 block下采样的32倍);
En_3 与 De_3采用的 block 是RSU-5
En_4 与 De_4采用的 block 是RSU-4
En_5、En_6、De_5采用的block是RSU-4F
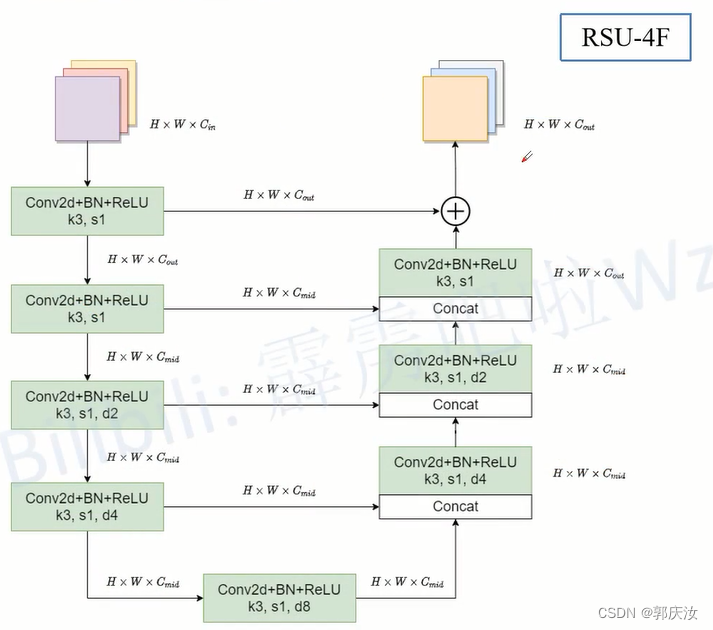
(使用RSU-4F的原因:因为数据经过En_1 ~ En4 下采样处理后对应特征图的高与宽就已经相对比较小了,如果再继续下采样就会丢失很多上下文信息,作者为了保留上下文信息,就对En_5、En_6、De_5不再进行下采样了而是在RSU-4F的模块中,将下采样、上采样结构换成了膨胀卷积)
RSU-7模块
详细结构图解
RSU-4F
saliency map fusion module
saliency map fusion module模块是将每个阶段的特征图进行融合,得到最终的预测概率图,即下图中,红色框标注的模块
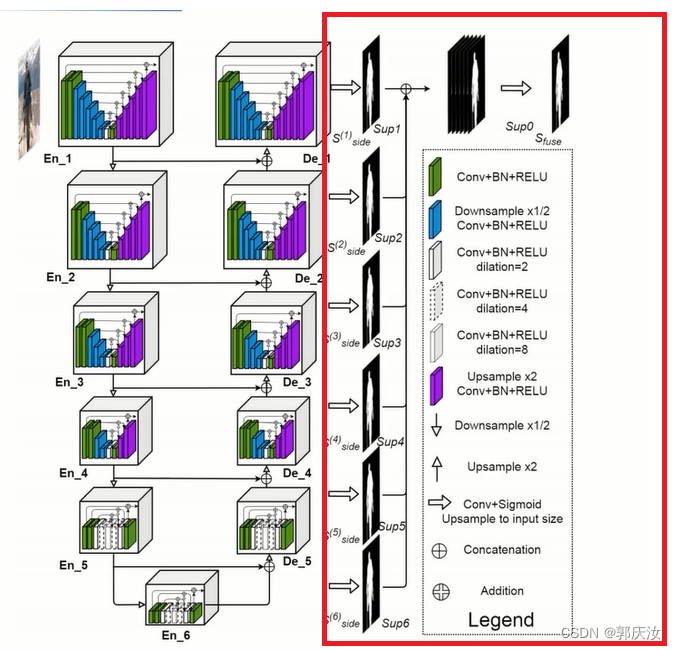
其会收集De_1、De_2、De_3、De_4、De_5、En_6模块的输出,将这些输出分别通过一个3x3的卷积层(这些卷积层的kerner的个数都是为1)输出的featuremap的channel是为1的,在经过双线性插值算法将得到的特征图还原回输入图像的大小;再将得到的6个特征图进行concant拼接;在经过一个1x1的卷积层以及sigmoid激活函数,最终得到融合之后的预测概率图。
U2Net网络结构详细参数配置
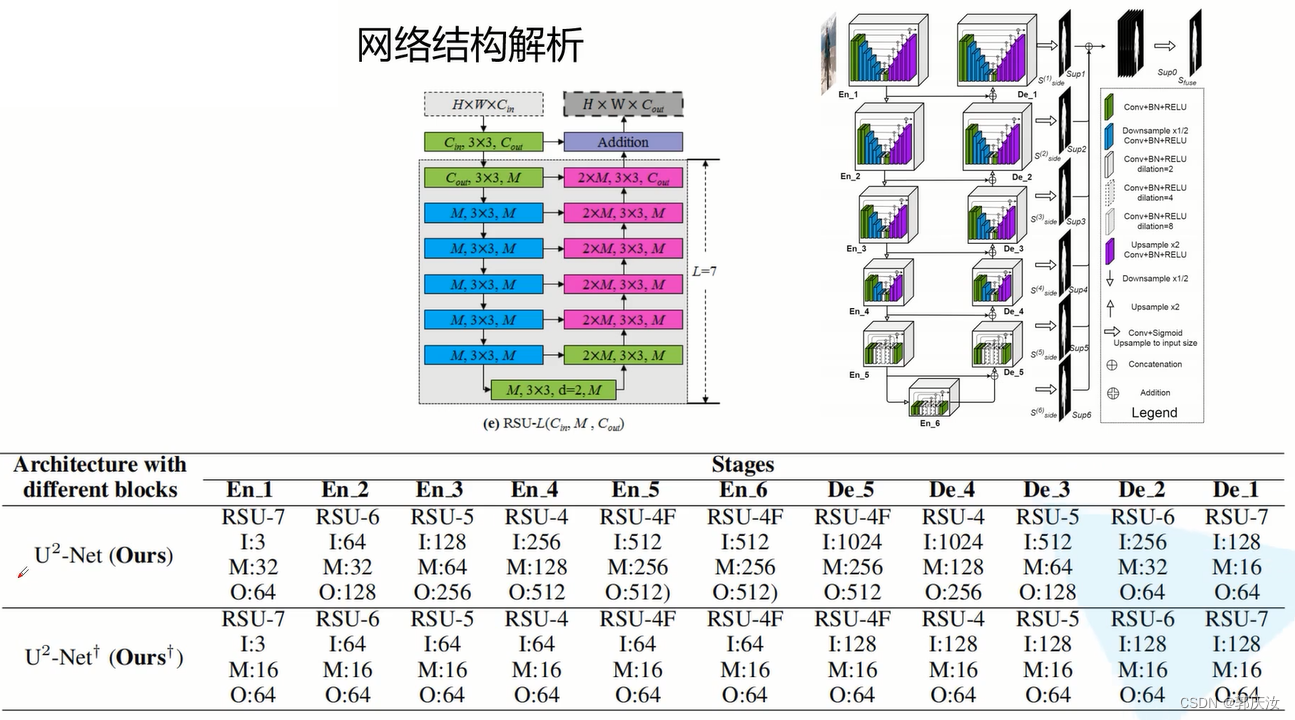
u2net_full大小为176.3M、u2net_lite大小为4.7M
RSU模块代码实现
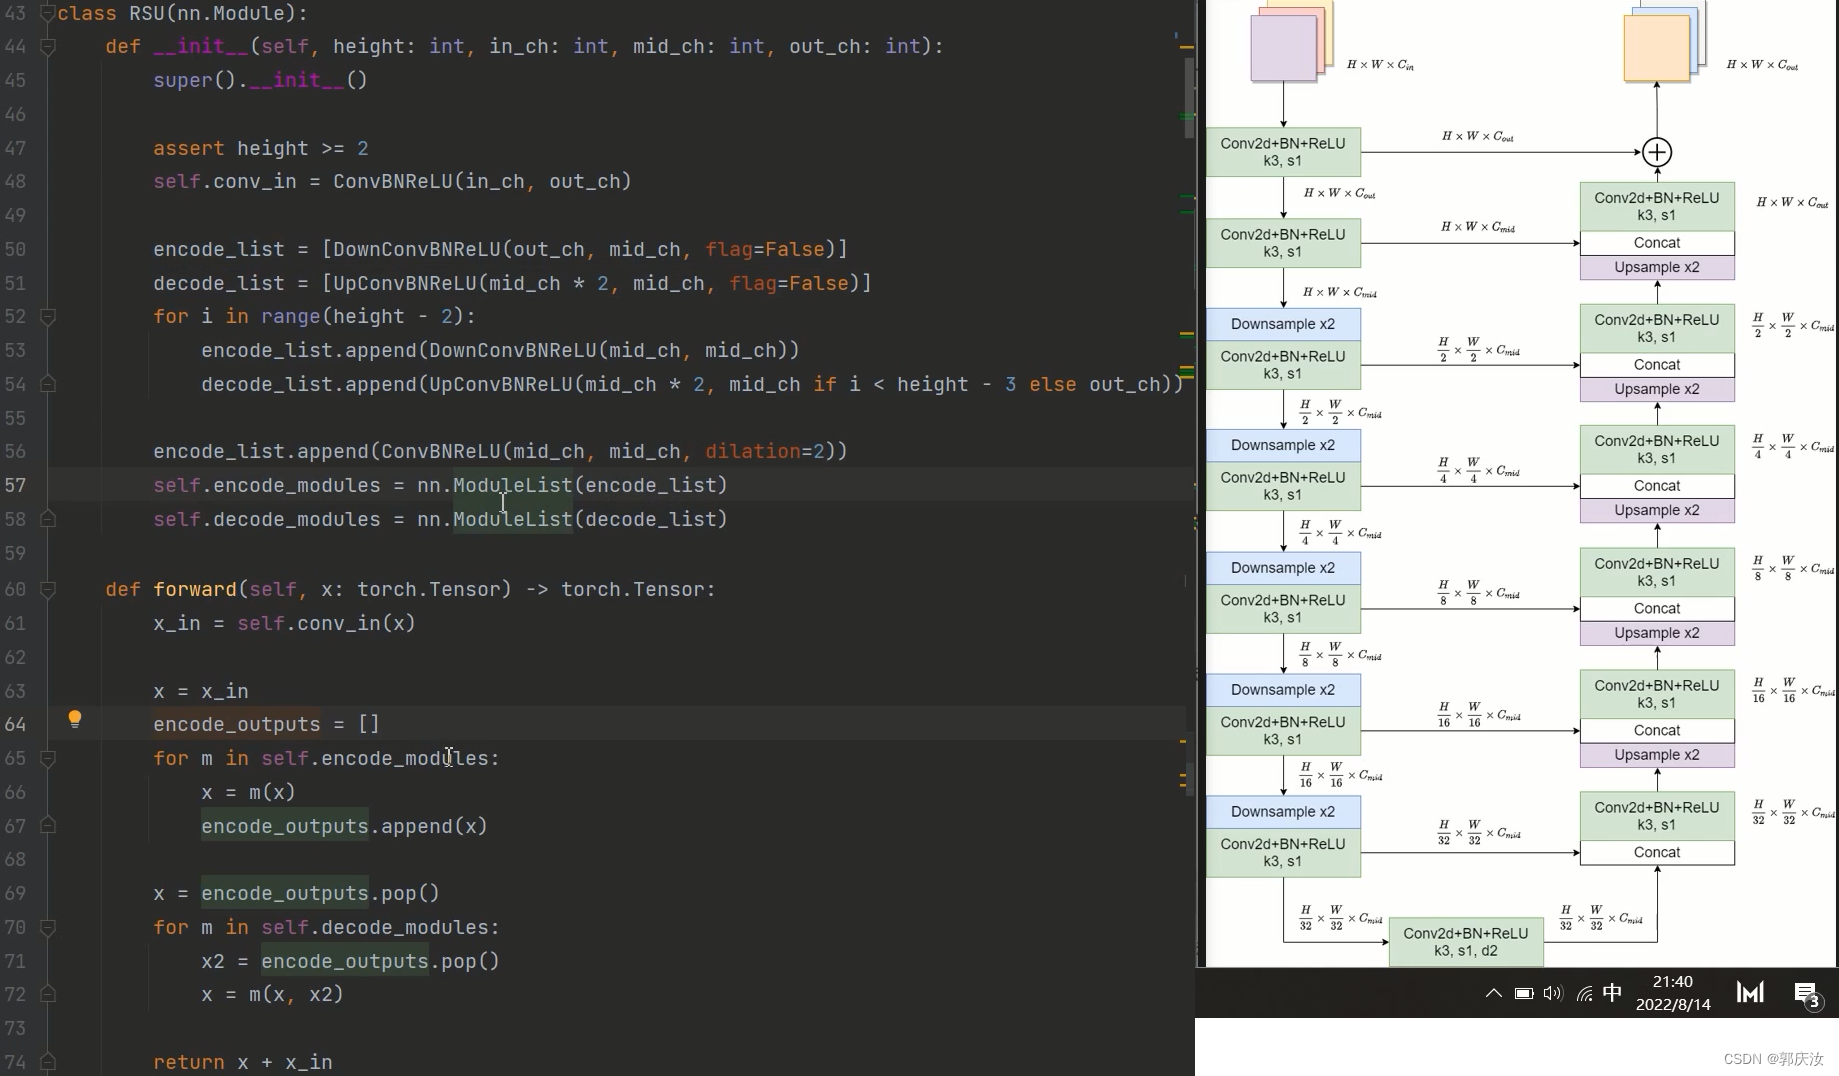
class RSU(nn.Module):def __init__(self, height: int, in_ch: int, mid_ch: int, out_ch: int):super().__init__()assert height >= 2self.conv_in = ConvBNReLU(in_ch, out_ch)encode_list = [DownConvBNReLU(out_ch, mid_ch, flag=False)]decode_list = [UpConvBNReLU(mid_ch * 2, mid_ch, flag=False)]for i in range(height - 2):encode_list.append(DownConvBNReLU(mid_ch, mid_ch))decode_list.append(UpConvBNReLU(mid_ch * 2, mid_ch if i < height - 3 else out_ch))encode_list.append(ConvBNReLU(mid_ch, mid_ch, dilation=2))self.encode_modules = nn.ModuleList(encode_list)self.decode_modules = nn.ModuleList(decode_list)def forward(self, x: torch.Tensor) -> torch.Tensor:x_in = self.conv_in(x)x = x_inencode_outputs = []for m in self.encode_modules:x = m(x)encode_outputs.append(x)x = encode_outputs.pop()for m in self.decode_modules:x2 = encode_outputs.pop()x = m(x, x2)return x + x_inRSU4F模块代码实现
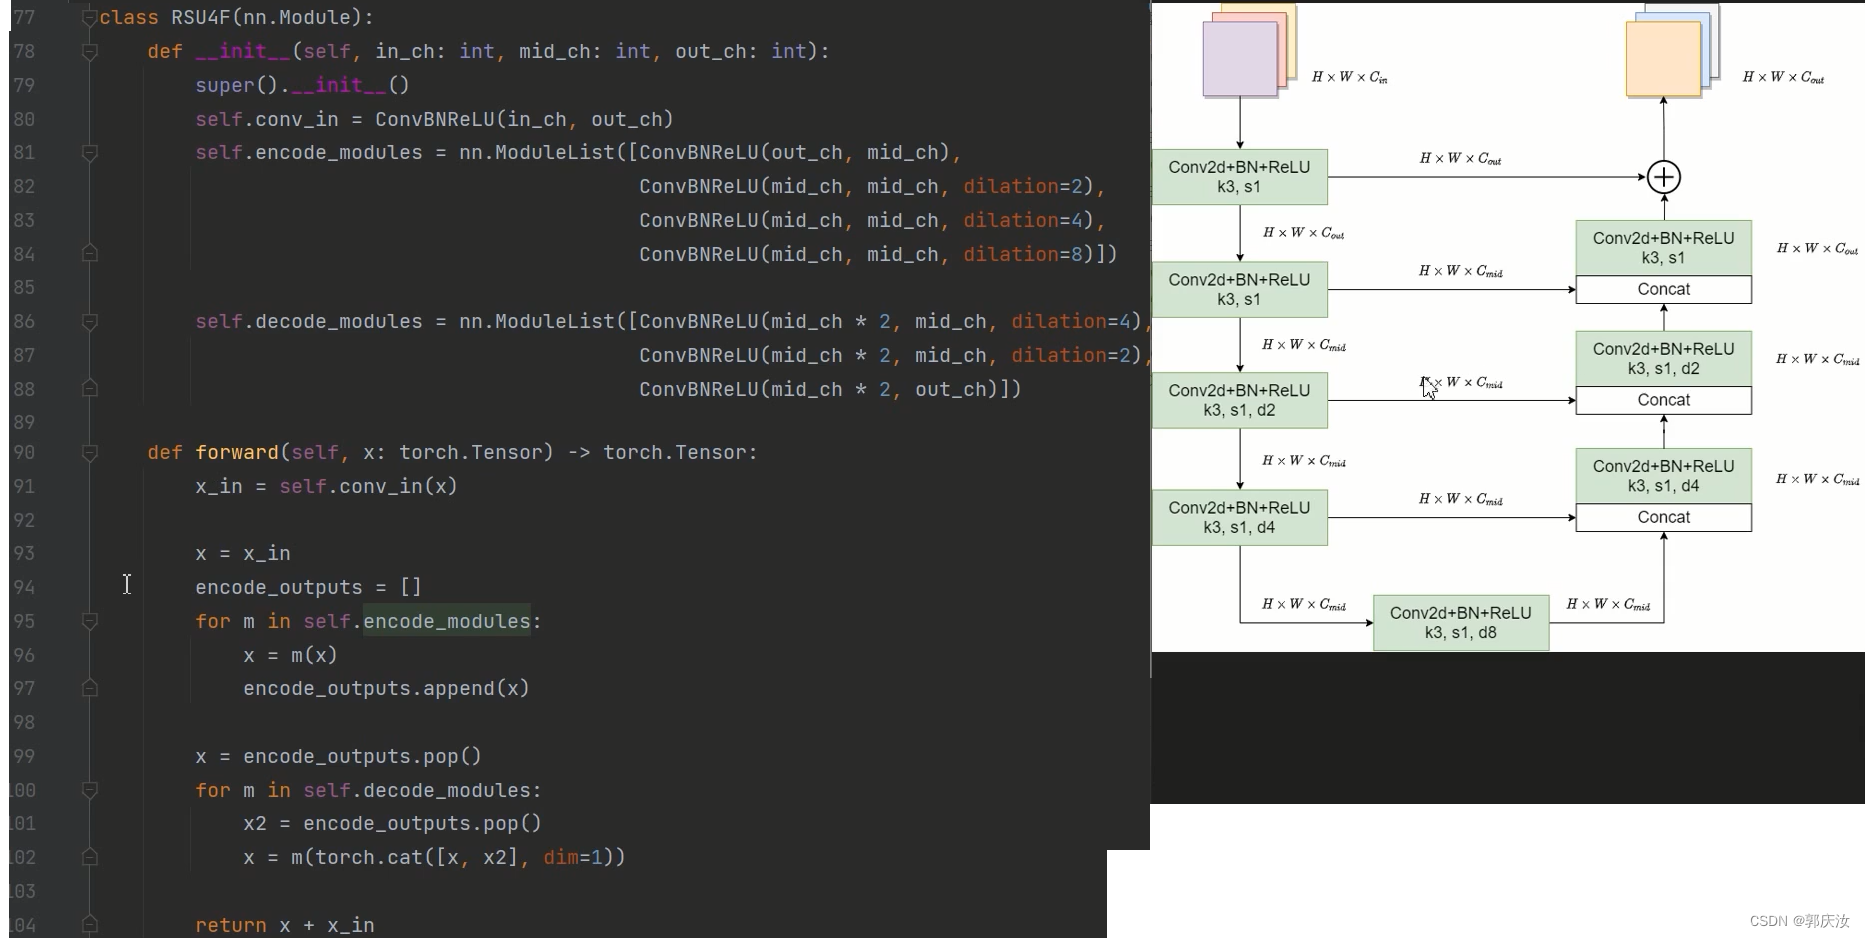
class RSU4F(nn.Module):def __init__(self, in_ch: int, mid_ch: int, out_ch: int):super().__init__()self.conv_in = ConvBNReLU(in_ch, out_ch)self.encode_modules = nn.ModuleList([ConvBNReLU(out_ch, mid_ch),ConvBNReLU(mid_ch, mid_ch, dilation=2),ConvBNReLU(mid_ch, mid_ch, dilation=4),ConvBNReLU(mid_ch, mid_ch, dilation=8)])self.decode_modules = nn.ModuleList([ConvBNReLU(mid_ch * 2, mid_ch, dilation=4),ConvBNReLU(mid_ch * 2, mid_ch, dilation=2),ConvBNReLU(mid_ch * 2, out_ch)])def forward(self, x: torch.Tensor) -> torch.Tensor:x_in = self.conv_in(x)x = x_inencode_outputs = []for m in self.encode_modules:x = m(x)encode_outputs.append(x)x = encode_outputs.pop()for m in self.decode_modules:x2 = encode_outputs.pop()x = m(torch.cat([x, x2], dim=1))return x + x_inu2net_full与u2net_lite模型配置函数
def u2net_full(out_ch: int = 1):cfg = {# height, in_ch, mid_ch, out_ch, RSU4F, side side:表示是否要收集当前block的输出"encode": [[7, 3, 32, 64, False, False], # En1[6, 64, 32, 128, False, False], # En2[5, 128, 64, 256, False, False], # En3[4, 256, 128, 512, False, False], # En4[4, 512, 256, 512, True, False], # En5[4, 512, 256, 512, True, True]], # En6# height, in_ch, mid_ch, out_ch, RSU4F, side"decode": [[4, 1024, 256, 512, True, True], # De5[4, 1024, 128, 256, False, True], # De4[5, 512, 64, 128, False, True], # De3[6, 256, 32, 64, False, True], # De2[7, 128, 16, 64, False, True]] # De1}return U2Net(cfg, out_ch)def u2net_lite(out_ch: int = 1):cfg = {# height, in_ch, mid_ch, out_ch, RSU4F, side"encode": [[7, 3, 16, 64, False, False], # En1[6, 64, 16, 64, False, False], # En2[5, 64, 16, 64, False, False], # En3[4, 64, 16, 64, False, False], # En4[4, 64, 16, 64, True, False], # En5[4, 64, 16, 64, True, True]], # En6# height, in_ch, mid_ch, out_ch, RSU4F, side"decode": [[4, 128, 16, 64, True, True], # De5[4, 128, 16, 64, False, True], # De4[5, 128, 16, 64, False, True], # De3[6, 128, 16, 64, False, True], # De2[7, 128, 16, 64, False, True]] # De1}
U2Net网络整体定义类
class U2Net(nn.Module):def __init__(self, cfg: dict, out_ch: int = 1):super().__init__()assert "encode" in cfgassert "decode" in cfgself.encode_num = len(cfg["encode"])encode_list = []side_list = []for c in cfg["encode"]:# c: [height, in_ch, mid_ch, out_ch, RSU4F, side]assert len(c) == 6encode_list.append(RSU(*c[:4]) if c[4] is False else RSU4F(*c[1:4])) # 判断当前是构建RSU模块,还是构建RSU4F模块if c[5] is True:side_list.append(nn.Conv2d(c[3], out_ch, kernel_size=3, padding=1))self.encode_modules = nn.ModuleList(encode_list)decode_list = []for c in cfg["decode"]:# c: [height, in_ch, mid_ch, out_ch, RSU4F, side]assert len(c) == 6decode_list.append(RSU(*c[:4]) if c[4] is False else RSU4F(*c[1:4]))if c[5] is True:side_list.append(nn.Conv2d(c[3], out_ch, kernel_size=3, padding=1)) # 收集当前block的输出self.decode_modules = nn.ModuleList(decode_list)self.side_modules = nn.ModuleList(side_list)self.out_conv = nn.Conv2d(self.encode_num * out_ch, out_ch, kernel_size=1) # 构建一个1x1的卷积层,去融合来自不同尺度的信息def forward(self, x: torch.Tensor) -> Union[torch.Tensor, List[torch.Tensor]]:_, _, h, w = x.shape# collect encode outputsencode_outputs = []for i, m in enumerate(self.encode_modules):x = m(x)encode_outputs.append(x)if i != self.encode_num - 1: # 此处需要进行判断,因为在没通过一个encoder模块后,都需要进行下采样的,但最后一个模块后,是不需要下采样的x = F.max_pool2d(x, kernel_size=2, stride=2, ceil_mode=True)# collect decode outputsx = encode_outputs.pop()decode_outputs = [x]for m in self.decode_modules:x2 = encode_outputs.pop()x = F.interpolate(x, size=x2.shape[2:], mode='bilinear', align_corners=False)x = m(torch.concat([x, x2], dim=1))decode_outputs.insert(0, x)# collect side outputsside_outputs = []for m in self.side_modules:x = decode_outputs.pop()x = F.interpolate(m(x), size=[h, w], mode='bilinear', align_corners=False)side_outputs.insert(0, x)x = self.out_conv(torch.concat(side_outputs, dim=1))if self.training:# do not use torch.sigmoid for amp safereturn [x] + side_outputs # 用于计算损失else:return torch.sigmoid(x)损失函数计算
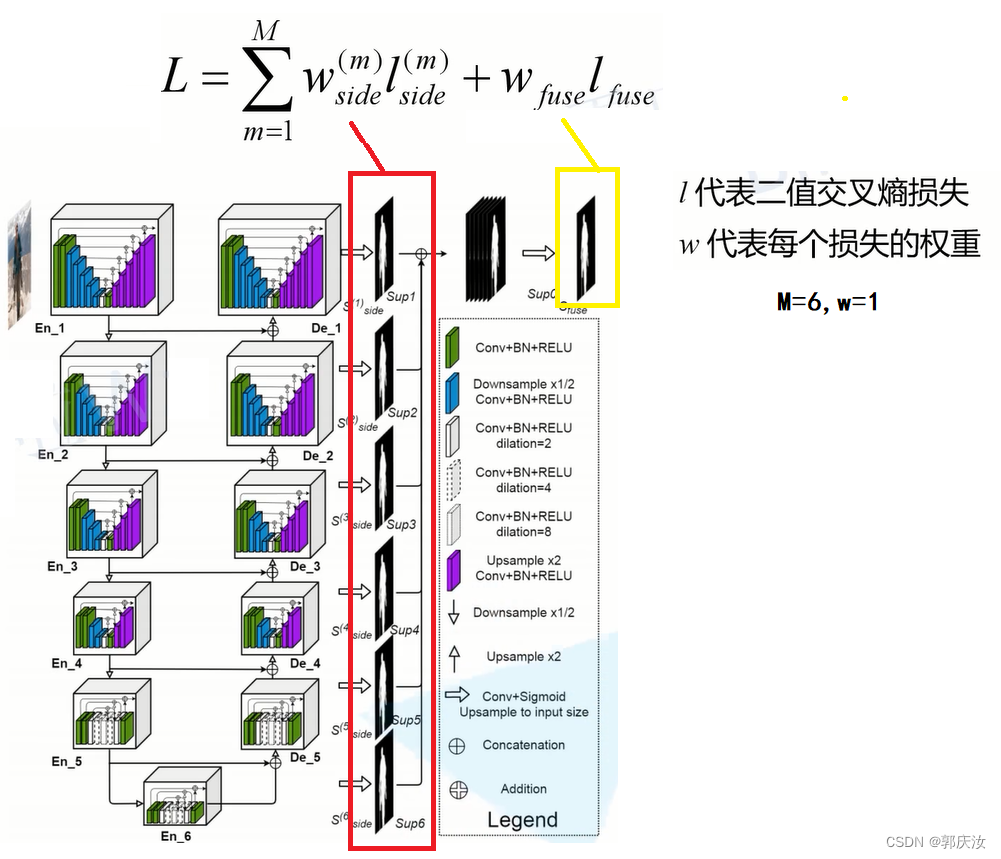
如上图所示,红色框部分为每个分量与真实标签的交叉熵损失函数求和;黄色框标部分为将各个分量经双线性插值恢复至原始尺寸、进行concant处理、经过1x1的卷积核与sigmoid处理后的结果与真实标签的交叉熵损失函数。
损失函数代码实现:
import math
import torch
from torch.nn import functional as F
import train_utils.distributed_utils as utilsdef criterion(inputs, target):losses = [F.binary_cross_entropy_with_logits(inputs[i], target) for i in range(len(inputs))]total_loss = sum(losses)return total_loss
评价指标
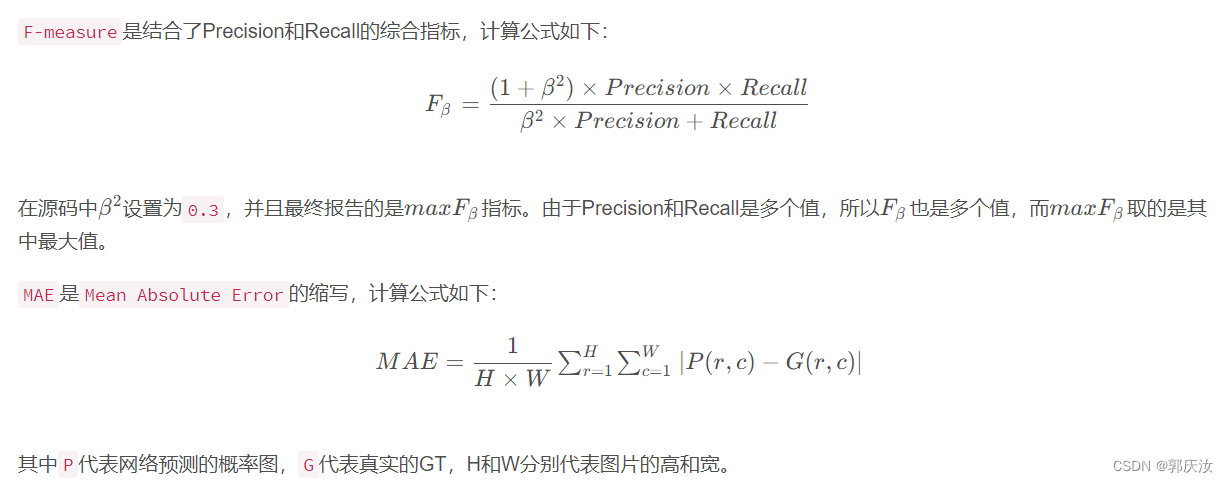
其中F-measure是在0~1之间的,数值越大,代表的网络分割效果越好;
MAE是Mean Absolute Error的缩写,其值是在0~1之间的,越趋近于0,代表网络性能越好。
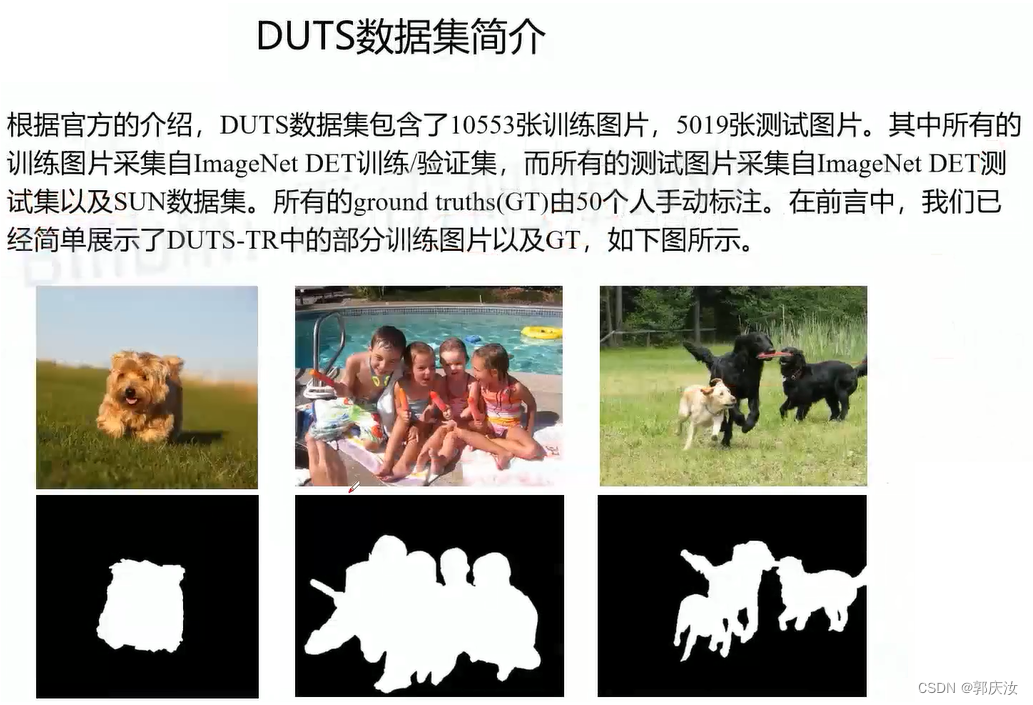
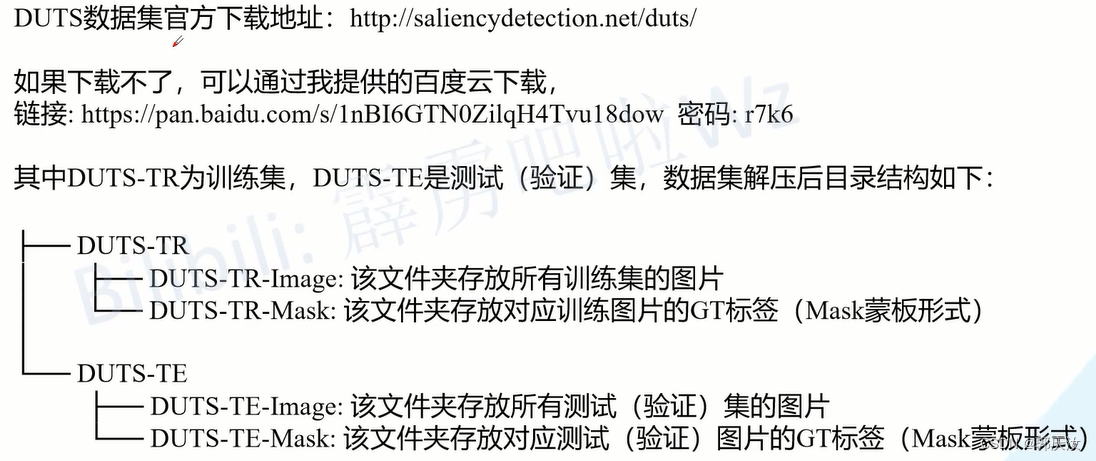
数据集
pytorch训练U2Net图像分割模型
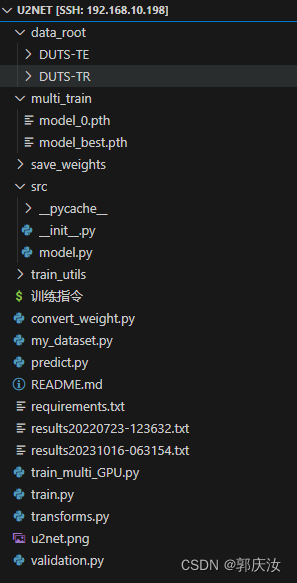
项目目录结构:
├── src: 搭建网络相关代码
├── train_utils: 训练以及验证相关代码
├── my_dataset.py: 自定义数据集读取相关代码
├── predict.py: 简易的预测代码
├── train.py: 单GPU或CPU训练代码
├── train_multi_GPU.py: 多GPU并行训练代码
├── validation.py: 单独验证模型相关代码
├── transforms.py: 数据预处理相关代码
└── requirements.txt: 项目依赖
项目目录:
项目中u2net_full大小为176.3M、u2net_lite大小为4.7M,演示过程中,训练的为u2net_lite版本
多GPU训练指令:
pytorch版本为1.7
CUDA_VISIBLE_DEVICES=0,1 python -m torch.distributed.launch --nproc_per_node=2 --use_env train_multi_GPU.py --data-path ./data_root
这篇关于图像语义分割 pytorch复现U2Net图像分割网络详解的文章就介绍到这儿,希望我们推荐的文章对编程师们有所帮助!


