本文主要是介绍接口自动化pytest+request+allure+logging+yaml+ddddocr验证码识别,希望对大家解决编程问题提供一定的参考价值,需要的开发者们随着小编来一起学习吧!
1、封装工具类common
fixture夹具
import pytest
from common.yaml_util import YamlUtil@pytest.fixture(scope='session',autouse=True)
def excute_sql():#print("连接数据库")YamlUtil().clean_yaml()#清空extract.yaml文件中的token、useridyield #print("测试执行什么")#作用是控制执行用例中执行什么# print("关闭数据库")
图像识别
(demo中暂时未使用,实际测试效果差强人意)此处加了一些自己图片处理逻辑,可以按照实际情况来修改逻辑;pyocr效果没有这个好
import os
import time
from PIL import Image
import ddddocr
import requestsdef returncode():re1=requests.request(method='get',url='http://localhost:8081/api/checkCode')# print(re1)with open(os.getcwd()+'\images\ceshi1.jpg',mode='wb') as f:f.write(re1.content)# 打开图片文件image = Image.open(os.getcwd()+"\images\ceshi1.jpg")# 将图像转换为灰度图像# gray_image = ImageOps.grayscale(image)# gray_image.show()# 转换为黑白二值图像,调整阈值以减少噪声和干扰,# 直接降噪,不灰度处理binary_image = image.point(lambda x: x < 200 and 255)binary_image.save(os.getcwd()+'\images\ceshi2.jpg')time.sleep(3)# 显示处理后的图像# binary_image.show()with open(os.getcwd()+'images\ceshi2.jpg','rb') as f:img=f.read()ocr=ddddocr.DdddOcr()result=ocr.classification(img)return result
封装请求、日志、接口关联数据操作、断言
需要按照实际场景进行微小修改
import loggingimport jsonpath
import requests
import json
from common.yaml_util import YamlUtil
from builtins import str
import reclass RequestUtil:def __init__(self, two_node):self.base_url = YamlUtil().read_config('base', two_node)# 替换值的方法# #(替换url,params,data,json,headers)# #(string,int,float,list,dict)def replace_value(self, data):if data:# 保存数据类型data_type = type(data)# 判断数据类型转换成strif isinstance(data, dict) or isinstance(data, list):str_data = json.dumps(data)else:str_data = str(data)for cs in range(1, str_data.count('${') + 1):# 替换if "${" in str_data and "}" in str_data:start_index = str_data.index("${")end_index = str_data.index("}", start_index)old_value = str_data[start_index:end_index + 1]new_value = YamlUtil().red_yaml(old_value[2:-1])str_data = str_data.replace(old_value, str(new_value))# 还原数据类型if isinstance(data, dict) or isinstance(data, list):data = json.loads(str_data)else:data = data_type(str_data)return data# 规范yaml测试用例def standard_yaml(self, caseinfo):caseinfo_keys = caseinfo.keys()# 判断一级关键字是否包含:name,request,validateif "name" in caseinfo_keys and "request" in caseinfo_keys and "validate" in caseinfo_keys:# 判断request下面是否包含:method、urlrequest_keys = caseinfo["request"].keys()if "method" in request_keys and "url" in request_keys:print("yaml基本架构检查通过")logging.debug(msg="{}请求信息:{}".format(caseinfo["title"],caseinfo["request"]))method = caseinfo['request'].pop("method")  # pop() 函数用于移除列表中的一个元素,并且返回该元素的值。url = caseinfo['request'].pop("url")res = self.send_request(method, url, **caseinfo['request'])  # caseinfo需要解包加**return_text = res.textlogging.debug(msg="{}响应信息:".format(caseinfo["title"]) + res.text)return_code = res.status_codereturn_json = ""try:return_json = res.json()except Exception as e:print("extract返回的结果不是JSON格式")# 提取值并写入extract.yaml文件if "extract" in caseinfo.keys():for key, value in caseinfo["extract"].items():if "(.*?)" in value or "(.+?)" in value:  # 正则表达式zz_value = re.search(value, return_text)if zz_value:extract_value = {key: zz_value.group(1)}YamlUtil().write_yaml(extract_value)else:  # jsonpathresturn_json = res.json()js_value = jsonpath.jsonpath(resturn_json, value)if js_value:extract_value = {key: js_value[0]}YamlUtil().write_yaml(extract_value)# 断言:logging.debug(msg="{}断言信息:{}".format(caseinfo["title"],caseinfo["validate"]))self.assert_result(caseinfo['validate'], return_json, return_code)return reselse:print("在request下必须包含method,url")else:print("一级关键字必须包含name,request,validate")sess = requests.session()# 统一请求封装def send_request(self, method, url, **kwargs):method = str(method).lower()  # 转换小写# 基础路径的拼接和替换url = self.base_url + self.replace_value(url)print(url)# 参数替换for key, value in kwargs.items():if key in ['params', 'data', 'json', 'headers','url']:kwargs[key] = self.replace_value(value)elif key == "files":for file_key, file_path in value.items():value[file_key] = open(file_path, 'rb')res = RequestUtil.sess.request(method, url, **kwargs)return res# 断言def assert_result(self, yq_result, sj_result, return_code):all_flag = 0for yq in yq_result:for key, value in yq.items():print(key, value)if key == "equals":flag = self.equals_assert(value, return_code, sj_result)all_flag = all_flag + flagelif key == 'contains':flag = self.contains_assert(value, sj_result)all_flag = all_flag + flagelse:print("框架暂不支持此段断言方式")assert all_flag == 0 , logging.debug(msg="Failed")# 相等断言def equals_assert(self, value, return_code, sj_result):flag = 0for assert_key, assert_value in value.items():print(assert_key, assert_value)if assert_key == "status_code":  # 状态断言if assert_value != return_code:flag = flag + 1print("断言失败,返回的状态码不等于%s" % assert_value)else:lists = jsonpath.jsonpath(sj_result, '$..%s' % assert_key)if lists:if assert_value not in lists:flag = flag + 1print("断言失败:" + assert_key + "不等于" + str(assert_value))else:flag = flag + 1print("断言失败:返回的结果不存在:" + assert_key)return flag# 包含断言def contains_assert(self, value, sj_result):flag = 0if value not in str(sj_result):flag = flag + 1print("断言失败:返回的结果中不包含:" + value)return flag
封装yaml文件操作方法
extract.yaml文件是存在接口关联的数据,提取的数据
import osimport yamlclass YamlUtil:
# 读def red_yaml(self,key):with open(os.getcwd() + '/extract.yaml', mode='r', encoding='utf-8') as f:value = yaml.load(f, yaml.FullLoader)return value[key]# 写def write_yaml(self,data):with open(os.getcwd() + '/extract.yaml', mode='a+', encoding='utf-8') as f:yaml.dump(data, stream=f, allow_unicode=True)# 清空def clean_yaml(self):with open(os.getcwd() + '/extract.yaml', mode='w', encoding='utf-8') as f:f.truncate()# 读yaml文件def read_yamlfile(slef,file):with open(os.getcwd() + '/' + file, mode='r', encoding='utf-8') as f:value = yaml.load(f, yaml.FullLoader)return valuedef read_config(self,one_node,two_node):with open(os.getcwd() + '/config.yaml', mode='r', encoding='utf-8') as f:value = yaml.load(f, yaml.FullLoader)return value[one_node][two_node]
2、配置文件
编辑环境控制yaml文件
base:base_test_url: http://testbase_normal_url: https://***编辑pytest.ini文件
[pytest]
log_cli = true
log_cli_level = DEBUG
log_cli_format = %(asctime)s %(levelname)s %(message)s %(filename)s
log_file = ./log/test.log
log_file_level = DEBUG
log_date_format = %Y-%m-%d %H:%M:%S
log_file_format = %(asctime)s %(levelname)s %(message)s %(filename)s
log_file_date_format = %Y-%m-%d %H:%M:%S;addopts = -sv -m "smoke" --reruns 2 -n 2 --html=./reports/report3.html --capture=sys
addopts = -sv --alluredir=./tmps --clean-alluredir
testpaths = ./testcases
python_files = test_*.py
python_classes = Test_*
python_functions = test_*
markers=smoke:冒烟测试
3、编写测试用例以及执行文件
编写测试用例
import allure
from common.conftest import *
from common.yaml_util import YamlUtil
from common.request_url import RequestUtilclass Test_ap:@allure.feature("登录")@allure.story("登录接口")@pytest.mark.smoke@pytest.mark.parametrize("caseinfo",YamlUtil().read_yamlfile("testcases/test_login.yaml"))def test_login(self,excute_sql,caseinfo):print(excute_sql)# Yamlutil().write_yaml(excute_sql)res = RequestUtil("base_test_url").standard_yaml(caseinfo)@allure.feature("用户管理")@allure.story("用户管理接口")@pytest.mark.smoke@pytest.mark.parametrize("caseinfo",YamlUtil().read_yamlfile("testcases/test_curd_user.yaml"))def test_adduser(self,excute_sql,caseinfo):print(excute_sql)# Yamlutil().write_yaml(excute_sql)res = RequestUtil("base_test_url").standard_yaml(caseinfo)
编写执行文件
import os
import timeimport pytestif __name__ == '__main__':pytest.main(['-sv','--html=./reports/report.html'])time.sleep(4)os.system("allure generate ./tmps -o ./reportsallure --clean")编写登录yaml测试数据;存在提取token
-featrue: 登录story: 登录接口title: 不存在账户登录name: 1request:method: posturl: /api/auth/oauth/tokendata:username: admin1password: e85ce909a38157c2fcgrant_type: passwordclient_id: hmcclient_secret: 123456validate:- equals: {status_code: 200}- contains: "用户名不存在"
-featrue: 登录story: 登录接口title: 正常登录name: 1request:method: posturl: /api/auth/oauth/tokendata:username: adminpassword: e85ce909a38157c2fcb022grant_type: passwordclient_id: hmcclient_secret: 123456extract:access_token: $.data.access_tokenvalidate:- equals: {status_code: 200}- contains: "OK"编写用户增删改查(curd)测试用例数据。存在提取userid;此处需要注意yaml文件的编写方式
-name: 1feature: 管理用户story: 新增用户title: 新增用户接口request:url: /api/system/user/addmethod: postjson: {"deptId":"12","userName":"testsa","nickName":"test","roleId":3,"deptType":0}headers:"Content-Type": "application/json""Authorization": "Bearer ${access_token}"validate:- equals: {status_code: 200}- contains: "OK"-name: 1feature: 管理用户story: 查询用户title: 查询用户接口request:url: /api/system/user/loadListmethod: postjson: {"pageNum":1,"pageSize":10,"username":"testsa"}headers:"Content-Type": "application/json""Authorization": "Bearer ${access_token}"validate:- equals: {status_code: 200}- contains: "OK"extract:userid: "$.data.list.[0].userId"-name: 1feature: 管理用户story: 修改用户title: 修改用户接口request:url: /api/system/user/editmethod: PUTjson:"userId": ${userid}"deptId": "12""userName": "testsa""nickName": "test""roleId": 3"remark": nullheaders:"Content-Type": "application/json""Authorization": "Bearer ${access_token}"validate:- equals: {status_code: 200}- contains: "OK"-name: 1feature: 管理用户story: 删除用户title: 删除用户接口request:url: /api/system/user/${userid}method: deleteheaders:"Content-Type": "application/json""Authorization": "Bearer ${access_token}"validate:- equals: {status_code: 200}- contains: "OK"4、实际效果展示
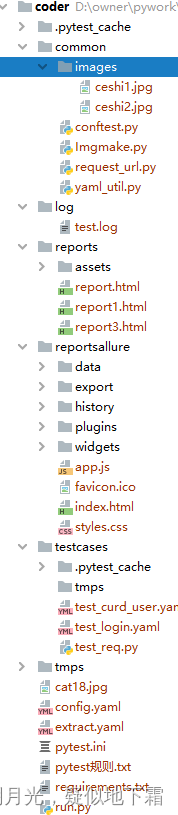
代码结构截图:
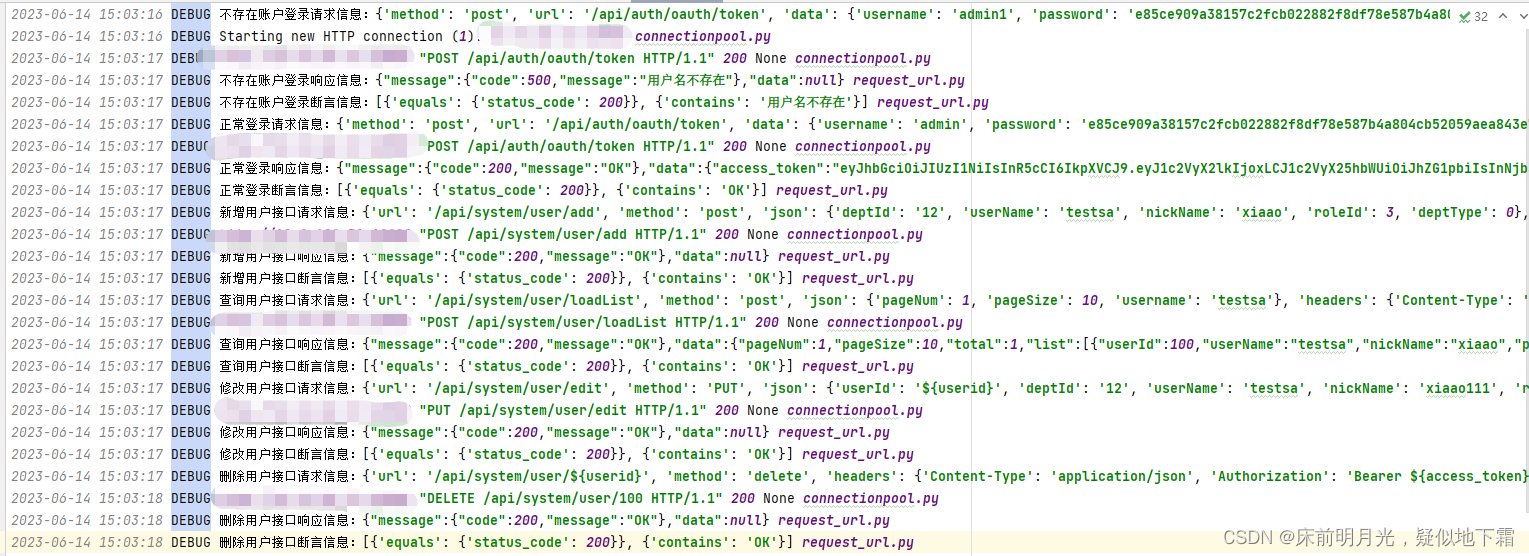
日志:
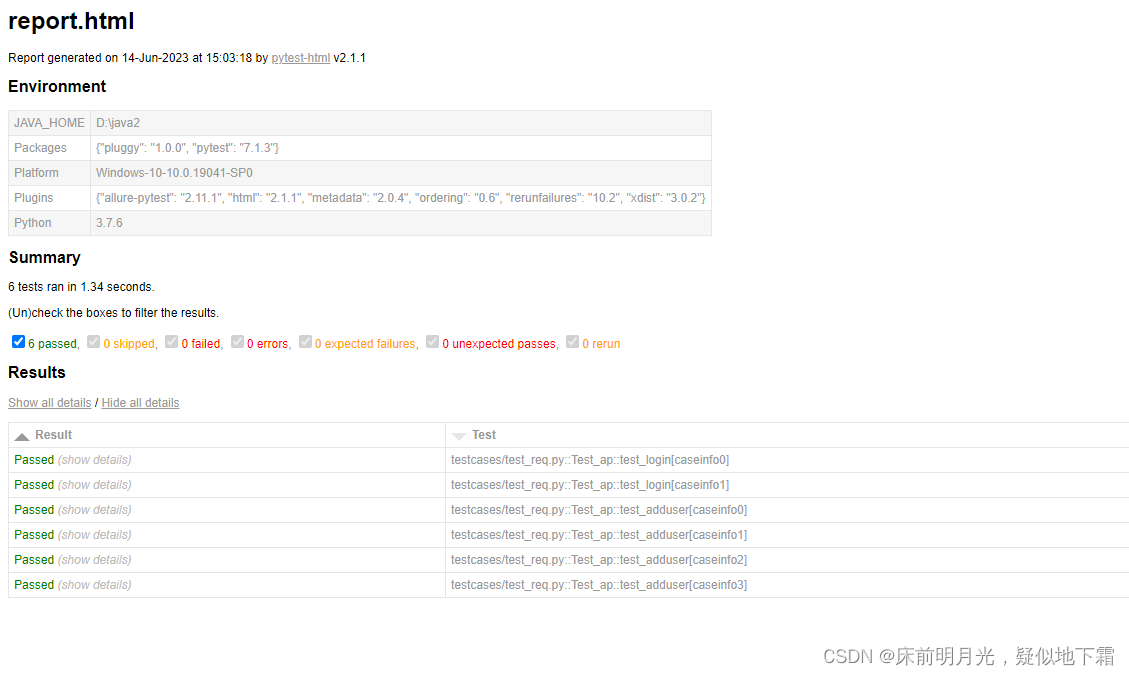
pytest-html:
allure报告:

后续可以自行安排将代码上传gitlab,联动jenkins;jenkins环境需要先部署好所有需要的环境和库
这篇关于接口自动化pytest+request+allure+logging+yaml+ddddocr验证码识别的文章就介绍到这儿,希望我们推荐的文章对编程师们有所帮助!


