本文主要是介绍Spark SQL 源码分析之 In-Memory Columnar Storage 之 cache table,希望对大家解决编程问题提供一定的参考价值,需要的开发者们随着小编来一起学习吧!
Spark SQL 可以将数据缓存到内存中,我们可以见到的通过调用cache table tableName即可将一张表缓存到内存中,来极大的提高查询效率。
这就涉及到内存中的数据的存储形式,我们知道基于关系型的数据可以存储为基于行存储结构 或 者基于列存储结构,或者基于行和列的混合存储,即Row Based Storage、Column Based Storage、 PAX Storage。
Spark SQL 的内存数据是如何组织的?
Spark SQL 将数据加载到内存是以列的存储结构。称为In-Memory Columnar Storage。
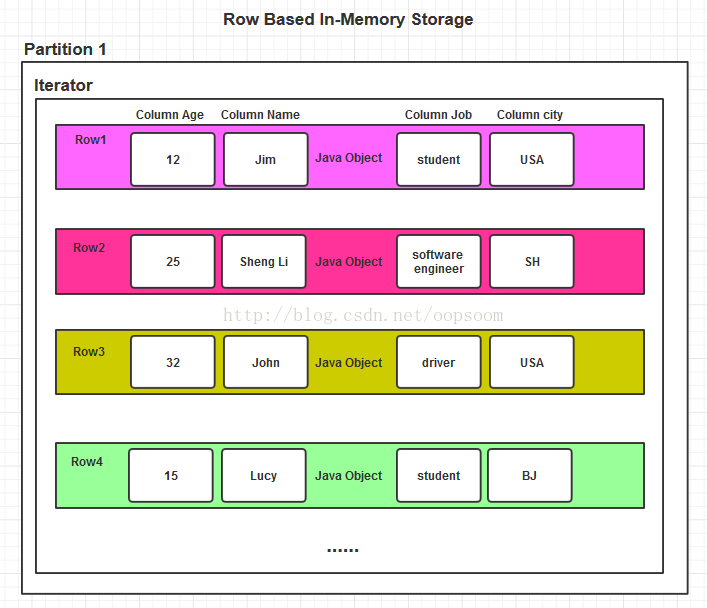
若直接存储Java Object 会产生很大的内存开销,并且这样是基于Row的存储结构。查询某些列速度略慢,虽然数据以及载入内存,查询效率还是低于面向列的存储结构。
基于Row的Java Object存储:
内存开销大,且容易FULL GC,按列查询比较慢。
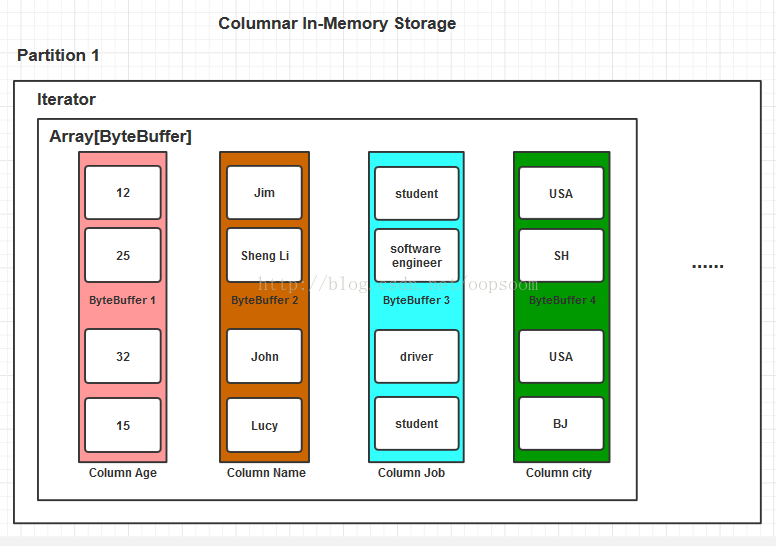
基于Column的ByteBuffer存储(Spark SQL):
内存开销小,按列查询速度较快。
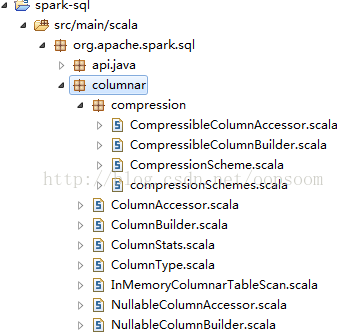
Spark SQL的In-Memory Columnar Storage是位于spark列下面org.apache.spark.sql.columnar包内:
核心的类有 ColumnBuilder, InMemoryColumnarTableScan, ColumnAccessor, ColumnType.
如果列有压缩的情况:compression包下面有具体的build列和access列的类。
一、引子
当我们调用spark sql 里的cache table command时,会生成一CacheCommand,这个Command是一个物理计划。
scala> val cached = sql("cache table src")-
cached: org.apache.spark.sql.SchemaRDD = -
SchemaRDD[0] at RDD at SchemaRDD.scala:103 -
== Query Plan == -
== Physical Plan == -
CacheCommand src, true
这里打印出来tableName是src, 和一个是否要cache的boolean flag.
我们看下CacheCommand的构造:
CacheCommand支持2种操作,一种是把数据源加载带内存中,一种是将数据源从内存中卸载。
对应于SQLContext下的cacheTable和uncacheTabele。
-
case class CacheCommand(tableName: String, doCache: Boolean)(@transient context: SQLContext) -
extends LeafNode with Command { -
override protected[sql] lazy val sideEffectResult = { -
if (doCache) { -
context.cacheTable(tableName) //缓存表到内存 -
} else { -
context.uncacheTable(tableName)//从内存中移除该表的数据 -
} -
Seq.empty[Any] -
} -
override def execute(): RDD[Row] = { -
sideEffectResult -
context.emptyResult -
} -
override def output: Seq[Attribute] = Seq.empty -
}
如果调用cached.collect(),则会根据Command命令来执行cache或者uncache操作,这里我们执行cache操作。
cached.collect()将会调用SQLContext下的cacheTable函数:
首先通过catalog查询关系,构造一个SchemaRDD。
-
/** Returns the specified table as a SchemaRDD */ -
def table(tableName: String): SchemaRDD = -
new SchemaRDD(this, catalog.lookupRelation(None, tableName))
找到该Schema的analyzed计划。匹配构造InMemoryRelation:
-
/** Caches the specified table in-memory. */ -
def cacheTable(tableName: String): Unit = { -
val currentTable = table(tableName).queryExecution.analyzed //构造schemaRDD并将其执行analyze计划操作 -
val asInMemoryRelation = currentTable match { -
case _: InMemoryRelation => //如果已经是InMemoryRelation,则返回 -
currentTable.logicalPlan -
case _ => //如果不是(默认刚刚cache的时候是空的)则构建一个内存关系InMemoryRelation -
InMemoryRelation(useCompression, columnBatchSize, executePlan(currentTable).executedPlan) -
} -
//将构建好的InMemoryRelation注册到catalog里。 -
catalog.registerTable(None, tableName, asInMemoryRelation) -
}
二、InMemoryRelation
InMemoryRelation继承自LogicalPlan,是Spark1.1 Spark SQL里新添加的一种TreeNode,也是catalyst里的一种plan. 现在TreeNode变成了4种:
1、BinaryNode 二元节点
2、LeafNode 叶子节点
3、UnaryNode 单孩子节点
4、InMemoryRelation 内存关系型节点

类图如下:
值得注意的是,_cachedColumnBuffers这个类型为RDD[Array[ByteBuffer]]的私有字段。
这个封装就是面向列的存储ByteBuffer。前面提到相较于plain java object存储记录,用ByteBuffer能显著的提高存储效率,减少内存占用。并且按列查询的速度会非常快。

InMemoryRelation具体实现如下:
构造一个InMemoryRelation需要该Relation的output Attributes,是否需要useCoompression来压缩,默认为false,一次处理的多少行数据batchSize, child 即SparkPlan。
-
private[sql] case class InMemoryRelation( -
output: Seq[Attribute], //输出属性,比如src表里就是[key,value] -
useCompression: Boolean, //操作时是否使用压缩,默认false -
batchSize: Int, //批的大小量 -
child: SparkPlan) //spark plan 具体child
可以通过设置:
spark.sql.inMemoryColumnarStorage.compressed 为true来设置内存中的列存储是否需要压缩。
spark.sql.inMemoryColumnarStorage.batchSize 来设置一次处理多少row
spark.sql.defaultSizeInBytes 来设置初始化的column的bufferbytes的默认大小,这里只是其中一个参数。
这些参数都可以在源码中设置,都在SQL Conf
-
private[spark] object SQLConf { -
val COMPRESS_CACHED = "spark.sql.inMemoryColumnarStorage.compressed" -
val COLUMN_BATCH_SIZE = "spark.sql.inMemoryColumnarStorage.batchSize" -
val DEFAULT_SIZE_IN_BYTES = "spark.sql.defaultSizeInBytes"
再回到case class InMemoryRelation:
_cachedColumnBuffers就是我们最终将table放入内存的存储句柄,是一个RDD[Array[ByteBuffer]。
缓存主流程:
1、判断_cachedColumnBuffers是否为null,如果不是null,则已经Cache了当前table,重复cache不会触发cache操作。
2、child是SparkPlan,即执行hive table scan,测试我拿sbt/sbt hive/console里test里的src table为例,操作是扫描这张表。这个表有2个字的key是int, value 是string
3、拿到child的output, 这里的output就是 key, value2个列。
4、执行mapPartitions操作,对当前RDD的每个分区的数据进行操作。
5、对于每一个分区,迭代里面的数据生成新的Iterator。每个Iterator里面是Array[ByteBuffer]
6、对于child.output的每一列,都会生成一个ColumnBuilder,最后组合为一个columnBuilders是一个数组。
7、数组内每个CommandBuilder持有一个ByteBuffer
8、遍历原始分区的记录,将对于的行转为列,并将数据存到ByteBuffer内。
9、最后将此RDD调用cache方法,将RDD缓存。
10、将cached赋给_cachedColumnBuffers。
此操作总结下来是:执行hive table scan操作,返回的MapPartitionsRDD对其重新定义mapPartition方法,将其行转列,并且最终cache到内存中。
所有流程如下:
-
// If the cached column buffers were not passed in, we calculate them in the constructor. -
// As in Spark, the actual work of caching is lazy. -
if (_cachedColumnBuffers == null) { //判断是否已经cache了当前table -
val output = child.output -
/** -
* child.output -
res65: Seq[org.apache.spark.sql.catalyst.expressions.Attribute] = ArrayBuffer(key#6, value#7) -
*/ -
val cached = child.execute().mapPartitions { baseIterator => -
/** -
* child.execute()是Row的集合,迭代Row -
* res66: Array[org.apache.spark.sql.catalyst.expressions.Row] = Array([238,val_238]) -
* -
* val row1 = child.execute().take(1) -
* res67: Array[org.apache.spark.sql.catalyst.expressions.Row] = Array([238,val_238]) -
* */ -
/* -
* 对每个Partition进行map,映射生成一个Iterator[Array[ByteBuffer],对应java的Iterator<List<ByteBuffer>> -
* */ -
new Iterator[Array[ByteBuffer]] { -
def next() = { -
//遍历每一列,首先attribute是key 为 IntegerType ,然后attribute是value是String -
//最后封装成一个Array, index 0 是 IntColumnBuilder, 1 是StringColumnBuilder -
val columnBuilders = output.map { attribute => -
val columnType = ColumnType(attribute.dataType) -
val initialBufferSize = columnType.defaultSize * batchSize -
ColumnBuilder(columnType.typeId, initialBufferSize, attribute.name, useCompression) -
}.toArray -
//src表里Row是[238,val_238] 这行Row的length就是2 -
var row: Row = null -
var rowCount = 0 -
//batchSize默认1000 -
while (baseIterator.hasNext && rowCount < batchSize) { -
//遍历每一条记录 -
row = baseIterator.next() -
var i = 0 -
//这里row length是2,i的取值是0 和 1 -
while (i < row.length) { -
//获取columnBuilders, 0是IntColumnBuilder, -
//BasicColumnBuilder的appendFrom -
//Appends `row(ordinal)` to the column builder. -
columnBuilders(i).appendFrom(row, i) -
i += 1 -
} -
//该行已经插入完毕 -
rowCount += 1 -
} -
//limit and rewind,Returns the final columnar byte buffer. -
columnBuilders.map(_.build()) -
} -
def hasNext = baseIterator.hasNext -
} -
}.cache() -
cached.setName(child.toString) -
_cachedColumnBuffers = cached -
}
三、Columnar Storage
初始化ColumnBuilders:
-
val columnBuilders = output.map { attribute => -
val columnType = ColumnType(attribute.dataType) -
val initialBufferSize = columnType.defaultSize * batchSize -
ColumnBuilder(columnType.typeId, initialBufferSize, attribute.name, useCompression) -
}.toArray
这里会声明一个数组,来对应每一列的存储,如下图:

然后初始化类型builder的时候会传入的参数:
initialBufferSize:文章开头的图中会有ByteBuffer,ByteBuffer的初始化大小是如何计算的?
initialBufferSize = 列类型默认长度 × batchSize ,默认batchSize是1000
拿Int类型举例,initialBufferSize of IntegerType = 4 * 1000
attribute.name即字段名age,name etc。。。
ColumnType:
ColumnType封装了 该类型的 typeId 和 该类型的 defaultSize。并且提供了extract、append\getField方法,来向buffer里追加和获取数据。
如IntegerType typeId 为0, defaultSize 4 ......
详细看下类图,画的不是非常严格的类图,主要为了展示目前类型系统:

ColumnBuilder:
ColumnBuilder的主要职责是:管理ByteBuffer,包括初始化buffer,添加数据到buffer内,检查剩余空间,和申请新的空间这几项主要职责。
initialize负责初始化buffer。
appendFrom是负责添加数据。
ensureFreeSpace确保buffer的长度动态增加。
类图如下:

ByteBuffer的初始化过程:
初始化大小initialSize:拿Int举例,在前面builder初始化传入的是4×batchSize=4*1000,initialSize也就是4KB,如果没有传入initialSize,则默认是1024×1024。
列名称,是否需要压缩,都是需要传入的。
ByteBuffer声明时预留了4个字节,为了放column type id,这个在ColumnType的构造里有介绍过。
-
override def initialize( -
initialSize: Int, -
columnName: String = "", -
useCompression: Boolean = false) = { -
val size = if (initialSize == 0) DEFAULT_INITIAL_BUFFER_SIZE else initialSize //如果没有默认1024×1024 byte -
this.columnName = columnName -
// Reserves 4 bytes for column type ID -
buffer = ByteBuffer.allocate(4 + size * columnType.defaultSize) // buffer的初始化长度,需要加上4byte类型ID空间。 -
buffer.order(ByteOrder.nativeOrder()).putInt(columnType.typeId)//根据nativeOrder排序,然后首先放入typeId -
}
存储的方式如下:
Int的type id 是0, string的 type id 是 7. 后面就是实际存储的数据了。

ByteBuffer写入过程:
存储结构都介绍完毕,最后开始对Table进行scan了,scan后对每一个分区的每个Row进行操作遍历:
1、读每个分区的每条Row
2、获取每个列的值,从builders数组里找到索引 i 对应的bytebuffer,追加至bytebuffer。
-
while (baseIterator.hasNext && rowCount < batchSize) { -
//遍历每一条记录 -
row = baseIterator.next() -
var i = 0 -
//这里row length是2,i的取值是0 和 1 Ps:还是拿src table做测试,每一个Row只有2个字段,key, value所有长度为2 -
while (i < row.length) { -
//获取columnBuilders, 0是IntColumnBuilder, -
//BasicColumnBuilder的appendFrom -
//Appends `row(ordinal)` to the column builder. -
columnBuilders(i).appendFrom(row, i) //追加到对应的bytebuffer -
i += 1 -
} -
//该行已经插入完毕 -
rowCount += 1 -
} -
//limit and rewind,Returns the final columnar byte buffer. -
columnBuilders.map(_.build())
追加过程:
根据当前builder的类型,从row的对应索引中取出值,最后追加到builder的bytebuffer内。
-
override def appendFrom(row: Row, ordinal: Int) { -
//ordinal是Row的index,0就是第一列值,1就是第二列值,获取列的值为field -
//最后在将该列的值put到该buffer内 -
val field = columnType.getField(row, ordinal) -
buffer = ensureFreeSpace(buffer, columnType.actualSize(field))//动态扩容 -
columnType.append(field, buffer) -
}
ensureFreeSpace:
主要是操作buffer,如果要追加的数据大于剩余空间,就扩大buffer。
-
//确保剩余空间能容下,如果剩余空间小于 要放入的大小,则重新分配一看内存空间 -
private[columnar] def ensureFreeSpace(orig: ByteBuffer, size: Int) = { -
if (orig.remaining >= size) { //当前buffer剩余空间比要追加的数据大,则什么都不做,返回自身 -
orig -
} else { //否则扩容 -
// grow in steps of initial size -
val capacity = orig.capacity() -
val newSize = capacity + size.max(capacity / 8 + 1) -
val pos = orig.position() -
orig.clear() -
ByteBuffer -
.allocate(newSize) -
.order(ByteOrder.nativeOrder()) -
.put(orig.array(), 0, pos) -
} -
}
......
最后调用MapPartitionsRDD.cache(),将该RDD缓存并添加到spark cache管理中。
至此,我们将一张spark sql table缓存到了spark的jvm中。
四、总结
对于数据的存储结构,我们常常关注持久化的存储结构,并且在长久时间内有了很多种高效结构。
但是在实时性的要求下,内存数据库越来越被关注,如何优化内存数据库的存储结构,是一个重点,也是一个难点。
对于Spark SQL 和 Shark 里的列存储 是一种优化方案,提高了关系查询中列查询的速度,和减少了内存占用。但是中存储方式还是比较简单的,没有额外的元数据和索引来提高查询效率,希望以后能了解到更多的In-Memory Storage。
这篇关于Spark SQL 源码分析之 In-Memory Columnar Storage 之 cache table的文章就介绍到这儿,希望我们推荐的文章对编程师们有所帮助!


