本文主要是介绍react 打字机效果_如何用打字稿构建素描插件React第1部分,希望对大家解决编程问题提供一定的参考价值,需要的开发者们随着小编来一起学习吧!
react 打字机效果
At Overlay, we started 2 years ago building a Sketch Plugin to help designers t export their symbols into prod-ready React/Vue.js components. I write this article to help people create Sketch plugins and to share our technical expertise on this subject.
在Overlay,我们从2年前开始构建一个Sketch Plugin,以帮助设计师将其符号导出到支持prod的React / Vue.js组件中。 我写这篇文章是为了帮助人们创建Sketch插件并分享我们在此主题上的技术专长。
First, Sketch plugins are very good tools to extend Sketch functionalities. Sketch has thousand plugins built by the community. For example, at Overlay our Sketch plugin allows designers to check the components consistency with their project guidelines (color, typography), extract data from Sketch (symbols data, assets, text style, etc…) and detect design defaults.
首先,Sketch插件是扩展Sketch功能的非常好的工具。 Sketch具有社区创建的数千个插件 。 例如,在Overlay中,我们的Sketch插件可让设计人员检查组件是否符合其项目准则(颜色,版式),从Sketch中提取数据(符号数据,素材资源,文本样式等)并检测设计默认值。
教程目标 (Tutorial objective)
This tutorial aims at creating a basic but complete Sketch plugin with React and Typescript, from scratch. I want to give you an overview of what can be achieved with Sketch Plugins: create web-feeling interfaces, trigger Sketch native functionalities from a web view, trigger web view app functionalities from Sketch native events.
本教程旨在从头开始使用React和Typescript创建一个基本但完整的Sketch插件。 我想向您概述使用Sketch Plugins可以实现的功能:创建Web感觉界面,从Web视图触发Sketch本机功能,从Sketch Native事件触发Web视图应用程序功能。
To keep things challenging, we are going to build a linter plugin: PixelPerfect ! PixelPerfect users will be able to select a Sketch Symbol and check if there are imperfect pixels in its layers.
为了使事情更具挑战性,我们将构建一个linter插件:PixelPerfect! PixelPerfect用户将能够选择草图符号,并检查其图层中是否存在不完美的像素。

If the plugin detects imperfect pixel, the user can fix all imperfections in one click through the plugin.
如果插件检测到不完美的像素,则用户只需单击一下插件即可修复所有缺陷。
The tutorial will be split in three parts, that will be published successively:
本教程将分为三个部分,并将依次发布:
- [Part 1] Some theory and get started your first plugin with React [第1部分]了解一些理论并开始使用React编写第一个插件
- [Part 2 ] Communication between React and Sketch [第二部分] React和Sketch之间的通信
- [Part 3] First deployment and how to automate them [第3部分]首次部署以及如何使它们自动化
建筑 (Architecture)
Let’s start with designing the plugin architecture, there are two approaches for building a Sketch plugins :
让我们从设计插件架构开始,有两种构建Sketch插件的方法:
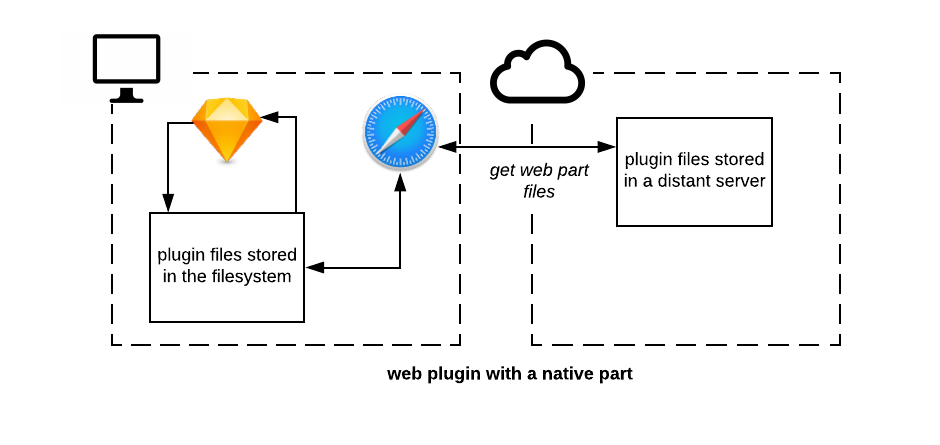
The native approach, where all the application code is stored in the user’s computer. This is the case for all plugins built without web-views (Zeplin, Craft) and plugins built with a web view where app files are hosted in local (see this tutorial) and displayed by Safari (opened by Sketch).
本机方法,其中所有应用程序代码都存储在用户的计算机中。 对于所有没有Web视图构建的插件( Zeplin , Craft )和使用Web视图构建的插件都是这种情况,其中应用程序文件托管在本地(请参见本教程 ),并由Safari显示(由Sketch打开)。

The web approach, where only a few code parts are stored in the user’s computer. in this case, we stored code responsible for web view handling and Sketch/Plugin communication. The rest of the application (interface and logic ) is stored on a server as a classic web client-side application.
Web方法 ,其中只有很少的代码部分存储在用户的计算机中。 在这种情况下,我们存储了负责Web视图处理和Sketch / Plugin通信的代码。 其余的应用程序(接口和逻辑)作为经典的Web客户端应用程序存储在服务器上。
Obviously, the second approach looks more complicated, so why choose this one ?
显然,第二种方法看起来更复杂,那么为什么选择这种方法呢?
- Web approach don’t requires Objective-C competences (which are rare) so “common” web developers can create a plugin. Web方法不需要Objective-C能力(这是很少见的),因此“普通” Web开发人员可以创建插件。
- With the web approach, you can ensure that all your users always have the plugin’s last version running (the one deployed on the server). This helps you a lot to iterate faster on your product. With the native approach you are dependent to the version installed in the user computer. That can leads you to new hard tech challenges like API versioning or retro compatibility changes. 使用Web方法,可以确保所有用户始终运行插件的最新版本(服务器上已部署的最新版本)。 这可以帮助您更快地迭代产品。 使用本机方法时,您将依赖于用户计算机中安装的版本。 这可能会导致您面临新的技术难题,例如API版本控制或复古兼容性更改。
- From a user point of view, the web approach is more user friendly, you don’t have to update your plugin manually as the browser will take care about it. 从用户的角度来看,Web方法更加用户友好,您无需手动更新插件,因为浏览器会处理它。
Nevertheless, be careful with this approach. If you want to get the full potential you must avoid writing business logic in the native part of your application as this part can be painful for your user to update (manual update).
但是,请谨慎使用此方法。 如果您想发挥全部潜能,则必须避免在应用程序的本机部分中编写业务逻辑,因为这部分可能会使用户难以进行更新(手动更新)。
At Overlay, we chose the web approach because :
在Overlay ,我们选择网络方法是因为:
- We want to iterate on the plugin every week. 我们想每周迭代一次插件。
- We don’t know Objective-C but we have strong knowledges on web development. 我们不了解Objective-C,但是我们对Web开发有丰富的知识。
We want to connect to several designer tools (Figma, AdobeXD, etc…) and we want to easily reuse our plugin interface.
我们想要连接到多个设计器工具( Figma , AdobeXD等),并且希望轻松地重用我们的插件界面。
Ready to start ? Let’s go !
准备开始 ? 我们走吧 !
开始吧 (Get started)
We will build the native part with SKPM and the web part with React but you can do this with all JS frameworks (I haven’t tested with Backbone…#RIP).
我们将使用SKPM构建本机部分,并使用React构建Web部分,但是您可以使用所有JS框架(我尚未使用Backbone …#RIP进行测试)来完成此任务。
Prerequisites:
先决条件:
Node
节点
Sketch
草图
First, create an empty directory project
首先,创建一个空目录项目
mkdir pixel-perfectCreate inside this directory a Sketch plugin with web view with SKPM
在此目录中创建一个具有SKPM Web视图的Sketch插件
cd pixel-perfect && npx skpm create pixel-perfect --template=skpm/with-webview && mv pixel-perfect pixel-perfect-nativeThen let’s start the Sketch watcher
然后让我们启动Sketch Watcher
cd pixel-perfect-native && npm run watchNow the native part of your Sketch plugin must be running, you must see this in Sketch
现在您的Sketch插件的本机部分必须正在运行,您必须在Sketch中看到它

Now let’s build the plugin’s web part. First create the React app with create react app inside the pixel-perfect folder
现在,让我们构建插件的Web部件。 首先使用pixel-perfect文件夹内的create react app创建React应用
npx create-react-app pixel-perfect-web --template typescriptThen let’s start the Webpack server
然后让我们启动Webpack服务器
cd pixel-perfect-web && npm run startNow you must see this in your browser at http://localhost:3000
现在,您必须在浏览器中的http:// localhost:3000上看到它

Ok now let’s connect the React app to the Sketch plugin, to do so, edit my-command.js
好的,现在让我们将React应用程序连接到Sketch插件,为此,请编辑my-command.js
Now open/close the plugin, you must see the web approach’s Hello world 🎉
现在打开/关闭插件,您必须看到网络方法的 Hello world🎉

开发环境 (Development environment)
Now, let’s have a look at the development environment we just built. First, we have the native part in the pixel-perfect-native/src folder. When we run npm run build command, SKPM launches a Webpack server to build the Sketch plugin in this location pixel-perfect-native/pixel-perfect-sketch/sketchplugin. SKPM watcher works well but it demands to open manually the new built plugin on each change which is painful. I recommend adding a Makefile in the project root pixel-perfect with this command.
现在,让我们看一下我们刚刚构建的开发环境。 首先,我们在pixel-perfect-native/src文件夹中具有本机部分。 当我们运行npm run build命令时, SKPM启动Webpack服务器在该位置pixel-perfect-native/pixel-perfect-sketch/sketchplugin构建Sketch插件。 SKPM watcher运行良好,但是每次更改时都需要手动打开新构建的插件,这很痛苦。 我建议使用此命令在项目根pixel-perfect添加一个Makefile。
With this Makefile in one command make build you can build and open the new plugin.
有了这个Makefile在一个命令make build你可以建立并打开新的插件。
The web part is located in pixel-perfect-web/src folder. When we run npm run start command, React script launches a Webpack server and builds the web app files. Every changes in the web part will be hot reloaded in the browser and in the Sketch plugin, that will be super useful to continue the plugin !
Web部件位于pixel-perfect-web/src文件夹中。 当我们运行npm run start命令时, React脚本会启动Webpack服务器并构建Web应用程序文件。 Web部件中的所有更改都将在浏览器和 Sketch插件中热加载,这对于继续插件非常有用!
It can be pretty hard to debug the native part. I recommend to install and use SketchDevTools to print data. For the web part you can use your favorite browser dev-tools or Safari dev-tools directly inside the plugin web-view. To know more about debugging follow this Sketch tutorial.
调试本机部分可能非常困难。 我建议安装并使用SketchDevTools打印数据。 对于Web部件,您可以直接在插件Web视图内使用自己喜欢的浏览器开发工具或Safari开发工具。 要了解有关调试的更多信息,请遵循此Sketch教程 。
添加快捷方式以打开插件 (Add a Shortcut to open up the plugin)
Clicking is painful for users and for developers. Instead of asking to the user to click each time on the plugin command, we will add a shortcut to toggle the plugin interface, what about ^+shift+P ? To do so let’s update the manifest.json native file with the shortcut line
单击对于用户和开发人员来说都是痛苦的。 我们不会要求用户每次在plugin命令上单击,而是添加快捷方式来切换插件界面, ^+shift+P怎么办? 为此,我们使用快捷方式行更新manifest.json本机文件
"commands": [
  {
    "name": "my-command",
    "identifier": "pixel-perfect.my-command-identifier",
    "script": "./my-command.js",    "shortcut": "ctrl shift p",    "handlers": {
      "run": "onRun",
      "actions": {
        "Shutdown": "onShutdown"
      }
    }
  }
],
Now we can rebuild the plugin and test it in Sketch :)
现在我们可以重建插件并在Sketch中对其进行测试了:)
向Sketch插件添加一个Reactive接口 (Add a Reactive interface to the Sketch plugin)
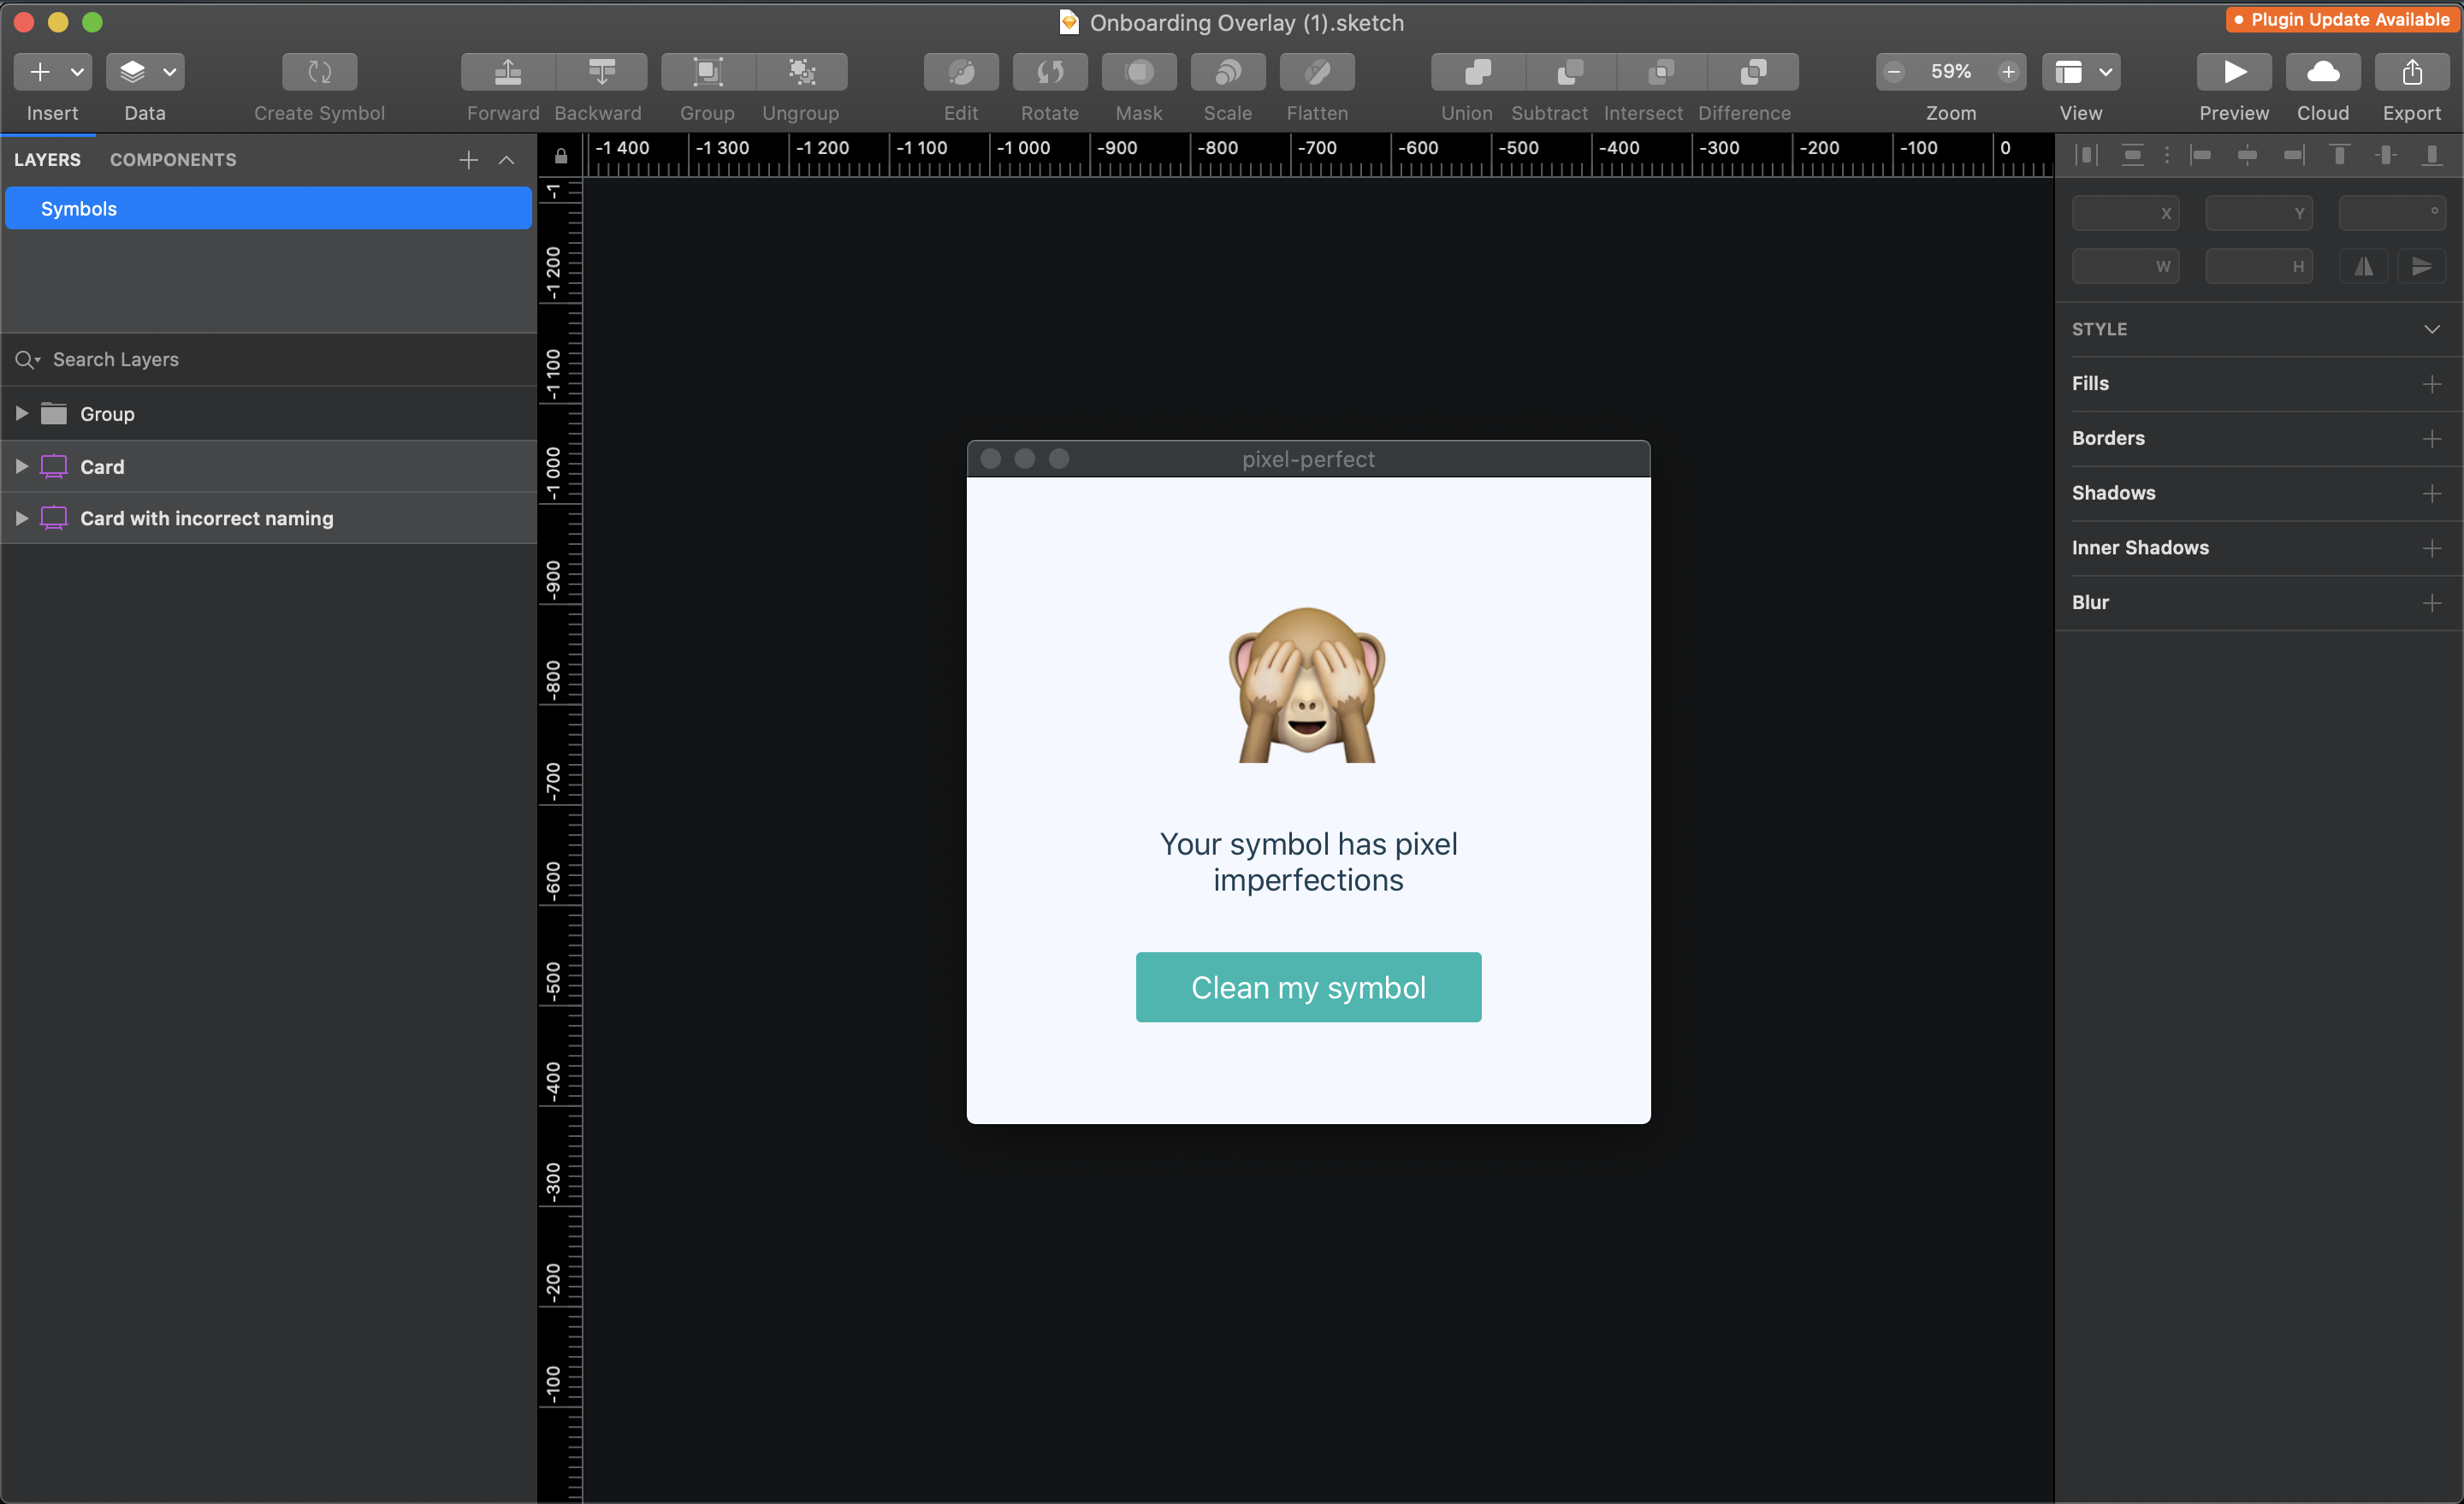
Now we will design the main screen plugin, it will show if the plugin has found some imperfections. Let’s change the App.tsx.
现在我们将设计主屏幕插件,它将显示该插件是否发现了一些缺陷。 让我们更改App.tsx 。
Then we need to change the App.css
然后我们需要更改App.css
Now we can see our new beautiful interface 🖼
现在我们可以看到我们新的漂亮界面🖼
Now let’s add a state hasImperfection to handle the component status. We use a ternary expression to conditionally render the clean button or the success message.
现在让我们添加一个状态hasImperfection来处理组件状态。 我们使用三元表达式有条件地渲染“清理”按钮或成功消息。
We use React hook useState, if you are not familiar with it, you can learn about it here or you can achieve the same result with the setState method. Now you must see this after clicking on the button
我们使用React hook useState,如果您不熟悉它,可以在这里学习 或者您可以使用setState方法获得相同的结果。 现在,您必须在单击按钮后看到此内容

You are done, Pixel Perfect is up !
您完成了,Pixel Perfect起来了!
Code source available on this GitHub repository: https://github.com/Overlay-tech/pixel-perfect-tutorial
该GitHub存储库上可用的代码源: https : //github.com/Overlay-tech/pixel-perfect-tutorial
结论 (Conclusion)
I hope I have convinced you of the capabilities of React to create a Sketch Plugin with very little effort. To sum things up:
我希望我已经使您相信React可以毫不费力地创建Sketch插件的功能。 总结一下:
SKPM and Create React App can create a dummy plugin in one command line.
SKPM和Create React App可以在一个命令行中创建一个虚拟插件。
- The Web approach allow to iterate really fast on your code base Web方法允许在您的代码库上真正快速地迭代
- Using a web-view plus React for building an interactive interface is very straight forward. 使用Web视图加上React来构建交互式界面非常简单。
However, Pixel Perfect is not yet a complete Sketch Plugin, in the next article we will :
但是,Pixel Perfect还不是一个完整的Sketch插件,在下一篇文章中,我们将:
- Pass the component information from Sketch to React to know if the symbols has inconsistencies. 将组件信息从Sketch传递到React,以了解符号是否不一致。
- Connect the ‘Clean my symbol’ button to Sketch native action to clean the component. 将“清洁我的符号”按钮连接到“草绘本机动作”以清洁组件。
If you want to know more about Overlay go here, it’s free to try:
如果您想了解更多有关Overlay的信息,请点击此处,可以免费尝试:
We build a series of technical articles to explain how Overlay engineering team designs, builds and operates our systems and we will continue to post tech content every month, if you are interested in tech problems, follow Overlay blog.
我们撰写了一系列技术文章来说明Overlay工程团队如何设计,构建和操作我们的系统,如果您对技术问题感兴趣,我们将继续每月发布技术内容,请关注Overlay博客 。
翻译自: https://medium.com/overlay-blog/how-to-build-a-sketch-plugin-with-typescript-react-part-1-ac3bbc2e5443
react 打字机效果
相关文章:
这篇关于react 打字机效果_如何用打字稿构建素描插件React第1部分的文章就介绍到这儿,希望我们推荐的文章对编程师们有所帮助!


