本文主要是介绍HDLBits-Circuits学习小结(一)初探门电路(basic gates),希望对大家解决编程问题提供一定的参考价值,需要的开发者们随着小编来一起学习吧!
目录
- 1 Basic Gates
- 1.1 GND NOR and Another gate
- 1.1.1 GND
- 1.1.2 NOR
- 1.1.3 Another gate
- 1.2 Two gates
- 1.3 More logic gates
- 2 Simple Circuit
- 2.1Truth tables
- 2.2 Two-bit equality
- 2.3 Simple circuit
- 2.3.1 Simple circuit A
- 2.3.2 Simple circuit B
- 2.3.3 Combine circuits A and B
- 2.4 Ring or vibrate?
- 2.5 Thermostat
- 2.6 3-bit population count
- 3 Vectors
- 3.1 Gates and vectors
- 3.2 Even longer vectors
1 Basic Gates
1.1 GND NOR and Another gate
1.1.1 GND
实现以下电路:

solution:
module top_module (output out);assign out = 1'b0;endmodule
1.1.2 NOR
实现以下电路:

solution:
module top_module (input in1,input in2,output out);assign out = ~(in1 | in2);endmodule
1.1.3 Another gate
实现以下电路:
solution:

module top_module (input in1,input in2,output out);assign out = in1 & (~in2);endmodule
1.2 Two gates
实现以下电路:

solution:
module top_module (input in1,input in2,input in3,output out);assign out = ~(in1^in2) ^ in3;endmodule
1.3 More logic gates
好的,让我们尝试同时构建多个逻辑门。用两个输入a和b建立一个组合电路。 有7个输出,每个输出都有一个逻辑门驱动:
- out_and: a and b
- out_or: a or b
- out_xor: a xor b
- out_nand: a nand b
- out_nor: a nor b
- out_xnor: a xnor b
- out_anotb: a and-not b
solution:
module top_module( input a, b,output out_and,output out_or,output out_xor,output out_nand,output out_nor,output out_xnor,output out_anotb
);assign out_and = a&b;assign out_or =  a|b;assign out_xor = a^b;assign out_nand = ~(a&b);assign out_nor = ~(a|b);assign out_xnor = ~(a^b);assign out_anotb = a&(~b);endmodule
## 1.4 7420 chip 7400系列集成电路是一系列数字芯片,每个都有几个门。 7420是具有**两个4输入与非门**的芯片。 创建具有与7420芯片相同功能的模块。它具有8个输入和2个输出。 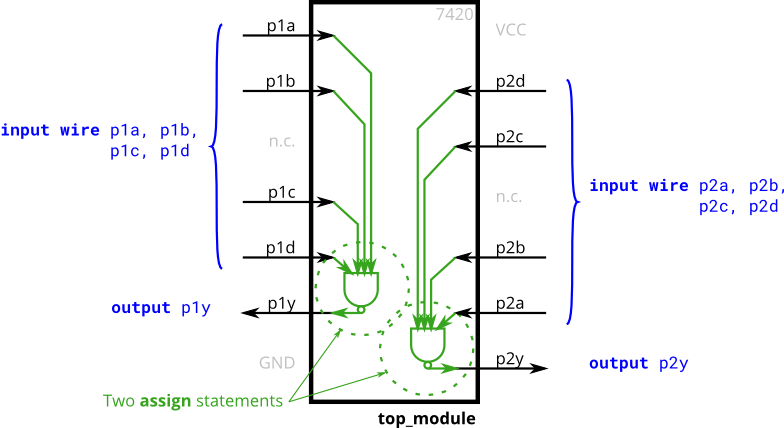
solution:
module top_module ( input p1a, p1b, p1c, p1d,output p1y,input p2a, p2b, p2c, p2d,output p2y );assign p1y = ~(p1a & p1b & p1c & p1d);assign p2y = ~(p2a & p2b & p2c & p2d);endmodule
2 Simple Circuit
2.1Truth tables
在前面的练习中,我们使用了简单的逻辑门和几个逻辑门的组合。这些电路是组合电路的示例。
组合表示电路的输出仅是其输入的函数(在数学意义上)。这意味着对于任何给定的输入值,只有一个可能的输出值。因此,描述组合功能行为的一种方法是显式列出输入的每个可能值的输出。这是一个真值表。
对于N个输入的布尔函数,有 2^N 个可能的输入组合。真值表的每一行都列出一个输入组合,因此总会有2^N行。输出列显示每个输入值的输出。
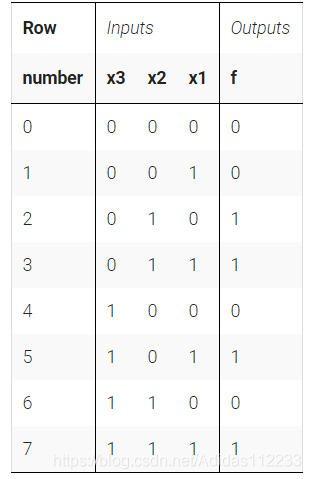
上面的真值表适用于三输入一输出功能。它为8种可能的输入组合中的每一种都有8行,并有一个输出列。
假设我们要构建上述电路,但仅限于使用一组标准逻辑门。这里将如何构建任意逻辑函数(表示为真值表)?
创建实现真值表功能的电路的一种简单方法是以乘积和形式表示该功能。
乘积(含义为AND)的总和(含义为OR)表示在真值表的每一行使用一个N输入与门(以检测输入何时与每一行匹配),其后是一个或门(OR gate),后者仅选择导致结果为’1’输出。
对于上面的示例,如果输入匹配第2行或第3行或第5行或第7行(这是4输入或门),则输出为’1’。如果x3 = 0和x2 = 1且x1 = 0,则输入匹配第2行(这是3输入与门)。因此,可以使用4个与门进行或运算,从而以规范的形式实现该真值表。
solution:
module top_module( input x3,input x2,input x1,  // three inputsoutput f   // one output
);assign f = (~x3&x2)|(x1&x3);endmodule
2.2 Two-bit equality
创建一个具有两个2位输入A [1:0]和B [1:0]的电路,并产生输出z。如果A = B,则z的值应为1,否则z应为0。
solution:
module top_module ( input [1:0] A, input [1:0] B, output z ); always @(*) beginif ((A[0]==B[0])&(A[1]==B[1])) //(A[1:0]==B[1:0])z = 1;elsez = 0;endendmodule
Official solution(⭐️):
module top_module(input [1:0] A,input [1:0] B,output z);assign z = (A[1:0]==B[1:0]); // Comparisons produce a 1 or 0 result.// Another option is to use a 16-entry truth table ( {A,B} is 4 bits, with 16 combinations ).// There are 4 rows with a 1 result. 0000, 0101, 1010, and 1111.endmodule
2.3 Simple circuit
2.3.1 Simple circuit A
假定模块A实现函数z =(x ^ y)&x。实现此模块。
solution:
module top_module (input x, input y, output z);assign z = (x^y) & x;endmodule
2.3.2 Simple circuit B
电路B可用以下仿真波形描述,实施此电路:

solution:
| x | y | z |
|---|---|---|
| 0 | 0 | 1 |
| 1 | 0 | 0 |
| 0 | 1 | 0 |
| 1 | 1 | 1 |
module top_module ( input x, input y, output z );assign z = ~(x^y);endmodule2.3.3 Combine circuits A and B
有关此处使用的子模块,请参见电路a和电路b。顶层设计由子电路A和B的两个实例组成,如下所示,试实现此电路。
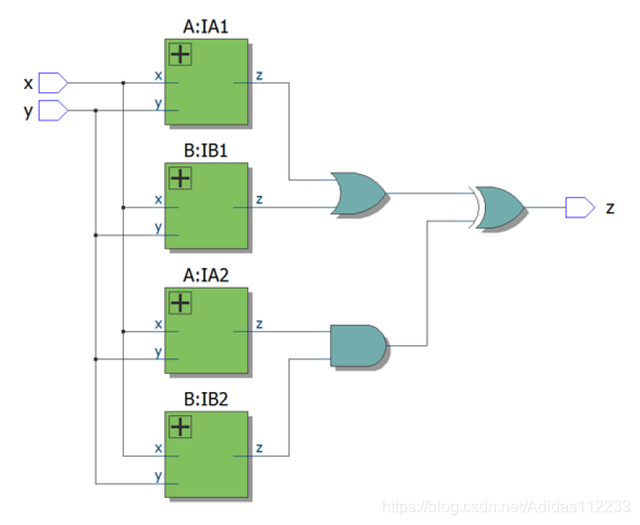
提示:可以选择使用两个子模块按层次创建该电路,也可以创建相同的功能而没有层次。
solution:
module top_module (input x, input y, output z);wire z1,z2,z3,z4,z5,z6;assign z1 = (x^y) & x;assign z2 = ~(x^y);assign z3 = (x^y) & x;assign z4 = ~(x^y);assign z5 = z1 | z2;assign z6 = z3 & z4;assign z = z5 ^ z6;endmodule
Official solution:
module top_module(input x,input y,output z);wire o1, o2, o3, o4;A ia1 (x, y, o1);B ib1 (x, y, o2);A ia2 (x, y, o3);B ib2 (x, y, o4);assign z = (o1 | o2) ^ (o3 & o4);// Or you could simplify the circuit including the sub-modules:// assign z = x|~y;endmodulemodule A (input x,input y,output z);assign z = (x^y) & x;endmodulemodule B (input x,input y,output z);assign z = ~(x^y);endmodule
2.4 Ring or vibrate?
假设您正在设计一个电路来控制手机的振铃器和振动马达。每当电话需要从来电中响起(输入振铃)时,您的电路必须打开振铃器(输出振铃器= 1)或打开电动机(输出电动机= 1),但不能同时打开两者。如果电话处于振动模式(输入vibrate_mode = 1),请打开电动机。否则,请打开铃声。
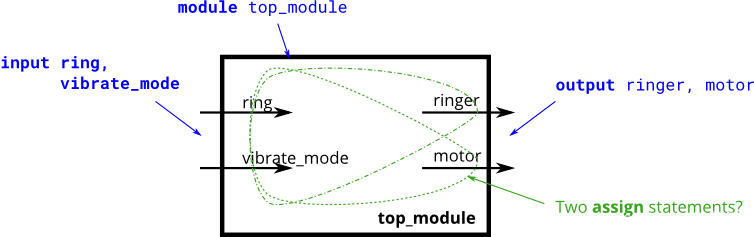
尝试仅使用assign语句,以查看是否可以将问题描述转换为逻辑门的集合。
设计提示:在设计电路时,人们常常不得不从输出开始向后朝输入反向思考问题。这通常与人们对(顺序,命令式)编程问题的思考方式相反,在编程问题中,人们将首先查看输入,然后决定一个动作(或输出)。对于顺序程序,人们经常会想到“如果(输入为___)则(输出应为___)”。
另一方面,硬件设计人员经常认为“(输入为___时,(输出应为___)”)。 上面的问题描述是以命令式形式编写的,该命令式形式适用于软件编程(如果执行ring,则执行此操作),因此,您必须将其转换为适合于硬件实现的声明式形式(assign ringer = ___)。能够在两种样式之间进行思考和转换是硬件设计所需的最重要技能之一。
本题这里需多分析一下逻辑关系。
module top_module (input ring,input vibrate_mode,output ringer,       // Make soundoutput motor         // Vibrate
);assign motor = ring & vibrate_mode;assign ringer = ring & (~vibrate_mode);endmodule
2.5 Thermostat
加热/冷却恒温器同时控制加热器(冬季)和空调(夏季)。实施适当的电路,以打开和关闭加热器,空调和风扇。 温控器可以处于两种模式之一:加热(模式= 1)和冷却(模式= 0)。
-
在制热模式下,当加热器太冷时(too_cold = 1)打开加热器,但不要使用空调。
-
在制冷模式下,当温度过高(too_hot = 1)时打开空调,但不要打开加热器。
当加热器或空调打开时,还要打开风扇以使空气流通。此外,即使加热器和空调关闭,用户也可以请求风扇打开(fan_on = 1)。 尝试仅使用assign语句,以查看是否可以将问题描述转换为逻辑门的集合。
提示:在设计电路时,人们常常不得不从输出端开始向后朝输入端“倒退”思考问题。
solution:
module top_module(input too_cold,input too_hot,input mode,input fan_on,output heater,output aircon,output fan
); assign heater = too_cold&mode;assign aircon = too_hot&(~mode);assign fan = fan_on | heater | aircon;endmodule
2.6 3-bit population count
“人口计数”电路对输入向量中的“ 1”进行计数。为3位输入向量建立一个人口计数电路。
module top_module( input [2:0] in,output [1:0] out );assign out[0] = in[0]^in[1]^in[2];assign out[1] = in[0]&in[1] | in[0]&in[2] | in[1]&in[2];endmodule
3 Vectors
3.1 Gates and vectors
您在[3:0]中获得了一个四位输入向量。我们想知道每个位与其邻居之间的一些关系:
- out_both:此输出向量的每一位都应指示相应的输入位及其左侧(较高索引)的邻居是否均为’1’。例如,out_both [2]应该指示in [2]和in [3]是否都为1。由于in [3]在左边没有邻居,答案很明显,因此我们不需要知道out_both [3 ]。
- out_any:此输出向量的每一位都应指示相应的输入位及其右侧的邻居是否为“ 1”。例如,out_any [2]应指示in [2]或in [1]是否为1。由于in [0]在右边没有邻居,答案很明显,因此我们不需要知道out_any [0 ]。
- out_different:此输出向量的每一位都应指示相应的输入位与其左侧的邻居是否不同。例如,out_different [2]应指示in [2]与in [3]是否不同。对于此部分,将向量视为环绕,因此in [3]的左邻是in [0]。
solution:
module top_module( input [3:0] in,output [2:0] out_both,output [3:1] out_any,output [3:0] out_different );assign out_both[2:0] = {in[2]&in[3],in[1]&in[2],in[0]&in[1]};assign out_any[3:1] = {in[3]|in[2],in[2]|in[1],in[1]|in[0]};assign out_different[3:0] = {in[3]^in[0],in[2]^in[3],in[1]^in[2],in[0]^in[1]};endmodule
Official solution(⭐️):
module top_module (input [3:0] in,output [2:0] out_both,output [3:1] out_any,output [3:0] out_different
);// Use bitwise operators and part-select to do the entire calculation in one line of code// in[3:1] is this vector:   					 in[3]  in[2]  in[1]// in[2:0] is this vector:   					 in[2]  in[1]  in[0]// Bitwise-OR produces a 3 bit vector.			   |      |      |// Assign this 3-bit result to out_any[3:1]:	o_a[3] o_a[2] o_a[1]// Thus, each output bit is the OR of the input bit and its neighbour to the right:// e.g., out_any[1] = in[1] | in[0];	// Notice how this works even for long vectors.assign out_any = in[3:1] | in[2:0];assign out_both = in[2:0] & in[3:1];// XOR 'in' with a vector that is 'in' rotated to the right by 1 position: {in[0], in[3:1]}// The rotation is accomplished by using part selects[] and the concatenation operator{}.assign out_different = in ^ {in[0], in[3:1]};endmodule
3.2 Even longer vectors
在[99:0]中为您提供了100位输入向量。我们想知道每个位与其邻居之间的一些关系:
- out_both:此输出向量的每一位都应指示相应的输入位及其左侧的邻居是否均为“ 1”。例如,out_both [98]应该指示in [98]和in [99]是否都为1。由于in [99]的左边没有邻居,答案很明显,因此我们不需要知道out_both [99]。
- out_any:此输出向量的每一位都应指示相应的输入位及其右侧的邻居是否为“ 1”。例如,out_any [2]应该指示in [2]或in [1]是否为1。由于in [0]在右边没有邻居,答案很明显,所以我们不需要知道out_any [0]。
- out_different:此输出向量的每一位都应指示相应的输入位与其左侧的邻居是否不同。例如,out_different [98]应指示in [98]与in [99]是否不同。对于此部分,将向量视为环绕,因此in [99]的左邻是in [0]。
solution:
module top_module( input [99:0] in,output [98:0] out_both,output [99:1] out_any,output [99:0] out_different );assign out_both = in[98:0] & in[99:1];assign out_any = in[99:1] | in[98:0];assign out_different = in ^ {in[0],in[99:1]};endmodule
这篇关于HDLBits-Circuits学习小结(一)初探门电路(basic gates)的文章就介绍到这儿,希望我们推荐的文章对编程师们有所帮助!


