本文主要是介绍从0到1,AI我来了- (7)AI应用-ComfyUI-II(进阶),希望对大家解决编程问题提供一定的参考价值,需要的开发者们随着小编来一起学习吧!
上篇comfyUI 入门 ,了解了TA是个啥,这篇,我们通过ComfyUI 及其相关Lora 模型,生成一些更惊艳的图片。这篇主要了解这些内容:
1、哪里获取模型?
2、实践如何画一个美女?
3、附录:
1)相关SD(稳定扩散模型的组成部分)
2)模型放置目录(重要)
1、哪里获取comfyUI 所需模型?
说几个常用的:
地址1:https://huggingface.co/models
地址2:https://www.liblib.art/
地址3:Comfy Workflows images page
地址4:https://civitai.com/
2、实践如何画一个美女?
先看效果图:

怎么实现的呢?请参考如下流程:
从这里 下载 工作流:Bikini Girl v2
整体流程:①先下载workflow JSON 文件=》②下载所需模型(如下图)=》③模型放置对于目录=》启动comfyUI
①工作流文件下载:下图左上角下载,也可下载我的 (如本文可下载文件)
② 模型下载相关模型:下图Models ,挨个下载
③按要求放置模型到指定位置:可以参考我的(附录2)
④启动ComfyUI ,执行 Queue Prompt,等待即可
Note: 不加Naked ,对身体不好。

3、附录
1)相关SD(稳定扩散模型的组成部分) 解释
Components of a Stable Diffusion Model稳定扩散模型的组成部分
Stable Diffusion isn't just one large, single model. Instead, it's made up of various components and models that collaborate to generate images from text.Stable Diffusion
不仅仅是一个大型的单一模型。相反,它由各种组件和模型组成,这些组件和模型协同工作以从文本生成图像。
Model files are large .ckpt or .safetensors files obtained from repositories such as HuggingFace or CivitAI. These files contain the weights for three different models:模型文件很大.ckpt,或者.safetensors是从 HuggingFace 或 CivitAI 等存储库获取的文件。这些文件包含三种不同模型的权重:
CLIP- a model to convert text prompt to a compressed format that the UNET model can understandCLIP- 将文本提示转换为 UNET 模型可以理解的压缩格式的模型MODEL- the main Stable Diffusion model, also known as UNET. Generates a compressed imageMODEL- 主要的 Stable Diffusion 模型,也称为 UNET。生成压缩图像VAE- Decodes the compressed image to a normal-looking imageVAE- 将压缩的图像解码为外观正常的图像
(UNET模型是一种用于图像分割的深度学习架构)
①CheckpointLoader 检查点加载器
In the default ComfyUI workflow, the CheckpointLoader serves as a representation of the model files. It allows users to select a checkpoint to load and displays three different outputs: MODEL, CLIP, and VAE.在默认的 ComfyUI 工作流中,CheckpointLoader 用作模型文件的表示。它允许用户选择要加载的检查点,并显示三种不同的输出: MODEL 、 CLIP 和 VAE 。
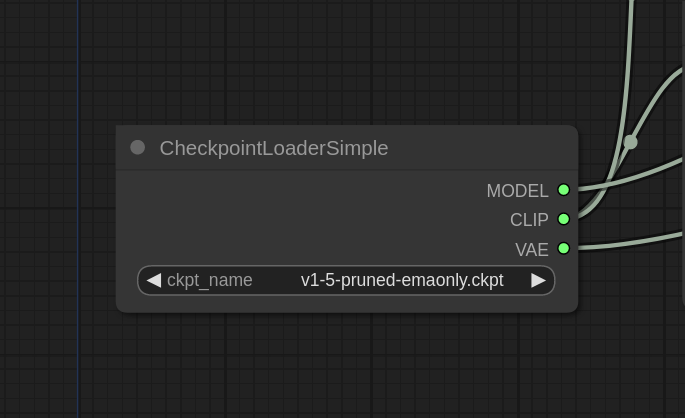
① CLIP Model CLIP 模型
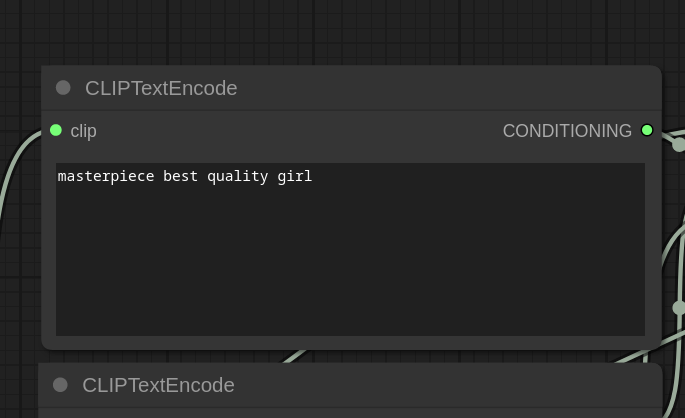
The CLIP model is connected to CLIPTextEncode nodes. CLIP, acting as a text encoder, converts text to a format understandable by the main MODEL.CLIP 模型连接到 CLIPTextEncode 节点。CLIP 充当文本编码器,将文本转换为主 MODEL 可以理解的格式。
②Stable Diffusion MODEL (aka UNET)2. 稳定扩散模型(又名 UNET)
In Stable Diffusion, image generation involves a sampler, represented by the sampler node in ComfyUI. The sampler takes the main Stable Diffusion MODEL, positive and negative prompts encoded by CLIP, and a Latent Image as inputs. The Latent Image is an empty image since we are generating an image from text (txt2img).在 Stable Diffusion 中,图像生成涉及一个采样器,由 ComfyUI 中的 sampler 节点表示。采样器采用主要的 Stable Diffusion MODEL、CLIP 编码的正负提示以及 Latent Image 作为输入。Latent Image 是一个空图像,因为我们是从文本 (txt2img) 生成图像。
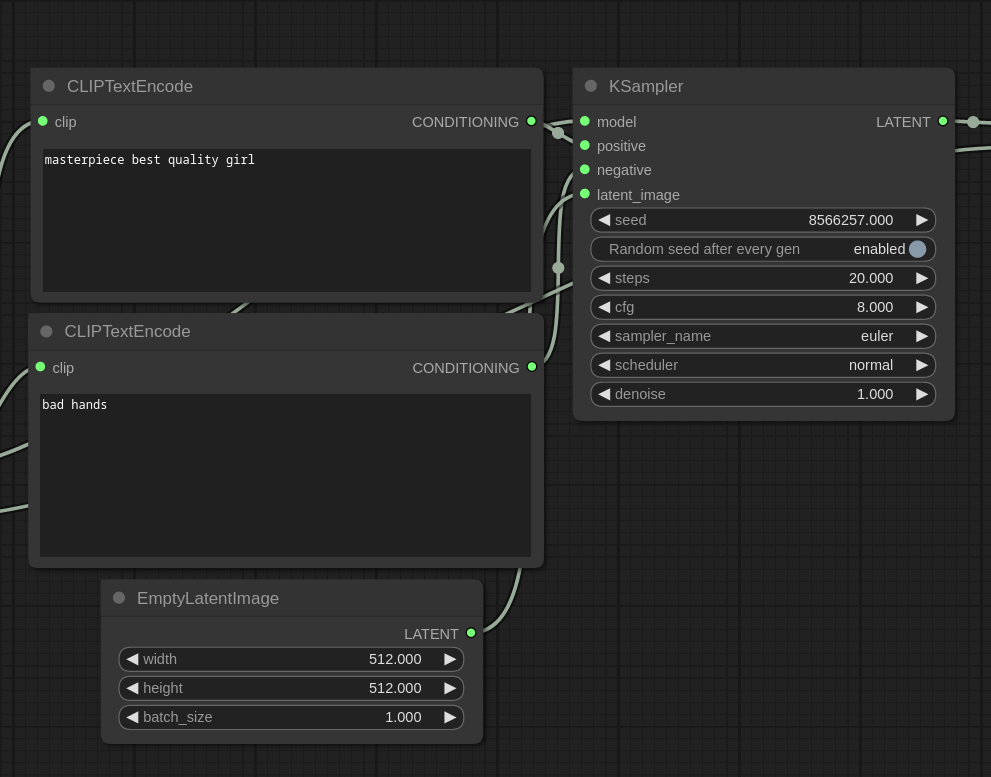
The sampler adds noise to the input latent image and denoises it using the main MODEL. Gradual denoising, guided by encoded prompts, is the process through which Stable Diffusion generates images.采样器将噪声添加到输入的潜在图像中,并使用主 MODEL 对其进行去噪。在编码提示的引导下,逐渐降噪是 Stable Diffusion 生成图像的过程。
③VAE Model VAE 模型
The third model used in Stable Diffusion is the VAE, responsible for translating an image from latent space to pixel space. Latent space is the format understood by the main MODEL, while pixel space is the format recognizable by image viewers.稳定扩散 中使用的第三个模型是 VAE,负责将图像从潜在空间转换为像素空间。潜在空间是主 MODEL 可以理解的格式,而像素空间是图像查看器可识别的格式。
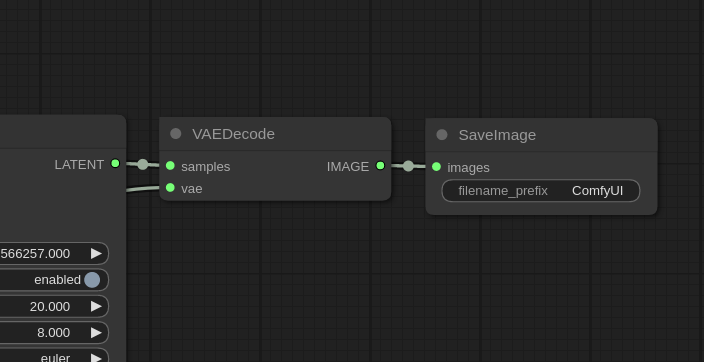
The VAEDecode node takes the latent image from the sampler as input and outputs a regular image. This image is then saved to a PNG file using the SaveImage node.VAEDecode 节点将采样器中的潜在图像作为输入,并输出常规图像。然后,使用 SaveImage 节点将此图像保存为 PNG 文件。
2)
pwd
/opt/tech/git/ComfyUI/models
❯ tree ./
./
├── checkpoints
│   ├── juggernaut_reborn.safetensors
│   ├── put_checkpoints_here
│   └── v1-5-pruned-emaonly.ckpt
├── clip
│   └── put_clip_or_text_encoder_models_here
├── clip_vision
│   └── put_clip_vision_models_here
├── configs
│   ├── anything_v3.yaml
│   ├── v1-inference.yaml
│   ├── v1-inference_clip_skip_2.yaml
│   ├── v1-inference_clip_skip_2_fp16.yaml
│   ├── v1-inference_fp16.yaml
│   ├── v1-inpainting-inference.yaml
│   ├── v2-inference-v.yaml
│   ├── v2-inference-v_fp32.yaml
│   ├── v2-inference.yaml
│   ├── v2-inference_fp32.yaml
│   └── v2-inpainting-inference.yaml
├── controlnet
│   ├── control_v11f1e_sd15_tile.pth
│   ├── control_v11f1e_sd15_tile_fp16.safetensors
│   ├── controlnet11Models_openpose.safetensors
│   └── put_controlnets_and_t2i_here
├── diffusers
│   └── put_diffusers_models_here
├── diffusion_models
│   └── put_diffusion_model_files_here
├── embeddings
│   ├── JuggernautNegative-neg.pt
│   └── put_embeddings_or_textual_inversion_concepts_here
├── gligen
│   └── put_gligen_models_here
├── hypernetworks
│   └── put_hypernetworks_here
├── loras
│   ├── JuggerCineXL2.safetensors
│   ├── add-detail-xl.safetensors
│   ├── add_detail.safetensors
│   ├── juggernaut_reborn.safetensors
│   └── put_loras_here
├── mmdets
│   └── bbox
├── onnx
├── photomaker
│   └── put_photomaker_models_here
├── sams
│   └── sam_vit_b_01ec64.pth
├── style_models
│   └── put_t2i_style_model_here
├── ultralytics
│   ├── bbox
│   │   └── hand_yolov8s.pt
│   └── segm
├── unet
│   └── put_unet_files_here
├── upscale_models
│   ├── 4x_NMKD-Superscale-SP_178000_G.pth
│   └── put_esrgan_and_other_upscale_models_here
├── vae
│   └── put_vae_here
└── vae_approx└── put_taesd_encoder_pth_and_taesd_decoder_pth_here
这篇关于从0到1,AI我来了- (7)AI应用-ComfyUI-II(进阶)的文章就介绍到这儿,希望我们推荐的文章对编程师们有所帮助!


