本文主要是介绍【docker】基于docker-compose 安装elasticsearch + kibana + ik分词器(8.10.4版本),希望对大家解决编程问题提供一定的参考价值,需要的开发者们随着小编来一起学习吧!
记录下,使用 docker-compose 安装 Elasticsearch 和 Kibana,并配置 IK 分词器,你可以按照以下步骤进行。此过程适用于 Elasticsearch 和 Kibana 8.10.4 版本。

安装
首先,在你的工作目录下创建一个 docker-compose.yml 文件,用于配置 Elasticsearch 和 Kibana 的服务。
version: "2.2"services:es01:image: docker.elastic.co/elasticsearch/elasticsearch:${STACK_VERSION}container_name: es01volumes:- esdata01:/usr/share/elasticsearch/data- ./plugins01:/usr/share/elasticsearch/pluginsports:- ${ES_PORT}:9200environment:- node.name=es01- cluster.name=${CLUSTER_NAME}- cluster.initial_master_nodes=es01,es02,es03- discovery.seed_hosts=es02,es03- bootstrap.memory_lock=true- xpack.security.enabled=false- xpack.security.http.ssl.enabled=false- xpack.security.transport.ssl.enabled=falsemem_limit: ${MEM_LIMIT}ulimits:memlock:soft: -1hard: -1#command: ># bash -c "elasticsearch-plugin install https://github.com/medcl/elasticsearch-analysis-ik/releases/download/v8.10.4/elasticsearch-analysis-ik-8.10.4.zip && # elasticsearch"es02:depends_on:- es01image: docker.elastic.co/elasticsearch/elasticsearch:${STACK_VERSION}container_name: es02volumes:- esdata02:/usr/share/elasticsearch/data- ./plugins02:/usr/share/elasticsearch/pluginsenvironment:- node.name=es02- cluster.name=${CLUSTER_NAME}- cluster.initial_master_nodes=es01,es02,es03- discovery.seed_hosts=es01,es03- bootstrap.memory_lock=true- xpack.security.enabled=false- xpack.security.http.ssl.enabled=false- xpack.security.transport.ssl.enabled=falsemem_limit: ${MEM_LIMIT}ulimits:memlock:soft: -1hard: -1#command: ># bash -c "elasticsearch-plugin install https://github.com/medcl/elasticsearch-analysis-ik/releases/download/v8.10.4/elasticsearch-analysis-ik-8.10.4.zip && # elasticsearch"es03:depends_on:- es02image: docker.elastic.co/elasticsearch/elasticsearch:${STACK_VERSION}container_name: es03volumes:- esdata03:/usr/share/elasticsearch/data- ./plugins03:/usr/share/elasticsearch/pluginsenvironment:- node.name=es03- cluster.name=${CLUSTER_NAME}- cluster.initial_master_nodes=es01,es02,es03- discovery.seed_hosts=es01,es02- bootstrap.memory_lock=true- xpack.security.enabled=false- xpack.security.http.ssl.enabled=false- xpack.security.transport.ssl.enabled=falsemem_limit: ${MEM_LIMIT}ulimits:memlock:soft: -1hard: -1#command: ># bash -c "elasticsearch-plugin install https://github.com/medcl/elasticsearch-analysis-ik/releases/download/v8.10.4/elasticsearch-analysis-ik-8.10.4.zip && # elasticsearch"kibana:image: docker.elastic.co/kibana/kibana:${STACK_VERSION}container_name: kibanavolumes:- kibanadata:/usr/share/kibana/dataports:- ${KIBANA_PORT}:5601environment:- SERVERNAME=kibana- ELASTICSEARCH_HOSTS=http://es01:9200- ELASTICSEARCH_USERNAME=kibana_system- ELASTICSEARCH_PASSWORD=${KIBANA_PASSWORD}mem_limit: ${MEM_LIMIT}volumes:esdata01:driver: localesdata02:driver: localesdata03:driver: localkibanadata:driver: local通过 docker-compose 文件配置 Elasticsearch 和 Kibana 后,你可以使用命令启动它们。IK 分词器的安装可以通过手动下载插件或在容器内安装的方式完成。
环境
- .env文件
# Password for the 'elastic' user (at least 6 characters)
ELASTIC_PASSWORD=lucky_pig# Password for the 'kibana_system' user (at least 6 characters)
KIBANA_PASSWORD=lucky_pig# Version of Elastic products
#STACK_VERSION=8.1.2
# win10出现max virtual memory areas vm.max_map_count [65530] is too low, increase to at least [262144]
# 处理1:win上面解决方案(cmd.exe进入):
# wsl -d docker-desktop
# sysctl -w vm.max_map_count=262144
# 在/etc/sysctl.conf文件最后添加一行vm.max_map_count=262144STACK_VERSION=8.10.4
# docker-compose -f docker-compose.yml up -d
# docker-compose -f docker-compose.yml down -v# Set the cluster name
CLUSTER_NAME=docker-cluster# Set to 'basic' or 'trial' to automatically start the 30-day trial
LICENSE=basic
#LICENSE=trial# Port to expose Elasticsearch HTTP API to the host
ES_PORT=9200
#ES_PORT=127.0.0.1:9200# Port to expose Kibana to the host
KIBANA_PORT=5601
#KIBANA_PORT=80# Increase or decrease based on the available host memory (in bytes)
MEM_LIMIT=1073741824# Project namespace (defaults to the current folder name if not set)
#COMPOSE_PROJECT_NAME=myproject
分词
# docker exec -it es01 /usr/share/elasticsearch/bin/elasticsearch-plugin install https://github.com/medcl/elasticsearch-analysis-ik/releases/download/v8.10.4/elasticsearch-analysis-ik-8.10.4.zip
# docker exec -it es02 /usr/share/elasticsearch/bin/elasticsearch-plugin install https://github.com/medcl/elasticsearch-analysis-ik/releases/download/v8.10.4/elasticsearch-analysis-ik-8.10.4.zip
# docker exec -it es03 /usr/share/elasticsearch/bin/elasticsearch-plugin install https://github.com/medcl/elasticsearch-analysis-ik/releases/download/v8.10.4/elasticsearch-analysis-ik-8.10.4.zip## 最直接方法是将这个文件解压到我们映射路径下面
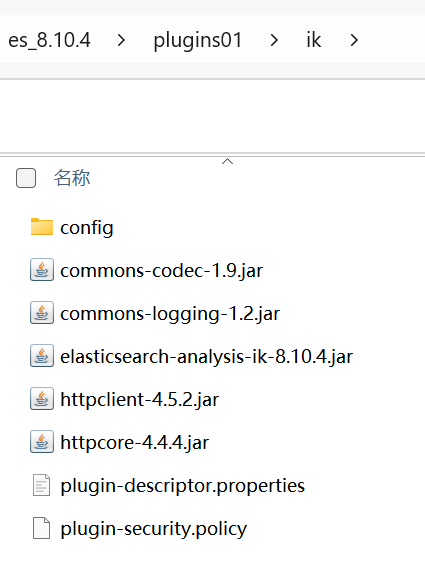
wget https://github.com/medcl/elasticsearch-analysis-ik/releases/download/v8.10.4/elasticsearch-analysis-ik-8.10.4.zip
unzip elasticsearch-analysis-ik-8.10.4.zip -d plugins/ik

- 验证
POST /_analyze
{"analyzer": "ik_smart","text": "你好,世界"
}
POST /_analyze
{"analyzer": "ik_max_word","text": "你好,世界"
}

kibana
GET lucky_pig_idx-000001/_searchGET lucky_pig_idx-000001/_search
{"query": {"match": {"userCode": "112"}}
}GET lucky_pig_idx-000001DELETE lucky_pig_idxPUT lucky_pig_idx-000001
{"mappings": {"properties": {  "id": {  "type": "keyword"  },  "title": {  "type": "text",  "analyzer": "ik_max_word",  "search_analyzer": "ik_smart"  },  "content": {  "type": "text",  "analyzer": "ik_max_word",  "search_analyzer": "ik_smart"  },  "staffNo": {  "type": "keyword"  },  "createTime": {  "type": "date",  "format": "yyyy-MM-dd HH:mm:ss||yyyy-MM-dd||epoch_millis"  }}}
}
- 样例1
POST lucky_pig_idx-000001/_doc/1
{"id": "1","title": "这是一个样例标题","content": "这是样例内容,包含中文分词。","staffNo": "A12345","createTime": "2023-09-07 10:30:00"
}- 样例2
POST _bulk
{ "index" : { "_index" : "lucky_pig_idx-000001", "_id" : "2" } }
{ "id" : "2", "title" : "样例标题 1", "content" : "这是样例内容 1,包含 IK 分词。", "staffNo" : "B12345", "createTime" : "2023-09-07 11:00:00" }
{ "index" : { "_index" : "lucky_pig_idx-000001", "_id" : "3" } }
{ "id" : "3", "title" : "样例标题 2", "content" : "这是样例内容 2,用于测试搜索功能。", "staffNo" : "C54321", "createTime" : "2023-09-06 09:15:00" }
{ "index" : { "_index" : "lucky_pig_idx-000001", "_id" : "4" } }
{ "id" : "4", "title" : "样例标题 3", "content" : "第三个样例,IK 分词测试。", "staffNo" : "D11111", "createTime" : "2023-09-05 12:00:00" }- 相关

POST /_analyze
{"analyzer": "ik_smart","text": "你好,世界"
}
POST /_analyze
{"analyzer": "ik_max_word","text": "你好,世界"
}POST lucky_pig_idx-000001/_doc/1
{"id": "1","title": "这是一个样例标题","content": "这是样例内容,包含中文分词。","staffNo": "A12345","createTime": "2023-09-07 10:30:00"
}POST _bulk
{ "index" : { "_index" : "lucky_pig_idx-000001", "_id" : "2" } }
{ "id" : "2", "title" : "样例标题 1", "content" : "这是样例内容 1,包含 IK 分词。", "staffNo" : "B12345", "createTime" : "2023-09-07 11:00:00" }
{ "index" : { "_index" : "lucky_pig_idx-000001", "_id" : "3" } }
{ "id" : "3", "title" : "样例标题 2", "content" : "这是样例内容 2,用于测试搜索功能。", "staffNo" : "C54321", "createTime" : "2023-09-06 09:15:00" }
{ "index" : { "_index" : "lucky_pig_idx-000001", "_id" : "4" } }
{ "id" : "4", "title" : "样例标题 3", "content" : "第三个样例,IK 分词测试。", "staffNo" : "D11111", "createTime" : "2023-09-05 12:00:00" }GET lucky_pig_idx-000001/_searchGET lucky_pig_idx-000001/_search
{"query": {"match": {"staffNo": "B12345"}}
}GET lucky_pig_idx-000001DELETE lucky_pig_idxPUT lucky_pig_idx-000001
{"mappings": {"properties": {  "id": {  "type": "keyword"  },  "title": {  "type": "text",  "analyzer": "ik_max_word",  "search_analyzer": "ik_smart"  },  "content": {  "type": "text",  "analyzer": "ik_max_word",  "search_analyzer": "ik_smart"  },  "staffNo": {  "type": "keyword"  },  "createTime": {  "type": "date",  "format": "yyyy-MM-dd HH:mm:ss||yyyy-MM-dd||epoch_millis"  }}}
}
这篇关于【docker】基于docker-compose 安装elasticsearch + kibana + ik分词器(8.10.4版本)的文章就介绍到这儿,希望我们推荐的文章对编程师们有所帮助!


