本文主要是介绍Emgu-WPF学习使用-识别二维码的位置,希望对大家解决编程问题提供一定的参考价值,需要的开发者们随着小编来一起学习吧!
参考链接:http://blog.csdn.net/gaobobo138968/article/details/47663607
我完全参照该链接实现了二维码的位置锁定,向原作者致敬。
由于我使用的为最新版本的Emgu,很多封装函数调用方法有所变化,新手接触Emgu,尝试做了调整,部分参数也做了微调!
我使用的Emgu版本:emgucv-windesktop 3.2.0.2682
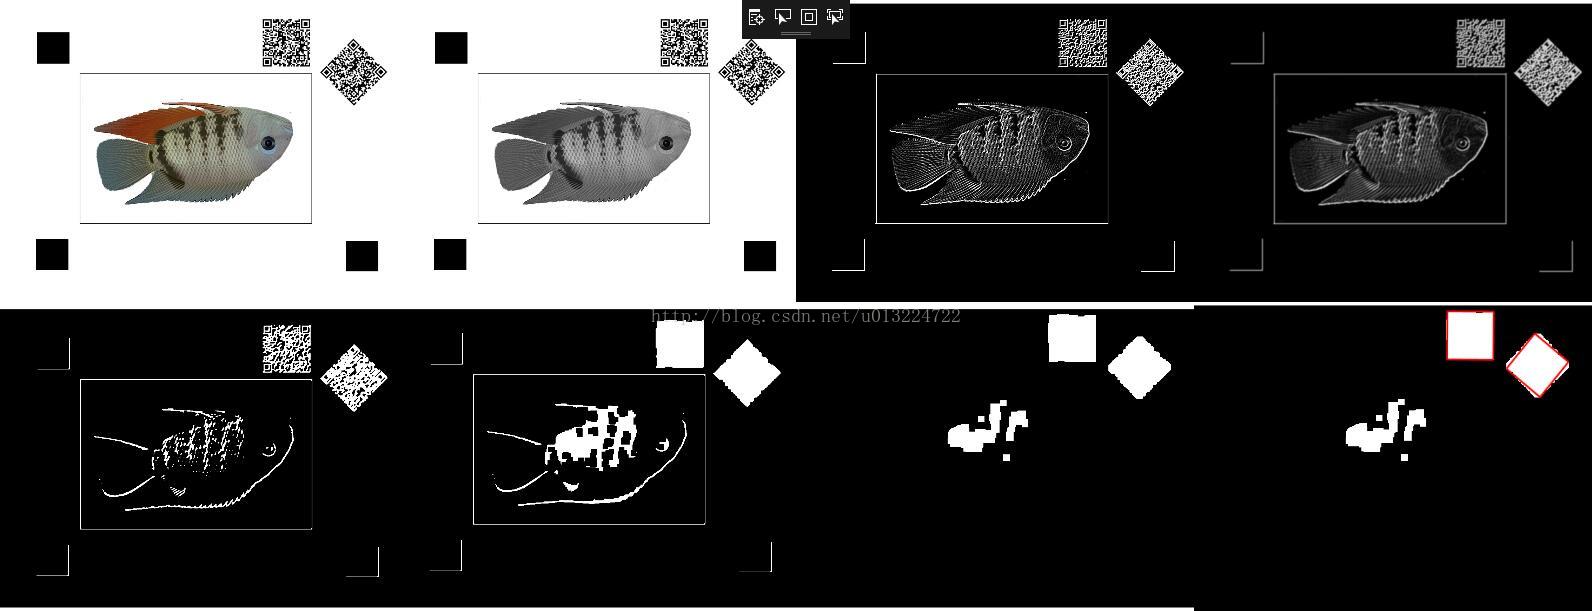
最终我实现的效果图如下:
前台xaml:
<Grid>
<Grid.ColumnDefinitions>
<ColumnDefinition/>
<ColumnDefinition/>
<ColumnDefinition/>
<ColumnDefinition/>
</Grid.ColumnDefinitions>
<Grid.RowDefinitions>
<RowDefinition/>
<RowDefinition/>
</Grid.RowDefinitions>
<Image x:Name="Img1" Grid.Column="0" />
<Image x:Name="Img2" Grid.Column="1" />
<Image x:Name="Img3" Grid.Column="2" />
<Image x:Name="Img4" Grid.Column="3" />
<Image x:Name="Img5" Grid.Column="0" Grid.Row="1"/>
<Image x:Name="Img6" Grid.Column="1" Grid.Row="1"/>
<Image x:Name="Img7" Grid.Column="2" Grid.Row="1"/>
<Viewbox Stretch="Fill" Grid.Column="3" Grid.Row="1">
<Grid Width="1134" Height="850" Background="Silver">
<Image x:Name="Img8"/>
<Canvas x:Name="CvMainZm"/>
</Grid>
</Viewbox>
</Grid>
后台源码:
private void ShowImage(System.Windows.Controls.Image oImage, UMat src)
{
this.Dispatcher.Invoke(() => {
oImage.Source = BitmapSourceConvert.ToBitmapSource(src);
});
}
private void ShowBgrImage(System.Windows.Controls.Image oImage, Image<Bgr, byte> src)
{
this.Dispatcher.Invoke(() => {
oImage.Source = BitmapSourceConvert.ToBitmapSource(src);
});
}
private void ShowGrayImage(System.Windows.Controls.Image oImage, Image<Gray, byte> src)
{
this.Dispatcher.Invoke(() => {
oImage.Source = BitmapSourceConvert.ToBitmapSource(src);
});
}
public MainWindow()
{
InitializeComponent();
this.Loaded += MainWindow_Loaded;
}
//参考链接 http://blog.csdn.net/gaobobo138968/article/details/47663607
private void MainWindow_Loaded(object sender, RoutedEventArgs e)
{
string sFile = AppDomain.CurrentDomain.BaseDirectory + "Test.jpg";
System.Drawing.Image img = System.Drawing.Image.FromFile(sFile);
Bitmap barcodeBitmap = new Bitmap(img);
Image<Bgr, byte> img_src = new Image<Bgr, byte>(barcodeBitmap);
this.ShowBgrImage(this.Img1, img_src);
//灰度化
Image<Gray, byte> imput_gray = new Image<Gray, byte>(img_src.Size);
CvInvoke.CvtColor(img_src, imput_gray, ColorConversion.Bgr2Gray);
this.ShowGrayImage(this.Img2, imput_gray);
//计算x,y方向梯度,相加
Image<Gray, byte> grad_x1 = new Image<Gray, byte>(img_src.Size);
Image<Gray, byte> grad_y1 = new Image<Gray, byte>(img_src.Size);
Image<Gray, byte> grad_all = new Image<Gray, byte>(img_src.Size);
CvInvoke.Sobel(imput_gray, grad_x1, DepthType.Default, 0, 1, 3);
CvInvoke.Sobel(imput_gray, grad_y1, DepthType.Default, 1, 0, 3);
CvInvoke.Add(grad_x1, grad_y1, grad_all, null);
this.ShowGrayImage(this.Img3, grad_all);
// 高斯模糊
grad_all = grad_all.SmoothGaussian(9);
this.ShowGrayImage(this.Img4, grad_all);
// 二值化
CvInvoke.Threshold(grad_all, grad_all, 100, 255, ThresholdType.Binary);
this.ShowGrayImage(this.Img5, grad_all);
//消除裂缝
Mat oMat1 = CvInvoke.GetStructuringElement(Emgu.CV.CvEnum.ElementShape.Rectangle,
new System.Drawing.Size(15, 15), new System.Drawing.Point(0, 0));
CvInvoke.MorphologyEx(grad_all, grad_all, Emgu.CV.CvEnum.MorphOp.Close, oMat1,
new System.Drawing.Point(0, 0), 1, BorderType.Default,
new MCvScalar(255, 0, 0, 255));
this.ShowGrayImage(this.Img6, grad_all);
//膨胀与腐蚀(消除杂点)
Mat oMat2 = CvInvoke.GetStructuringElement(Emgu.CV.CvEnum.ElementShape.Rectangle,
new System.Drawing.Size(5, 5), new System.Drawing.Point(0, 0));
CvInvoke.Erode(grad_all, grad_all, oMat2, new System.Drawing.Point(0, 0), 4,
BorderType.Default, new MCvScalar(255, 0, 0, 255));
CvInvoke.Dilate(grad_all, grad_all, oMat2, new System.Drawing.Point(0, 0), 4,
BorderType.Default, new MCvScalar(255, 0, 0, 255));
this.ShowGrayImage(this.Img7, grad_all);
//查找轮廓,绘制轮廓
#region Find triangles and rectangles
List<Triangle2DF> triangleList = new List<Triangle2DF>();
List<RotatedRect> boxList = new List<RotatedRect>(); //a box is a rotated rectangle
using (VectorOfVectorOfPoint contours = new VectorOfVectorOfPoint())
{
CvInvoke.FindContours(grad_all, contours, null, RetrType.List, ChainApproxMethod.ChainApproxSimple);
int count = contours.Size;
for (int i = 0; i < count; i++)
{
using (VectorOfPoint contour = contours[i])
using (VectorOfPoint approxContour = new VectorOfPoint())
{
CvInvoke.ApproxPolyDP(contour, approxContour, CvInvoke.ArcLength(contour, true) * 0.05, true);
if (CvInvoke.ContourArea(approxContour, false) > 500)
{
if (approxContour.Size == 3)
{
System.Drawing.Point[] pts = approxContour.ToArray();
triangleList.Add(new Triangle2DF(
pts[0],
pts[1],
pts[2]
));
}
else if (approxContour.Size == 4)
{
#region determine if all the angles in the contour are within [80, 100] degree
bool isRectangle = true;
System.Drawing.Point[] pts = approxContour.ToArray();
LineSegment2D[] edges = Emgu.CV.PointCollection.PolyLine(pts, true);
for (int j = 0; j < edges.Length; j++)
{
double angle = Math.Abs(
edges[(j + 1) % edges.Length].GetExteriorAngleDegree(edges[j]));
if (angle < 80 || angle > 100)
{
isRectangle = false;
break;
}
}
#endregion
if (isRectangle)
{
boxList.Add(CvInvoke.MinAreaRect(approxContour));
}
}
}
}
}
}
//this.Img8.Source = new BitmapImage(new Uri(sFile));
this.ShowGrayImage(this.Img8, grad_all);
foreach (RotatedRect box in boxList)
{
System.Drawing.Point[] pts = Array.ConvertAll(box.GetVertices(), System.Drawing.Point.Round);
for (int i = 0; i < pts.Length; i++)
{
System.Drawing.Point point = pts[i];
System.Drawing.Point point1 = new System.Drawing.Point();
if (i == pts.Length-1)
point1 = pts[0];
else
point1 = pts[i + 1];
Line oLine = new Line();
oLine.Stroke = new SolidColorBrush(Colors.Red);
oLine.StrokeThickness = 5;
oLine.X1 = point.X;
oLine.Y1 = point.Y;
oLine.X2 = point1.X;
oLine.Y2 = point1.Y;
this.CvMainZm.Children.Add(oLine);
}
}
#endregion
}
BitmapSourceConvert 类直接使用的SDK中的示例。
这篇关于Emgu-WPF学习使用-识别二维码的位置的文章就介绍到这儿,希望我们推荐的文章对编程师们有所帮助!


