本文主要是介绍尚品汇静态网页设计,希望对大家解决编程问题提供一定的参考价值,需要的开发者们随着小编来一起学习吧!
目录
尚品汇静态网页设计
在线浏览
项目结果展示
准备
顶部导航条设计
头部设计
主导航区设计
主要内容区设计
左侧边栏区
一级菜单
二级菜单
中间内容区
右侧其他内容区
上部分快报区
下部分图标导航区
秒杀区设计
楼层区设计
顶部设计
详情区设计
页脚设计
尚品汇静态网页设计
在线浏览
尚品汇![]() https://h0308.github.io/Gmall/
https://h0308.github.io/Gmall/
项目结果展示
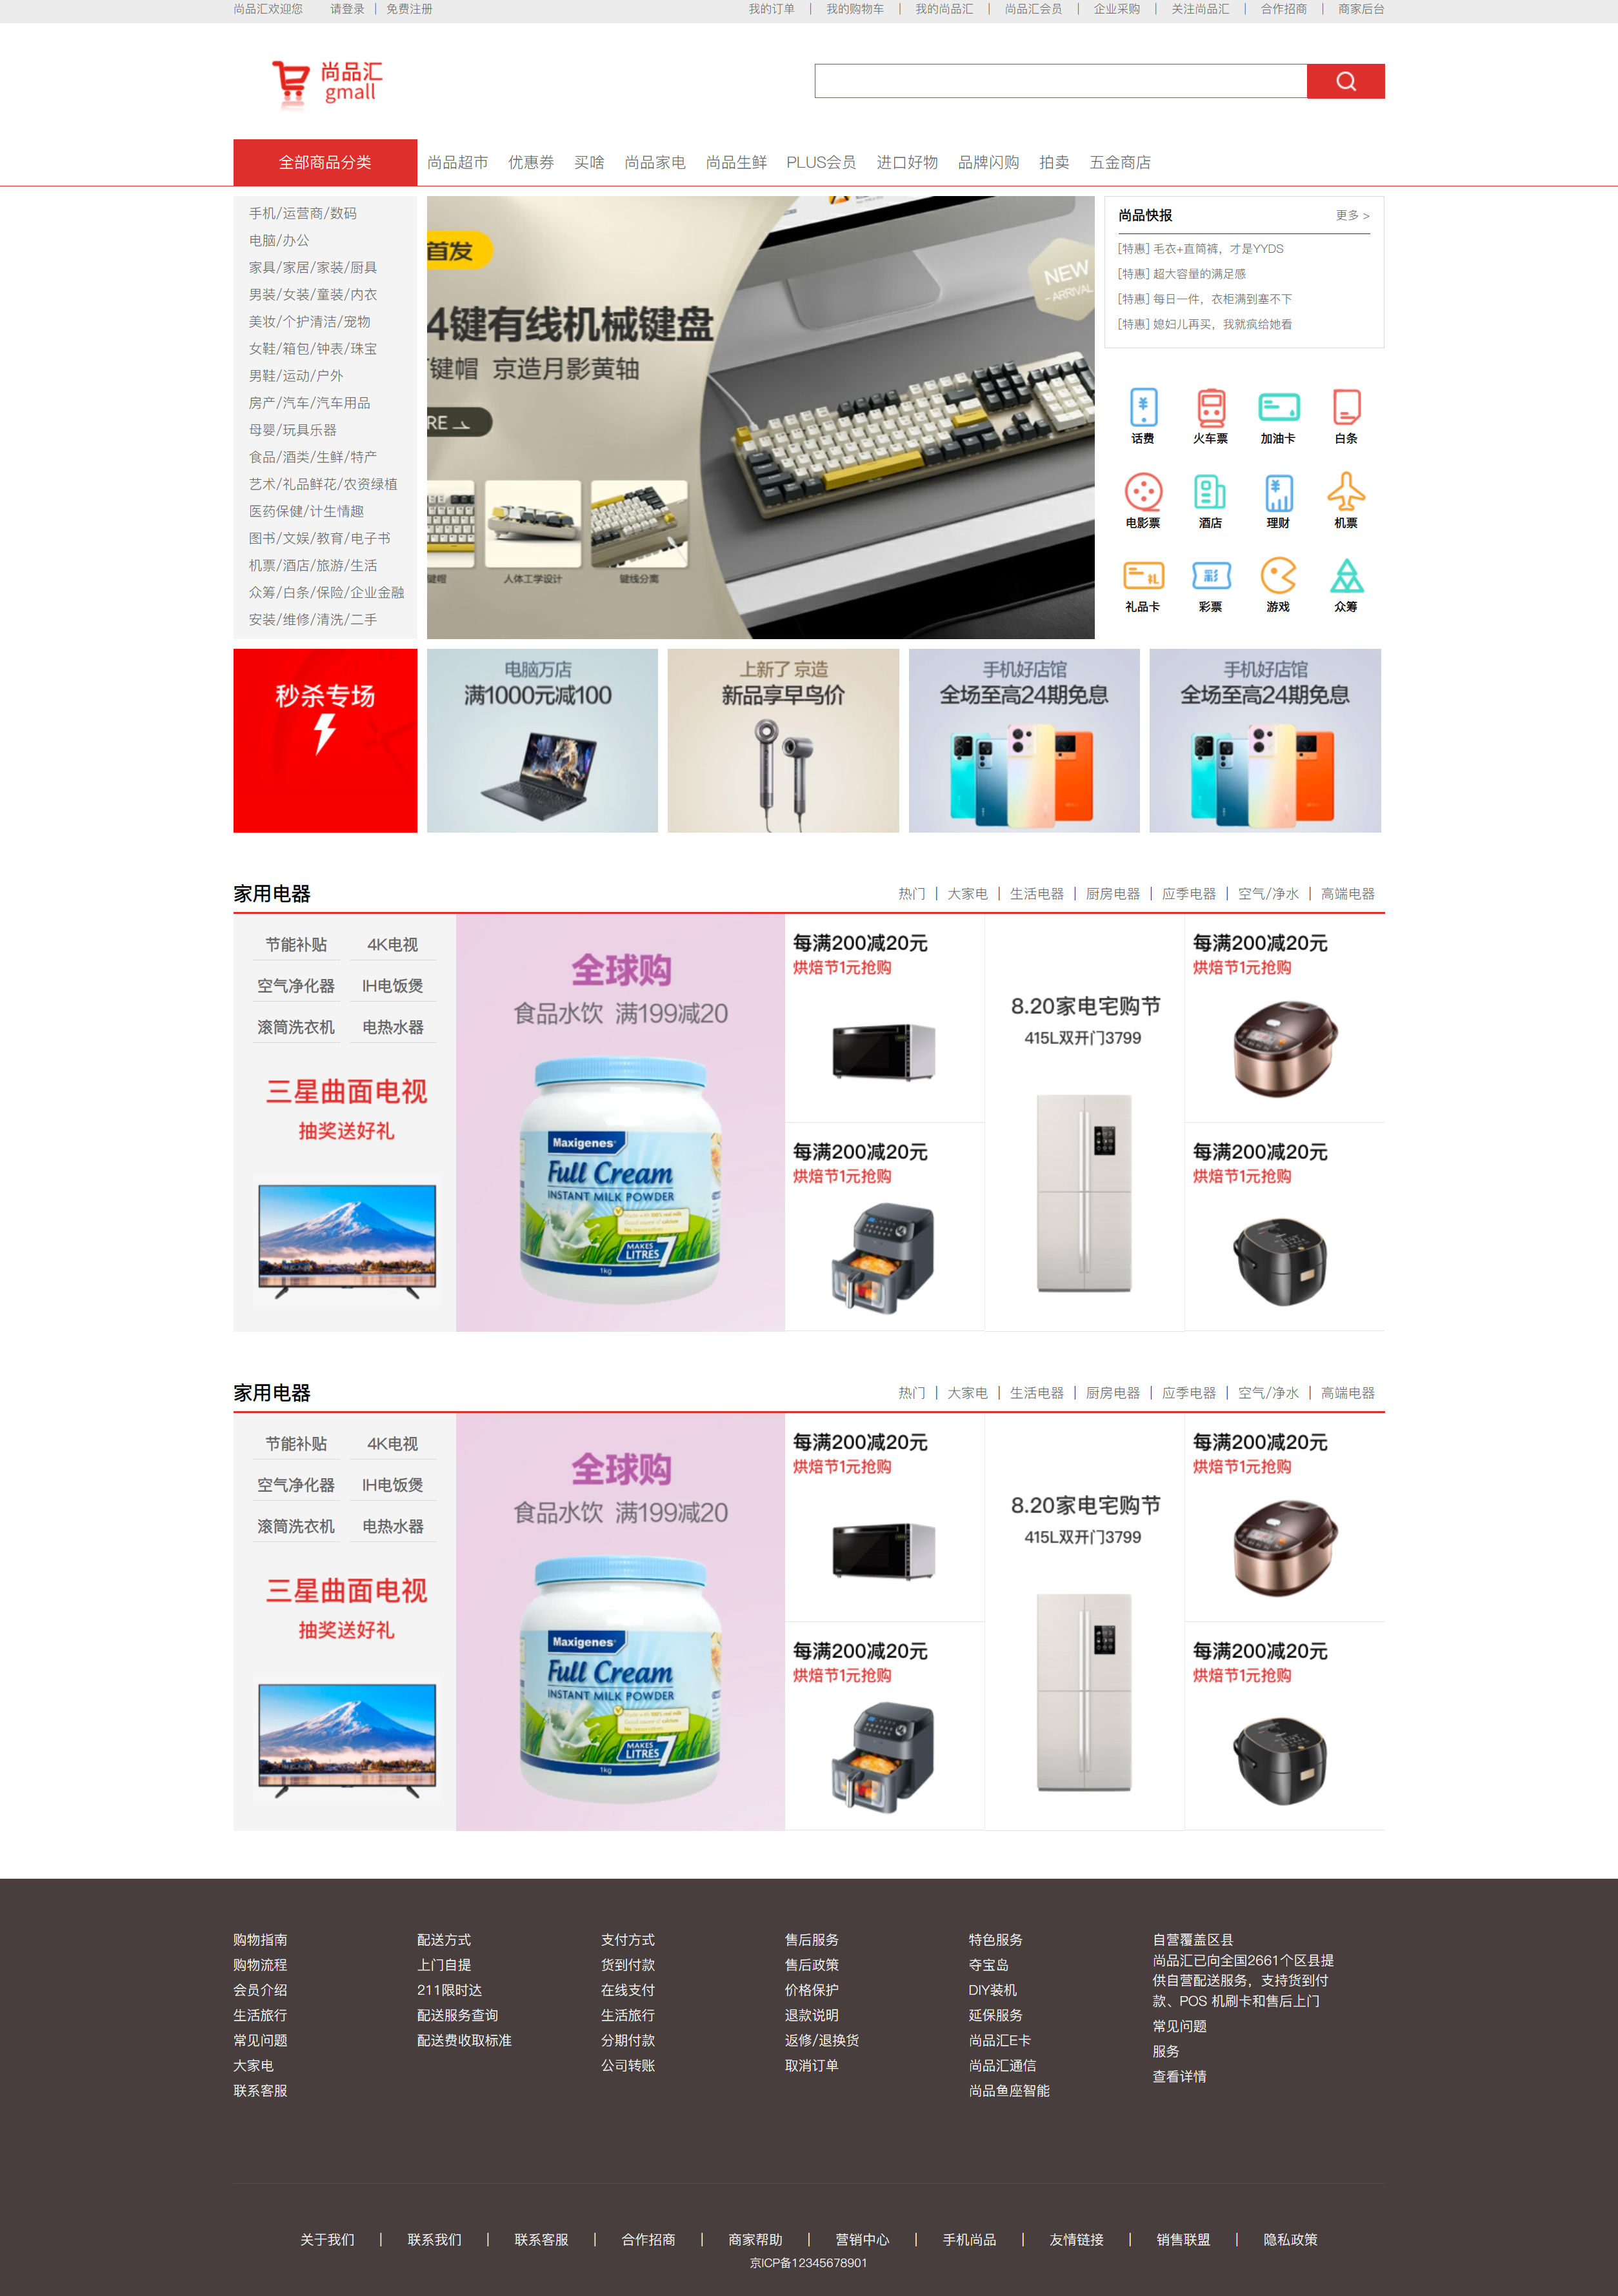
准备
引入外部资源,包括网页默认样式重置文件reset.css、图标文件favicon.ico文件和自定义样式表index.css,代码如下:
<!-- 引入网页图标 -->
<link rel="shortcut icon" href="./favicon.ico" type="image/x-icon" />
<!-- 引入默认样式重置文件 -->
<link rel="stylesheet" href="reset.css" />
<!-- 引入自定义样式文件 -->
<link rel="stylesheet" href="index.css" />
顶部导航条设计
效果图展示:
![]()
设计思路:
- 确定顶部导航条的位置,高度30px,宽度默认充满整个父元素(当前为
<html>),背景颜色为参考设计稿 - 确定版心位置,根据设计稿可以确定版心宽度为1190px,高度为30px,并且版心在整个导航条部分居中。但是不建议显示设计高度,因为后面的版心也是同样的宽度,只是高度不同而已,所以高度可以通过内容进行控制
- 将导航条的内容分为左右两侧的部分,左侧部分为欢迎部分,右侧为选项部分,使左侧在版心中左浮动,右侧在版心中右浮动
- 左侧部分结构:首先「尚品汇欢迎您」和「请」属于正常文字,但是为了设计样式,使用
<span>元素包裹,「登录」和「免费注册」属于超链接,使用<a>元素包裹,链接设置为空。 - 左侧部分样式:首先对左侧部分和右侧部分设置高度防止出现父容器高度异常。因为是左侧浮动,所以为左侧的所有元素设置为浮动
.leftfix,将左侧部分的盒子设置为左浮动。接着找到左侧部消除浮动的影响(后面称为消除浮动),在reset.css中存在.clearfix类选择器,使用其消除浮动的影响。此时会出现一个情况:文字之间有空格,本身是换行导致的,将对应的父元素字体大小设置为0px,再选中所有元素设置统一字体大小为12px。根据设计稿,导航条所有文字垂直居中,可以使用行高和高度的规律设置。接着设计每一个边距,根据设计稿,对于「尚品汇欢迎您」的右侧存在一个宽为28px的右边距,选中其所在的元素,将右外边距设置为28px;对于「登录」和「免费注册」来说,二者中间一共有21px的边距,而其中存在1px宽的边框,根据盒子模型的结构,设计边框需要使用内边距,否则边框会贴紧文字 - 右侧部分结构:因为是一个一个选项,所以可以使用一个无序列表包裹所有内容,对于每一个列表项,因为是都是可以点击的超链接,所以使用链接元素包裹每一个列表项的内容
- 右侧部分样式:首先需要将右侧部分整体浮动到版心的右侧,接着其中的每一个列表项需要浮动到右侧部分的左侧。接着设置每一个列表项的边框和内边距,注意内边距不要设置到
<li>元素上,而是设置在<a>元素上,其余思路同左侧「登录」和「免费注册」部分,最后需要单独处理第一个<a>元素左内边距和最后一个<a>元素的边框与右内边距
- 左侧部分结构:首先「尚品汇欢迎您」和「请」属于正常文字,但是为了设计样式,使用
结构示例代码如下:
<!-- 顶部导航条 --><div class="topbar"><!-- 版心 --><div class="container clearfix"><!-- 左侧部分 --><div class="welcome leftfix"><span class="greeting">尚品汇欢迎您</span><span>请</span><a href="#" class="login">登录</a><a href="#" class="register">免费注册</a></div><!-- 右侧部分 --><div class="topbar-nav clearfix"><!-- 整体右侧浮动 --><ul class="list rightfix"><li><a href="#">我的订单</a></li><li><a href="#">我的购物车</a></li><li><a href="#">我的尚品汇</a></li><li><a href="#">尚品汇会员</a></li><li><a href="#">企业采购</a></li><li><a href="#">关注尚品汇</a></li><li><a href="#">合作招商</a></li><li><a href="#">商家后台</a></li></ul></div></div></div>样式示例代码如下:
/* 版心设置 */
.container {width: 1190px;margin: 0 auto;
}/* #region顶部导航条start *//* 设置导航条部分的主样式 */
.topbar {height: 30px;line-height: 30px;background-color: #ECECEC;color: #666;
}.welcome {height: 30px;font-size: 0; /* 清除内部字体之间的空格 */
}/* 设置内部所有字体的统一大小 */
.welcome span, .welcome a {font-size: 12px;
}/* 设置欢迎部分的右侧边距 */
.welcome .greeting {margin-right: 28px;
}/* 设置登录和注册的样式 */
.welcome .login {padding-right: 10px;border-right: 1px solid;
}.welcome .register {padding-left: 10px;
}
.topbar-nav {height: 30px;
}/* 每一个小列表项左侧浮动 */
.topbar-nav .list li{float: left;
}/* 设置间距 */
.topbar-nav .list li a {padding-left: 15px;padding-right: 15px;border-right: 1px solid;
}/* 清除第一个列表项左侧边距和最后一个的右侧边距和边框 */
.topbar-nav .list li:first-child a {padding-left: 0;
}.topbar-nav .list li:last-child a {padding-right: 0;border: 0;
}/* #endregion顶部导航条end */在vscode中使用:在当前部分的注释内容前➕#region➕注释内容,在当前部分的最后一个注释内容前➕#endregion➕注释内容,可以实现注释部分整体收缩而不需要单独对每一个选择器收缩
如果考虑到点击任意一个超链接时会选中其边框的情况,则可以将边框用常规的字符|代替,代码修改如下:
结构示例代码如下:
<!-- 顶部导航条 -->
<div class="topbar"><!-- 版心 --><div class="container clearfix"><!-- 左侧部分 --><div class="welcome leftfix"><span class="greeting">尚品汇欢迎您</span><span>请</span><a href="#" class="login">登录</a><span>|</span><a href="#" class="register">免费注册</a></div><!-- 右侧部分 --><div class="topbar-nav clearfix"><!-- 整体右侧浮动 --><ul class="list rightfix clearfix"><li><a href="#">我的订单</a><span>|</span></li><li><a href="#">我的购物车</a><span>|</span></li><li><a href="#">我的尚品汇</a><span>|</span></li><li><a href="#">尚品汇会员</a><span>|</span></li><li><a href="#">企业采购</a><span>|</span></li><li><a href="#">关注尚品汇</a><span>|</span></li><li><a href="#">合作招商</a><span>|</span></li><li><a href="#">商家后台</a></li></ul></div></div>
</div>
样式示例代码如下:
/* 版心设置 */
.container {width: 1190px;margin: 0 auto;
}/* #region顶部导航条start *//* 设置导航条部分的主样式 */
.topbar {height: 30px;line-height: 30px;background-color: #ECECEC;color: #666;
}.welcome {height: 30px;font-size: 0; /* 清除内部字体之间的空格 */
}/* 设置内部所有字体的统一大小 */
.welcome span, .welcome a {font-size: 12px;
}/* 设置欢迎部分的右侧边距 */
.welcome .greeting {margin-right: 28px;
}/* 设置登录和注册的样式 */
.welcome .login {padding-right: 10px;
}.welcome .register {padding-left: 10px;
}
.topbar-nav {height: 30px;
}/* 每一个小列表项左侧浮动 */
.topbar-nav .list li{float: left;
}/* 设置间距 */
.topbar-nav .list li a {padding-left: 15px;padding-right: 15px;
}/* 清除第一个列表项左侧边距和最后一个的右侧边距和边框 */
.topbar-nav .list li:first-child a {padding-left: 0;
}.topbar-nav .list li:last-child a {padding-right: 0;
}
头部设计
效果图展示:

图中的背景只是为了便于观察,再设计后面的内容时会去除
设计思路:
- 确定头部范围,高度为120px,宽度默认充满整个父元素(当前为
<html>) - 确定版心位置,因为前面已经设计过版心,所以这里不需要重复设计
- 根据头部结构,可以分为左侧部分
logo区域和右侧部分搜索区域,同前面设计,将logo区域左浮动,将搜索区域右浮动- 左侧部分结构:因为左侧只有图片,所以只需要放置一个
<img>元素即可 - 左侧部分样式:让图片左浮动即可,如果出现图片显示位置异常,请检查是否存在溢出现象发生
- 右侧部分结构:因为右侧是一个搜索框与一个按钮,所以需要一个表单,里面包裹
input:text元素和<button>元素 - 右侧部分样式:首先对输入框和按钮的样式进行修改,根据设计稿,输入框的高度为510px,宽度为36px,按钮元素的宽度为80px,高度为36px,但是因为输入框含有红色边框,所以需要高度和宽度都需要减去2px。此时会出现输入框和按钮中间的间隙,本质还是因为换行导致的空格,使用同样的方法将空隙去除。接下来将输入框和按钮垂直居中,因为输入框和按钮本质还是在表单中,所以需要让表单垂直居中即可。此时如果仔细观察可以看到按钮和搜索框并没有完全对齐,本质是因为字体设计导致默认以基线对齐,可以将需要移动的元素设置
vertical-align属性,使其按照除基线以外的方式对齐即可。最后将搜索按钮的图片放置到内容按钮区域,这里可以使用background-image属性,并使用background-repeat属性去除当照片小于面积时导致的重复,确定搜索图片的位置为按钮区域的水平垂直中间位置,此处可以通过计算得到具体位置((总高度(总宽度)-图片的高度(图片的宽度)) / 2),也可以通过设计稿看出位置
- 左侧部分结构:因为左侧只有图片,所以只需要放置一个
结构示例代码:
<!-- 头部 -->
<div class="header"><div class="container clearfix"><div class="logo leftfix"><img src="./images/logo.png" alt="图标"></div><div class="search rightfix"><form><input type="text"><button></button></form></div></div>
</div>
样式示例代码:
/* #region头部start */
.header {height: 120px;/* background-color: aqua;  */
}.search form {font-size: 0;/* 此时不会影响子元素的默认样式 */margin-top: 42px;
}.search input {width: 508px;height: 34px;border: 1px solid #DD302D;
}.search button {width: 80px;height: 36px;background-color: #DD302D;vertical-align: top;background-image: url('./images/search_icon.png');background-repeat: no-repeat;background-position: 28px 6px;
}/* #endregion头部end */
主导航区设计
效果图展示:

设计思路:
- 确定主导航区位置,高度为48px,宽度默认充满整个父元素(当前为
<html>) - 确定版心位置
- 主导航区总共有两部分,但是,该部分版心所在的父元素有底部边框,所以需要先使父元素下方有一个红色边框,第一部分为「全部商品分类」,第二部分为「推荐的分类」,考虑将「全部商品分类」左浮动,再将「推荐的分类」整体左浮动,最后将「推荐的分类」中的每一个分类左浮动
- 「全部商品分类」部分结构:因为「全部商品分类」是一个有颜色填充的盒子,所以考虑使用盒子元素进行处理
- 「全部商品分类」部分样式:将该部分左浮动,再将文本内容居中,并给出下边框和填充颜色,根据设计稿修改其他部分样式
- 「推荐的分类」部分结构:这一部分主要是每一个列表项,所以可以使用无序列表
- 「推荐的分类」部分样式:首先使整体部分左浮动,再将每一个列表项左浮动,因为每一个列表项实际上是一个超链接,所以可以使用超链接包裹文字,将每一个列表项的文本居中,更改间距,根据设计稿修改其他部分样式即可
结构示例代码:
<!-- 主导航区 -->
<div class="main-nav"><div class="container clearfix"><div class="all-kinds leftfix">全部商品分类</div><ul class="every-list leftfix clearfix"><li><a href="#">尚品超市</a></li><li><a href="#">优惠券</a></li><li><a href="#">买啥</a></li><li><a href="#">尚品家电</a></li><li><a href="#">尚品生鲜</a></li><li><a href="#">PLUS会员</a></li><li><a href="#">进口好物</a></li><li><a href="#">品牌闪购</a></li><li><a href="#">拍卖</a></li><li><a href="#">五金商店</a></li></ul></div>
</div>
样式示例代码:
/* #region主导航区start */.main-nav {height: 48px;border-bottom: 1px solid #DD302D;
}/* 全部商品分类主要样式 */
.all-kinds {width: 190px;height: 48px;line-height: 48px;background-color: #DD302D;color: white;text-align: center;font-size: 16px;
}/* 列表项部分主要样式 */
.main-nav .every-list {height: 48px;line-height: 48px;text-align: center;font-size: 16px;
}/* 每一个列表项左浮动 */
.main-nav .every-list li {float: left;
}/* 每一个列表项的间距 */
.main-nav .every-list li {padding: 0px 10px;
}/* #endregion主导航区end */
主要内容区设计
主要内容区一共分为三部分:
- 左侧边栏区
- 中间内容区
- 右侧其他内容区
使用版心包裹全部的内容,设置对应的上边距,一共有三个部分,所以三个部分依次左浮动
样式示例代码:
.main-content {margin-top: 10px; /* 整体距离上边10px */
}
左侧边栏区
一级菜单
效果图展示:
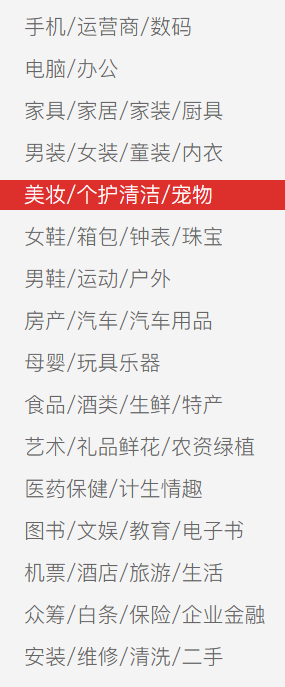
设计思路:
结构设计:因为每一行都是一个超链接,并且可以将每一行看作一个列表项,所以考虑使用<li>包裹<a>的形式
样式设计:确定左侧边栏区的高度为458px,宽度为190px,根据设计稿可以看出每一个<li>元素的高度为20px,并且文字垂直居中,每一个<li>距离上一个元素的外边距为8px,距离左侧边距为16px。还可以添加悬浮样式:当鼠标在<li>的范围内,背景颜色变为主题红色,此时超链接的字体颜色显示为白色,这里超链接变色使用子代选择器,防止选中后面二级菜单中的超链接
结构示例代码:
<!-- 左侧边栏区 -->
<ul class="sidebar leftfix"><li><a href="#">手机/运营商/数码</a></li><li><a href="#">电脑/办公</a></li><li><a href="#">家具/家居/家装/厨具</a></li><li><a href="#">男装/女装/童装/内衣</a></li><li><a href="#">美妆/个护清洁/宠物</a></li><li><a href="#">女鞋/箱包/钟表/珠宝</a></li><li><a href="#">男鞋/运动/户外</a></li><li><a href="#">房产/汽车/汽车用品</a></li><li><a href="#">母婴/玩具乐器</a></li><li><a href="#">食品/酒类/生鲜/特产</a></li><li><a href="#">艺术/礼品鲜花/农资绿植</a></li><li><a href="#">医药保健/计生情趣</a></li><li><a href="#">图书/文娱/教育/电子书</a></li><li><a href="#">机票/酒店/旅游/生活</a></li><li><a href="#">众筹/白条/保险/企业金融</a></li><li><a href="#">安装/维修/清洗/二手</a></li>
</ul>
样式示例代码:
.main-content .sidebar {width: 190px;height: 458px;background-color: #F4F4F4;
}.main-content .sidebar li {height: 20px;line-height: 20px;font-size: 14px;padding-left: 16px; /* 使用padding控制每一行左侧边距可以使鼠标悬浮时包含padding部分 */margin-top: 8px; /* 使用margin控制每一行的间距可以使鼠标悬浮时不包含margin部分 */
}.main-content .sidebar li:hover {background-color: #DD302D;
}.main-content .sidebar li:hover>a {color:white;
}
二级菜单
效果图展示:

设计思路:
首先理解二级菜单的工作逻辑:当鼠标悬停在一级菜单中的某一个列表项时,展开二级菜单,否则不显示二级菜单,需要注意一个细节:当鼠标在二级菜单部分时,对应位置的<li>也需要进行高亮显示
接着确定二级菜单的位置和大小,根据设计稿可以看出,二级菜单的高度为458px,宽度为700px,而因为是盖住中间内容,所以需要使用到定位进行处理,这里使用绝对定位,以<ul>元素为包含块,注意不要用<li>作为包含块,因为当<li>是第二个及以后的任意一个时都会导致二级菜单下移,从而无法完全盖住中间部分。并且为了保证鼠标在二级菜单时也可以高亮对应的<li>,应将二级菜单放置在<li>元素中。确定好主要逻辑后,根据设计稿完善其余内容即可
最后设计二级菜单的内容,二级菜单中的每一行都是一个自定义列表,并且每一个自定义列表距左侧都会存在一个20左边距,需要注意,如果设置了内边距,因为计算盒子大小需要考虑到内边距,所以此时宽度要减去设置的20px左边距。因为自定义列表默认的样式是竖向排列,所以需要对每一个列表项进行左浮动,在自定义列表中的每一个名词中,为了保证不论是长的名词还是短的名词都有足够的空间,需要额外给定宽度和高度,而对于每一个解释名词来说,同样使用超链接包裹文字,并设置一个左边框,而边框距文字有一定距离,根据设计稿,给出10px的内边距即可
想要实现鼠标悬浮在每一个列表项时显示二级菜单,否则不显示的效果,可以让二级菜单默认不显示,当鼠标在每一个列表项时,将显示模式改为显示即可,推荐用display属性,因为隐藏后不占位
结构示例代码如下(只展示其中一种):
<li><a href="#">手机/运营商/数码</a><div class="second-menu clearfix"><dl class="clearfix"><dt><span>电子书刊</span></dt><dd><a href="#">电子书</a></dd><dd><a href="#">网络原创</a></dd><dd><a href="#">数字杂志</a></dd><dd><a href="#">多媒体图书</a></dd></dl><dl class="clearfix"><dt><span>音像</span></dt><dd><a href="#">音乐</a></dd><dd><a href="#">影视</a></dd><dd><a href="#">教育音像</a></dd></dl><dl class="clearfix"><dt><span>英文原版</span></dt><dd><a href="#">少儿</a></dd><dd><a href="#">商务投资</a></dd><dd><a href="#">英语学习考试</a></dd><dd><a href="#">文学</a></dd><dd><a href="#">传记</a></dd><dd><a href="#">励志</a></dd></dl><dl class="clearfix"><dt><span>文艺</span></dt><dd><a href="#">小说</a></dd><dd><a href="#">文学</a></dd><dd><a href="#">青春文学</a></dd><dd><a href="#">传记</a></dd><dd><a href="#">艺术</a></dd></dl><dl class="clearfix"><dt><span>少儿</span></dt><dd><a href="#">胎教</a></dd><dd><a href="#">0-2岁</a></dd><dd><a href="#">3-6岁</a></dd><dd><a href="#">7-10岁</a></dd><dd><a href="#">11-14岁</a></dd></dl><dl class="clearfix"><dt><span>人文社科</span></dt><dd><a href="#">历史</a></dd><dd><a href="#">哲学</a></dd><dd><a href="#">国学</a></dd><dd><a href="#">政治/军事</a></dd><dd><a href="#">法律</a></dd><dd><a href="#">人文社科</a></dd><dd><a href="#">心理学</a></dd><dd><a href="#">文化</a></dd><dd><a href="#">社会科学</a></dd></dl><dl class="clearfix"><dt><span>经管励志</span></dt><dd><a href="#">经济</a></dd><dd><a href="#">金融与投资</a></dd><dd><a href="#">管理</a></dd><dd><a href="#">励志与成功</a></dd></dl><dl class="clearfix"><dt><span>生活</span></dt><dd><a href="#">健康与保健</a></dd><dd><a href="#">家庭与育儿</a></dd><dd><a href="#">旅游</a></dd><dd><a href="#">烹饪美食</a></dd></dl><dl class="clearfix"><dt><span>科技</span></dt><dd><a href="#">工业技术</a></dd><dd><a href="#">科普读物</a></dd><dd><a href="#">建筑</a></dd><dd><a href="#">医学</a></dd><dd><a href="#">科学与自然</a></dd><dd><a href="#">计算机与互联网</a></dd><dd><a href="#">电子通信</a></dd></dl><dl class="clearfix"><dt><span>教育</span></dt><dd><a href="#">中小学教辅</a></dd><dd><a href="#">教育与考试</a></dd><dd><a href="#">外语学习</a></dd><dd><a href="#">大中专教材</a></dd><dd><a href="#">科学与自然</a></dd><dd><a href="#">字典词典</a></dd></dl><dl class="clearfix"><dt><span>艺术与收藏</span></dt><dd><a href="#">经济管理</a></dd><dd><a href="#">文化与艺术</a></dd></dl><dl class="clearfix"><dt><span>其他</span></dt><dd><a href="#">工具书</a></dd><dd><a href="#">杂志期刊</a></dd><dd><a href="#">套装书</a></dd><dd><a href="#">打折图书</a></dd></dl></div>
</li>
样式示例代码如下:
/* 确定包含块 */
.main-content .sidebar {/* ... *//* 使二级菜单以父亲作为包含块 */position: relative;
}/* 悬浮在列表项时以块元素显示二级菜单 */
.main-content .sidebar li:hover .second-menu{display: block;
}.sidebar .second-menu {height: 458px;width: 680px;background-color: #F4F4F4;/* 二级菜单开启绝对定位 */position: absolute;top: 0;left: 190px;/* 默认不显示二级菜单 */display: none;  font-size: 14px;/* 整个内容区的左侧边距 */padding-left: 20px;
}.sidebar .second-menu dl {height: 36px; /* 设置每一个dl的高度,宽度默认撑开父元素 */line-height: 36px;
}/* 单独设置第一个自定义列表的上边距 */
.sidebar .second-menu dl:first-child {margin-top: 10px;
}/* 设置每一个自定义列表的名词样式 */
.sidebar .second-menu dt {width: 70px;height: 20px;margin-right: 10px;float: left;
}.sidebar .second-menu dt span {color: black;font-weight: bold;
}.sidebar .second-menu dd {float: left;
}.sidebar .second-menu dd a {padding: 0 10px;border-left: 1px solid;
}
中间内容区
效果图展示:
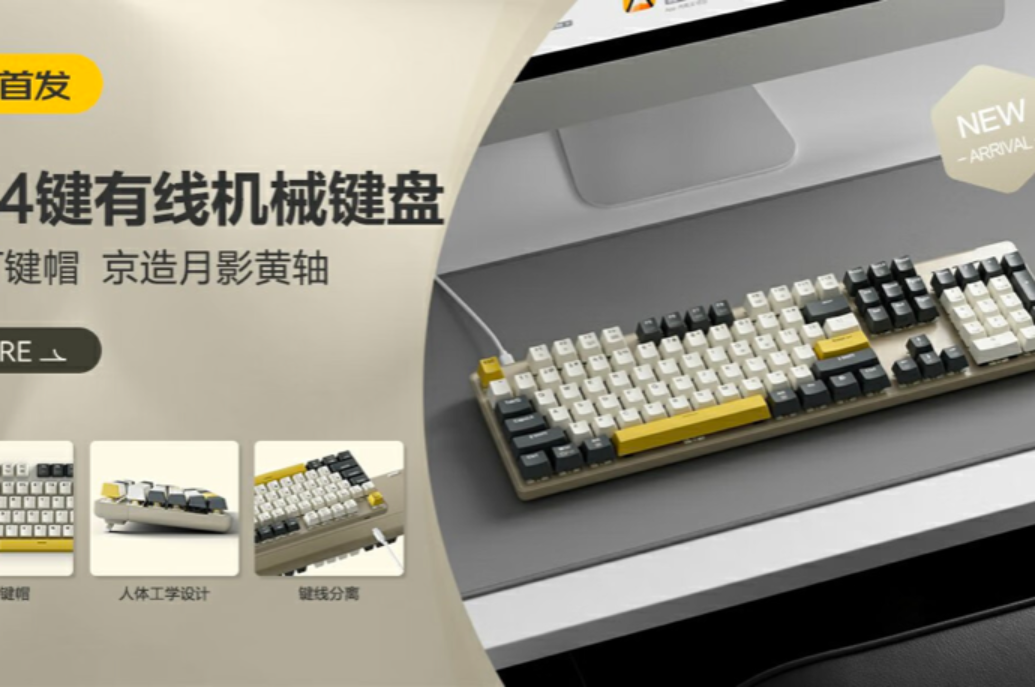
设计思路:
因为不考虑实际轮播的效果,根据设计稿确定位置后,直接使用图片标签即可
结构示例代码:
<!-- 中间内容区 -->
<div class="banner leftfix"><img src="./images/banner主图.png" alt="banner">
</div>
样式示例代码:
.main-content .banner {height:458px;width: 690px;margin: 0px 10px;/* background-color: antiquewhite; */
}
右侧其他内容区
右侧部分可以分为两个部分:
- 上部分快报区
- 下部分图标导航区
根据设计稿可以看到上下两个部分是两个盒子,中间间距为10px,因为默认是上下结构,所以不需要使用浮动
上部分快报区
效果图展示:
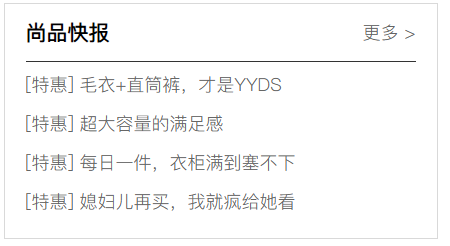
设计思路:
快报区可以分为两部分:标题和资讯
首先,根据设计稿可以看出,整个快报区的部分有左右两部分的内边距分别是14px,此时设计盒子宽度和高度时也需要考虑内边距的大小
接着设计内容,对于标题区可以考虑使用一个高度为39px的盒子,该盒子有一个下边框,需要注意,设置了下边框后盒子高度需要减去边框,否则会多出1px的高度,根据高度使内容文本垂直居中,「尚品快报」和「更多 >」本质是两个浮动的内容,对「尚品快报」使用左浮动,对「更多 >」使用右浮动。接着处理资讯区,该部分使用四个盒子,盒子内部使用超链接包裹资讯,但是鉴于每一个资讯可以看成单独的一个列表项,所以考虑使用无序列表包裹,根据设计稿设计对应高度即可,需要注意,每一个盒子都有上下的6px的内边距
结构示例代码:
<!-- 上部分快报区 -->
<div class="top-msg"><!-- 标题区 --><div class="title clearfix"><h2 class="leftfix">尚品快报</h2><a href="#" class="rightfix">更多 ></a></div><!-- 资讯区 --><ul class="info"><li><a href="#">[特惠] 毛衣+直筒裤,才是YYDS</a></li><li><a href="#">[特惠] 超大容量的满足感</a></li><li><a href="#">[特惠] 每日一件,衣柜满到塞不下</a></li><li><a href="#">[特惠] 媳妇儿再买,我就疯给她看</a></li></ul>
</div>样式示例代码:
/* 上部分快报区 */
.top-msg {height: 156px;width: 260px;border: 1px solid;padding: 0 14px;
}.top-msg .title {height: 38px;line-height: 38px;border-bottom: 1px solid;
}.top-msg .title h2 {font-size: 14px;color: black;font-weight: bold;
}/* 下部分资讯区 */
.top-msg .info li {height: 14px;padding: 6px 0;
}
下部分图标导航区
效果图展示:
设计思路:
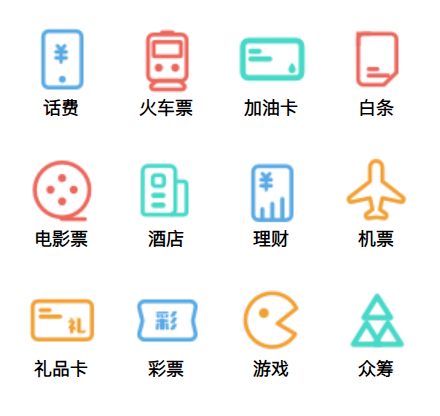
首先确定框架,每一个导航块都是由宽度为48px、高度为48px的图片和宽度为48px、高度为22px的文字组成,所以可以直接使用一个高度为70px、宽度为48px的盒子来容纳每一个导航块,每一个导航块可以考虑为列表项,所以可以使用无序列表,每一行看作一个无序列表,每一个导航块看作一个列表项,三个导航块为一行。接着根据设计稿设计每一个间距,首先对于第一个无序列表来说,距离整个区域存在一个上边距26px,这里需要注意margin塌陷问题。对于所有的无序列表来说,右侧均存在一个16px的左边距,但是可以考虑单独为每一行的第一个<li>设置左边距,最后考虑每一行的间距和每一个列表项的间距。
接着设计每一个导航块,导航块是由文字和图片组成的,第一个元素为图片,第二个元素为文字
对于图片来说,不推荐直接使用<img>引入照片,因为一共有12张照片,如果每一个导航块都使用的是<img>标签引入图片就需要向服务器发送12次请求,服务器响应12次请求,来回总共24次,如果请求发送的数量巨大,那么服务器的开销就会变得很大,所以这里考虑使用背景图(精灵图)以及图片偏移量解决问题,根据素材中的精灵图可以看出,每一个小型的图标高度和宽度都为48px,并且是一个挨着一个,所以可以使用偏移量选择每一张图片,如下图所示:

精灵图:由一个一个小型的图片组成的大图片
使用上面的方法可以达到向服务器请求一次、响应一次,共计两次就可以获取到全部图标,只需要浏览器渲染时计算位置即可达到不同的图标显示
最后,为了保证显示效果,每一个导航块实际上是可以进行点击的,所以将鼠标指针用「点击」状态替换
结构示例代码:
<!-- 下部分图标导航区 -->
<div class="bottom-other-nav"><!-- 第一行 --><ul class="other-list clearfix"><li><div class="picture"></div><span>话费</span></li><li><div class="picture"></div><span>火车票</span></li><li><div class="picture"></div><span>加油卡</span></li><li><div class="picture"></div><span>白条</span></li></ul><!-- 第二行 --><ul class="other-list clearfix"><li><div class="picture"></div><span>电影票</span></li><li><div class="picture"></div><span>酒店</span></li><li><div class="picture"></div><span>理财</span></li><li><div class="picture"></div><span>机票</span></li></ul><!-- 第三行 --><ul class="other-list clearfix"><li><div class="picture"></div><span>礼品卡</span></li><li><div class="picture"></div><span>彩票</span></li><li><div class="picture"></div><span>游戏</span></li><li><div class="picture"></div><span>众筹</span></li></ul>
</div>
样式示例代码:
/* 下部分图标导航区 */
.bottom-other-nav {height: 290px;width: 290px;margin-top: 10px;/* background-color: grey; */overflow: hidden;
}.bottom-other-nav .other-list li {height: 70px;width: 48px;/* background-color: aqua; */float: left;/* 每一个列表项左右外边距为11 */margin:0 11px;/* 文字水平居中 */text-align: center;color:black;font-weight: bold;/* 鼠标为点击效果 */cursor: pointer;
}/* 控制第二行的上下外边距 */
.bottom-other-nav .other-list:nth-child(2) {margin: 17px 0;
}/* 单独为每一行的第一个列表项设置左侧外边距 */
.bottom-other-nav .other-list  li:first-child{margin-left: 16px;
}/* 设置距离父元素的上外边距 */
.bottom-other-nav .other-list:first-child {margin-top: 26px;
}/* 设置背景图片 */
.bottom-other-nav .other-list .picture {width: 48px;height: 48px;background-image: url('./images/精灵图-侧边功能.png');
}/* 第一行第一个 */
.bottom-other-nav .other-list:nth-child(1) li:nth-child(1) .picture {background-position: 0px 0px;
}
/* 第一行第二个 */
.bottom-other-nav .other-list:nth-child(1) li:nth-child(2) .picture {background-position: -48px 0px;
}
/* 第一行第三个 */
.bottom-other-nav .other-list:nth-child(1) li:nth-child(3) .picture {background-position: -96px 0px;
}
/* 第一行第四个 */
.bottom-other-nav .other-list:nth-child(1) li:nth-child(4) .picture {background-position: -144px 0px;
}
/* 第二行第一个 */
.bottom-other-nav .other-list:nth-child(2) li:nth-child(1) .picture {background-position: 0px -48px;
}
/* 第二行第二个 */
.bottom-other-nav .other-list:nth-child(2) li:nth-child(2) .picture {background-position: -48px -48px;
}
/* 第二行第三个 */
.bottom-other-nav .other-list:nth-child(2) li:nth-child(3) .picture {background-position: -96px -48px;
}
/* 第二行第四个 */
.bottom-other-nav .other-list:nth-child(2) li:nth-child(4) .picture {background-position: -144px -48px;
}
/* 第三行第一个 */
.bottom-other-nav .other-list:nth-child(3) li:nth-child(1) .picture {background-position: 0px -96px;
}
/* 第三行第二个 */
.bottom-other-nav .other-list:nth-child(3) li:nth-child(2) .picture {background-position: -48px -96px;
}
/* 第三行第三个 */
.bottom-other-nav .other-list:nth-child(3) li:nth-child(3) .picture {background-position: -96px -96px;
}
/* 第三行第四个 */
.bottom-other-nav .other-list:nth-child(3) li:nth-child(4) .picture {background-position: -144px -96px;
}
秒杀区设计
效果图展示:

设计思路:
确定结构位置以及版心后,引入图片,因为是横向排列,默认情况下<img>已经被重置为块元素,所以需要使用左浮动使所有图片处于同一行,最后调整间距即可,为了显示效果,可以将鼠标指针用「点击」状态替换
结构示例代码:
<!-- 秒杀专场 -->
<div class="seckill"><div class="container clearfix"><img src="./images/seckill.png" alt="秒杀"><img src="./images/banner1.png" alt="秒杀"><img src="./images/banner2.png" alt="秒杀"><img src="./images/banner3.png" alt="秒杀"><img src="./images/banner3.png" alt="秒杀"></div>
</div>
样式示例代码:
/* #region秒杀区start */
.seckill {margin-top: 10px;/* background-color: #666; */
}/* 设置每一张图片样式 */
.seckill img{float: left;cursor: pointer;margin-right: 10px;
}/* 去掉最后一个图片的右边距 */
.seckill img:last-child {margin-right: 0;
}
/* #endregion秒杀区end */
楼层区设计
楼层区分为两部分:顶部和详情区
顶部设计
效果图展示:

顶部设计思路类似于「顶部导航条」设计方式,不再赘述,根据设计稿修改部分样式即可
结构示例代码:
<!-- 顶部 -->
<div class="floor-bar clearfix"><span class="title leftfix">家用电器</span><ul class="rightfix clearfix"><li><a href="#">热门</a><span>|</span></li><li><a href="#">大家电</a><span>|</span></li><li><a href="#">生活电器</a><span>|</span></li><li><a href="#">厨房电器</a><span>|</span></li><li><a href="#">应季电器</a><span>|</span></li><li><a href="#">空气/净水</a><span>|</span></li><li><a href="#">高端电器</a></li></ul>
</div>
样式示例代码:
.floor-bar {height: 30px; /* 文字所在位置高度,不是整个盒子高度 */line-height: 30px;margin-top: 48px;line-height: ;border-bottom: 2px solid #DD302D;padding-bottom: 4px;
}.floor-bar .title {font-size: 20px;color:black;font-weight: bold;
}.floor-bar ul li{font-size: 14px;float: left;/* 使顶部每一个列表项左浮动 */
}.floor-bar ul li a {padding: 0 10px;
}/* 取消第一个超链接的左边距 */
.floor-bar ul li:first-child a {padding-left: 0;
}
详情区设计
效果图展示:
设计思路:
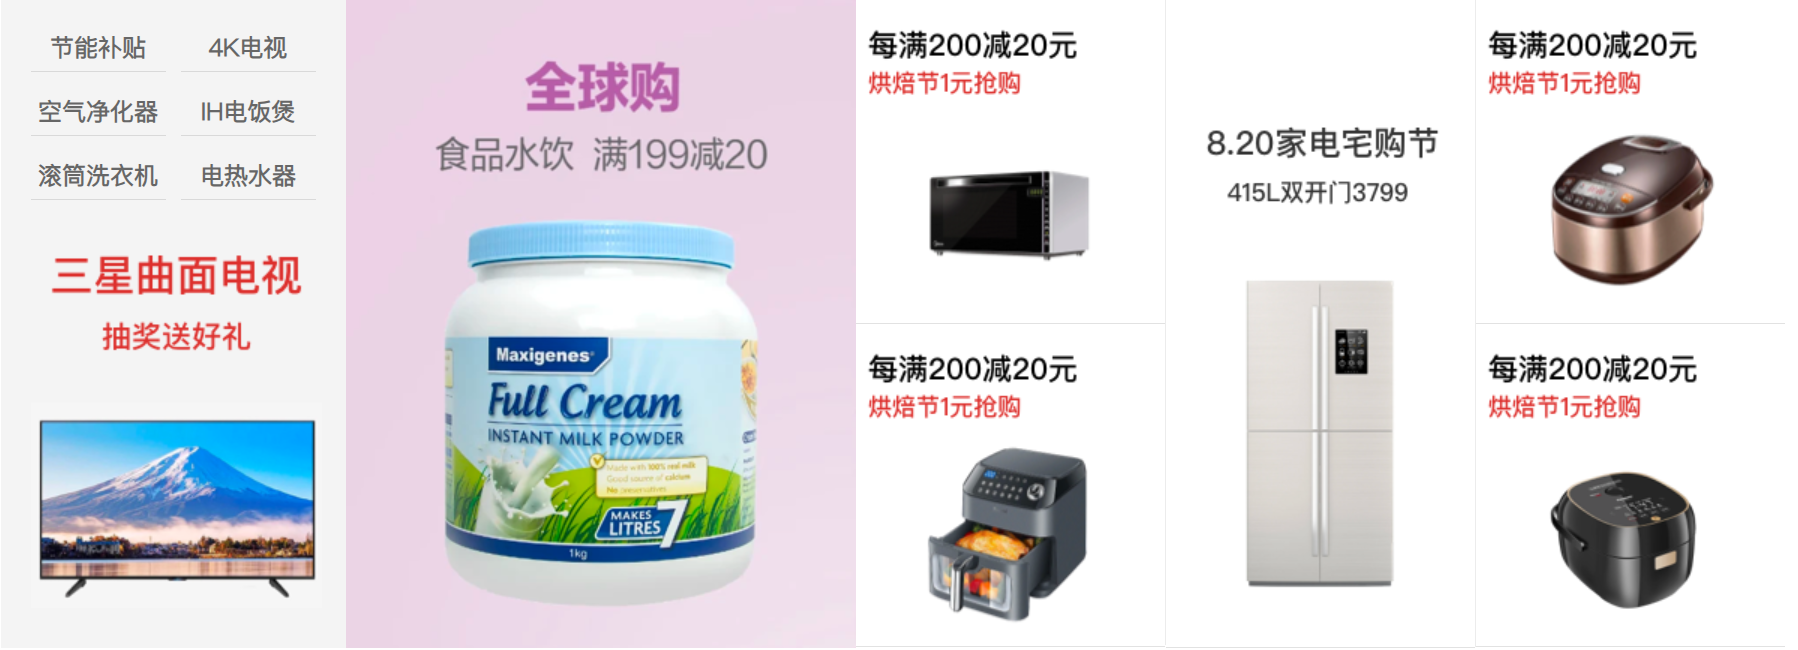
首先是第一个部分的样式,根据设计稿可以看出该部分的区域整体有一圈20px的内边距,本部分主要设计第一个广告区域的列表文字,该部分使用无序列表,并且每一个列表均有下边框样式。设置完基础样式后,使奇数列表项(左侧)左浮动,偶数列表项(右侧)右浮动即可,最后根据设计稿设置其他样式。其余部分均为图片,但是需要注意图片之间的边框
结构示例代码:
<!-- 楼层区 -->
<div class="floor"><div class="container"><!-- 顶部 --><div class="floor-bar clearfix"><span class="title leftfix">家用电器</span><ul class="rightfix clearfix"><li><a href="#">热门</a><span>|</span></li><li><a href="#">大家电</a><span>|</span></li><li><a href="#">生活电器</a><span>|</span></li><li><a href="#">厨房电器</a><span>|</span></li><li><a href="#">应季电器</a><span>|</span></li><li><a href="#">空气/净水</a><span>|</span></li><li><a href="#">高端电器</a></li></ul></div><!-- 底部 --><div class="floor-list clearfix"><div class="item item1"><ul class="clearfix"><li><a href="#">节能补贴</a></li><li><a href="#">4K电视</a></li><li><a href="#">空气净化器</a></li><li><a href="#">IH电饭煲</a></li><li><a href="#">滚筒洗衣机</a></li><li><a href="#">电热水器</a></li></ul><img src="./images/编组.png" alt="ad"></div><div class="item item2"><img src="./images/appliance_banner07.png" alt="ad"></div><div class="item item3"><img src="./images/微波炉.png" alt="ad"><img src="./images/空气炸锅.png" alt="ad"></div><div class="item item4"><img src="./images/冰箱.png" alt="ad"></div><div class="item item5"><img src="./images/电饭煲.png" alt="ad"><img src="./images/电饭煲2.png" alt="ad"></div></div></div>
</div>
样式示例代码:
/* 底部 */
.floor-list .item {float: left;
}/* 第一个广告区域 */
.floor-list .item1 {height: 392px;width: 190px;background-color: #F4F4F4;text-align: center;padding: 20px;
}/* 设置整个列表的下边距 */
.floor-list .item1 ul {margin-bottom: 30px;
}/* 设置每一个列表项的样式 */
.floor-list .item1 ul li {font-size: 16px;font-weight: bold;width: 90px;border-bottom: 1px solid #D9D9D9;padding-bottom: 3.5px;
}/* 设置奇数部分的左浮动 */
.floor-list .item1 ul li:nth-child(2n - 1) {float: left;
}/* 设置偶数部分的右浮动 */
.floor-list .item1 ul li:nth-child(2n) {float: right;
}/* 设置第二个的上下间距 */
.floor-list .item1 ul li:nth-child(3),
.floor-list .item1 ul li:nth-child(4){margin: 14.4px 0;
}/* 第二个广告区域 */
.floor-list .item2 {height: 432px;width: 340px;/* background-color: skyblue; */
}/* 第三个广告区域 */
.floor-list .item3 {height: 430px;width: 206px;/* background-color: orange; */border-right: 1px solid #ECECEC;
}/* 第四个广告区域 */
.floor-list .item4 {height: 431px;width: 206px;/* background-color: greenyellow; */border-right: 1px solid #ECECEC;
}/* 第五个广告区域 */
.floor-list .item5 {height: 430px;width: 206px;/* background-color: purple; */
}/* 设置出现底部边框的图片 */
.floor-list .item3 img,
.floor-list .item4 img,
.floor-list .item5 img {    border-bottom: 1px solid #E2E2E2;
}
页脚设计
效果图展示:

设计思路:
本部分只需要设计一系列无序列表,根据设计稿确定对应高度和宽度即可
结构示例代码:
<div class="footer"><div class="container"><!-- 顶部链接 --><div class="top-links clearfix"><ul class="links-list"><li><a href="#">购物指南</a></li><li><a href="#">购物流程</a></li><li><a href="#">会员介绍</a></li><li><a href="#">生活旅行</a></li><li><a href="#">常见问题</a></li><li><a href="#">大家电</a></li><li><a href="#">联系客服</a></li></ul><ul class="links-list"><li><a href="#">配送方式</a></li><li><a href="#">上门自提</a></li><li><a href="#">211限时达</a></li><li><a href="#">配送服务查询</a></li><li><a href="#">配送费收取标准</a></li></ul><ul class="links-list"><li><a href="#">支付方式</a></li><li><a href="#">货到付款</a></li><li><a href="#">在线支付</a></li><li><a href="#">生活旅行</a></li><li><a href="#">分期付款</a></li><li><a href="#">公司转账</a></li></ul><ul class="links-list"><li><a href="#">售后服务</a></li><li><a href="#">售后政策</a></li><li><a href="#">价格保护</a></li><li><a href="#">退款说明</a></li><li><a href="#">返修/退换货</a></li><li><a href="#">取消订单</a></li></ul><ul class="links-list"><li><a href="#">特色服务</a></li><li><a href="#">夺宝岛</a></li><li><a href="#">DIY装机</a></li><li><a href="#">延保服务</a></li><li><a href="#">尚品汇E卡</a></li><li><a href="#">尚品汇通信</a></li><li><a href="#">尚品鱼座智能</a></li></ul><ul class="links-list"><li>自营覆盖区县<br/>尚品汇已向全国2661个区县提供自营配送服务,支持货到付款、POS 机刷卡和售后上门</li><li><a href="#">常见问题</a></li><li><a href="#">服务</a></li><li><a href="#">查看详情</a></li></ul></div><!-- 分割线 --><div class="cut"></div><!-- 底部链接 --><div class="bottom-links"><ul class="bottom-links-list clearfix"><li><a href="#">关于我们</a><span>|</span></li><li><a href="#">联系我们</a><span>|</span></li><li><a href="#">联系客服</a><span>|</span></li><li><a href="#">合作招商</a><span>|</span></li><li><a href="#">商家帮助</a><span>|</span></li><li><a href="#">营销中心</a><span>|</span></li><li><a href="#">手机尚品</a><span>|</span></li><li><a href="#">友情链接</a><span>|</span></li><li><a href="#">销售联盟</a><span>|</span></li><li><a href="#">隐私政策</a></li></ul><div class="copyright">京ICP备12345678901</div></div></div>
</div>
样式示例代码:
/* #region页脚区start */
.footer {height: 440px;background-color: #483E3E;margin-top: 49px;
}/* 每一个列表样式 */
.links-list{width: 190px;height: 176px;float: left;margin-top: 48px;margin-bottom: 90px;
}/* 每一个列表项样式 */
.links-list li {font-size: 14px;margin: 5px 0;
}
.top-links .links-list,
.top-links .links-list a {color: white;
}/* 分割线样式 */
.cut {height: 1px;border-bottom: 1px solid #584D4D;
}/* 使文字居中,但是块元素不可以直接使用text-align,所以需要对需要居中的内容转换为行内块 */
.bottom-links {text-align: center;
}.bottom-links-list {display: inline-block;
}.bottom-links-list {margin-top: 47px;
}/* 设置每一个列表项的左浮动 */
.bottom-links-list li {float: left;
}/* 设置文字颜色和大小 */
.bottom-links-list li span,
.bottom-links-list li a {color: white;font-size: 14px;
}.bottom-links-list li a {padding: 0 26px;
}/* 备案号 */
.copyright {color: white;
}
/* #endregion页脚区end */
这篇关于尚品汇静态网页设计的文章就介绍到这儿,希望我们推荐的文章对编程师们有所帮助!


