本文主要是介绍HarmonyOS NEXT星河版零基础入门(3),希望对大家解决编程问题提供一定的参考价值,需要的开发者们随着小编来一起学习吧!
目录
1. 系统弹出框
2.interface转成class类
3.vp/fp
4. 写一个正方形 设置它的宽度 但不设定高度 不论屏幕怎么变实现他的宽高比
5.@State
6.图片和资源
7.淘宝镜像
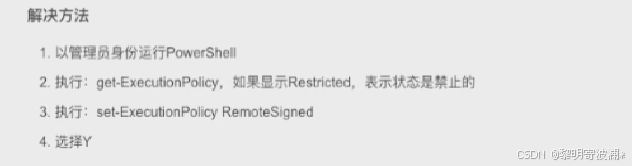
7.1windows 脚本禁用(操作策略 允许npm包的命令可执行)
8. es6&ArkTS中的导入和导出
9.按钮切换组件 SegmentButton
10.waterFlow组件
如果想要实现加载下一页 就得用到加载中
和滚动到底部的事件
11. async/await
12.Builder和BuilderParams的区别
13.常用的修饰符有哪些
14.CustomDialog的使用
15.sheet用法
16.弹窗UI是怎么在页面中使用的
17.常用的修饰符有哪些 -介绍下
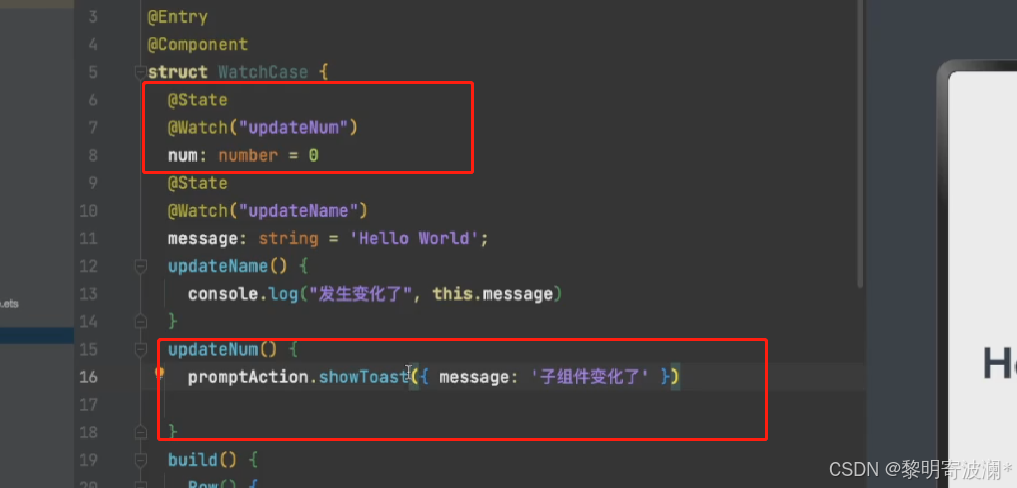
18.watch状态监听器
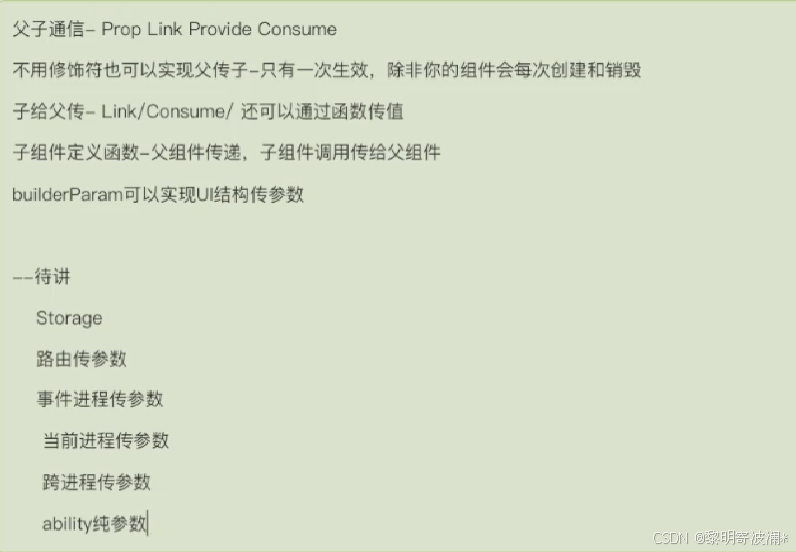
19.组件通信的方式有哪些?
20.Next新增修饰符
1.Require修饰符
2.Track修饰符
编辑21.鸿蒙的刷新机制是怎么样的,多层嵌套时,是从build开始刷新吗?
22.全局存储状态有哪些方式?
1.UIAbility内状态-LocalStorage
1.1
1.2在页面中传入
2.应用状态-AppStorage(需要模拟器)
2.1获取
2.2还有第二种获取方式
3.状态持久化-PersistenStorage
4.首选项
23.HTTP用法、
1.原生用法
2.第三方库 axios
24.进程 线程
1.进程
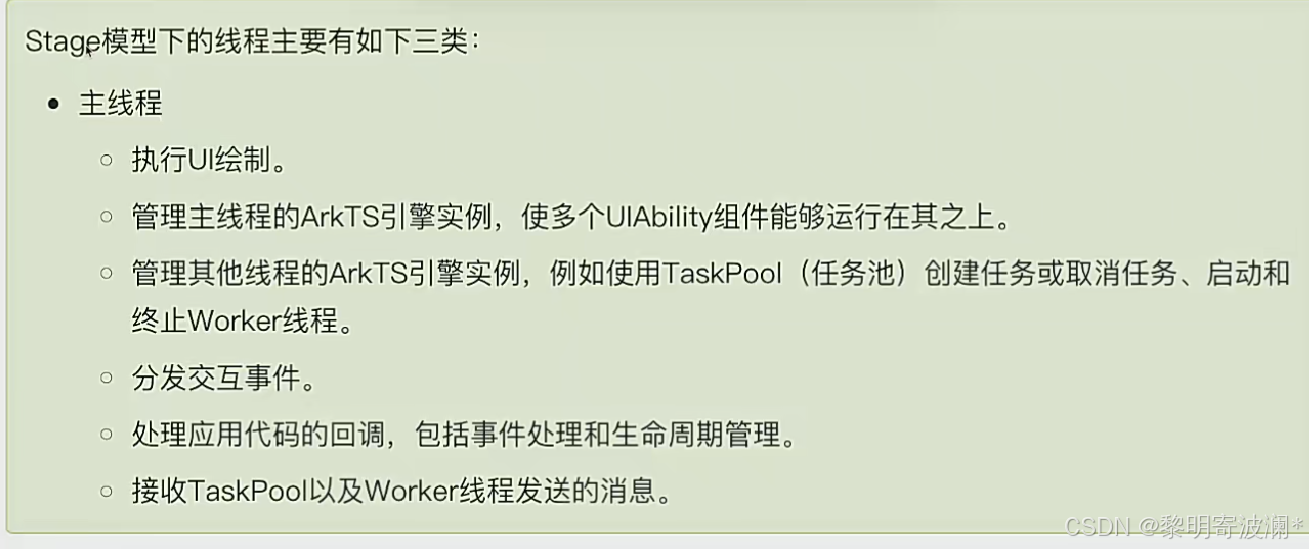
2.线程
TaskPool多线程代码:
编辑Worker进程代码:
1. 系统弹出框
import { promptAction } from '@kit.ArkUI';
@Component
struct weChat {@State text:string =''build(){Column(){Text(this.text )Search({value:$$this.text})Button('改值').onClick(()=>{promptAction.showToast({message:this.text,duration:10000})})}}
}
message是弹出的内容 duration是控制弹出的时间
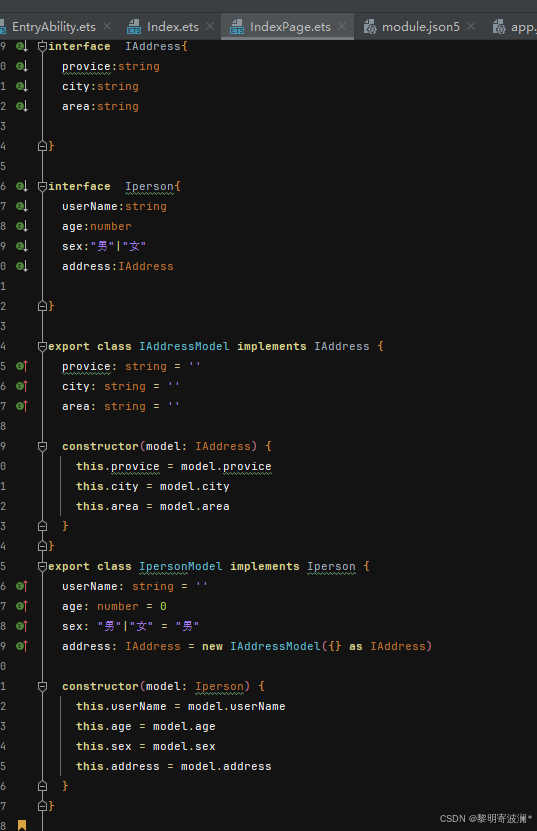
2.interface转成class类
npm i -g interface2class

在IndexPage声明了两个interface
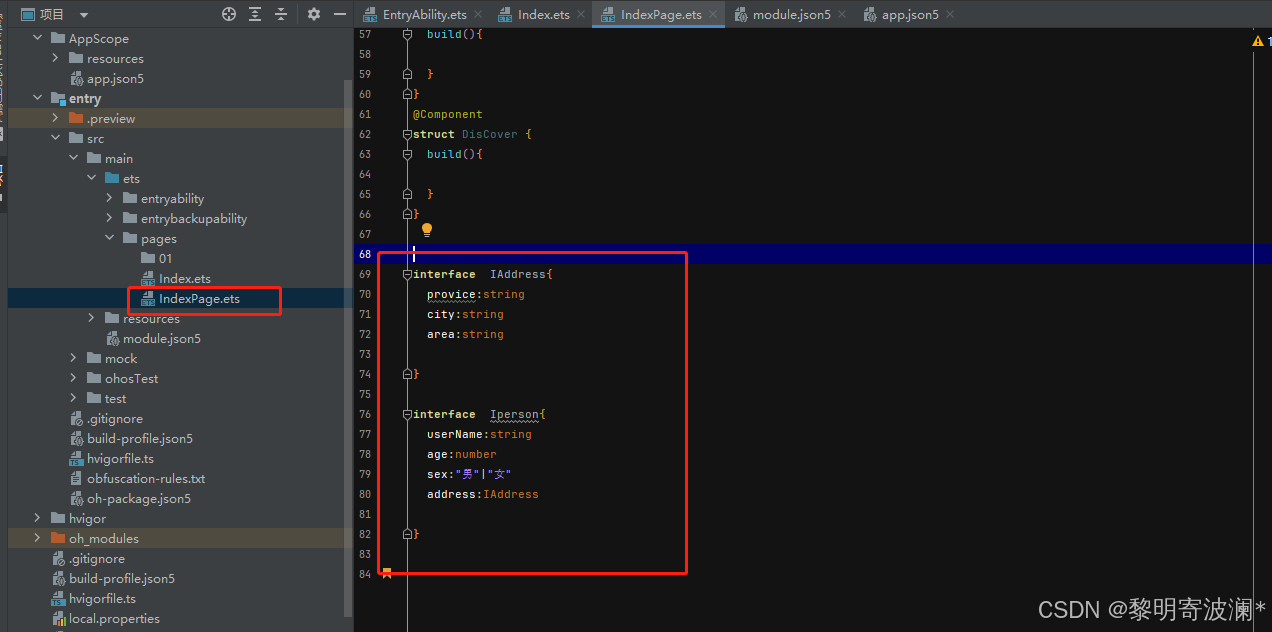
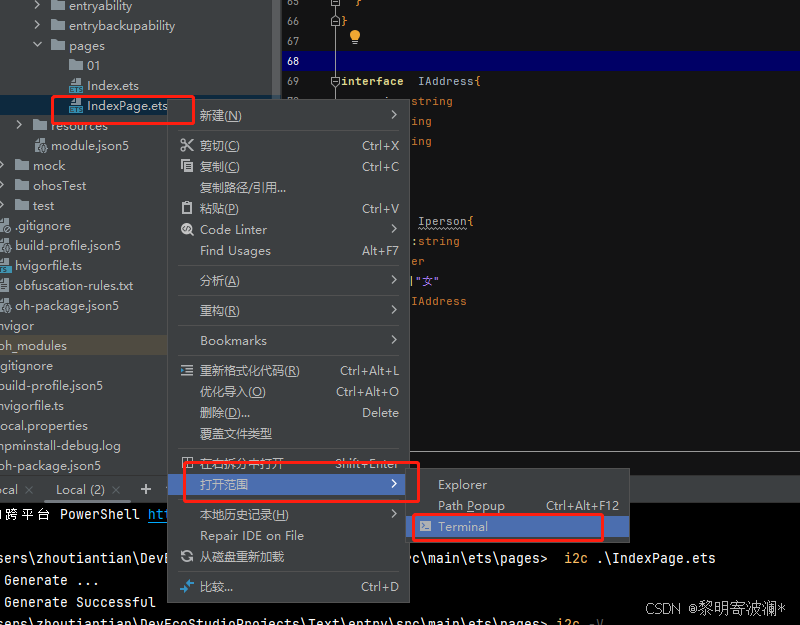
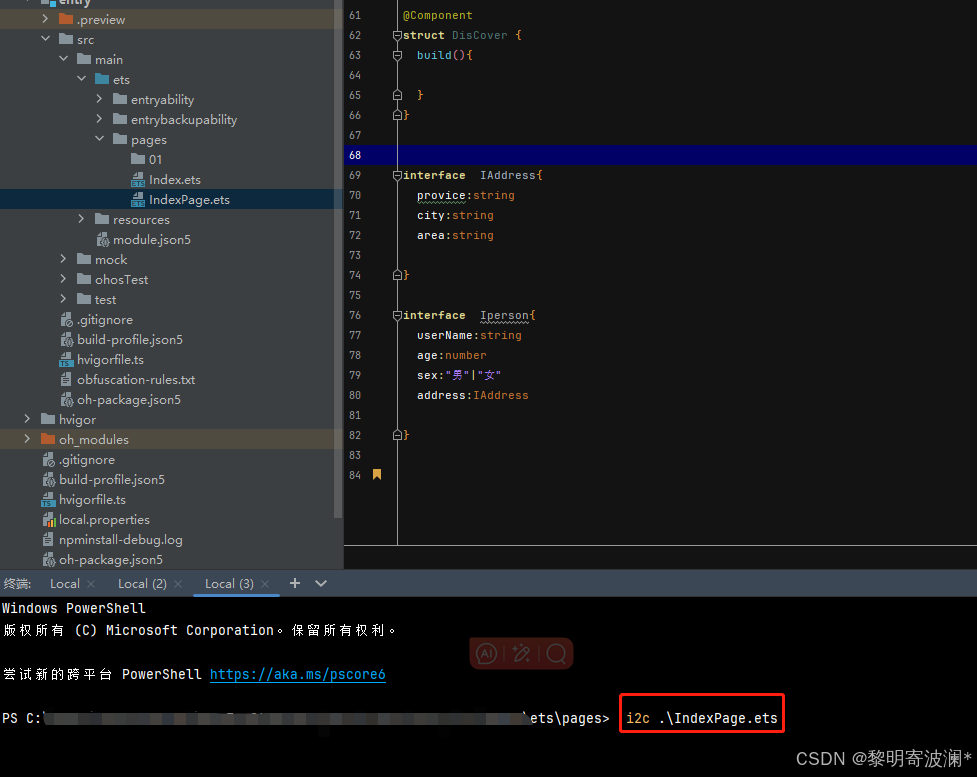
点击回车就自动生成了
3.vp/fp
不论是什么样的像素密度的设备,可呈现区域是一样的
fp---》字体大小
vp----->宽高大小
4. 写一个正方形 设置它的宽度 但不设定高度 不论屏幕怎么变实现他的宽高比
.aspectRatio(长/宽)5.@State
state修饰的数据是响应式数据,他只能检测到单层的数据变化,如果要更新多层
- 要么连带着更新单层
- 要么重新new一个
- 先声明interface,用工具生成class实现 interface2class
- interface生命类型也是可以的 ,如果用到了嵌套更新,必须得用class
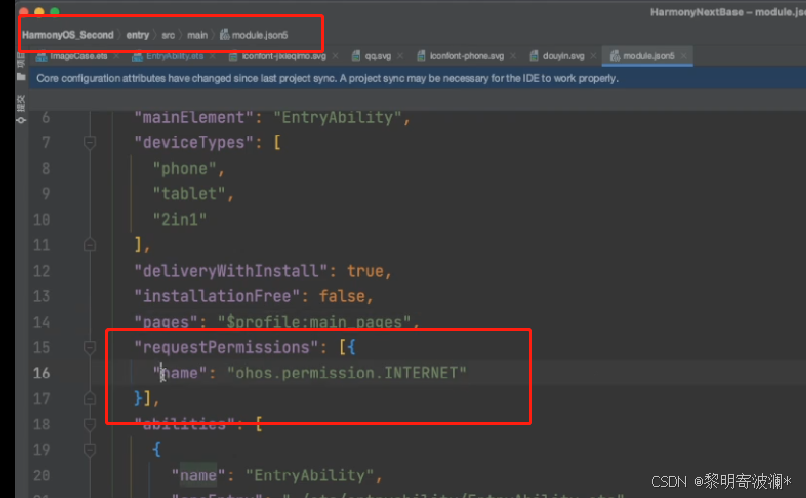
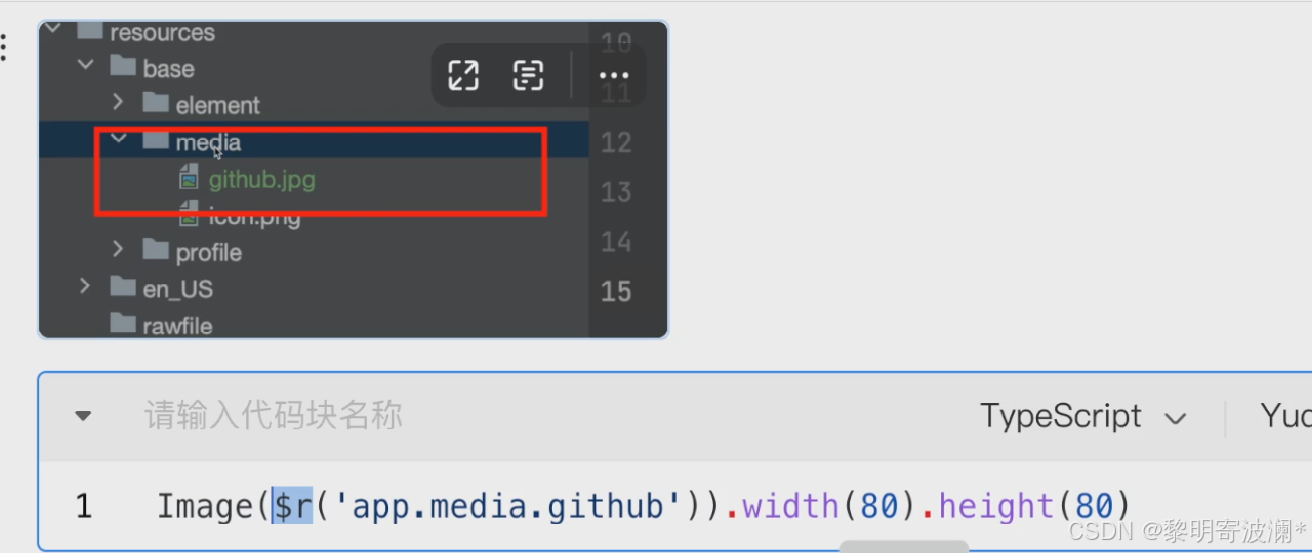
6.图片和资源
- 本地路径
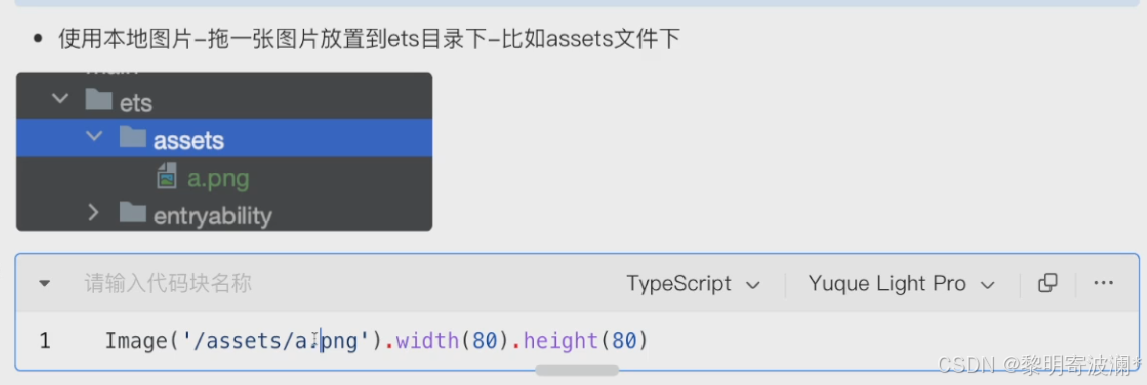
- 线上路径
必须开启网络权限
- svg着色-主题
- 资源目录下-base/media(图片)(推荐)图片不需要跟后缀
- rawfile(原始文件)

7.淘宝镜像
 npm config get registry
npm config set registry https://registry.npmirror.com/
7.1windows 脚本禁用(操作策略 允许npm包的命令可执行)
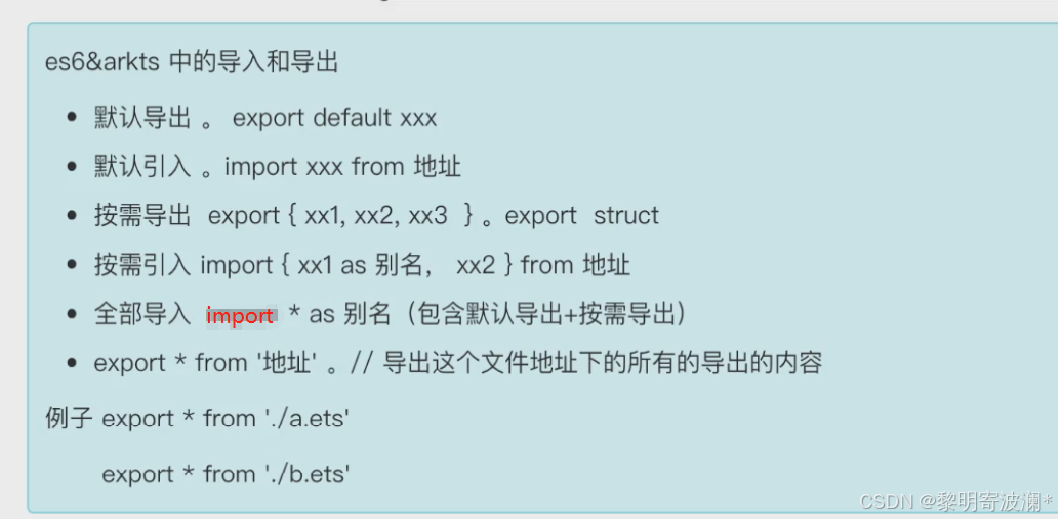
8. es6&ArkTS中的导入和导出
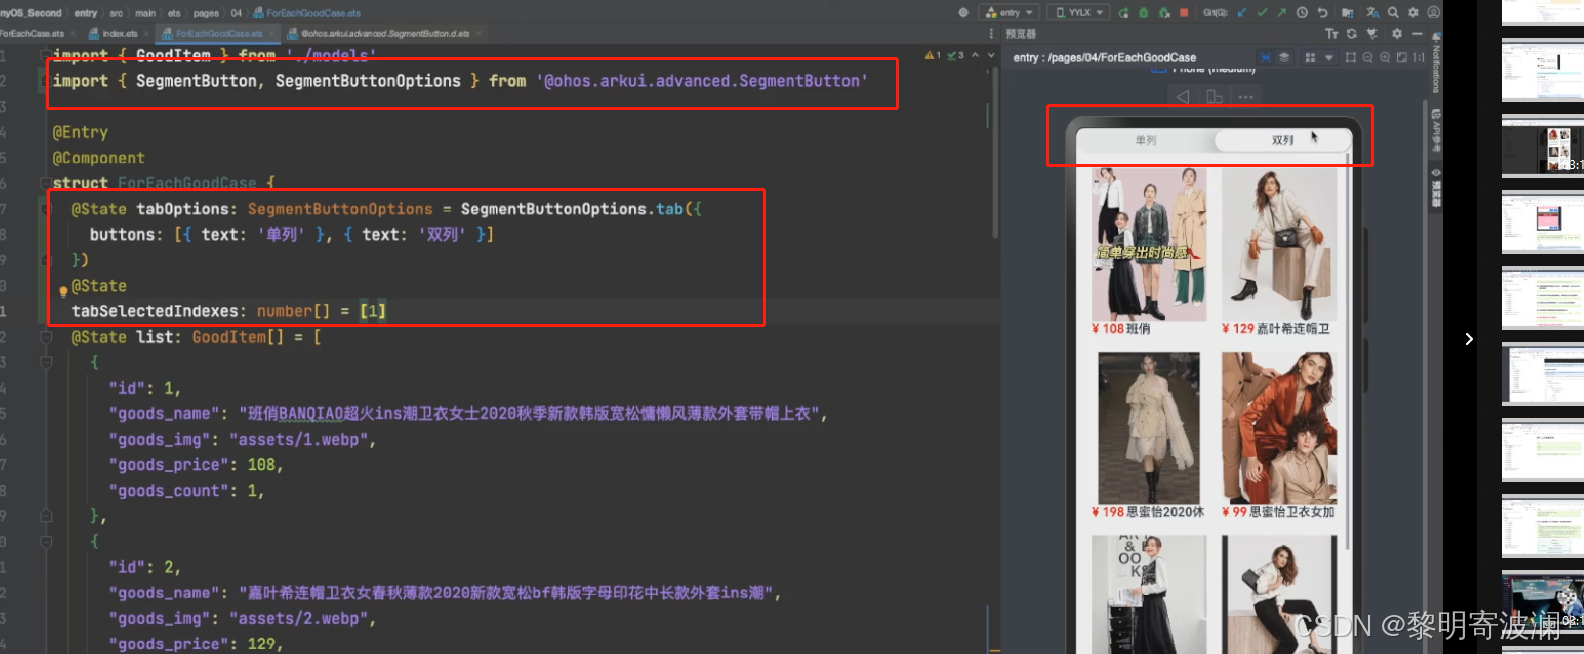
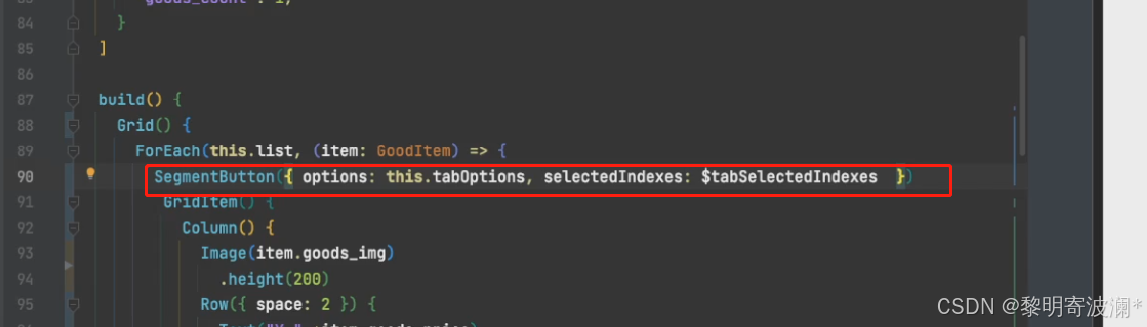
9.按钮切换组件 SegmentButton
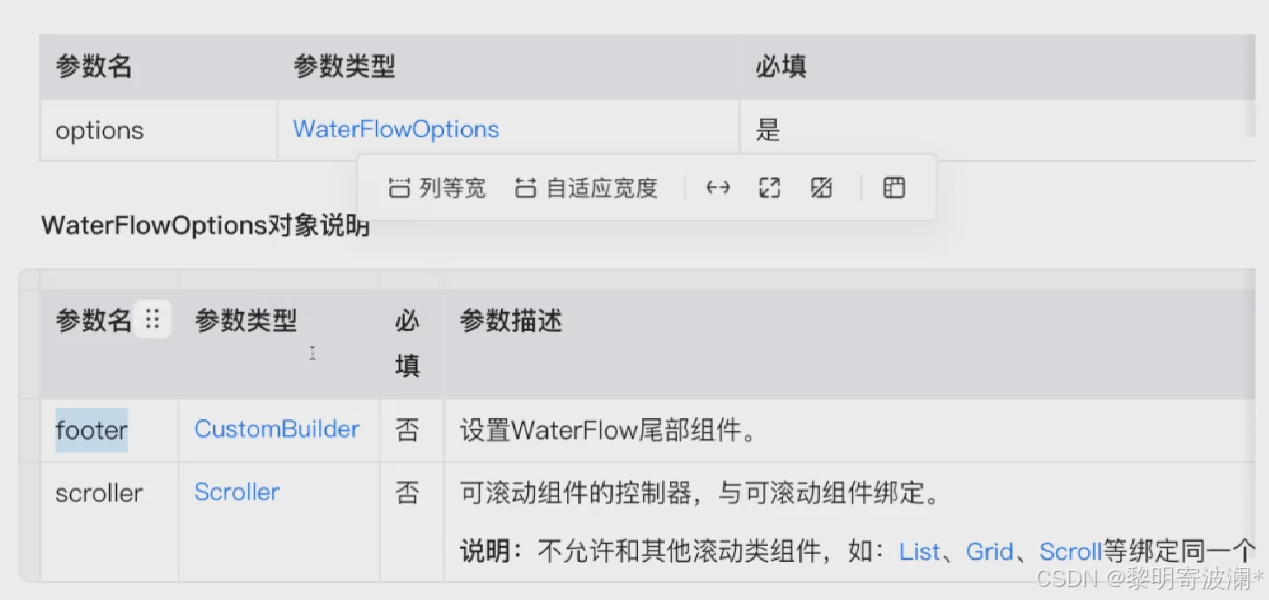
10.waterFlow组件
它的用法和Grid布局很像
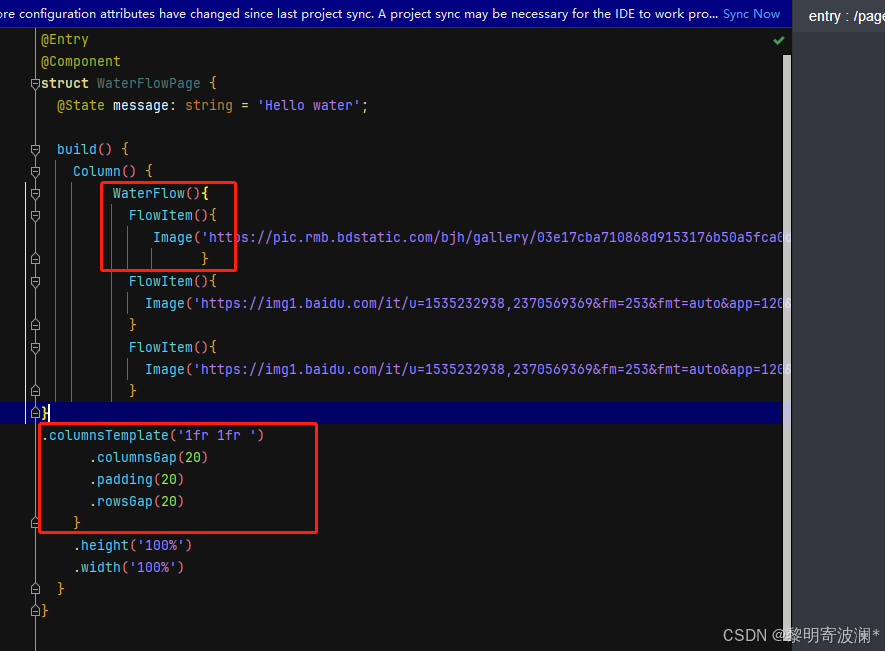
@Entry
@Component
struct WaterFlowPage {@State message: string = 'Hello water';build() {Column() {WaterFlow(){FlowItem(){Image('https://pic.rmb.bdstatic.com/bjh/gallery/03e17cba710868d9153176b50a5fca0d1090.jpeg').height(150)}FlowItem(){Image('https://img1.baidu.com/it/u=1535232938,2370569369&fm=253&fmt=auto&app=120&f=JPEG?w=1280&h=800').height(200)}FlowItem(){Image('https://img1.baidu.com/it/u=1535232938,2370569369&fm=253&fmt=auto&app=120&f=JPEG?w=1280&h=800').height(200)}
}
.columnsTemplate('1fr 1fr ').columnsGap(20).padding(20).rowsGap(20)}.height('100%').width('100%')}
}
看下效果图

如果想要实现加载下一页 就得用到加载中
WaterFlow({footer:this.Loading})
和滚动到底部的事件
onReachEnd

全部代码: 11.11.
import { GoodItem } from './modules'
import { promptAction } from '@kit.ArkUI'@Entry
@Component
struct WaterFlowGoodPage {@State GoodList:GoodItem[]=[{goods_name:'dsfjlsjkfsf',goods_price:100,goods_img:'https://img1.baidu.com/it/u=1535232938,2370569369&fm=253&fmt=auto&app=120&f=JPEG?w=1280&h=800',goods_count:1,id:1},{goods_name:'dfhlsdjflkdsjklfs 加速度的佛教山東i附件',goods_price:200,goods_img:'https://img1.baidu.com/it/u=2603934083,3021636721&fm=253&fmt=auto&app=138&f=JPEG?w=889&h=500',goods_count:2,id:2},{goods_name:'收到回复技术大会哦恶化日发方大化工iu而韩国佛热',goods_price:300,goods_img:'https://img0.baidu.com/it/u=4289818793,3552718550&fm=253&fmt=auto&app=138&f=JPEG?w=889&h=500',goods_count:3,id:3},{goods_name:'的時間佛薩飛機埃里克森放假哦i二fore多氟多化工i額方法過後i額外人',goods_price:400,goods_img:'https://img0.baidu.com/it/u=2080725050,2021436341&fm=253&fmt=auto&app=138&f=JPEG?w=1200&h=800',goods_count:4,id:4},{goods_name:'时间佛ID分机构IE',goods_price:500,goods_img:'https://img1.baidu.com/it/u=4202924242,2178453218&fm=253&fmt=auto&app=120&f=JPEG?w=1422&h=800',goods_count:5,id:5},{goods_name:'司法鉴定哦is叫哦私人',goods_price:600,goods_img:'https://10wallpaper.com/wallpaper/1680x1050/1405/Lavender_mountain_river-Landscape_HD_Wallpaper_1680x1050.jpg',goods_count:6,id:6}]//开启个阀门 意味着如果数据没有加载成功就不会继续加载@State isLoadding:boolean=false//加载中函数@BuilderLoading(){Row(){Text('加载中')LoadingProgress().width(20)}.width('100%').justifyContent(FlexAlign.Center).height(60)}//加载下一页方法loadMore(){setTimeout(()=>{this.GoodList.push(...this.GoodList.slice(0,9))this.isLoadding=false},1000)}build() {Column(){WaterFlow({footer:this.Loading}){ForEach(this.GoodList,(item:GoodItem,index:number)=>{FlowItem(){Column({space:20}){Image(item.goods_img).height(index%2?220:180)Text(item.goods_name).fontSize(14)}}})}.onReachEnd(()=>{if(!this.isLoadding){this.isLoadding=truethis.loadMore()}}).columnsTemplate('1fr 1fr').columnsGap(20).rowsGap(20)}.height('100%').width('100%').padding(20)}
}
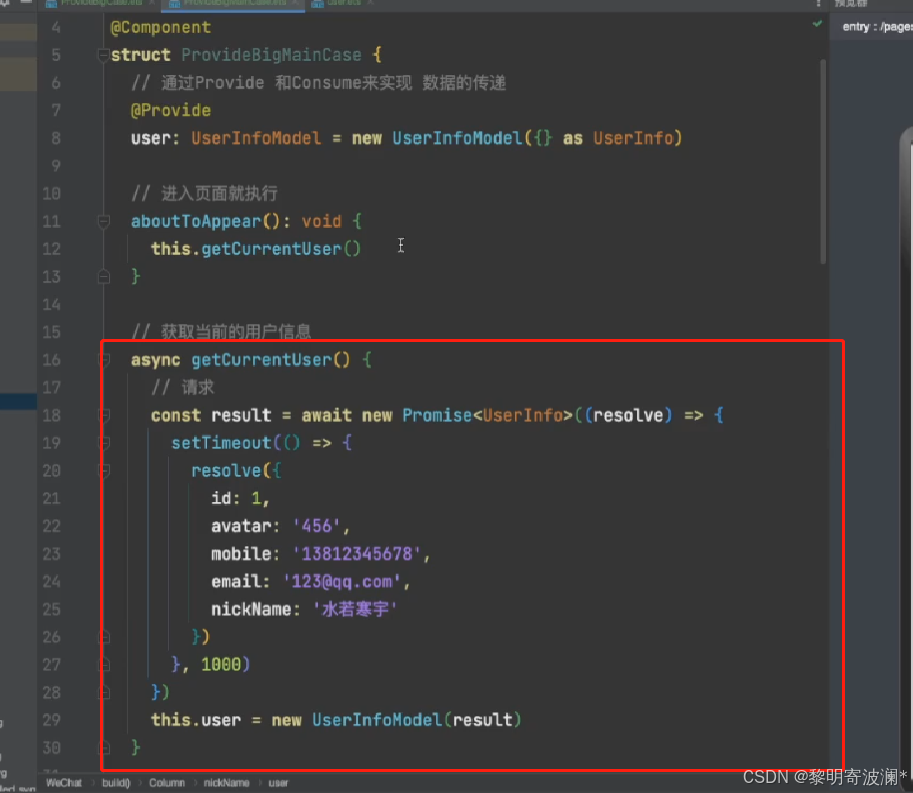
11. async/await
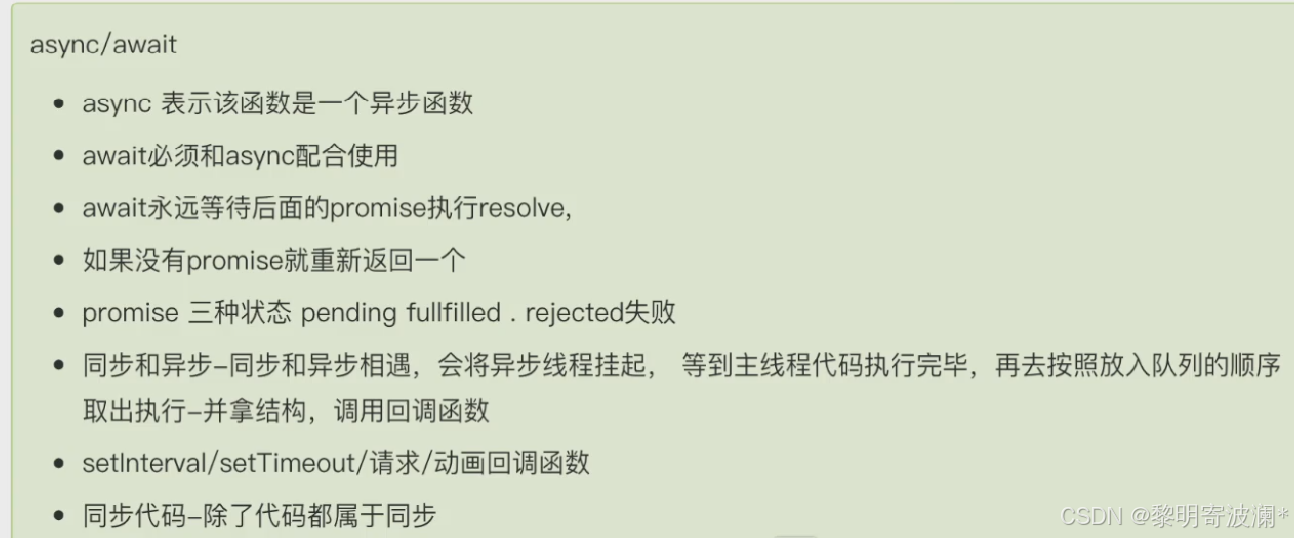
模拟一个网络请求
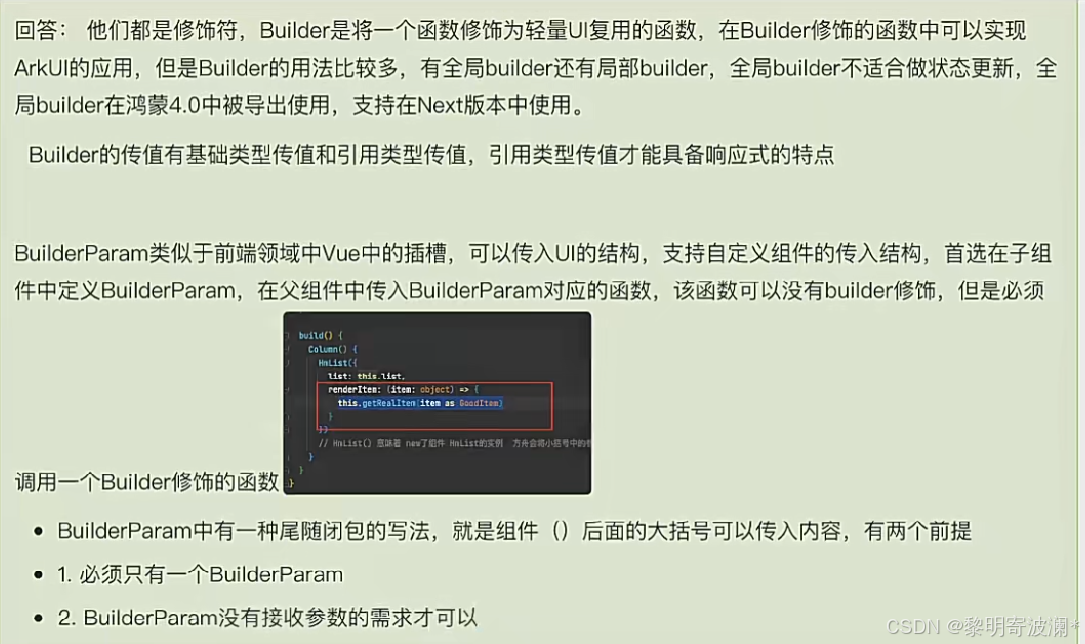
12.Builder和BuilderParams的区别
13.常用的修饰符有哪些
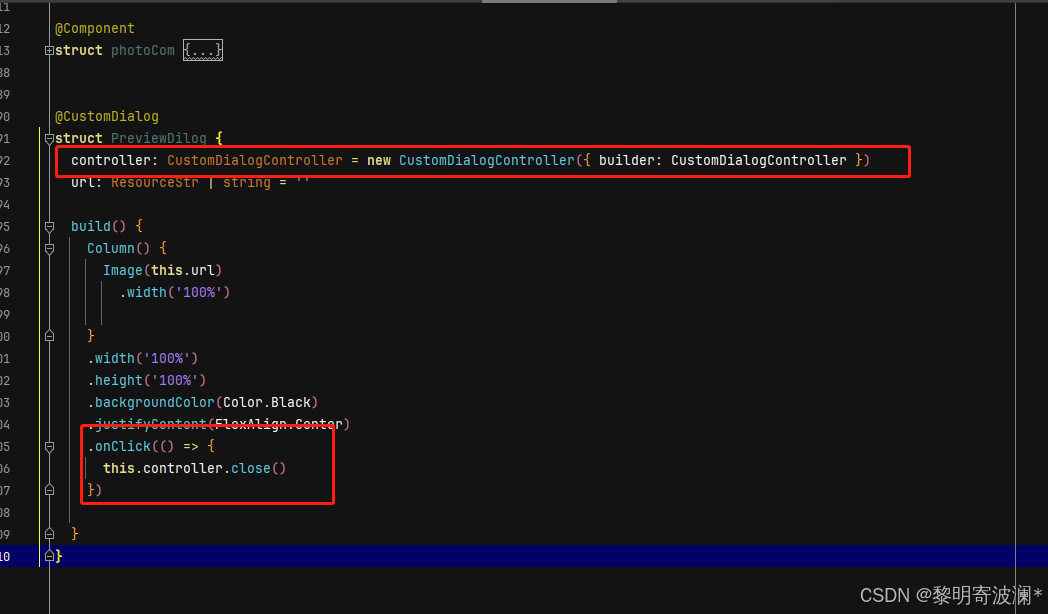
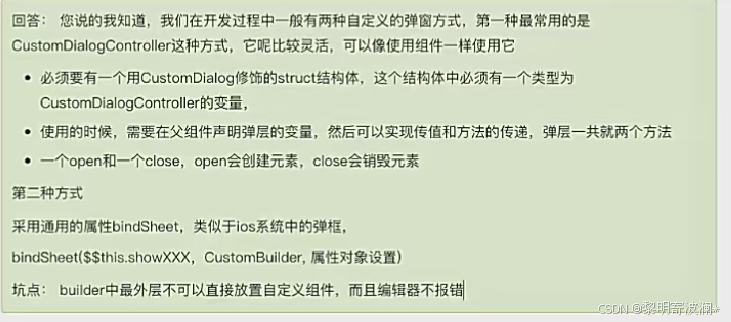
14.CustomDialog的使用
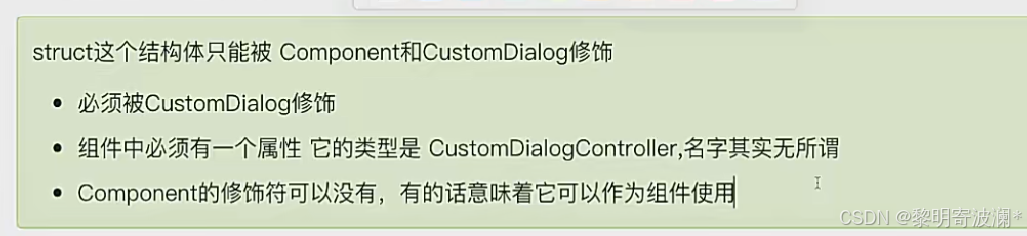
@CustomDialog
struct PreviewDilog {controller: CustomDialogController = new CustomDialogController({ builder: CustomDialogController })url: ResourceStr | string = ''build() {Column() {Image(this.url).width('100%')}.width('100%').height('100%').backgroundColor(Color.Black).justifyContent(FlexAlign.Center).onClick(() => {this.controller.close()})}
}
如果需要使用弹层 ,需要在使用的组件或者页面中显式的声明一个对象
@State selectImage: ResourceStr | string = ''previw: CustomDialogController = new CustomDialogController({builder: PreviewDilog({ url: this.selectImage }),//这里需要传入自定义弹层的对象customStyle: true //是否使用自定义样式})弹层就两个方法
- open--创建弹层组件-显示-会有动画的弹出
- close--销毁组件-退出-会有动画的退出
涉及到Dialog传值
因为open/close会创建和销毁组件,不会存在缓存现象,里边的参数实际上没有任何必要用修饰符
在父组件中调用打开
GridItem() {Image(item.goods_img).aspectRatio(1).onClick(() => {this.selectImage = item.goods_imgthis.previw.open()})}在本身组件中同样可以打开和关闭
15.sheet用法

.bindSheet($$this.isShowPhotoCom, this.sheetBuilder, {showClose: false})$$为什么在这里使用?
因为需要数据驱动视图,视图发生变化,他同样需要更新数据
视图内容
@BuildersheetBuilder() {Column() {photoCom({List: this.List,isShowPhotoCom: this.isShowPhotoCom,maxSelectNum: this.maxSelectNum,showSelectImgs: this.showSelectImgs})}}16.弹窗UI是怎么在页面中使用的
17.常用的修饰符有哪些 -介绍下
- Entry -修饰页面
- Component-修饰成为组件
- Preview-让组件可预览
- State-在组件内部定义响应式数据-必须给初始值
- Prop-接收父组件的响应式数据-可给也可不给初始值
- Builder-声明轻量复用UI
- BuilderParam-接收传入的轻量复用UI-必须给初始值
- CustomDialog-修饰自定义弹层
- Styles-修饰样式复用集合-不允许传参数
- Extend-修饰某个特定组件包的样式复用集合-允许传参数
- Link-可以实现父-子的双向绑定-注意:$$指的是组件内的双向绑定,$$同样可以实现和Link绑定-不允许给初始值
新增-API11
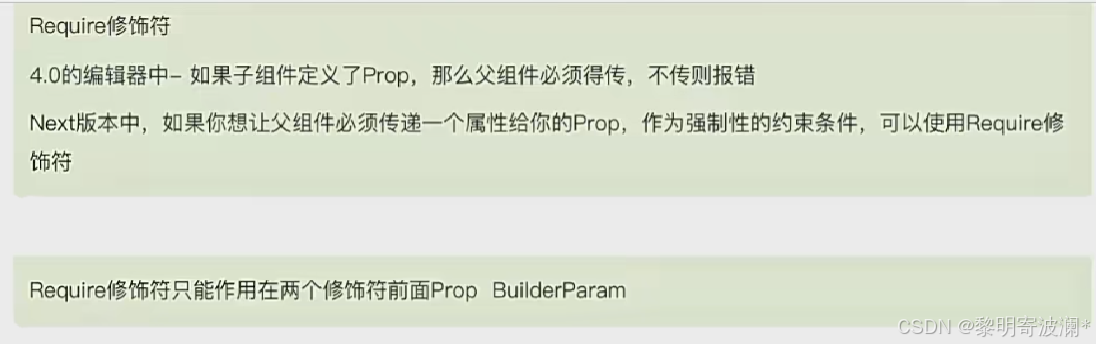
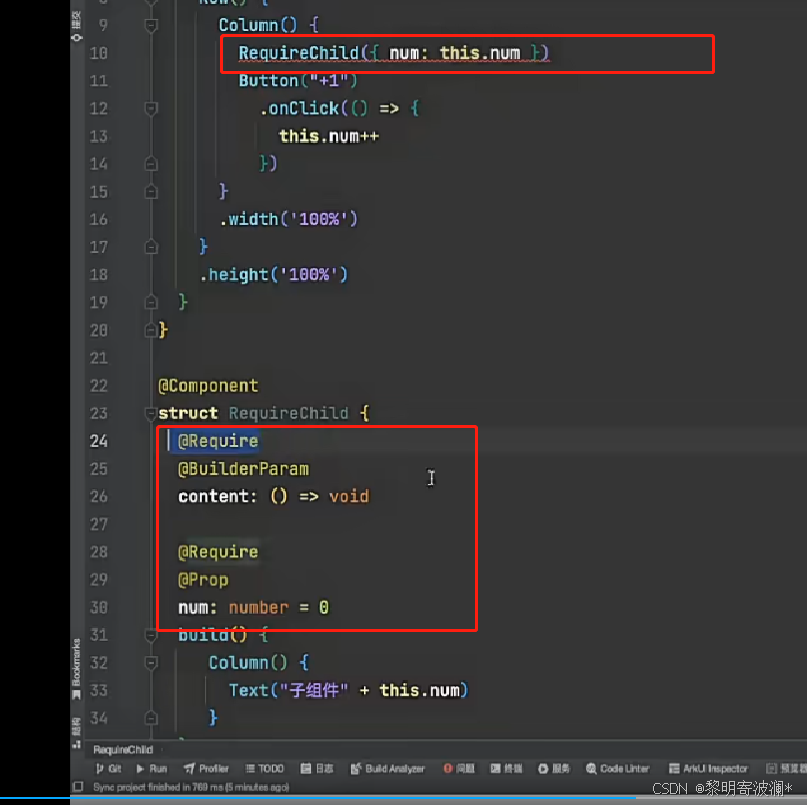
Requir-可以约束Prop和BuilderParam的参数为必须传递
- Track-用来标记一个对象中的哪些字段可以被更新和使用-如果一个Track都没有,那无所谓,只要有一个Track,只有被Track标记的字段才可以使用
- ObjectLink-它可以实现局部的数据更新-但是必须和Observed修饰的class配合使用,不能再Entry修饰的组件中使用ObjectLink,场景是子组件想要局部组件更新
- LocalStorageProp-单向读取LocalStorage共享的属性(必须给初始值)
- LocalStorageLink -双向读取LocalStorage共享的属性 (必须给初始值)
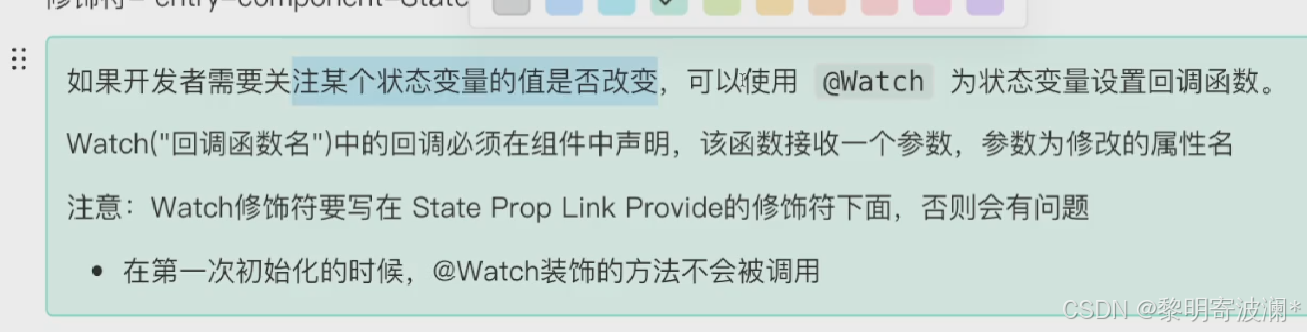
18.watch状态监听器
19.组件通信的方式有哪些?
20.Next新增修饰符
1.Require修饰符
2.Track修饰符

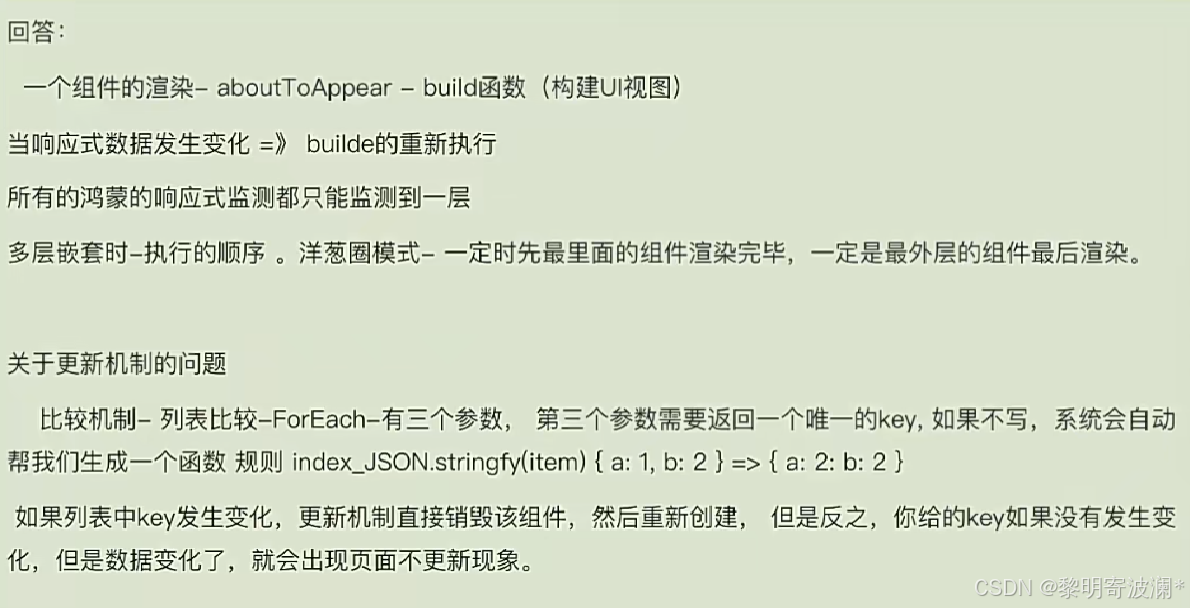
 21.鸿蒙的刷新机制是怎么样的,多层嵌套时,是从build开始刷新吗?
22.全局存储状态有哪些方式?
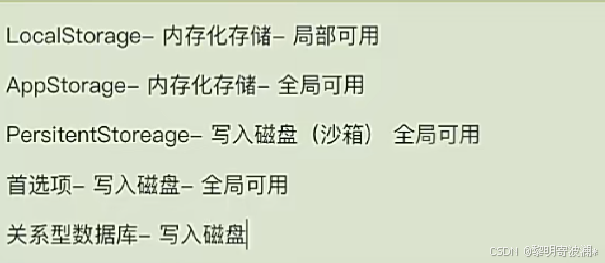
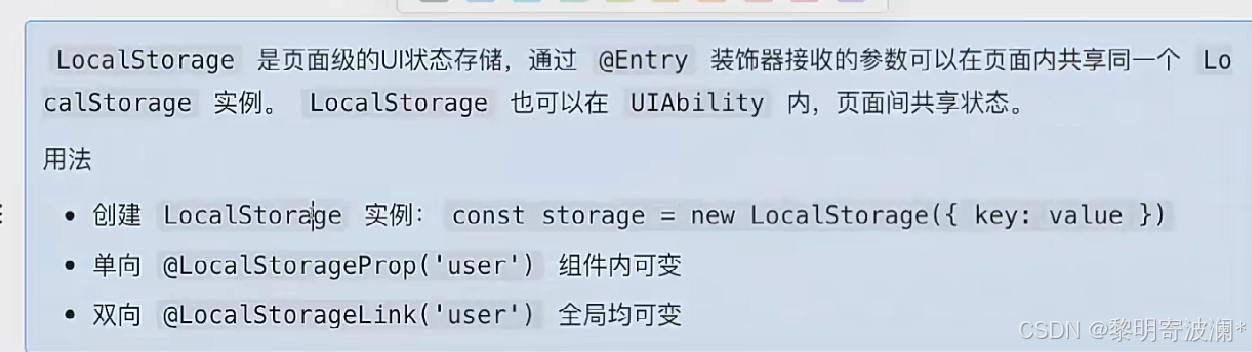
1.UIAbility内状态-LocalStorage
1.1
代码实现
1.首先定义:

2.
1.2在页面中传入
UIAbility中
页面引入:重点代码
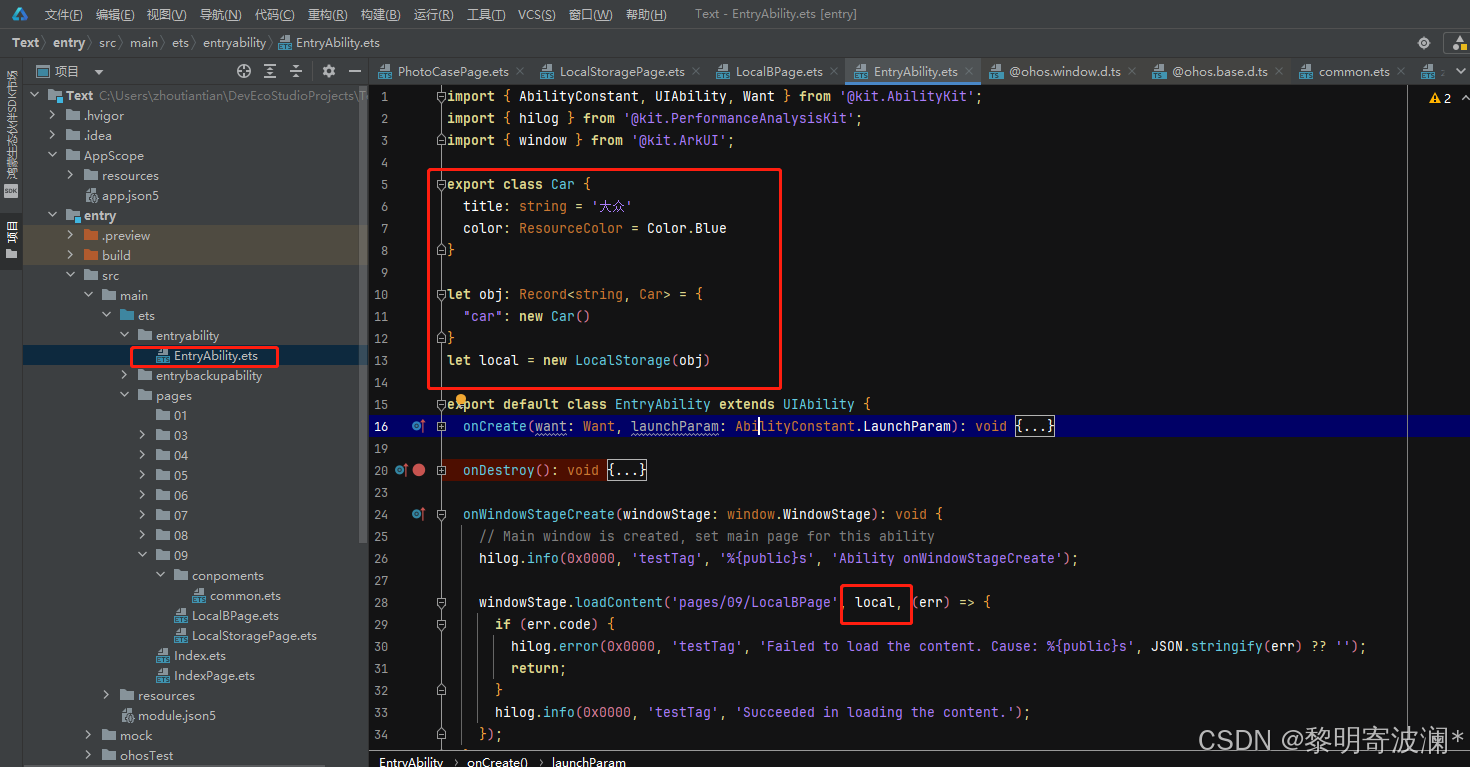
let local = LocalStorage.getShared()@Entry(local)全部代码:
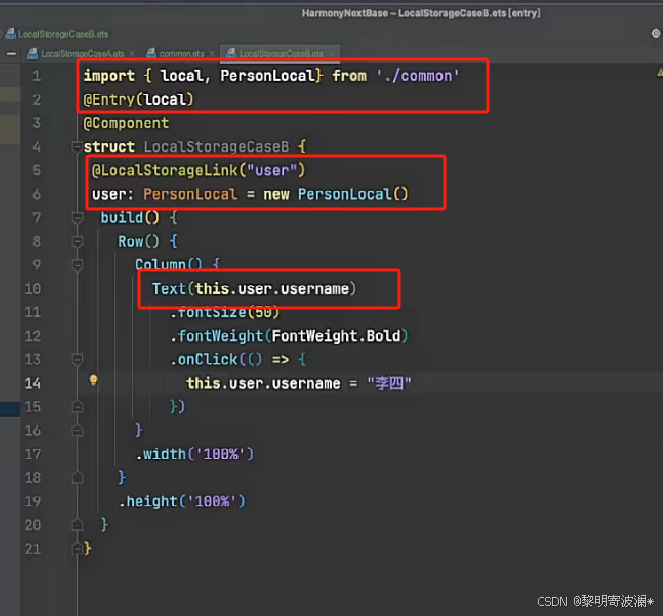
import { Car } from '../../entryability/EntryAbility';let local = LocalStorage.getShared()@Entry(local)
@Component
struct LocalStoragePage {@State message: string = 'Hello World11';@LocalStorageLink('car')car: Car = new Car()build() {RelativeContainer() {Text(this.car.title).id('LocalStoragePageHelloWorld').fontSize(50)}.height('100%').width('100%')}
}
注意:测试全局分享LocalStorage时需要使用模拟器 Preview不支持
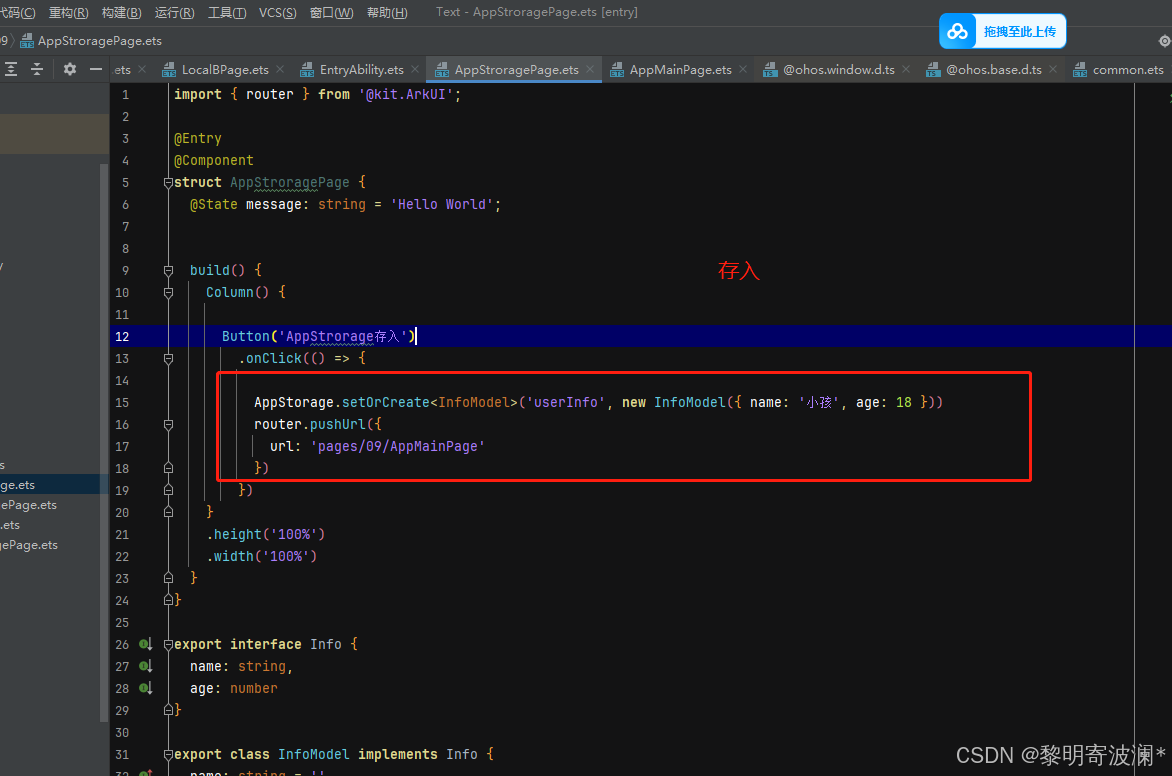
2.应用状态-AppStorage(需要模拟器)

代码
存入
import { router } from '@kit.ArkUI';@Entry
@Component
struct AppStroragePage {@State message: string = 'Hello World';build() {Column() {Button('AppStrorage存入').onClick(() => {AppStorage.setOrCreate<InfoModel>('userInfo', new InfoModel({ name: '小孩', age: 18 }))router.pushUrl({url: 'pages/09/AppMainPage'})})}.height('100%').width('100%')}
}export interface Info {name: string,age: number
}export class InfoModel implements Info {name: string = ''age: number = 0constructor(model: Info) {this.name = model.namethis.age = model.age}
}
2.1获取
import { Info, InfoModel } from './AppStroragePage';@Entry
@Component
struct AppMainPage {@State message: string = 'Hello World';@StorageLink('userInfo')userInfo: InfoModel = new InfoModel({} as Info)build() {RelativeContainer() {Text(this.userInfo.name).id('AppMainPageHelloWorld').fontSize(50).fontWeight(FontWeight.Bold).alignRules({center: { anchor: '__container__', align: VerticalAlign.Center },middle: { anchor: '__container__', align: HorizontalAlign.Center }})}.height('100%').width('100%')}
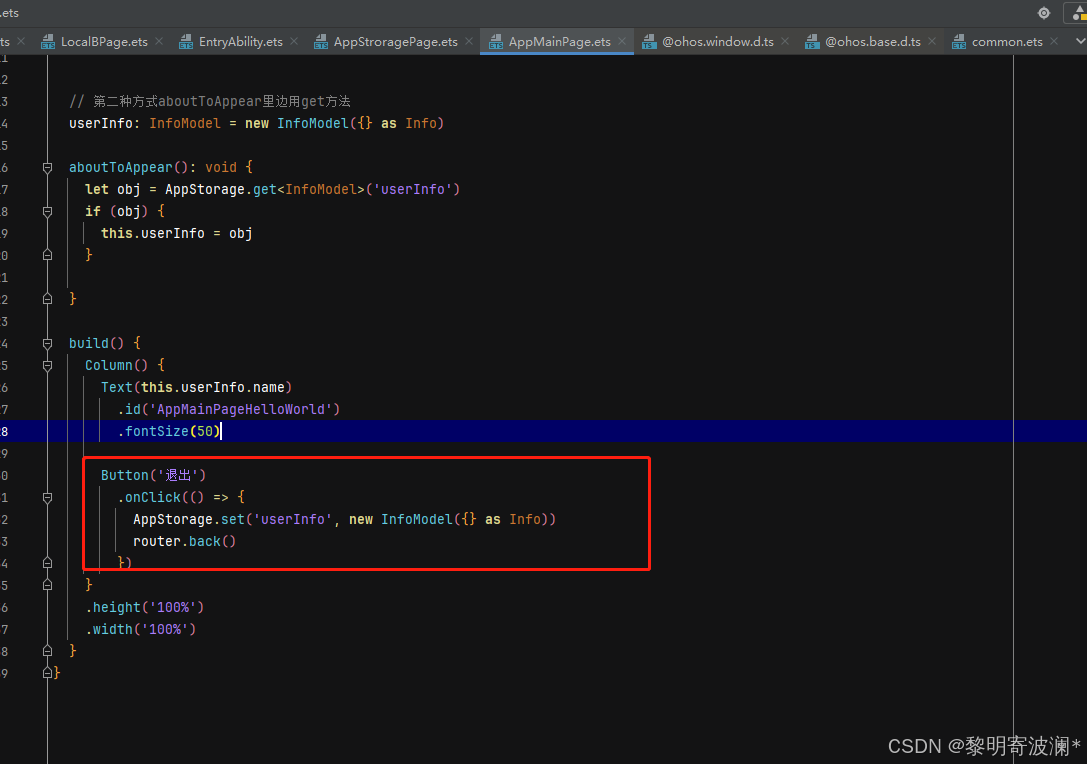
}2.2还有第二种获取方式
import { Info, InfoModel } from './AppStroragePage';
import { router } from '@kit.ArkUI';@Entry
@Component
struct AppMainPage {@State message: string = 'Hello World';// @StorageLink('userInfo')// userInfo: InfoModel = new InfoModel({} as Info)userInfo: InfoModel = new InfoModel({} as Info)aboutToAppear(): void {let obj = AppStorage.get<InfoModel>('userInfo')if (obj) {this.userInfo = obj}}build() {Column() {Text(this.userInfo.name).id('AppMainPageHelloWorld').fontSize(50)Button('退出').onClick(() => {AppStorage.set('userInfo', new InfoModel({} as Info))router.back()})}.height('100%').width('100%')}
}
重点代码部分截图
获取的两种方式

还有一种set方法
3.状态持久化-PersistenStorage
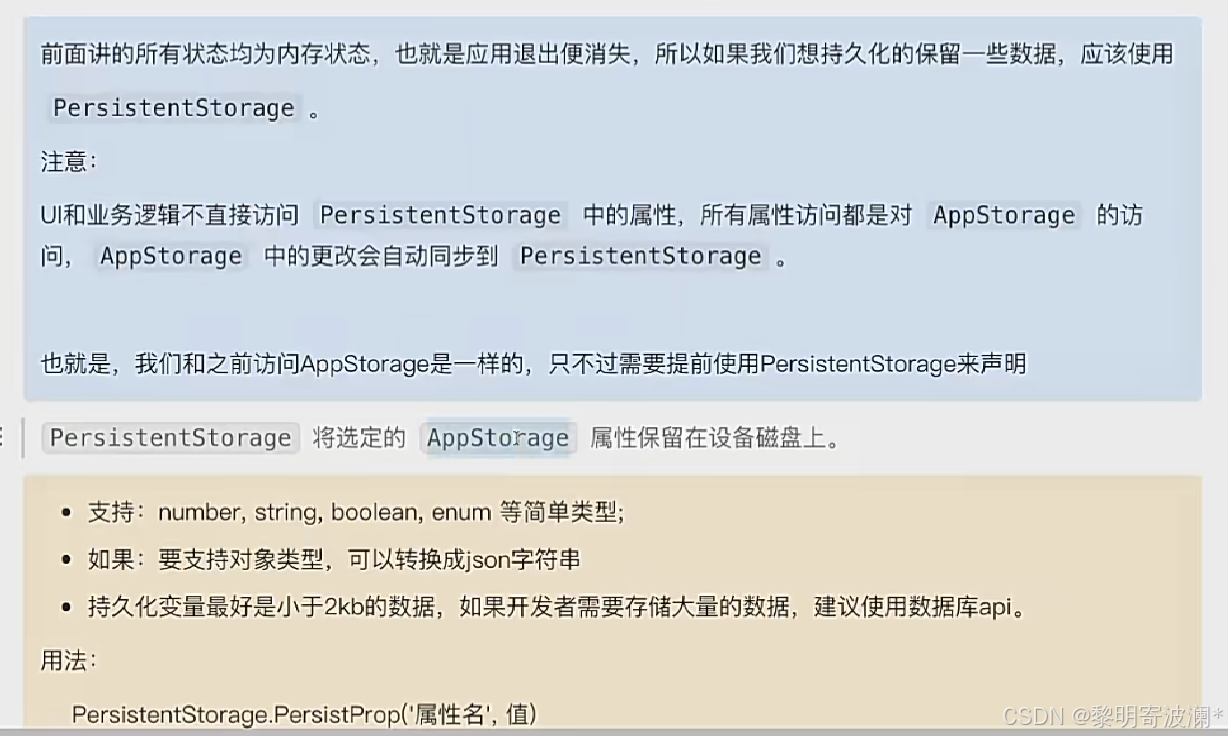
注意:如果使用了持久化,那么AppStorage读取出来的对象实际上是个json字符串
如果没有持久化,那么读取出来的对象就是对象
重点代码截图:
代码:
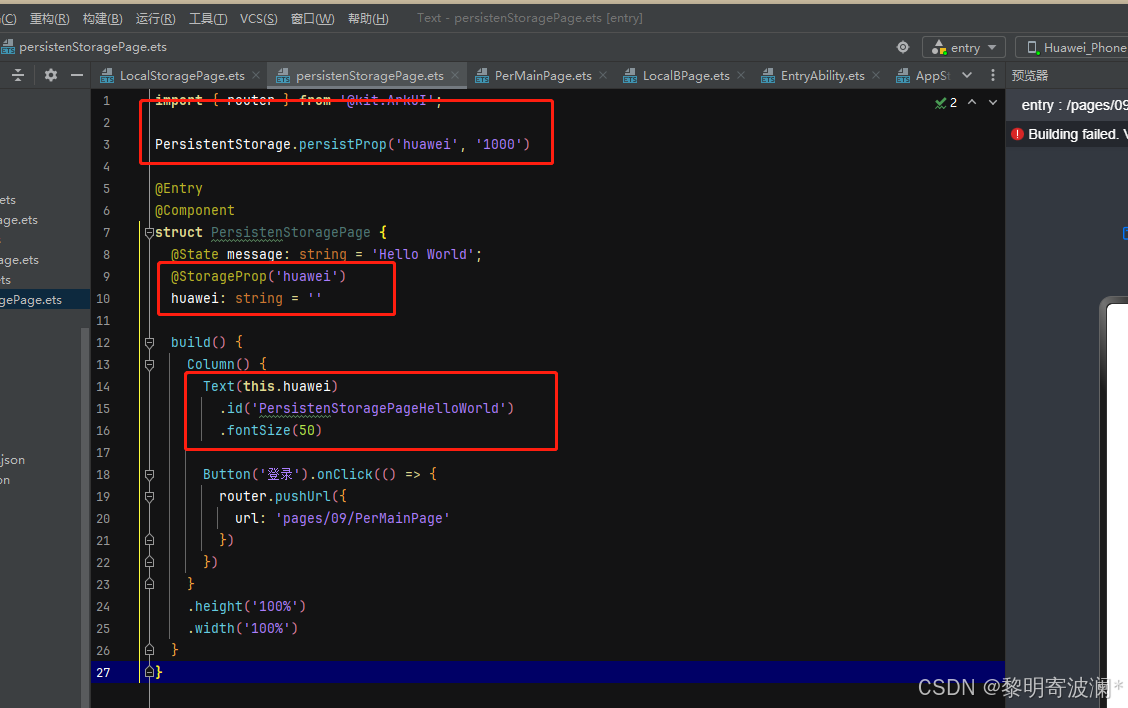
import { router } from '@kit.ArkUI';PersistentStorage.persistProp('huawei', '1000')@Entry
@Component
struct PersistenStoragePage {@State message: string = 'Hello World';@StorageProp('huawei')huawei: string = ''build() {Column() {Text(this.huawei).id('PersistenStoragePageHelloWorld').fontSize(50)Button('登录').onClick(() => {router.pushUrl({url: 'pages/09/PerMainPage'})})}.height('100%').width('100%')}
}
@Entry
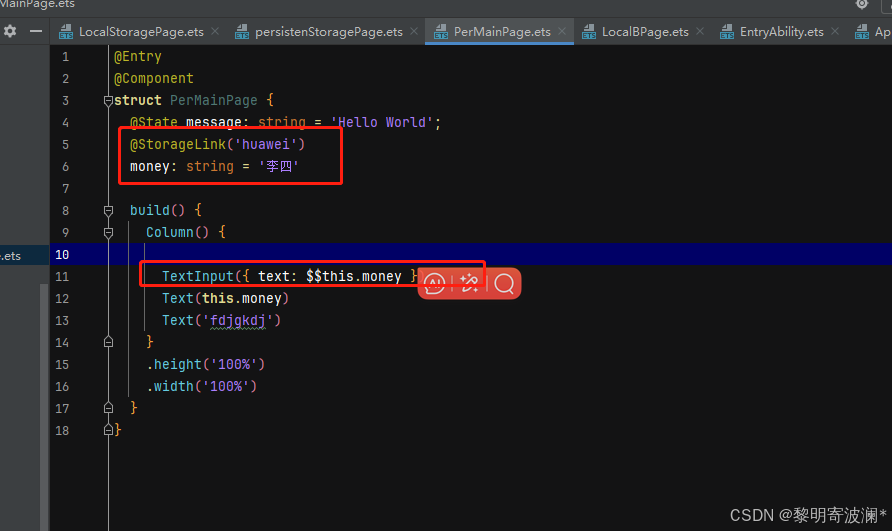
@Component
struct PerMainPage {@State message: string = 'Hello World';@StorageLink('huawei')money: string = '李四'build() {Column() {TextInput({ text: $$this.money })Text(this.money)Text('fdjgkdj')}.height('100%').width('100%')}
}PersistenStorage虽说是存在磁盘里 但是在entryAbility中访问不到 所以不能根据他去调用不同的页面(比如:登录页和主页 因在entryAbility中控制入口页面 一般都是登录页 但因每次都获取不到PersistenStorage的值 所以每次都会进入登录页)
注意:坑点 写入的时候 如果发现对象的地址一致 那就不写入 如要更改复杂类型的地址 例如数组[...list]
4.首选项
写一个首选项
import { preferences } from '@kit.ArkData'
import { Context } from '@kit.AbilityKit'export class TonkenManager {// 获取仓库static async getStore(context?: Context) {return await preferences.getPreferences(getContext() || context, 'token_store')}// 写入数据static async setToken(token: string, context?: Context) {const store = await TonkenManager.getStore(context)store.putSync('my_token', token) //同步写入内容// 写入磁盘await store.flush()}// 写入数据static async getToken(context?: Context) {const store = await TonkenManager.getStore(context)return store.getSync('my_token', '') as string}
}
在登录页 存入一个数据

然后再bility模块获取
看下完整代码吧
登录页代码
import { router } from '@kit.ArkUI';
import { TonkenManager } from './uitils/token';// PersistentStorage.persistProp('huawei', '1000')@Entry
@Component
struct PersistenStoragePage {@State message: string = 'Hello World';@StorageProp('huawei')huawei: string = ''build() {Column() {Text(this.huawei).id('PersistenStoragePageHelloWorld').fontSize(50)Button('登录').onClick(() => {TonkenManager.setToken('123456')router.pushUrl({url: 'pages/09/PerMainPage'})})}.height('100%').width('100%')}
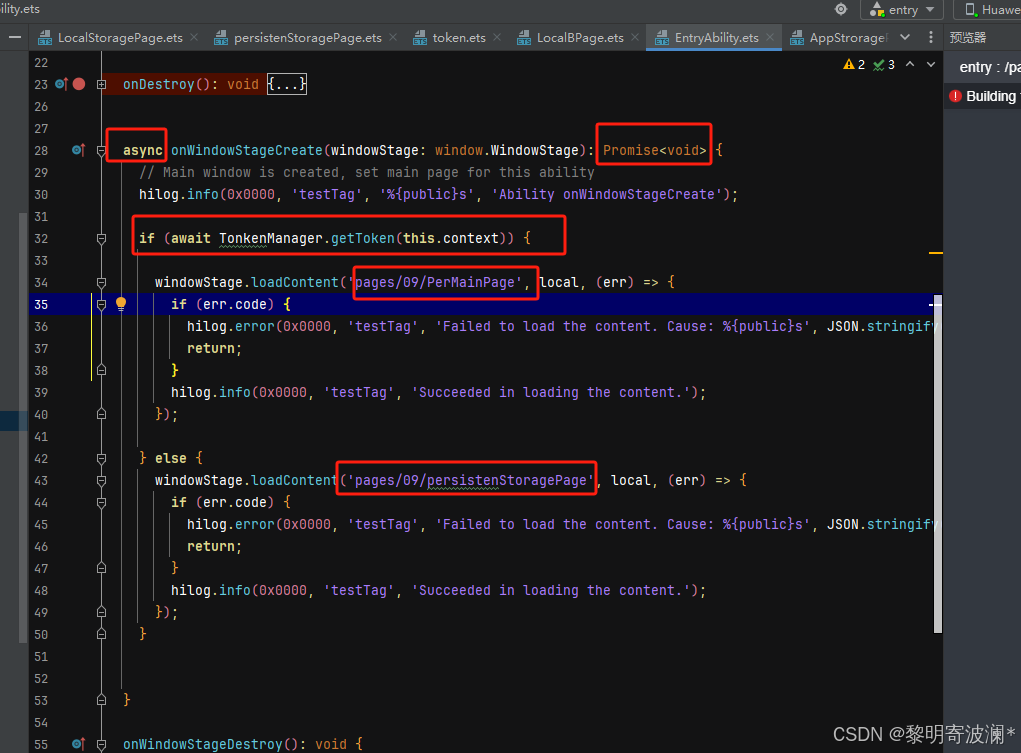
}Ability代码:
async onWindowStageCreate(windowStage: window.WindowStage): Promise<void> {// Main window is created, set main page for this abilityhilog.info(0x0000, 'testTag', '%{public}s', 'Ability onWindowStageCreate');if (await TonkenManager.getToken(this.context)) {windowStage.loadContent('pages/09/PerMainPage', local, (err) => {if (err.code) {hilog.error(0x0000, 'testTag', 'Failed to load the content. Cause: %{public}s', JSON.stringify(err) ?? '');return;}hilog.info(0x0000, 'testTag', 'Succeeded in loading the content.');});} else {windowStage.loadContent('pages/09/persistenStoragePage', local, (err) => {if (err.code) {hilog.error(0x0000, 'testTag', 'Failed to load the content. Cause: %{public}s', JSON.stringify(err) ?? '');return;}hilog.info(0x0000, 'testTag', 'Succeeded in loading the content.');});}}23.HTTP用法、
1.原生用法
hormony原生用法返回的值是字符串类型(取得是res.result)
aboutToAppear(): void {console.log('aboutToAppear')this.sendHttp()}async sendHttp() {const req = http.createHttp()const res =await req.request('https://jsonplaceholder.typicode.com/posts')AlertDialog.show({ message: res.result as string })req.destroy()} }2.第三方库 axios
axios用法返回的值是object类型(取得是res.data)
ohpm install @ohos/axios
Button('获取数据').onClick(() => {this.testaxios()})async testaxios() {// axios的泛型的第二个参数是声明返回数据的类型的结构let res = await axios.get<object, AxiosResponse<object, null>>('https://jsonplaceholder.typicode.com/posts')AlertDialog.show({ message: JSON.stringify(res.data) })}24.进程 线程
进程通信
1.进程
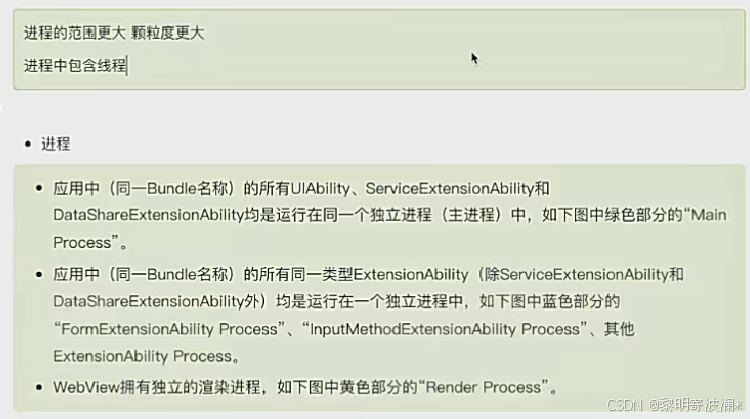
进程通信

2.线程
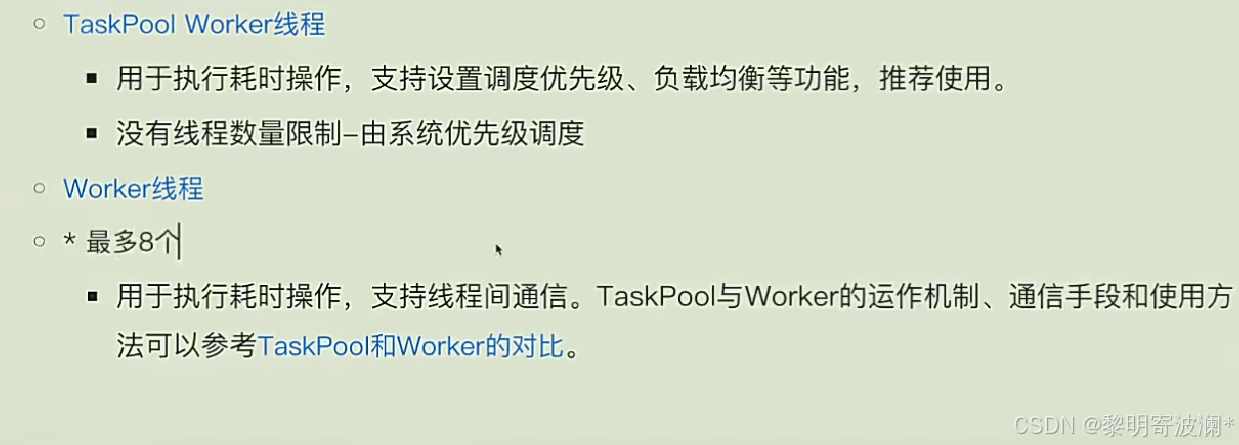
TaskPool多线程代码:
import { taskpool } from '@kit.ArkTS';@Entry
@Component
struct TaskpoolPage {@State message: string = 'Hello World';// 开启多线程方法beginTaskPool() {taskpool.execute(getData)taskpool.execute(addData)}build() {Column() {Button('开启多线程').onClick(() => {// 调用开启多线程方法this.beginTaskPool()})}.height('100%').width('100%')}
}// 第一个线程方法
@Concurrent
function getData() {for (let index = 0; index < 10000; index++) {console.log('任务1', index)}
}// 第二个线程方法
@Concurrent
function addData() {for (let index = 10000; index > 0; index--) {console.log('任务2', index)}
}
然后看下控制台
 Worker进程代码:
先新建个worker

然后建一个worker页面
import worker, { MessageEvents } from '@ohos.worker';@Entry
@Component
struct WorkCasePage {@State message: string = 'Hello World';build() {Column() {Button('worker开启多线程').onClick(() => {let w = new worker.ThreadWorker('entry/ets/workers/Worker')w.postMessage('我是测试woker页面')w.onmessage = (e: MessageEvents) => {console.log(e.data, 'worker页面接收到了')w.terminate() //自毁线程}})}.height('100%').width('100%')}
}
woker页面里边的代码
import { ErrorEvent, MessageEvents, ThreadWorkerGlobalScope, worker } from '@kit.ArkTS';const workerPort: ThreadWorkerGlobalScope = worker.workerPort;/*** Defines the event handler to be called when the worker thread receives a message sent by the host thread.* The event handler is executed in the worker thread.** @param e message data*/
workerPort.onmessage = (e: MessageEvents) => {console.log(e.data, 'worker页面收到')for (let index = 0; index < 10000; index++) {console.log(index.toString(), '多线程执行')}workerPort.postMessage('我已经干完活了')}/*** Defines the event handler to be called when the worker receives a message that cannot be deserialized.* The event handler is executed in the worker thread.** @param e message data*/
workerPort.onmessageerror = (e: MessageEvents) => {
}/*** Defines the event handler to be called when an exception occurs during worker execution.* The event handler is executed in the worker thread.** @param e error message*/
workerPort.onerror = (e: ErrorEvent) => {
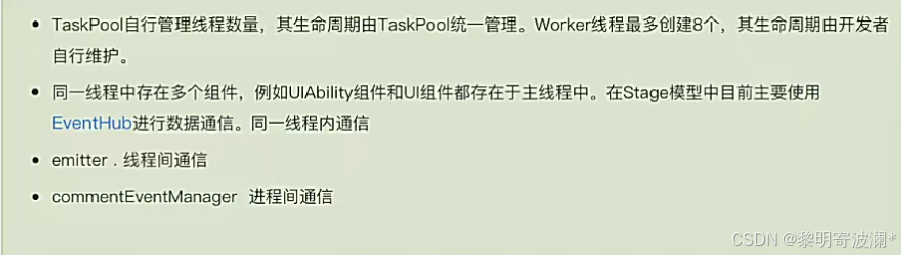
}3.事件总线:线程内通信,线程间通信 ,进程间通信
3.1线程内通信
发生改变
getContext().eventHub.emit('change_cart')监听改变 (一定要在aboutToAppear生命周期中进行监听)
aboutToAppear(): void {getContext().eventHub.on('change_cart', () => {console.log('发生改变了')})}这篇关于HarmonyOS NEXT星河版零基础入门(3)的文章就介绍到这儿,希望我们推荐的文章对编程师们有所帮助!


