本文主要是介绍H5 svg (二),希望对大家解决编程问题提供一定的参考价值,需要的开发者们随着小编来一起学习吧!
优化:
<!DOCTYPE html>
<html lang="en"><head><meta charset="UTF-8"><meta name="viewport" content="width=device-width, initial-scale=1.0"><meta http-equiv="X-UA-Compatible" content="ie=edge"><title>Svg 2</title>
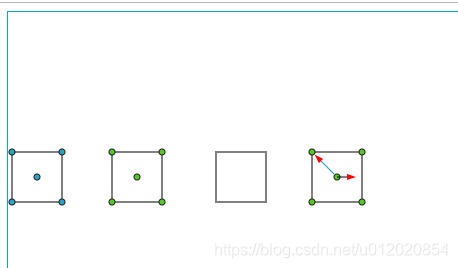
</head><body><!--(0,0)-----→ x 方向 (屏幕坐标系)--><!---- | --><!--y ↓ 方向 --><svg width="800" height="600" preserveAspectRatio="xMidYMid meet" viewbox="0 0 800 600"style="border:1px solid rgb(0,170,204)"><!-- 优化 --><!-- 控制点 --><defs><ellipse id="control-pos" cx="0" cy="0" rx="3" ry="3" style="stroke: #201f1a;fill: #26a4ca;"></ellipse></defs><!---画矩形--- x1,y1 起始点; x2,y2终点 -------------------------------------><rect x="4" y="140" width="50" height="50" style="stroke: black;fill: none;"></rect><!-- 中心点 --><use xlink:href="#control-pos" x="29" y="165" /><!-- 左上 --><use xlink:href="#control-pos" x="4" y="140" /><!-- 右上 --><use xlink:href="#control-pos" x="54" y="140" /><!-- 左下 --><use xlink:href="#control-pos" x="4" y="190" /><!-- 右下 --><use xlink:href="#control-pos" x="54" y="190" /><!-- 再优化 --><!-- 箭头 --><defs><marker id="arrow" markerWidth="10" markerHeight="10" refx="0" refy="3" orient="auto"markerUnits="strokeWidth"><path d="M 0 0 L 0 6 L 9 3 z" fill="#f00" /></marker></defs><defs><g id="group-pos"><!-- 这里我们发现修改 style 是无效的 --><!-- <use xlink:href="#control-pos" style="stroke: #201f1a;fill: #26ca8b;" /> --><ellipse id="control-pos1" cx="0" cy="0" rx="3" ry="3" style="stroke: #201f1a;fill: #54ca26;"></ellipse></g><g id="arrow-line"><line id="arrow-line1" x1="0" y1="0" x2="10" y2="0" stroke="#000" stroke-width="1"marker-end="url(#arrow)" /></g></defs><defs><g id="group1"><!---画矩形--- x1,y1 起始点; x2,y2终点 -------------------------------------><rect id="rect2" x="4" y="140" width="50" height="50" style="stroke: black;fill: none;"></rect><!-- 中心点 --><use xlink:href="#group-pos" x="29" y="165" /><!-- 左上 --><use xlink:href="#group-pos" x="4" y="140" /><!-- 右上 --><use xlink:href="#group-pos" x="54" y="140" /><!-- 左下 --><use xlink:href="#group-pos" x="4" y="190" /><!-- 右下 --><use xlink:href="#group-pos" x="54" y="190" /></g><g id="group2"><!---画矩形--- x1,y1 起始点; x2,y2终点 -------------------------------------><rect x="4" y="140" width="50" height="50" style="stroke: black;fill: none;"></rect><!-- 中心点 --><use xlink:href="#group-pos" x="29" y="165" /><!-- 左上 --><use xlink:href="#group-pos" x="4" y="140" /><!-- 右上 --><use xlink:href="#group-pos" x="54" y="140" /><!-- 左下 --><use xlink:href="#group-pos" x="4" y="190" /><!-- 右下 --><use xlink:href="#group-pos" x="54" y="190" /><!-- 我们这样使用只能修改它的位姿,而不能修改它的指向 --><use xlink:href="#arrow-line" x="29" y="165" /><!-- 估算 -3,-3 保证在圆圈的外部,如果图太小,这里可以-2,-2 加上箭头的长度 +6 +6 --><line x1="26" y1="162" x2="13" y2="149" style="stroke:#26a4ca" stroke-width="1"marker-end="url(#arrow)" /></g></defs><!-- 注意这里的 y=0;其实是 rect2.y+这里的坐标 --><use xlink:href="#group1" x="100" y="0" /><!-- 还可以单独使用组内的单个图元 --><use xlink:href="#rect2" x="204" y="0" /><!-- group2 --><use xlink:href="#group2" x="300" y="0" /></svg>
</body></html>
效果:
H5 svg (一)
这篇关于H5 svg (二)的文章就介绍到这儿,希望我们推荐的文章对编程师们有所帮助!


