本文主要是介绍ffmpeg学习十一:封装音视频到同一个文件(muxing.c源码分析),希望对大家解决编程问题提供一定的参考价值,需要的开发者们随着小编来一起学习吧!
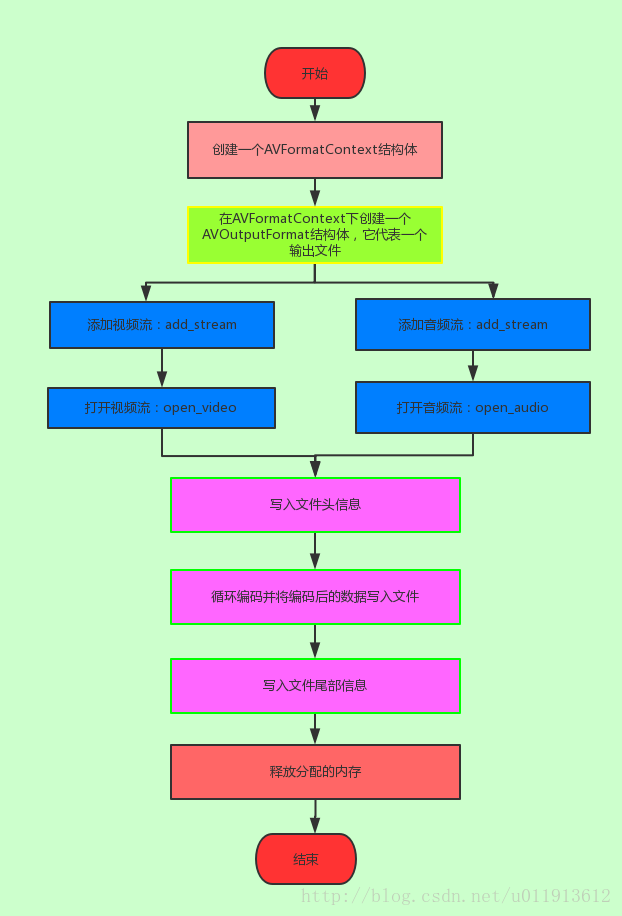
这一节学习怎么把音频流和视频按一定的格式封装成一个文件。ffmpeg所给的例子muxing.c很好的演示封装的过程,因此,这一节主要是学习muxing.c这个文件。
这个文件的路径为:doc/examples/muxing.c
首先感受下,运行结果如下:
直接执行./muxing xxx.xxx即可

这里插讲以下使用ffmpeg生成gif的命令:
当我们执行muxing可执行文件的时候,比如,执行./muxing hello.mp4,就会生成Mp4文件,我们可以将其转为gif格式的图片:
ffmpeg -i hello.mp4 -r 10 -t 1 hello.gif
-i:指定输入文件
-r:帧率,一秒钟10帧
-t:制定gif的时间长度,这里这制定1s钟。
main函数
muxing.c的main函数如下:
/**************************************************************/
/* media file output */int main(int argc, char **argv)
{OutputStream video_st = { 0 }, audio_st = { 0 };const char *filename;AVOutputFormat *fmt;AVFormatContext *oc;AVCodec *audio_codec, *video_codec;int ret;int have_video = 0, have_audio = 0;int encode_video = 0, encode_audio = 0;AVDictionary *opt = NULL;int i;/* Initialize libavcodec, and register all codecs and formats. */av_register_all();if (argc < 2) {printf("usage: %s output_file\n""API example program to output a media file with libavformat.\n""This program generates a synthetic audio and video stream, encodes and\n""muxes them into a file named output_file.\n""The output format is automatically guessed according to the file extension.\n""Raw images can also be output by using '%%d' in the filename.\n""\n", argv[0]);
        return 1;}filename = argv[1];for (i = 2; i+1 < argc; i+=2) {if (!strcmp(argv[i], "-flags") || !strcmp(argv[i], "-fflags"))av_dict_set(&opt, argv[i]+1, argv[i+1], 0);}/* allocate the output media context */avformat_alloc_output_context2(&oc, NULL, NULL, filename);if (!oc) {printf("Could not deduce output format from file extension: using MPEG.\n");avformat_alloc_output_context2(&oc, NULL, "mpeg", filename);}if (!oc)
        return 1;fmt = oc->oformat;/* Add the audio and video streams using the default format codecs* and initialize the codecs. */if (fmt->video_codec != AV_CODEC_ID_NONE) {add_stream(&video_st, oc, &video_codec, fmt->video_codec);have_video = 1;encode_video = 1;}if (fmt->audio_codec != AV_CODEC_ID_NONE) {add_stream(&audio_st, oc, &audio_codec, fmt->audio_codec);have_audio = 1;encode_audio = 1;}/* Now that all the parameters are set, we can open the audio and* video codecs and allocate the necessary encode buffers. */if (have_video)open_video(oc, video_codec, &video_st, opt);if (have_audio)open_audio(oc, audio_codec, &audio_st, opt);av_dump_format(oc, 0, filename, 1);/* open the output file, if needed */if (!(fmt->flags & AVFMT_NOFILE)) {ret = avio_open(&oc->pb, filename, AVIO_FLAG_WRITE);if (ret < 0) {fprintf(stderr, "Could not open '%s': %s\n", filename,av_err2str(ret));
            return 1;}}/* Write the stream header, if any. */ret = avformat_write_header(oc, &opt);if (ret < 0) {fprintf(stderr, "Error occurred when opening output file: %s\n",av_err2str(ret));
        return 1;}while (encode_video || encode_audio) {/* select the stream to encode */if (encode_video &&(!encode_audio || av_compare_ts(video_st.next_pts, video_st.enc->time_base,audio_st.next_pts, audio_st.enc->time_base) <= 0)) {encode_video = !write_video_frame(oc, &video_st);} else {encode_audio = !write_audio_frame(oc, &audio_st);}}/* Write the trailer, if any. The trailer must be written before you* close the CodecContexts open when you wrote the header; otherwise* av_write_trailer() may try to use memory that was freed on* av_codec_close(). */av_write_trailer(oc);/* Close each codec. */if (have_video)close_stream(oc, &video_st);if (have_audio)close_stream(oc, &audio_st);if (!(fmt->flags & AVFMT_NOFILE))/* Close the output file. */avio_closep(&oc->pb);/* free the stream */avformat_free_context(oc);
return 0;
}
我们可以梳理一下这个过程:
add_stream
接下来看看如何添加一个输出流的:
/* Add an output stream. */
static void add_stream(OutputStream *ost, AVFormatContext *oc,AVCodec **codec,enum AVCodecID codec_id)
{AVCodecContext *c;int i;/* find the encoder */*codec = avcodec_find_encoder(codec_id);if (!(*codec)) {fprintf(stderr, "Could not find encoder for '%s'\n",avcodec_get_name(codec_id));exit(1);}ost->st = avformat_new_stream(oc, NULL);
这篇关于ffmpeg学习十一:封装音视频到同一个文件(muxing.c源码分析)的文章就介绍到这儿,希望我们推荐的文章对编程师们有所帮助!


