本文主要是介绍人脑功能连接与相似性分析:基于Python,希望对大家解决编程问题提供一定的参考价值,需要的开发者们随着小编来一起学习吧!
文章来源于微信公众号(茗创科技),欢迎有兴趣的朋友搜索关注。
本文将以人脑腹侧颞叶皮层的多体素模式分析(MVPA)来探讨人脑功能连接与相似性分析。MVPA被认为是一个监督分类问题,分类器试图捕捉fMRI活动的空间模式和实验条件之间的关系,从而推断大脑区域和网络的功能作用。从机器学习的角度来看,这里输入(input)的通常是来自神经科学实验的fMRI数据,输出(output)是有关类别的概率分布。在本示例中将尝试解码人类被试所看到的视觉刺激类别(面孔、猫、椅子、鞋子、房子、剪刀……)。
使用“nilearn”框架从web上下载Haxby数据集,Haxby数据集是一个基于区组设计4-D时间序列的fMRI数据集,来自于人脸和物体表征的研究。由6名被试组成,每名被试完成12组实验。在每组实验中,让被试观看8种物体类别的灰度图像,每组以24秒的休息时间间隔开来。每张图像呈现500ms,紧接着是1500ms的刺激间隔。全脑fMRI数据以2.5s的像重复时间记录,一种刺激block约含9个像。第6个4-D fMRI时间序列图像数据除外,它由每个被试的高分辨率解剖图像组成,形状为1452个像,包含40x64x64个体素。
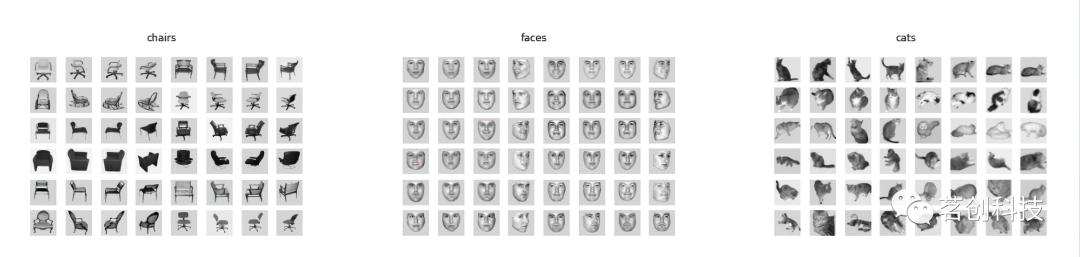
部分视觉刺激示例(Haxby, 2001)
首先,安装Python包,复制并粘贴以下代码进行安装。
!pip install umap
!pip install pipreqs
!pip install lazypredict
!pip install nibabel
!pip install nilearn
!pip install -U kaleidotry:import sklearnprint('Scikit-learn is available, version', sklearn.__version__)except:!pip install scikit-learntry:import numpy as npprint('Numpy is available, version', np.__version__)except:!pip install numpytry:import pandas as pdprint('Pandas is available, version', pd.__version__)except:!pip install pandastry:import scipyprint(' Scipy is available, version', scipy.__version__)except:!pip install scipytry:import plotlyexcept:!pip install plotly
然后,导入所有需要用到的Python包。如果想保存结果,可以创建一个名为“images”和“results”的文件夹,或者删除下面的66-67行。
from __future__ import print_function, division# Basics:
import numpy as np,pandas as pd, matplotlib.pyplot as plt
import os, random, time, sys, copy, math, pickle# interactive mode
plt.ion()# Ignore warnings
import warnings
warnings.filterwarnings("ignore")# For plotting
import plotly.io as plt_io
import plotly.graph_objects as go
%matplotlib inline# Dimension Reduction Algorithms:
from sklearn.decomposition import PCA
from sklearn.manifold import TSNE
from sklearn.discriminant_analysis import LinearDiscriminantAnalysis as LDA
from sklearn.decomposition import FastICA
from sklearn.decomposition import NMF
import umap# Transformations
from sklearn.preprocessing import StandardScaler
from sklearn.preprocessing import MinMaxScaler# Metrics:
from sklearn.metrics import classification_report# Train-Test Splitter:
from sklearn.model_selection import train_test_split# For Classical ML algorithms:
from lazypredict.Supervised import LazyClassifier# Utilies:
from tqdm import tqdm# For distance measurements:
from scipy.spatial.distance import cdist# Extras:
from abc import abstractmethod
from typing import Callable, Iterable, List, Tuple# Set true for Google Colab:
COLAB = Falseif COLAB:# To access Google Drive:from google.colab import drivedrive.mount("/content/gdrive")# For neuroimaging:
from nibabel.testing import data_path
from nilearn import plotting as nplt
from nilearn.input_data import NiftiMasker
from nilearn import datasets
from nilearn import plotting
from nilearn.image import mean_img
from nilearn.image import index_img
import nibabel as nib
from nilearn import imageprint("NumPy Version: ", np.__version__)root_dir = os.getcwd()
image_results_dir = os.path.join(root_dir, 'images')
results_dir = os.path.join(root_dir, 'results')print('Working Directory: \n ', root_dir)# Creating requirements.txt file
!pip3 freeze > requirements.txt
为了理解Haxby数据集,请阅读下面的文档字符串。注意,从网上下载数据大约需要30分钟,这取决于你的下载速度等方面的原因。
"""
Experimental View of the Haxby (Faces and Objects in Ventral Temporal Cortex (fMRI)) Dataset:
This is a block-design fMRI dataset (Haxby) from a study on face and object representation in
human ventral temporal cortex. It consists of 6 subjects with 12 runs per subject.
In each run, the subjects passively viewed greyscale images of eight object categories,
grouped in 24s blocks separated by rest periods. Each image was shown for 500ms
and was followed by a 1500ms inter-stimulus interval.
Full-brain fMRI data were recorded with a volume repetition time of 2.5s,
thus, a stimulus block was covered by roughly 9 volumes.---
Dataset Description1. anat.nii.gz- High resolution anatomical image. For subject 6 there is no anatomical image available.2.bold.nii.gz- 4D fMRI timeseries image. (1452 volumes with 40 x 64 x 64 voxels,
corresponding to a voxel size of 3.5 x 3.75 x 3.75 mm and
a volume repetition time of 2.5 seconds).
The timeseries contains all 12 runs of the original experiment,
concatenated in a single file. Please note, that the timeseries signal is not detrended.3.mask*.nii.gz- Various masks in functional space provided by the original authors.
“vt” refers to “ventral temporal”, “face” and “house” masks are GLM contrast based localizer maps.4.labels.txt- A two-column text file with the stimulation condition and the corresponding experimental run for
each volume in the timeseries image. Labels are given in literal form (e.g. ‘face’).
---
We have 8 different stimuli categories that are :
scissors, face, cat, scrambledpix, bottle, chair, shoe, house.
We'll work with haxby dataset that can be downloaded directly from the neuroimaging library Nilearn.
There are 6 subjects in the experiment that will be downloaded seperately with their fMRI images and masks.
These fMRI images are 4-D nifti images.
"""# There are 6 number of subjects in the experiment:
haxby_dataset = datasets.fetch_haxby(subjects= [1,2,3,4,5,6])
获取Haxby数据集后,接下来理解数据结构并将其转换为NumPy数组以进行进一步处理。
# Load behavioral information
behavioral = pd.read_csv(haxby_dataset.session_target[0], delimiter=' ')
behavioral.head()# Output:
"""
#Out[5]:
labels  chunks
0  rest  0
1  rest  0
2  rest  0
3  rest  0
4  rest  0
"""# Visual Stimuli Categories:
for stimuli in np.unique(behavioral['labels']).tolist():print(stimuli)"""
bottle
cat
chair
face
house
rest
scissors
scrambledpix
shoe
"""
可以看到,有8个刺激类别。(忽略“rest”类别,因为它没有提供额外信息)
stimuli_categories = ['scissors','face', 'cat','scrambledpix','bottle','chair','shoe','house'
]num_subjects = 6for subject in range(num_subjects):   # 'func' is a list of filenames: one for each subjectfmri_filename = haxby_dataset.func[subject]# print basic information on the datasetprint('First subject functional nifti images (4D) are at: %s' %fmri_filename)  # 4D data"""
First subject functional nifti images (4D) are at: C:\Users\Administrator/nilearn_data\haxby2001\subj1\bold.nii.gz
First subject functional nifti images (4D) are at: C:\Users\Administrator/nilearn_data\haxby2001\subj2\bold.nii.gz
First subject functional nifti images (4D) are at: C:\Users\Administrator/nilearn_data\haxby2001\subj3\bold.nii.gz
First subject functional nifti images (4D) are at: C:\Users\Administrator/nilearn_data\haxby2001\subj4\bold.nii.gz
First subject functional nifti images (4D) are at: C:\Users\Administrator/nilearn_data\haxby2001\subj5\bold.nii.gz
First subject functional nifti images (4D) are at: C:\Users\Administrator/nilearn_data\haxby2001\subj6\bold.nii.gz
"""
删除“rest”条件数据,并探究数据形状,如下所示。
# Creating conditional categories:
conditions = behavioral['labels']# We ignore rest condition:
condition_mask = conditions.isin(stimuli_categories).tolist()fmri_niimgs = index_img(fmri_filename, condition_mask)conditions = conditions[condition_mask]# Convert to numpy array
conditions = conditions.values
print(conditions.shape)""""
(864,)
"""# (depth, spatial dimension 1, spatial dimension 2, # of experiments)
print(fmri_niimgs.get_data().shape)"""
(40, 64, 64, 864)
"""
一共有864个时间序列数据。固定时间的fMRI数据的大小为40x64x64,其中40表示三维图像的深度,两个64表示空间维度。因此,这里是4维时间序列图像数据。先来看看实验中6个被试的数据情况,所有被试都有864个时间序列数据。
for subject_id in range(num_subjects):label = pd.read_csv(haxby_dataset.session_target[subject_id], delimiter=' ')# Creating conditional categories:conditions = behavioral['labels']condition_mask = conditions.isin(stimuli_categories).tolist()conditions = conditions[condition_mask]# Convert to numpy arrayconditions = conditions.valuesprint(conditions.shape)"""
(864,)
(864,)
(864,)
(864,)
(864,)
(864,)
"""
然后,进行掩膜,提取感兴趣区域,对fMRI进行降维。掩膜的fMRI样本代表可能发生神经活动的区域。
# Creating stimuli to category and category to stimuli:
stimuli2category = {'scissors'     : 0,'face'         : 1, 'cat'          : 2,'scrambledpix' : 3,'bottle'       : 4,'chair'        : 5,'shoe'         : 6,'house'        : 7
}category2stimuli = {category:stimuli for stimuli, category in stimuli2category.items()}def fetch_haxby_per_subject(subject_id:int = None,standardize:bool = True) -> Tuple[np.ndarray, np.ndarray, np.ndarray]:"""Given the subject id, fetch the haxby data in matrix format.Arguments:- subject_id  (int) : Subject number from [1,6]- standardize (bool): If true, masks are standardizedReturns:- data (Tuple[np.ndarray, np.ndarray, np.ndarray]) = Original 4-D data, Flattened + Masked Data, Label  """# Getting the data file name:spatio_temporal_data_path = haxby_dataset.func[subject_id]  # Getting labels:behavioral = pd.read_csv(haxby_dataset.session_target[subject_id], delimiter = ' ')# Creating conditional categories:conditions = behavioral['labels']# Creating masks for stimuli categories, (ignores rest conditions)condition_mask = conditions.isin([*stimuli2category]).tolist()# Appylying masks to labels (categorical):conditions = conditions[condition_mask]# Creating labels series (numerical):categories = np.array([stimuli2category[stimulus] for stimulus in conditions])# Masking fMRI images: (shape = (40, 64, 64, 864))fmri_niimgs = index_img(spatio_temporal_data_path, condition_mask)# Converting NumPy and transposing to (864, 40, 64, 64):numpy_fmri = fmri_niimgs.get_data().transpose(3,0,1,2)masker = NiftiMasker(mask_img=haxby_dataset.mask_vt[subject_id],smoothing_fwhm=4,standardize=standardize,memory='nilearn_cache',memory_level=1)masked = masker.fit_transform(fmri_niimgs)return numpy_fmri,  masked, categories
这个脚本能够获取fMRI数据,将数据转换为NumPy矩阵;创建并应用时空掩膜来提取感兴趣的区域;准备监督(目标/标签)。
接下来,运行这个函数并获取数据。
data = [fetch_haxby_per_subject(subject_id) for subject_id in range(num_subjects)]
fmri_imgs_mat, masks, categories = list(zip(*data))
现在,可以执行对大脑的功能连接和相似性分析了。
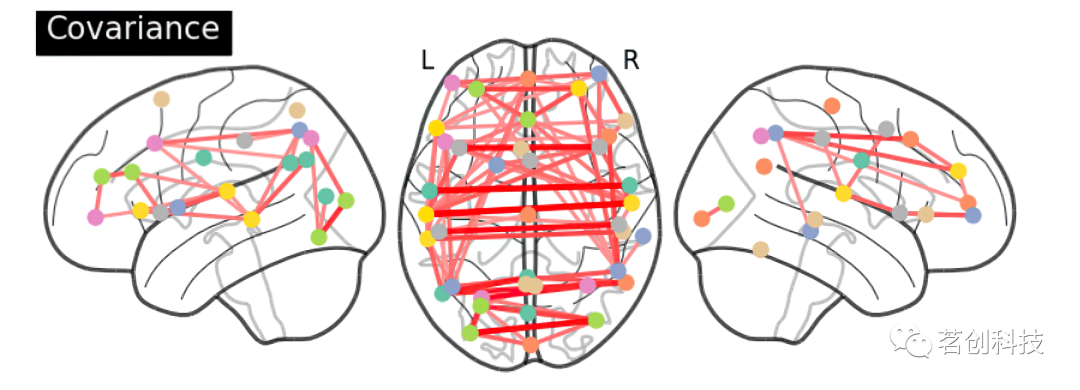
功能连接被定义为脑区解剖学上神经元激活模式的时间依赖性。近年来,越来越多的神经成像研究开始通过测量脑区静息态fMRI时间序列的共激活水平来探索功能连接。这些功能连接对于建立大脑区域的统计连接很重要。功能连接可以通过估计来自不同大脑区域分解信号的协方差(或相关)矩阵来获得,例如在静息态或自然刺激数据集上。在这里,基于相关性、精度和偏相关性进行了功能连接分析。然后,基于余弦距离、闵可夫斯基距离和欧氏距离进行相似性分析,进一步扩展掩膜fMRI数据的统计结果。
功能连接性:相关性
对被试1进行基于皮尔逊相关的功能连接。可以看到,在被试1的腹侧颞叶皮层中,当面孔刺激被呈现时,存在很强的相关性。
from nilearn.connectome import ConnectivityMeasuresubject_id = 0correlation_measure = ConnectivityMeasure(kind='correlation')
correlation_matrix = correlation_measure.fit_transform([masks[subject_id]])[0]fig = plt.figure()# Mask out the major diagonal
np.fill_diagonal(correlation_matrix, 0)
plotting.plot_matrix(correlation_matrix,colorbar=True,vmax=0.8, vmin=-0.8,figure = fig)
plotting.show()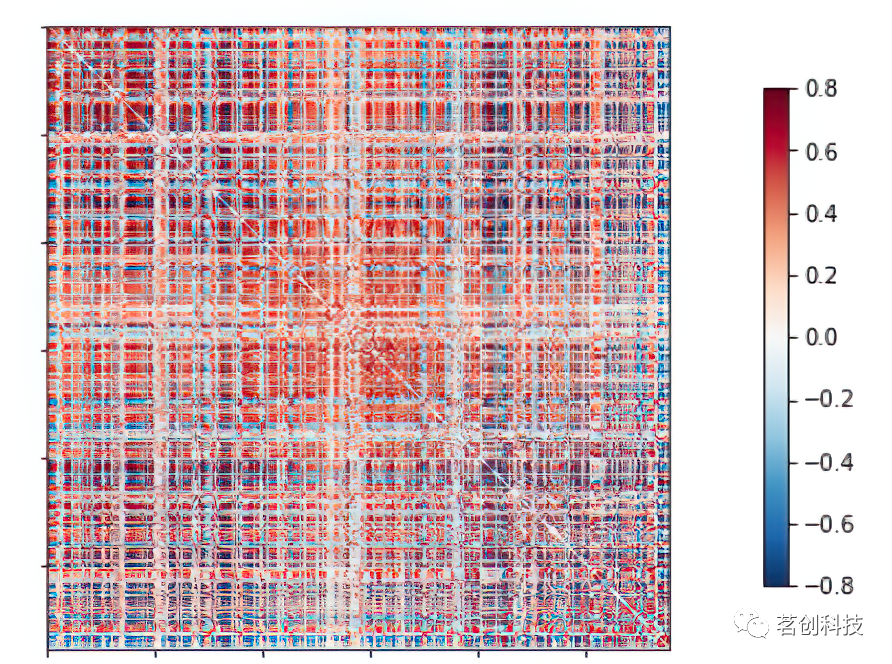
功能连接性:精度
使用逆协方差矩阵,即精度矩阵更有意思。它只给出了区域之间的直接联系,因为它包含偏协方差,即两个区域之间的协方差取决于所有其他区域。此外,在精度评分的基础上进行了功能连接体,以提取被试1的ROI信号。在这里,随着连接性测量的变化,可以看到被试1的腹侧皮层空间相关性的直接变化。通过精度测量,进一步了解大脑的组织和网络。
correlation_measure = ConnectivityMeasure(kind='precision')
correlation_matrix = correlation_measure.fit_transform([masks[subject_id]])[0]fig = plt.figure()# Mask out the major diagonal
np.fill_diagonal(correlation_matrix, 0)
plotting.plot_matrix(correlation_matrix, colorbar=True,vmax=0.8,vmin=-0.8,figure = fig)
plotting.show()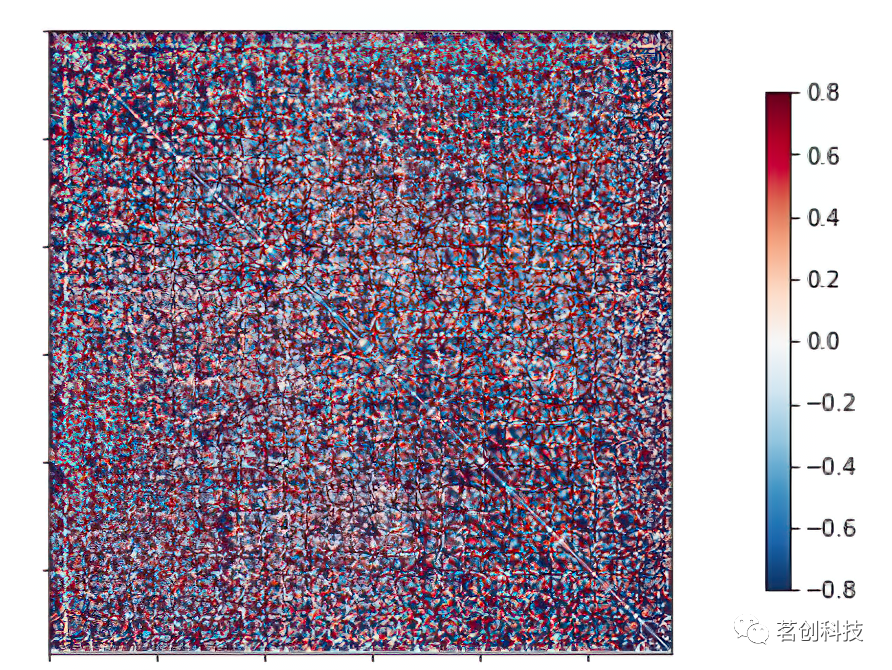
功能连接:偏相关
在众多的网络建模方法中,偏相关在准确检测真实脑网络连接方面具有很大的潜力。因此,接下来执行基于偏相关的功能连接性分析。对ROI fMRI数据进行偏相关的可视化显示,结果发现被试1的腹侧颞叶皮层相关性不高。
correlation_measure = ConnectivityMeasure(kind='partial correlation')
correlation_matrix = correlation_measure.fit_transform([masks[subject_id]])[0]
fig = plt.figure()# Mask out the major diagonal
np.fill_diagonal(correlation_matrix, 0)
plotting.plot_matrix(correlation_matrix, colorbar=True,vmax=0.8, vmin=-0.8,figure = fig)
plotting.show()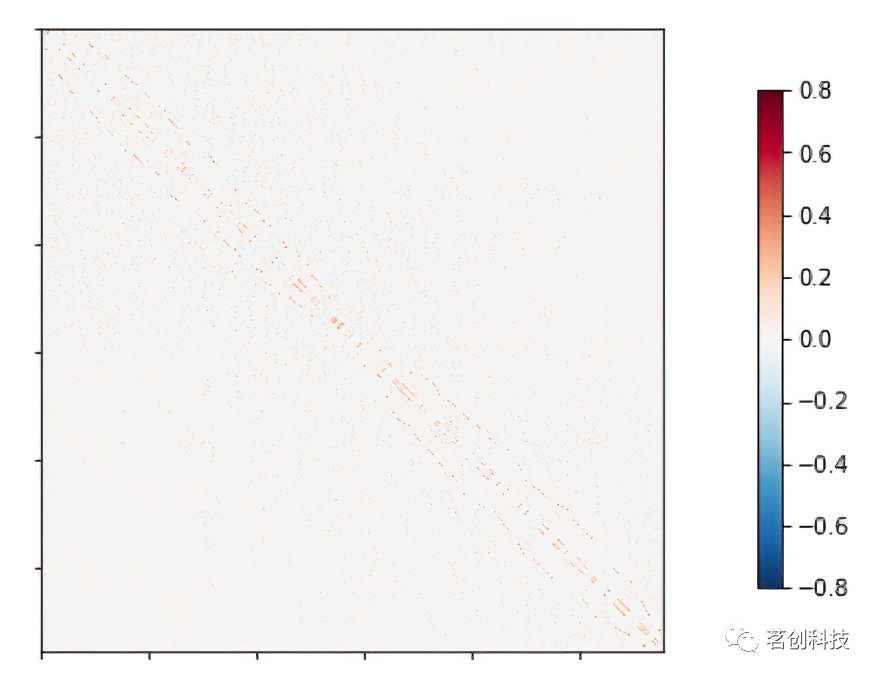
相似性分析:余弦距离
为了便于在大脑的统计连接背景下理解测地线,对被试1进行余弦相似性分析,并将得到的矩阵可视化。结果表明,当视觉刺激出现时,神经活动有高度重叠的区域。
fig = plt.figure(figsize=(8,6))
plt.imshow(cdist(masks[subject_id], masks[subject_id], metric='cosine'))
plt.colorbar()
plt.title('Cosine Similarity of Masked fMRI Samples')
plt.show()
相似性分析:闵可夫斯基距离
为了使用不同的相似性测量进行实验,接下来,采用闵可夫斯基距离,这是欧氏距离和曼哈顿距离的概括性表述。该方法在fMRI时间相似性分析中非常有用。
fig = plt.figure(figsize=(8,6))
plt.imshow(cdist(masks[subject_id], masks[subject_id], metric='minkowski'))
plt.colorbar()
plt.title('Minkowski Similarity of Masked fMRI Samples')
plt.show()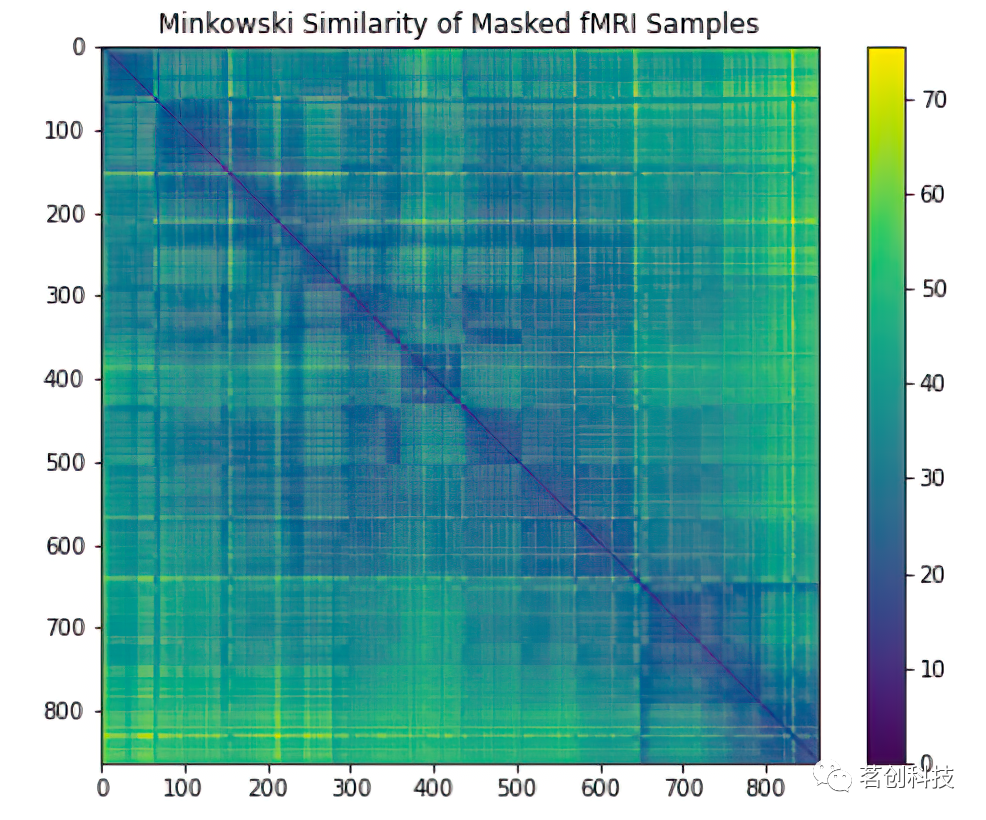
相似性分析:欧氏距离
最后,基于经典欧氏距离进行相似性分析。这是一个非常经典的距离测量方法,用勾股定理表示这些点的笛卡尔坐标。从功能连接和相似分析所揭示的统计和结构模式可以得出结论,人脑腹侧颞叶皮层诱发的神经活动具有高度重叠和分布式的特点。
fig = plt.figure(figsize=(8,6))
plt.imshow(cdist(masks[subject_id], masks[subject_id]))
plt.colorbar()
plt.title('Euclidean Similarity of Masked fMRI Samples')
plt.show()
参考来源:
Haxby, J. V. , Gobbini, M. I. , Furey, M. L. , Ishai, A. , & Pietrini, P. .(2001). Distributed and overlapping representations of faces and objects in ventral temporal cortex. Science, 293(5539), 2425-2430.
https://nilearn.github.io/auto_examples/03_connectivity/plot_multi_subject_connectome.html#sphx-glr-auto-examples-03-connectivity-plot-multi-subject-connectome-py
https://towardsdatascience.com/functional-connectivity-and-similarity-analysis-of-human-brain-part-iii-c427c88ca5bb
https://github.com/cankocagil/Cognitive-Computational-Modelling-for-Spatio-Temporal-fMRI-in-Ventral-Temporal-Cortex
文章来源于微信公众号(茗创科技),欢迎有兴趣的朋友搜索关注。

这篇关于人脑功能连接与相似性分析:基于Python的文章就介绍到这儿,希望我们推荐的文章对编程师们有所帮助!


