本文主要是介绍Python Flask框架基础(七)留言板,希望对大家解决编程问题提供一定的参考价值,需要的开发者们随着小编来一起学习吧!
本章示例程序是一个非常简单的留言板程序SayHello,涉及的知识完全是前面六个章节的内容 。这一章会基于这个程序介绍一种组织代码的形式,并了解Web程序开发流程,对前面六章的知识进行简单的回顾复习。
在具体的开发中,代码编写主要分为前端页面和后端程序。前端开发的主要流程:
1)根据功能规格书画页面草图
2)根据草图做交互式原型图
3)根据原型图开发前端页面(HTML、CSS、JavaScript)
后端开发的主要流程:
1)数据库建模
2)编写表单类
3)编写视图函数和相关的处理函数
4)在页面中使用Jinja2替换虚拟数据
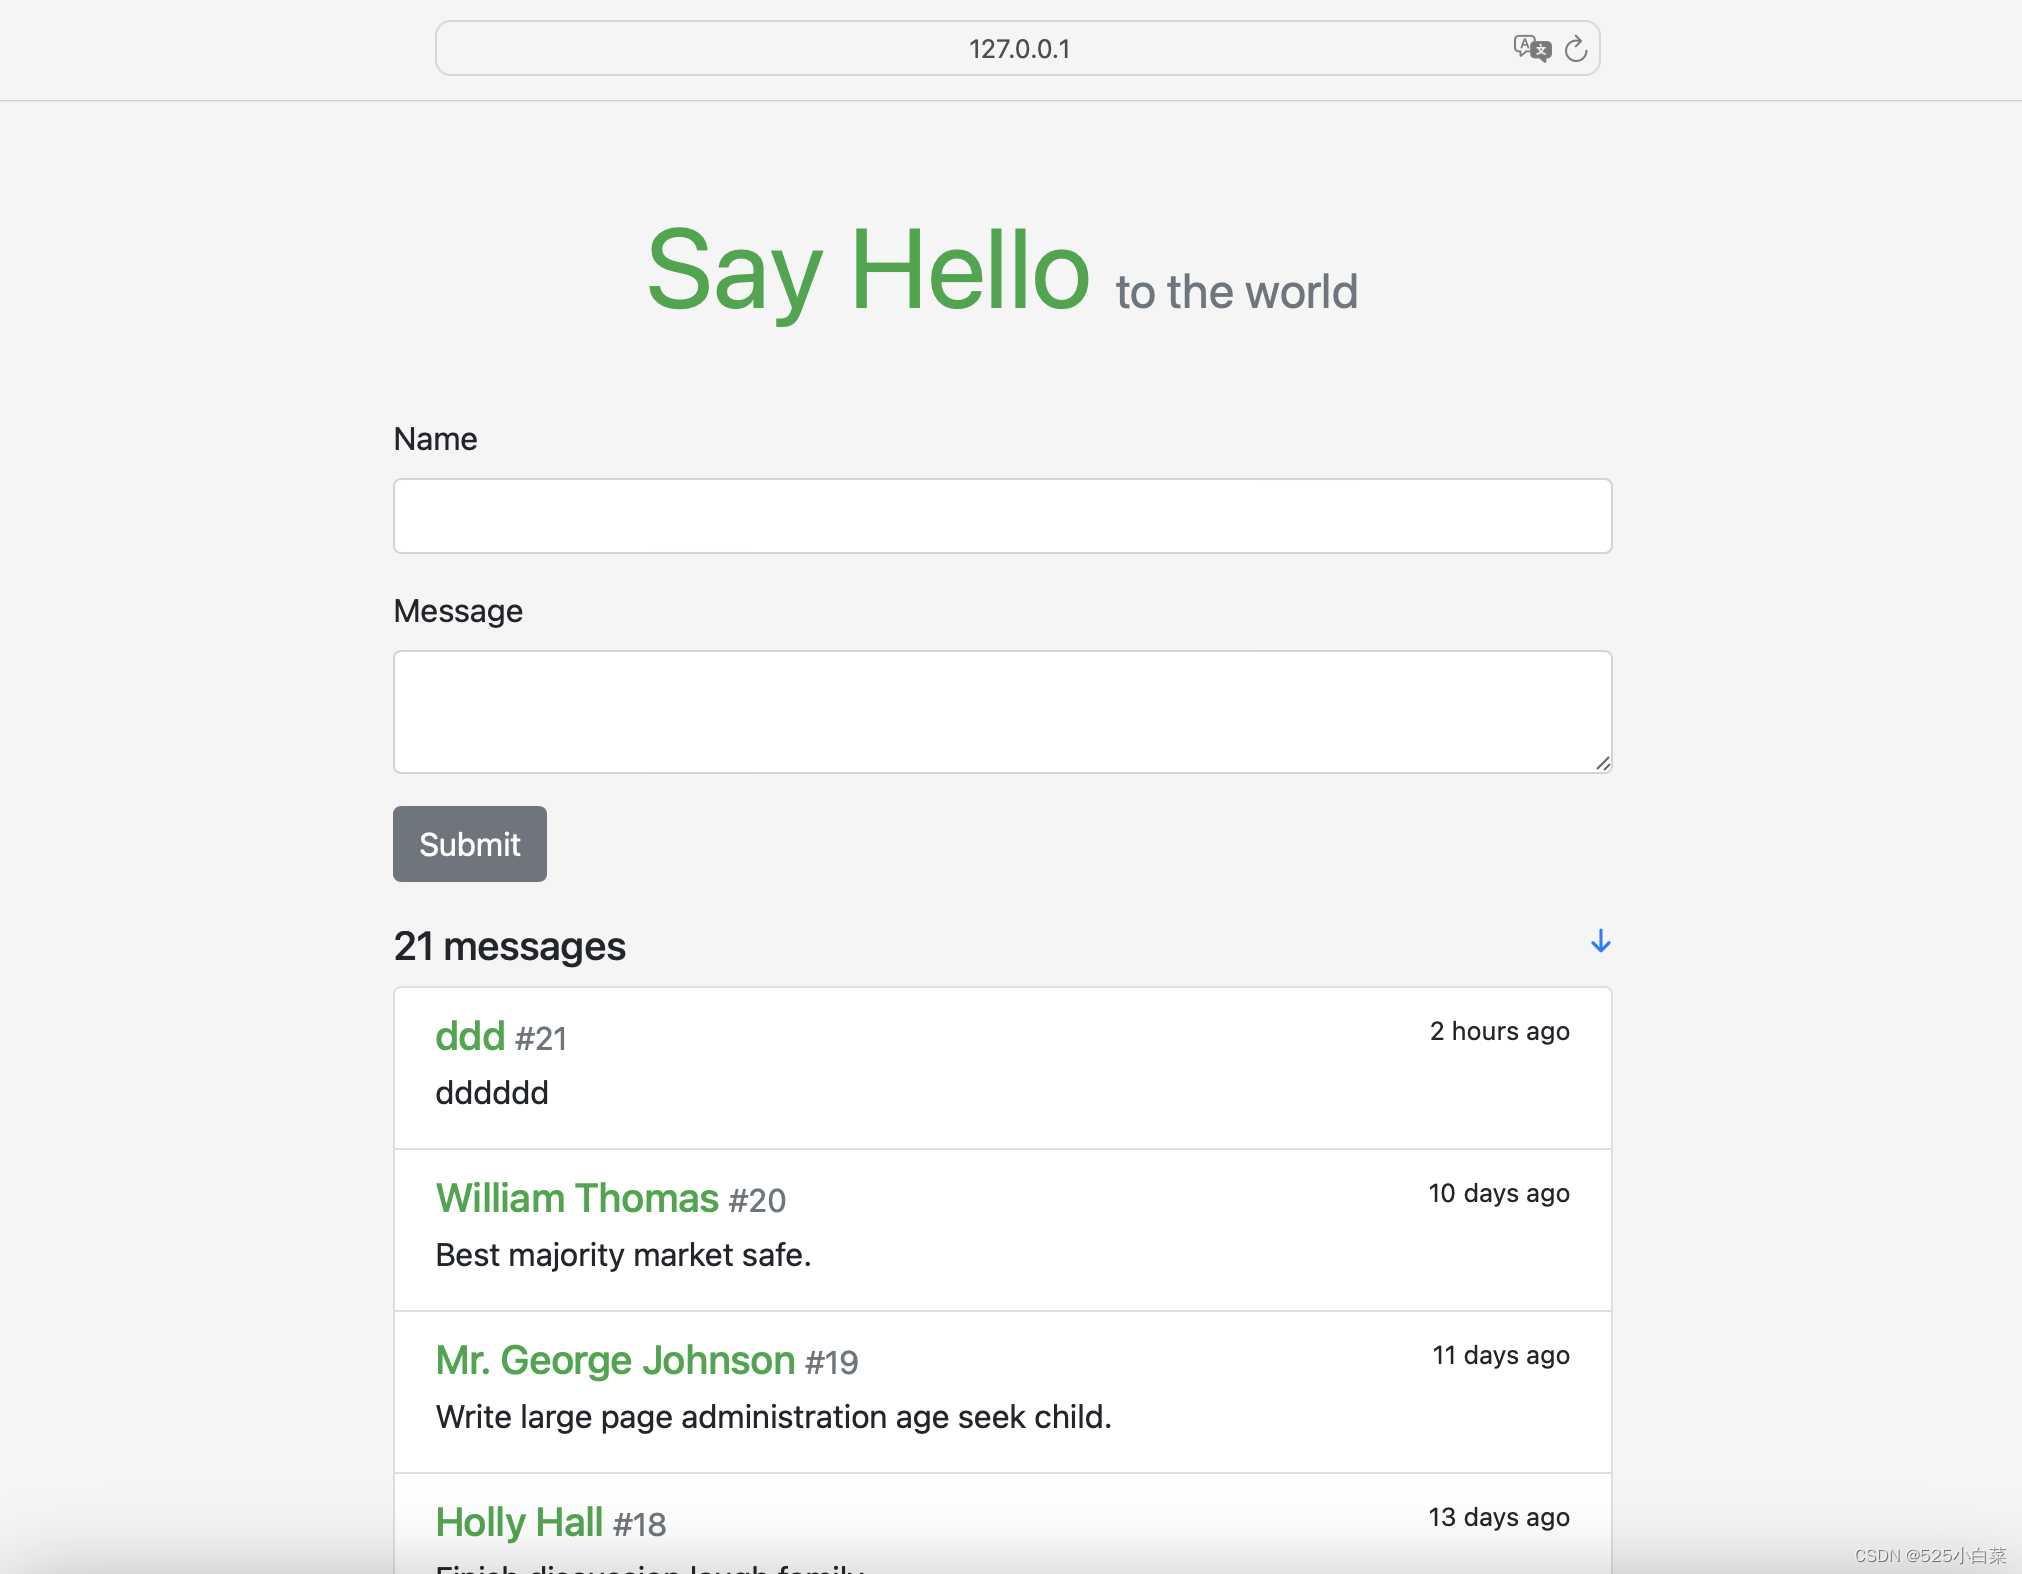
本章的示例程序SayHello非常简单,就是在表单中输入姓名和留言,按下提交按钮后,就可以将留言加入到页面的消息列表中。
程序主页设计如图:

前几章的示例程序都采用单脚本的形式存储代码,随着项目的增大,把所有代码都放在app.py会导致可读性降低,不方便管理。更好地组织方式是将单一的模块升级为包(Package),把不同的代码分模块存放。
在Python中,每一个有效的Python 文件(.py)都是模块。每一个包含
__init__.py文件的文件夹都被视作包,包让你可以使用文件夹来组织模块。__init__.py文件通常被称作构造文件,文件可以为空,也可以用来放置包的初始化代码。当包或包内的模块被导入时,构造文件将被自动执行。
SayHello程序的核心组件都放到一个包中,包的名称通常使用程序名称,除了程序代码,Flask项目还包括其他必要的组件,如下说明
| 组件 | 说明 |
|---|---|
| sayhello/__init__.py | 构造文件,包含程序实例 |
| sayhello/templates/ | 模板 |
| sayhello/static/ | 静态文件,其中又包含js和css文件夹 |
| sayhello/views.py | 视图函数 |
| sayhello/forms.py | 表单 |
| sayhello/errors.py | 错误处理 |
| sayhello/models.py | 数据库模型 |
| sayhello/commands.py | 自定义flask命令 |
| sayhello/settings.py | 配置文件 |
和前面几章不同的是,配置不仅可以通过config对象直接写入,还可以写在单独的文件中,配置文件的内容主要是配置变量 = 值。
在创建程序实例后,使用config对象的form_pyfile()方法即可加载配置,传入配置模块的文件名作为参数:
...
app = Flask(__name__)
app.config.form_pyfile('settings.py')
创建程序实例
使用包组织程序代码后,创建程序实例、初始化扩展等操作可以在程序包的构造文件(__init__.py)中实现。
# 文件__init__.py
from flask import Flask
from flask_bootstrap import Bootstrap
from flask_moment import Moment
from flask_sqlalchemy import SQLAlchemyapp = Flask('sayhello')
app.config.from_pyfile('settings.py')
app.jinja_env.trim_blocks = True
app.jinja_env.lstrip_blocks = Truedb = SQLAlchemy(app)
bootstrap = Bootstrap(app)
moment = Moment(app)from sayhello import views, errors, commands
当程序启动时,最先被执行的是包含程序实例的脚本,在本例中也就是构造文件(__init__.py)。
虽然本例中,程序实例化在构造文件中,但注册在实例上的各种处理函数都在其他脚本文件中(例如views.py、errors.py等),为了将处理函数与程序实例关联起来,我们可以在构造文件中导入这些模块,也可以在这些模块中导入构造文件。但是在构造文件中导入这些模块会在构造文件执行时,将构造函数和错误处理函数一并注册到程序中,保障程序可以正常执行,因此我们选用在构造文件中导入这些模块,如代码中最后一行。
后端程序开发
1、数据库建模
在程序设计阶段就确定了需要使用哪些表来存储数据,表中存储哪些字段以及各个表的关系。因此我们首先进行数据库建模。
在本例中用于保存留言的Message模型如代码所示:
# 文件models.py
from datetime import datetime
from sayhello import dbclass Message(db.Model):id = db.Column(db.Integer, primary_key=True)name = db.Column(db.String(20))body = db.Column(db.String(200))timestamp = db.Column(db.DateTime, default=datetime.now, index=True)
2、创建表单类
留言表单由表单类HelloForm表示,表单中使用了文本区域字段TextAreaField。
#文件forms.py
from flask_wtf import FlaskForm
from wtforms import StringField, SubmitField, TextAreaField
from wtforms.validators import DataRequired, Lengthclass HelloForm(FlaskForm):name = StringField('Name', validators=[DataRequired(), Length(1, 20)])body = TextAreaField('Message', validators=[DataRequired(), Length(1, 200)])submit = SubmitField()
3、编写视图函数
视图函数主要存在两个文件中,一个是正常逻辑的处理views.py,另一个是错误处理errors.py。
正常逻辑的处理:
1)处理GET请求,从数据库中查询所有的消息记录,返回渲染后的包含消息列表的主页模板index.html。
2)处理POST请求,问候表单提交后,验证表单数据,通过验证后将数据保存在数据库中,使用flash()函数显示一条提示,然后重定向到index视图,渲染页面。
#文件views.py
from flask import flash, redirect, url_for, render_template
from sayhello import app, db
from sayhello.forms import HelloForm
from sayhello.models import Message@app.route('/', methods=['GET', 'POST'])
def index():form = HelloForm()if form.validate_on_submit():name = form.name.databody = form.body.datamessage = Message(body=body, name=name)db.session.add(message)db.session.commit()flash('Your message have been recorded!')return redirect(url_for('index'))messages = Message.query.order_by(Message.timestamp.desc()).all()return render_template('index.html', form=form, messages=messages)
order_by(Message.timestamp.desc())的意思是根据Message模型的timestamp字段排序,字段上的排序使用降序。
#文件errors.py
from flask import render_template
from sayhello import app@app.errorhandler(404)
def page_not_found(e):return render_template('errors/404.html'), 404@app.errorhandler(500)
def internal_server_error(e):return render_template('errors/500.html'), 500
4、编写模板
将index.html和404.html以及500.html中的共有部分抽出合并为基模板base.html。基模板包含一个完整的HTML结构。
base.html模板如下:
<!DOCTYPE html>
<html lang="en">
<head><meta charset="utf-8"><meta name="viewport" content="width=device-width, initial-scale=1, shrink-to-fit=no"><title>{% block title %}Say Hello!{% endblock %}</title><link rel="icon" href="{{ url_for('static', filename='favicon.ico') }}"><link rel="stylesheet" href="{{ url_for('static', filename='css/bootstrap.min.css') }}" type="text/css"><link rel="stylesheet" href="{{ url_for('static', filename='css/style.css') }}" type="text/css">
</head>
<body>
<main class="container"><header><h1 class="text-center display-4"><a href="{{ url_for('index') }}" class="text-success"><strong>Say Hello</strong></a><small class="text-muted sub-title">to the world</small></h1></header>{% for message in get_flashed_messages() %}<div class="alert alert-info"><button type="button" class="close" data-dismiss="alert">×</button>{{ message }}</div>{% endfor %}{% block content %}{% endblock %}<footer class="text-center">{% block footer %}<small> © 2018 <a href="http://greyli.com" title="Written by Grey Li">Grey Li</a> /<a href="https://github.com/greyli/sayhello" title="Fork me on GitHub">GitHub</a> /<a href="http://helloflask.com" title="A HelloFlask project">HelloFlask</a></small><p><a id="bottom" href="#" title="Go Top">↑</a></p>{% endblock %}</footer>
</main><script type="text/javascript" src="{{ url_for('static', filename='js/jquery-3.2.1.slim.min.js') }}"></script>
<script type="text/javascript" src="{{ url_for('static', filename='js/popper.min.js') }}"></script>
<script type="text/javascript" src="{{ url_for('static', filename='js/bootstrap.min.js') }}"></script>
<script type="text/javascript" src="{{ url_for('static', filename='js/script.js') }}"></script>
{{ moment.include_moment(local_js=url_for('static', filename='js/moment-with-locales.min.js')) }}
</body>
</html>
在head和body标签内,我们引入了bootstrap所需的CSS和JavaScript文件,以及自定义的style.css和script.js文件。
在主页模版index.html中,使用form_field()宏渲染表单,然后迭代传入的messages变量,渲染消息列表。
index.html文件如下:
{% extends 'base.html' %}
{% from 'bootstrap/form.html' import render_form %}{% block content %}<div class="hello-form"><form method='post'>{{ form.csrf_token }}<div class="form-group required">{{ form_field(form.name,class='form-control') }}</div><div class="form-group required">{{ form_field(form.body,class='form-control') }}</div>{{ form.submit(class='btn btn-secondary') }}</form></div><h5>{{ messages|length }} messages<small class="float-right"><a href="#bottom" title="Go Bottom">↓</a></small></h5><div class="list-group">{% for message in messages %}<a class="list-group-item list-group-item-action flex-column"><div class="d-flex w-100 justify-content-between"><h5 class="mb-1 text-success">{{ message.name }}<small class="text-muted"> #{{ loop.revindex }}</small></h5><small>{{ message.timestamp.strftime('%Y/%m/%d %H:%M') }}</small></div><p class="mb-1">{{ message.body }}</p></a>{% endfor %}</div>
{% endblock %}
5、生成虚拟数据
创建虚拟数据是编写Web程序时的常见需求,流行的Python虚拟数据生成工具有Mimesis和Faker。Faker内置了20多类虚拟数据,包括姓名、地址、网络账号、信用卡、时间、职位、公司名称、python数据等。faker的使用示例如下,每次调用都会获得不同的随机结果。
>>> from faker import Faker
>>> fake = Faker()>>> fake.name()
'Lucy Cechtelar'>>> fake.address()
426 Jordy lodge
Cartwrightshire,SC 88120-6700
本例利用Faker实现了一个生成虚拟留言数据的命令函数forge,forge函数代码详见commands.py文件。
import click
from sayhello import app, db
from sayhello.models import Message@app.cli.command()
@click.option('--count', default=20, help='Quantity of messages, default is 20.')
def forge(count):"""Generate fake messages."""from faker import Fakerdb.drop_all()db.create_all()fake = Faker()click.echo('Working...')for i in range(count):message = Message(name=fake.name(),body=fake.sentence(),timestamp=fake.date_time_this_year())db.session.add(message)db.session.commit()click.echo('Created %d fake messages.' % count)
本例的运行:
$ cd sayhello
$ pipenv install --dev --pypi-mirror https://pypi.doubanio.com/simple
$ pipenv shell $ flask forge #生成虚拟数据
$ flask run #运行程序
参考资料:《Flask Web开发实战入门、进阶与原理解析》李辉 著
这篇关于Python Flask框架基础(七)留言板的文章就介绍到这儿,希望我们推荐的文章对编程师们有所帮助!


