本文主要是介绍LVS – NAT 模式集群构建,希望对大家解决编程问题提供一定的参考价值,需要的开发者们随着小编来一起学习吧!
目录
1 环境准备
1.1 准备四台服务器
1.2 IP与网关均按照下图配置
1.3 网卡配置
1.4 real server 安装 web服务
1.5 安装ipvsadm 管理工具
2 使用ipvsadm管理LVS
2.1 创建集群指定使用的算法
2.2 添加真实服务器指定工作原理
2.3 查看是否正确创建集群
3 测试
3.1 使用tcpdump工具监听网卡收发数据包
第一次监听
第二次监听
3.2 使用循环与http建立连接
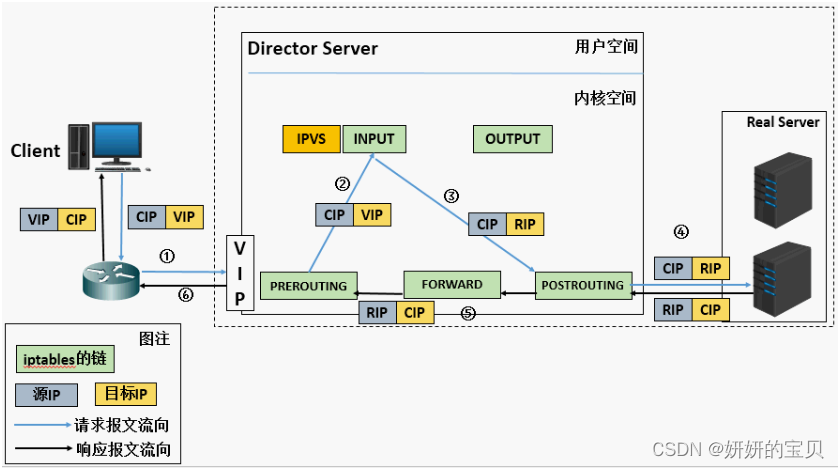
重温工作过程(配置重点是需要开启路由转发功能)
(a). 当用户请求到达Director Server,此时请求的数据报文会先到内核空间的PREROUTING链。 此时报文的源IP为CIP,目标IP为VIP
(b). PREROUTING检查发现数据包的目标IP是本机,将数据包送至INPUT链
(c). IPVS比对数据包请求的服务是否为集群服务,若是,修改数据包的目标IP地址为后端服务器IP,然后将数据包发至POSTROUTING链。 此时报文的源IP为CIP,目标IP为RIP
(d). POSTROUTING链通过选路,将数据包发送给Real Server
(e). Real Server比对发现目标为自己的IP,开始构建响应报文发回给Director Server。 此时报文的源IP为RIP,目标IP为CIP,并且经过FORWARD
(f). Director Server在响应客户端前,此时会将源IP地址修改为自己的VIP地址,然后响应给客户端。 此时报文的源IP为VIP,目标IP为CIP
了解了过程之后,进行配置,有一点重要的配置就是经过FORWARD需要将路由转发给打开
在 Linux 系统中,ip_forward 参数控制着内核是否允许转发数据包。默认情况下,为了提高安全性,大多数 Linux 发行版都将 ip_forward 设置为 0,这意味着系统不会转发数据包。如果你想让系统能够像路由器一样工作,转发不同网络之间的数据包,就需要将 ip_forward 设置为 1。
1 环境准备
1.1 准备四台服务器
Rocky 9.4 --客户端 IP:10.0.0.201/24
openEuler -- LVS VIP:10.0.0.129/24 DIP:192.168.239.152/24
centos -- real server IP :192.168.239.148/24
Rocky 9.4_v2 -- real server IP :192.168.239.137/24
![]()
1.2 IP与网关均按照下图配置
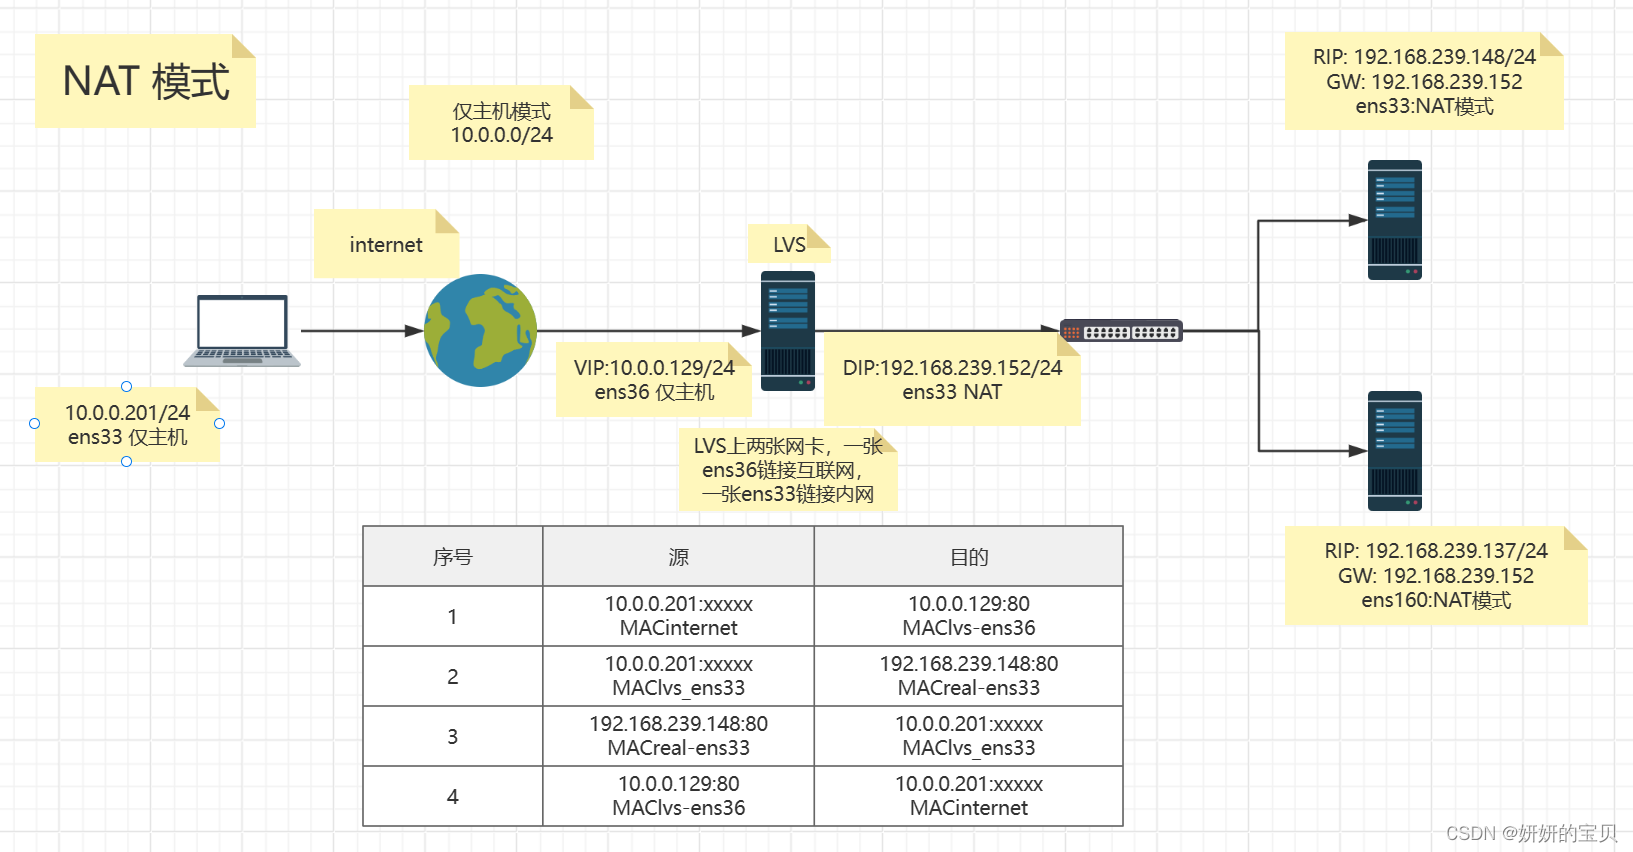
1.3 网卡配置
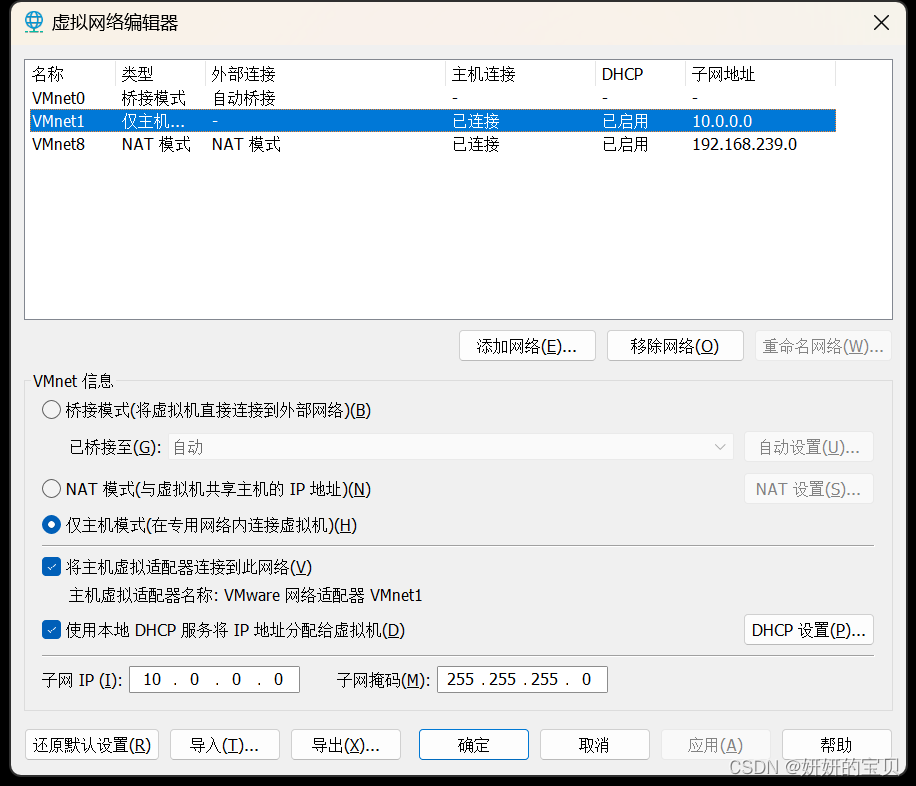
客户端修改为主机模式
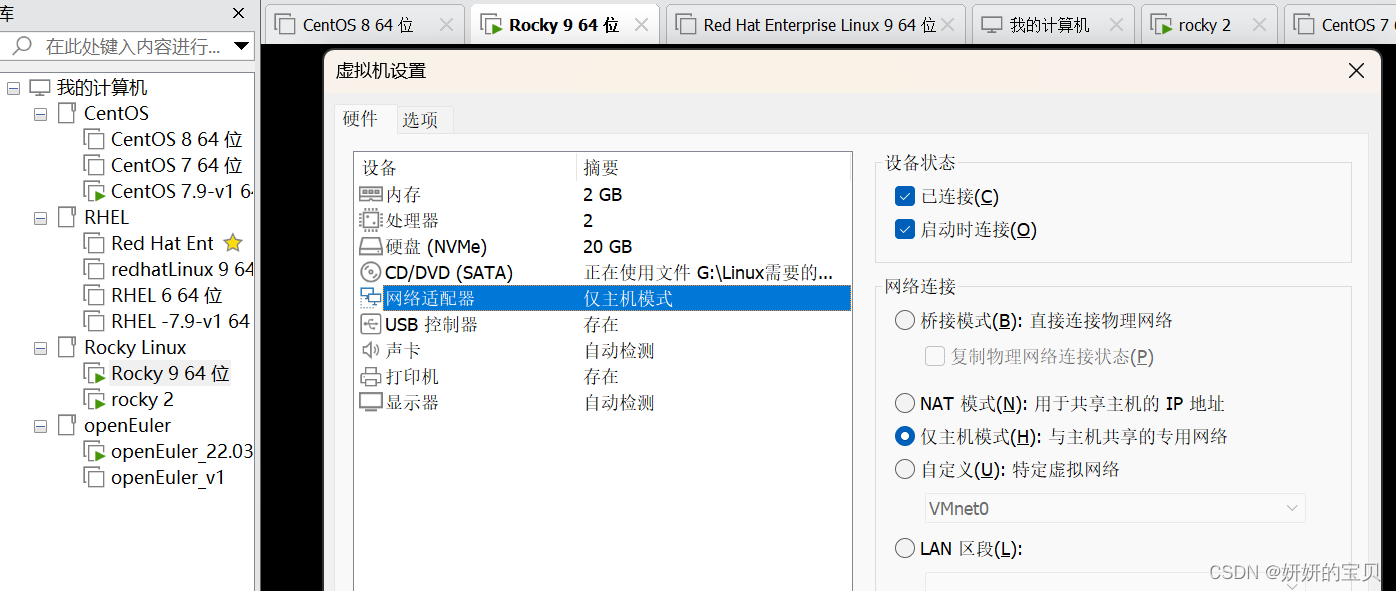
LVS 添加一张网卡选择仅主机模式,原网卡连接内网,新增网卡连接internet
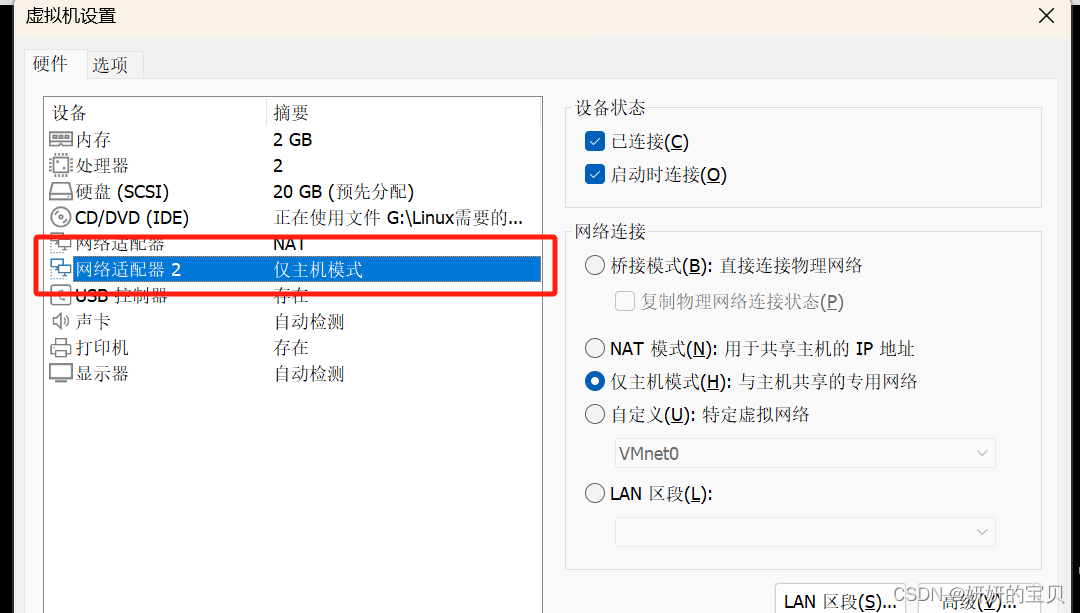
配置如下
# 客户端不需要配置网关,由于和VIP在同一网段之下,访问的是VIP
[root@internet ~] nmcli connection modify ens160 ipv4.addresses 10.0.0.201/24
[root@internet ~] nmcli connection up ens160[root@LVS ~] nmcli device status
DEVICE  TYPE      STATE   CONNECTION
ens33   ethernet  已连接  ens33
ens36   ethernet  未连接  --- # 显示未创建会话接下来给网卡创建一个会话[root@LVS ~] nmcli connection add con-name ens36 ifname ens36 type ethernet autoconnect yes ipv4.method manual ipv4.addresses 10.0.0.129/24# 重启网卡
[root@LVS ~]nmcli connection up ens36# 服务端[root@web01 ~] nmcli connection modify ens160 ipv4.addresses 192.168.239.148/24 ipv4.gateway 192.168.239.152
[root@web01 ~] nmcli connection up ens33[root@web02 ~] nmcli connection modify ens160 ipv4.addresses 192.168.239.137/24 ipv4.gateway 192.168.239.152
[root@web02 ~] nmcli connection up ens33
LVS 新增的 做仅主机模式的网卡
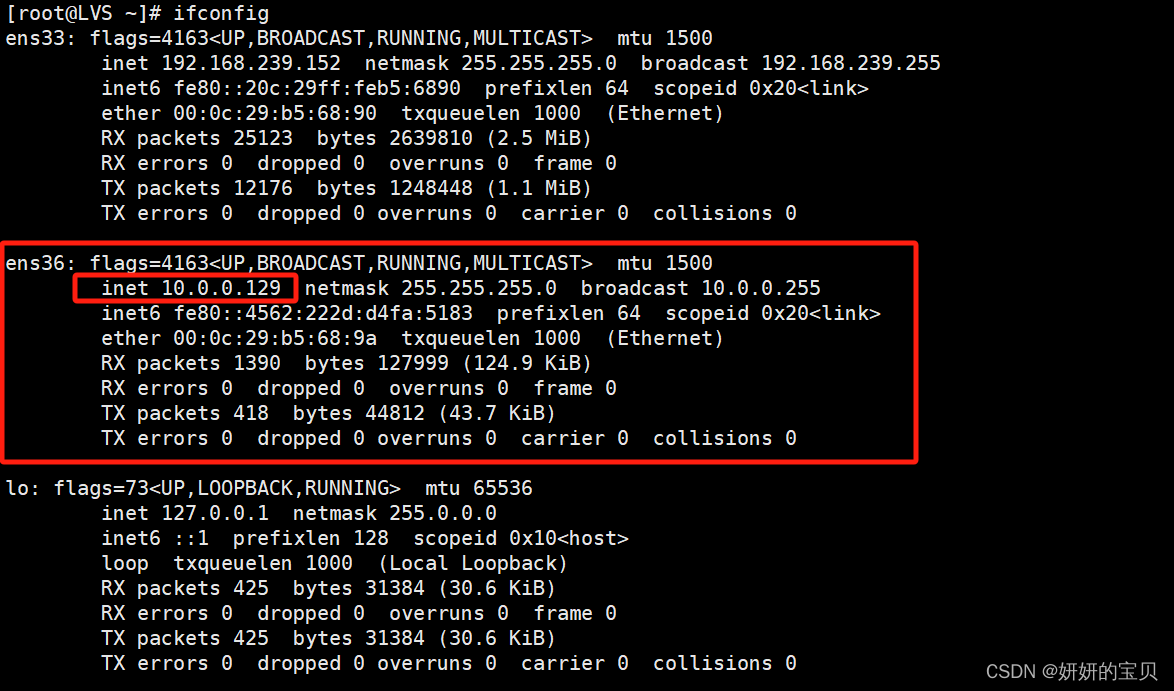
1.4 real server 安装 web服务
# web 01
[root@web01 ~] yum install nginx[root@web01 ~] vim /etc/nginx/nginx.conf
worker_processes  1;
events {worker_connections  1024;
}
http {include       mime.types;default_type  application/octet-stream;include /etc/nginx/conf.d/*.conf;server {listen       80;server_name localhost;error_page   500 502 503 504  /50x.html;location = /50x.html {root   html;}}
}# web 01 使用虚拟主机
[root@web01 ~] vim /etc/nginx/conf.d/shuyan.conf
server{listen 192.168.239.148:80;server_name www.shuyan.com;location / {root /web/one;index index.html index.htm;}
}# 创建目录
[root@web01 ~] mkdir -p /web/one/
# 导入内容
[root@web01 ~] echo 192.168.239.148 is www.shuyan.com > /web/one/index.html
[root@web01 ~] setenforce 0
[root@web01 ~] systemctl stop firewalld.service
[root@web01 ~] systemctl restart nginx.service# web02
# 直接导入nginx默认的index.html中
[root@web02 ~] yum install nginx
[root@web02 ~] mv index.html index.html.bak
[root@web02 ~] echo 192.168.239.137 > /usr/share/nginx/html/index.html
[root@web02 ~] setenforce 0
[root@web02 ~] systemctl stop firewalld.service
[root@web02 ~] nginx -t
nginx: the configuration file /etc/nginx/nginx.conf syntax is ok
nginx: configuration file /etc/nginx/nginx.conf test is successful[root@web02 ~] systemctl restart nginx.service
1.5 安装ipvsadm 管理工具
[root@LVS ~] yum install ipvsadm
2 使用ipvsadm管理LVS
2.1 创建集群指定使用的算法
指定使用 rr 轮循算法
[root@LVS ~] ipvsadm -A -t 10.0.0.129:80 -s rr2.2 添加真实服务器指定工作原理
2.2.1 指定使用NAT为真实服务器的工作原理
# 添加一个虚拟服务器,其对外提供的服务地址和端口为10.0.0.129:80
# 并将请求调度到后端真实服务器192.168.239.148,使用最小连接数(Minimum Connections)算法进行负载均衡。
[root@LVS ~] ipvsadm -a -t 10.0.0.129:80 -r 192.168.239.148 -m# 同样地,再添加一个后端真实服务器192.168.239.137到同一个虚拟服务器10.0.0.129:80
# 以便将请求负载均衡到这两个后端服务器之间。
[root@LVS ~] ipvsadm -a -t 10.0.0.129:80 -r 192.168.239.137 -m
2.3 查看是否正确创建集群
[root@LVS ~] ipvsadm -Ln
IP Virtual Server version 1.2.1 (size=4096)
Prot LocalAddress:Port Scheduler Flags-> RemoteAddress:Port           Forward Weight ActiveConn InActConn
TCP  10.0.0.129:80 rr-> 192.168.239.137:80           Masq    1      0          0         -> 192.168.239.148:80           Masq    1      0          0
3 测试
在LVS集群上安装tcpdump软件 用于监测网卡转发的包是否达到轮循算法(rr)的作用
[root@LVS ~] yum install tcpdump3.1 使用tcpdump工具监听网卡收发数据包
第一次监听(tcpdump工具)
# 会话 1
[root@LVS ~] tcpdump -i ens36 -nn port 80
# 会话 2
[root@LVS ~] tcpdump -i ens33 -nn port 80# 客户端发起http请求
[root@internet ~] curl 10.0.0.129
192.168.239.148 is www.shuyan.com
同一台设备开启两个会话,分别监听两个网卡收发的数据包
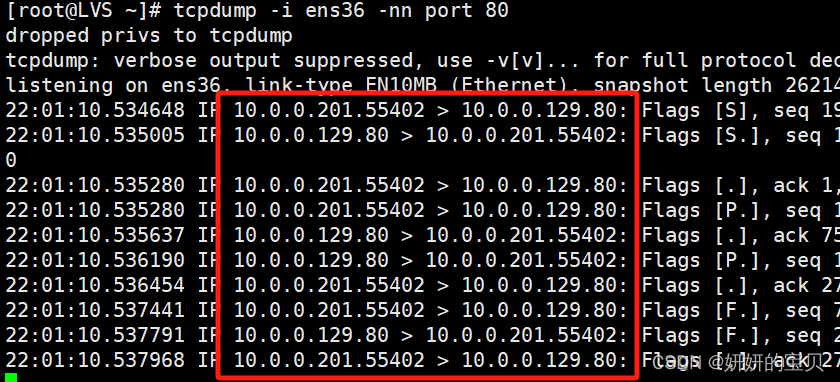
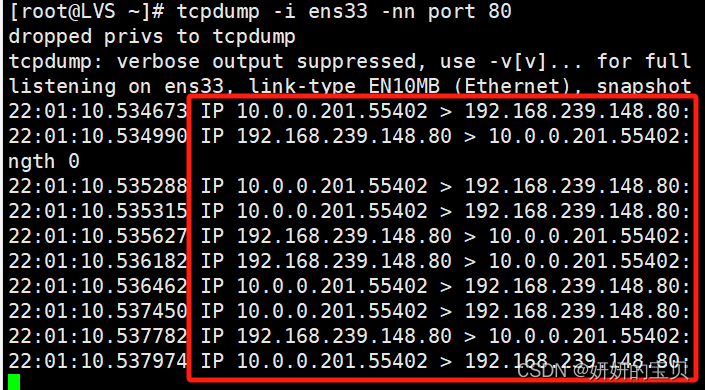
完整分析过程注释
# 在ens36接口上监听端口80的所有网络流量
[root@LVS ~] tcpdump -i ens36 -nn port 80
# 用户权限被降级到tcpdump用户,这是为了安全考虑
dropped privs to tcpdump
# 输出被简化,详细的协议解码可以通过增加-v参数来获取
tcpdump: verbose output suppressed, use -v[v]... for full protocol decode
# 开始监听ens36接口上的数据包,类型为Ethernet,捕获长度为262144字节
listening on ens36, link-type EN10MB (Ethernet), snapshot length 262144 bytes# 客户端10.0.0.201发起SYN请求,开始建立与10.0.0.129的TCP连接,端口为80
22:01:10.534648 IP 10.0.0.201.55402 > 10.0.0.129.80: Flags [S], seq 1990624513, win 32120, options [mss 1460,sackOK,TS val 3895296276 ecr 0,nop,wscale 7], length 0
# 服务器10.0.0.129响应SYN+ACK,确认客户端的SYN并发送自己的SYN
22:01:10.535005 IP 10.0.0.129.80 > 10.0.0.201.55402: Flags [S.], seq 1092267152, ack 1990624514, win 28960, options [mss 1460,sackOK,TS val 46107594 ecr 3895296276,nop,wscale 7], length 0
# 客户端发送ACK确认服务器的SYN,完成三次握手,建立连接
22:01:10.535280 IP 10.0.0.201.55402 > 10.0.0.129.80: Flags [.], ack 1, win 251, options [nop,nop,TS val 3895296276 ecr 46107594], length 0
# 客户端发送HTTP GET请求至服务器
22:01:10.535280 IP 10.0.0.201.55402 > 10.0.0.129.80: Flags [P.], seq 1:75, ack 1, win 251, options [nop,nop,TS val 3895296277 ecr 46107594], length 74: HTTP: GET / HTTP/1.1
# 服务器回应ACK,确认收到客户端的数据
22:01:10.535637 IP 10.0.0.129.80 > 10.0.0.201.55402: Flags [.], ack 75, win 227, options [nop,nop,TS val 46107595 ecr 3895296277], length 0
# 服务器发送HTTP响应,状态码为200 OK
22:01:10.536190 IP 10.0.0.129.80 > 10.0.0.201.55402: Flags [P.], seq 1:271, ack 75, win 227, options [nop,nop,TS val 46107595 ecr 3895296277], length 270: HTTP: HTTP/1.1 200 OK
# 客户端回应ACK,确认收到服务器的数据
22:01:10.536454 IP 10.0.0.201.55402 > 10.0.0.129.80: Flags [.], ack 271, win 249, options [nop,nop,TS val 3895296278 ecr 46107595], length 0
# 客户端发送FIN,请求关闭连接
22:01:10.537441 IP 10.0.0.201.55402 > 10.0.0.129.80: Flags [F.], seq 75, ack 271, win 249, options [nop,nop,TS val 3895296278 ecr 46107595], length 0
# 服务器回应FIN+ACK,同意关闭连接
22:01:10.537791 IP 10.0.0.129.80 > 10.0.0.201.55402: Flags [F.], seq 271, ack 76, win 227, options [nop,nop,TS val 46107597 ecr 3895296278], length 0
# 客户端发送最终ACK,连接关闭
22:01:10.537968 IP 10.0.0.201.55402 > 10.0.0.129.80: Flags [.], ack 272, win 249, options [nop,nop,TS val 3895296279 ecr 46107597], length 0# 下面是在ens33接口上监听端口80的网络流量
[root@LVS ~] tcpdump -i ens33 -nn port 80
# 用户权限被降级到tcpdump用户
dropped privs to tcpdump
# 输出被简化
tcpdump: verbose output suppressed, use -v[v]... for full protocol decode
# 开始监听ens33接口上的数据包,类型为Ethernet,捕获长度为262144字节
listening on ens33, link-type EN10MB (Ethernet), snapshot length 262144 bytes# 类似地,客户端10.0.0.201发起与192.168.239.148的TCP连接,端口为80
22:01:10.534673 IP 10.0.0.201.55402 > 192.168.239.148.80: Flags [S], seq 1990624513, win 32120, options [mss 1460,sackOK,TS val 3895296276 ecr 0,nop,wscale 7], length 0
# 服务器192.168.239.148响应SYN+ACK
22:01:10.534990 IP 192.168.239.148.80 > 10.0.0.201.55402: Flags [S.], seq 1092267152, ack 1990624514, win 28960, options [mss 1460,sackOK,TS val 46107594 ecr 3895296276,nop,wscale 7], length 0
# 客户端发送ACK,完成三次握手
22:01:10.535288 IP 10.0.0.201.55402 > 192.168.239.148.80: Flags [.], ack 1, win 251, options [nop,nop,TS val 3895296276 ecr 46107594], length 0
# 客户端发送HTTP GET请求
22:01:10.535315 IP 10.0.0.201.55402 > 192.168.239.148.80: Flags [P.], seq 1:75, ack 1, win 251, options [nop,nop,TS val 3895296277 ecr 46107594], length 74: HTTP: GET / HTTP/1.1
# 服务器回应ACK
22:01:10.535627 IP 192.168.239.148.80 > 10.0.0.201.55402: Flags [.], ack 75, win 227, options [nop,nop,TS val 46107595 ecr 3895296277], length 0
# 服务器发送HTTP响应,状态码为200 OK
22:01:10.536182 IP 192.168.239.148.80 > 10.0.0.201.55402: Flags [P.], seq 1:271, ack 75, win 227, options [nop,nop,TS val 46107595 ecr 3895296277], length 270: HTTP: HTTP/1.1 200 OK
# 客户端回应ACK
22:01:10.536462 IP 10.0.0.201.55402 > 192.168.239.148.80: Flags [.], ack 271, win 249, options [nop,nop,TS val 3895296278 ecr 46107595], length 0
# 客户端发送FIN,请求关闭连接
22:01:10.537450 IP 10.0.0.201.55402 > 192.168.239.148.80: Flags [F.], seq 75, ack 271, win 249, options [nop,nop,TS val 3895296278 ecr 46107595], length 0
# 服务器回应FIN+ACK,同意关闭连接
22:01:10.537782 IP 192.168.239.148.80 > 10.0.0.201.55402: Flags [F.], seq 271, ack 76, win 227, options [nop,nop,TS val 46107597 ecr 3895296278], length 0
# 客户端发送最终ACK,连接关闭
22:01:10.537974 IP 10.0.0.201.55402 > 192.168.239.148.80: Flags [.], ack 272, win 249, options [nop,nop,TS val 3895296279 ecr 46107597], length 0
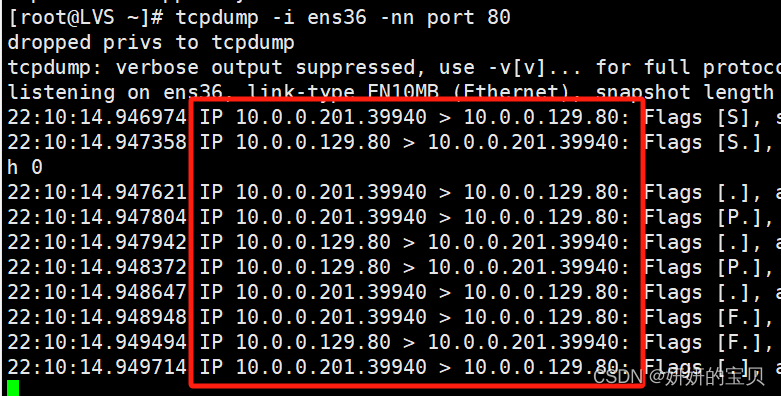
第二次监听(tcpdump工具)
# 会话 1
[root@LVS ~] tcpdump -i ens36 -nn port 80
# 会话 2
[root@LVS ~] tcpdump -i ens33 -nn port 80# 客户端再次发起http请求
[root@internet ~] curl 10.0.0.129
192.168.239.137
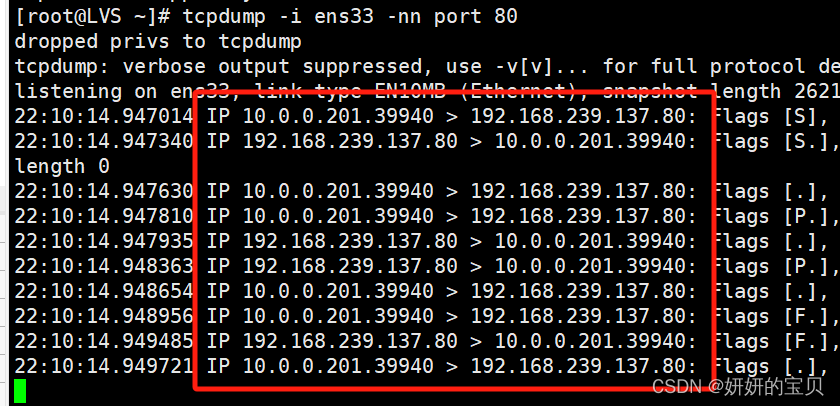
[root@LVS ~] tcpdump -i ens33 -nn port 80
dropped privs to tcpdump
tcpdump: verbose output suppressed, use -v[v]... for full protocol decode
listening on ens33, link-type EN10MB (Ethernet), snapshot length 262144 bytes
22:10:14.947014 IP 10.0.0.201.39940 > 192.168.239.137.80: Flags [S], seq 2119984101, win 32120, options [mss 1460,sackOK,TS val 3895840687 ecr 0,nop,wscale 7], length 0
22:10:14.947340 IP 192.168.239.137.80 > 10.0.0.201.39940: Flags [S.], seq 3761349315, ack 2119984102, win 31856, options [mss 1460,sackOK,TS val 1505324052 ecr 3895840687,nop,wscale 7], length 0
22:10:14.947630 IP 10.0.0.201.39940 > 192.168.239.137.80: Flags [.], ack 1, win 251, options [nop,nop,TS val 3895840688 ecr 1505324052], length 0
22:10:14.947810 IP 10.0.0.201.39940 > 192.168.239.137.80: Flags [P.], seq 1:75, ack 1, win 251, options [nop,nop,TS val 3895840688 ecr 1505324052], length 74: HTTP: GET / HTTP/1.1
22:10:14.947935 IP 192.168.239.137.80 > 10.0.0.201.39940: Flags [.], ack 75, win 249, options [nop,nop,TS val 1505324053 ecr 3895840688], length 0
22:10:14.948363 IP 192.168.239.137.80 > 10.0.0.201.39940: Flags [P.], seq 1:253, ack 75, win 249, options [nop,nop,TS val 1505324053 ecr 3895840688], length 252: HTTP: HTTP/1.1 200 OK
22:10:14.948654 IP 10.0.0.201.39940 > 192.168.239.137.80: Flags [.], ack 253, win 250, options [nop,nop,TS val 3895840689 ecr 1505324053], length 0
22:10:14.948956 IP 10.0.0.201.39940 > 192.168.239.137.80: Flags [F.], seq 75, ack 253, win 250, options [nop,nop,TS val 3895840689 ecr 1505324053], length 0
22:10:14.949485 IP 192.168.239.137.80 > 10.0.0.201.39940: Flags [F.], seq 253, ack 76, win 249, options [nop,nop,TS val 1505324054 ecr 3895840689], length 0
22:10:14.949721 IP 10.0.0.201.39940 > 192.168.239.137.80: Flags [.], ack 254, win 250, options [nop,nop,TS val 3895840690 ecr 1505324054], length 0[root@LVS ~] tcpdump -i ens36 -nn port 80
dropped privs to tcpdump
tcpdump: verbose output suppressed, use -v[v]... for full protocol decode
listening on ens36, link-type EN10MB (Ethernet), snapshot length 262144 bytes
22:10:14.946974 IP 10.0.0.201.39940 > 10.0.0.129.80: Flags [S], seq 2119984101, win 32120, options [mss 1460,sackOK,TS val 3895840687 ecr 0,nop,wscale 7], length 0
22:10:14.947358 IP 10.0.0.129.80 > 10.0.0.201.39940: Flags [S.], seq 3761349315, ack 2119984102, win 31856, options [mss 1460,sackOK,TS val 1505324052 ecr 3895840687,nop,wscale 7], length 0
22:10:14.947621 IP 10.0.0.201.39940 > 10.0.0.129.80: Flags [.], ack 1, win 251, options [nop,nop,TS val 3895840688 ecr 1505324052], length 0
22:10:14.947804 IP 10.0.0.201.39940 > 10.0.0.129.80: Flags [P.], seq 1:75, ack 1, win 251, options [nop,nop,TS val 3895840688 ecr 1505324052], length 74: HTTP: GET / HTTP/1.1
22:10:14.947942 IP 10.0.0.129.80 > 10.0.0.201.39940: Flags [.], ack 75, win 249, options [nop,nop,TS val 1505324053 ecr 3895840688], length 0
22:10:14.948372 IP 10.0.0.129.80 > 10.0.0.201.39940: Flags [P.], seq 1:253, ack 75, win 249, options [nop,nop,TS val 1505324053 ecr 3895840688], length 252: HTTP: HTTP/1.1 200 OK
22:10:14.948647 IP 10.0.0.201.39940 > 10.0.0.129.80: Flags [.], ack 253, win 250, options [nop,nop,TS val 3895840689 ecr 1505324053], length 0
22:10:14.948948 IP 10.0.0.201.39940 > 10.0.0.129.80: Flags [F.], seq 75, ack 253, win 250, options [nop,nop,TS val 3895840689 ecr 1505324053], length 0
22:10:14.949494 IP 10.0.0.129.80 > 10.0.0.201.39940: Flags [F.], seq 253, ack 76, win 249, options [nop,nop,TS val 1505324054 ecr 3895840689], length 0
22:10:14.949714 IP 10.0.0.201.39940 > 10.0.0.129.80: Flags [.], ack 254, win 250, options [nop,nop,TS val 3895840690 ecr 1505324054], length 0
3.2 使用循环与http建立连接
通过 观察结果,符合轮循算法 rr
[root@internet ~] for((i=0;i<=10;i++))
> do
> curl 10.0.0.129
> done
192.168.239.148 is www.shuyan.com
192.168.239.137
192.168.239.148 is www.shuyan.com
192.168.239.137
192.168.239.148 is www.shuyan.com
192.168.239.137
192.168.239.148 is www.shuyan.com
192.168.239.137
192.168.239.148 is www.shuyan.com
192.168.239.137
192.168.239.148 is www.shuyan.com
这篇关于LVS – NAT 模式集群构建的文章就介绍到这儿,希望我们推荐的文章对编程师们有所帮助!


