本文主要是介绍6、组件通信详解(父子、兄弟、祖孙),希望对大家解决编程问题提供一定的参考价值,需要的开发者们随着小编来一起学习吧!
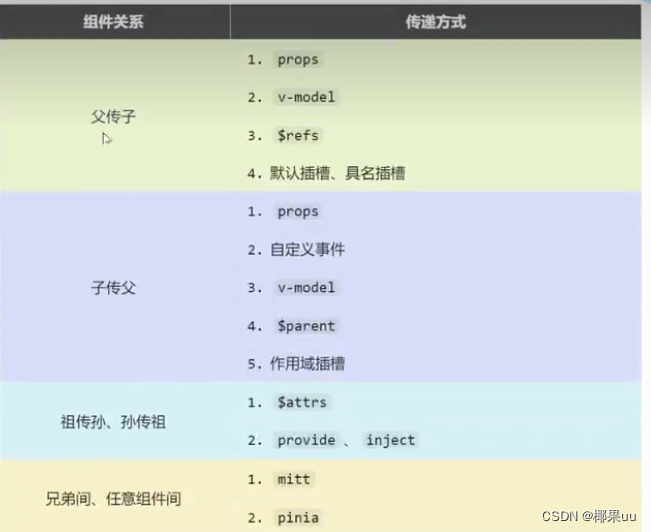
一、父传子
1、props
- 用法:
(1)父组件用 props绑定数据,表示为 v-bind:props="数据" (v-bind:简写为 : ,props可以任意命名)
(2)子组件用 defineProps(['props',....])接收
- 注意:
(1)v-bind:c="数据" 表示父组件给数据绑定了一个名为c的prop属性。这样当父组件的数据发生改变,子组件也能接收到,使双方数据同步;
(2)父传子prop是非函数;
(3)props绑定的数据是只读属性,不能进行修改
父组件Father.vue
<template><div class="father"><h3>父组件</h3><h4>汽车:{{ car }}</h4><Child v-bind:c="car"/></div>
</template><script setup lang="ts" name="Father">
// @ts-nocheckimport Child from './Child.vue'import {ref} from 'vue'// 数据let car = ref('奔驰')
</script>
子组件 Child.vue
<template><div class="child"><h3>子组件</h3><h4>父给的车:{{ c }}</h4></div>
</template><script setup lang="ts" name="Child">
// @ts-nocheckimport {ref} from 'vue'// 声明接收propsdefineProps(['c'])
</script>
2、v-model
用法:
(1)父组件 使用v-model给数据绑定
(2)子组件 利用了props和自定义事件的组合使用
父组件
<Child1 v-model:pageNo="pageNo" v-model:pageSize="pageSize"></Child1>
//父亲的数据
let pageNo = ref(1)
let pageSize = ref(3)
子组件
<template><div class="child2"><h1>同时绑定多个v-model</h1><button @click="handler">pageNo{{ pageNo }}</button><button @click="$emit('update:pageSize', pageSize + 4)">pageSize{{ pageSize }}</button></div>
</template><script setup lang="ts">
let props = defineProps(["pageNo", "pageSize"]);
let $emit = defineEmits(["update:pageNo", "update:pageSize"]);
//第一个按钮的事件回调
const handler = () => {$emit("update:pageNo", props.pageNo + 3);
};
</script>
3、$refs
用法:
ref
(1)父组件 给所有子组件用ref打标识,定义点击事件以及回调。
(2)子组件 defineExpose暴露自己的数据,父亲可以拿到
$refs
父亲想修改所有儿子的数据。
(1)父组件定义一个修改全部儿子的方法传入参数$refs。$refs可以获取所有儿子实例
(2)子组件都使用defineExpose向外暴露自己的数据
父组件:
<template><div class="father"><h3>父组件</h3><h4>房产:{{ house }}</h4><button @click="changeToy">修改Child1的玩具</button><button @click="changeComputer">修改Child2的电脑</button><button @click="getAllChild($refs)">让所有孩子的书变多</button><Child1 ref="c1"/><Child2 ref="c2"/></div>
</template><script setup lang="ts" name="Father">import Child1 from './Child1.vue'import Child2 from './Child2.vue'import { ref,reactive } from "vue";let c1 = ref()let c2 = ref()// 注意点:当访问obj.c的时候,底层会自动读取value属性,因为c是在obj这个响应式对象中的/* let obj = reactive({a:1,b:2,c:ref(3)})let x = ref(4)console.log(obj.a)console.log(obj.b)console.log(obj.c)console.log(x) */// 数据let house = ref(4)// 方法function changeToy(){c1.value.toy = '小猪佩奇'}function changeComputer(){c2.value.computer = '华为'}function getAllChild(refs:{[key:string]:any}){console.log(refs)for (let key in refs){refs[key].book += 3}}// 向外部提供数据defineExpose({house})
</script>
子组件1:
<template><div class="child1"><h3>子组件1</h3><h4>玩具:{{ toy }}</h4><h4>书籍:{{ book }} 本</h4><button @click="minusHouse($parent)">干掉父亲的一套房产</button></div>
</template><script setup lang="ts" name="Child1">import { ref } from "vue";// 数据let toy = ref('奥特曼')let book = ref(3)// 方法function minusHouse(parent:any){parent.house -= 1}// 把数据交给外部defineExpose({toy,book})</script>
子组件2:
<template><div class="child2"><h3>子组件2</h3><h4>电脑:{{ computer }}</h4><h4>书籍:{{ book }} 本</h4></div>
</template><script setup lang="ts" name="Child2">import { ref } from "vue";// 数据let computer = ref('联想')let book = ref(6)// 把数据交给外部defineExpose({computer,book})
</script>
4、默认插槽
用法:
(1)父组件 使用category子组件的起始终止标签,里面夹带要展示的内容
(2)子组件 使用slot默认插槽,父组件的每一个category标签中间的内容都会插入到slot里面
这样就能把父亲里面的数据显示到子组件里面。
父组件
<template><div class="father"><h3>父组件</h3><div class="content"><Category title="热门游戏列表"><ul><li v-for="g in games" :key="g.id">{{ g.name }}</li></ul></Category><Category title="今日美食城市"><img :src="imgUrl" alt=""></Category><Category title="今日影视推荐"><video :src="videoUrl" controls></video></Category></div></div>
</template><script setup lang="ts" name="Father">import Category from './Category.vue'import { ref,reactive } from "vue";let games = reactive([{id:'asgytdfats01',name:'英雄联盟'},{id:'asgytdfats02',name:'王者农药'},{id:'asgytdfats03',name:'红色警戒'},{id:'asgytdfats04',name:'斗罗大陆'}])let imgUrl = ref('https://z1.ax1x.com/2023/11/19/piNxLo4.jpg')let videoUrl = ref('http://clips.vorwaerts-gmbh.de/big_buck_bunny.mp4')</script>
子组件
<template><div class="category"><h2>{{title}}</h2><slot>默认内容</slot></div>
</template><script setup lang="ts" name="Category">defineProps(['title'])
</script>
5、具名插槽
用法:
(1)父组件 用template v-slot:s1或者#s2来命名
(2)子组件 用slot name=xxx来决定存放位置
这样父组件里面的数据就能决定放在子组件的哪个位置了,不受顺序影响
父组件中:<Category title="今日热门游戏"><template v-slot:s1><ul><li v-for="g in games" :key="g.id">{{ g.name }}</li></ul></template><template #s2><a href="">更多</a></template></Category>
子组件中:<template><div class="item"><h3>{{ title }}</h3><slot name="s1"></slot><slot name="s2"></slot></div></template>
二、子传父
1、props
- 用法:
(1)先在父组件内部定义一个关于获取数据的方法getToy,为这个方法getToy绑定prop属性为函数sendToy。表示为 :sendToy="getToy"
(2)子组件definprops(['prop',....])接收,并绑定点击事件@click="sendToy(toy)"把要传的数据发送过去。
- 注意:
(1)子传父prop是函数
(2)props绑定的数据是只读属性,不能进行修改
父组件Father.vue
<template><div class="father"><h3>父组件</h3><h4 v-show="toy">子给的玩具:{{ toy }}</h4><Child :sendToy="getToy"/></div>
</template><script setup lang="ts" name="Father">
// @ts-nocheckimport Child from './Child.vue'import {ref} from 'vue'// 数据let toy = ref('')// 方法function getToy(value:string){toy.value = value}
</script>
子组件Child.vue
<template><div class="child"><h3>子组件</h3><button @click="sendToy(toy)">把玩具给父亲</button></div>
</template><script setup lang="ts" name="Child">
// @ts-nocheckimport {ref} from 'vue'// 数据let toy = ref('奥特曼')// 声明接收propsdefineProps(['sendToy'])
</script>
2、emit自定义事件通信
用法:
(1) 先在父组件内部的子组件绑定自定义事件@xxx,即为 @send-toy="saveToy",再定义自定义事件的回调saveToy
(2)子组件声明事件,用definEmits(['send-toy'])
(3)子组件绑定事件传递参数,@click="emit('send-toy',toy)"
Father.vue
<template><div class="father"><h3>父组件</h3><h4 v-show="toy">子给的玩具:{{ toy }}</h4><!-- 给子组件Child绑定事件 --><Child @send-toy="saveToy"/></div>
</template><script setup lang="ts" name="Father">
// @ts-nocheckimport Child from './Child.vue'import { ref } from "vue";// 数据let toy = ref('')// 用于保存传递过来的玩具function saveToy(value:string){console.log('saveToy',value)toy.value = value}
</script>
Child.vue
<template><div class="child"><h3>子组件</h3><h4>玩具:{{ toy }}</h4><button @click="emit('send-toy',toy)">测试</button></div>
</template><script setup lang="ts" name="Child">
// @ts-nocheckimport { ref } from "vue";// 数据let toy = ref('奥特曼')// 声明事件const emit =  defineEmits(['send-toy'])
</script>
3、v-model
4、$parent
用法:
(1)父组件,用definExpose向外暴露自己的数据
(2)子组件,通过$parent获取父组件实例,定义点击事件传入$parent 修改父组件的数据
父组件:
<template><div class="father"><h3>父组件</h3><h4>房产:{{ house }}</h4><button @click="changeToy">修改Child1的玩具</button><button @click="changeComputer">修改Child2的电脑</button><button @click="getAllChild($refs)">让所有孩子的书变多</button><Child1 ref="c1"/><Child2 ref="c2"/></div>
</template><script setup lang="ts" name="Father">import Child1 from './Child1.vue'import Child2 from './Child2.vue'import { ref,reactive } from "vue";let c1 = ref()let c2 = ref()// 注意点:当访问obj.c的时候,底层会自动读取value属性,因为c是在obj这个响应式对象中的/* let obj = reactive({a:1,b:2,c:ref(3)})let x = ref(4)console.log(obj.a)console.log(obj.b)console.log(obj.c)console.log(x) */// 数据let house = ref(4)// 方法function changeToy(){c1.value.toy = '小猪佩奇'}function changeComputer(){c2.value.computer = '华为'}function getAllChild(refs:{[key:string]:any}){console.log(refs)for (let key in refs){refs[key].book += 3}}// 向外部提供数据defineExpose({house})
</script>
子组件1:
<template><div class="child1"><h3>子组件1</h3><h4>玩具:{{ toy }}</h4><h4>书籍:{{ book }} 本</h4><button @click="minusHouse($parent)">干掉父亲的一套房产</button></div>
</template><script setup lang="ts" name="Child1">import { ref } from "vue";// 数据let toy = ref('奥特曼')let book = ref(3)// 方法function minusHouse(parent:any){parent.house -= 1}// 把数据交给外部defineExpose({toy,book})</script>
5、作用域插槽
比如你要在父组件显示子组件的不同形式(有序,无序,标题),但是当你在父组件遍历子组件的数据时候,你是拿不到的。这时候就用到了作用域插槽。数据在子组件,数据的展示解构由父组件决定。
用法:
(1)父组件 使用template v-slot="params" params就是子组件传递过来的所有对象
(2)子组件 用props绑定数据,传给了内置组件slot,slot又把数据传给了他的使用者,父组件。
父组件
<template><div class="father"><h3>父组件</h3><div class="content"><Game><template v-slot="params"><ul><li v-for="y in params.youxi" :key="y.id">{{ y.name }}</li></ul></template></Game><Game><template v-slot="params"><ol><li v-for="item in params.youxi" :key="item.id">{{ item.name }}</li></ol></template></Game><Game><template #default="{youxi}"><h3 v-for="g in youxi" :key="g.id">{{ g.name }}</h3></template></Game></div></div>
</template><script setup lang="ts" name="Father">import Game from './Game.vue'
</script>
子组件
<template><div class="game"><h2>游戏列表</h2><slot :youxi="games" x="哈哈" y="你好"></slot></div>
</template><script setup lang="ts" name="Game">import {reactive} from 'vue'let games = reactive([{id:'asgytdfats01',name:'英雄联盟'},{id:'asgytdfats02',name:'王者农药'},{id:'asgytdfats03',name:'红色警戒'},{id:'asgytdfats04',name:'斗罗大陆'}])
</script>
三、祖传孙
1、$attrs
用法:
(1)父组件 使用v-bind给数据绑定props
(2)子组件 不接收,使用v-bind="$attrs"存给孙组件
(3)孙组件 使用defineprops接收
父组件:
<template><div class="father"><h3>父组件</h3><h4>a:{{a}}</h4><h4>b:{{b}}</h4><h4>c:{{c}}</h4><h4>d:{{d}}</h4><Child :a="a" :b="b" :c="c" :d="d" /></div>
</template><script setup lang="ts" name="Father">import Child from './Child.vue'import {ref} from 'vue'let a = ref(1)let b = ref(2)let c = ref(3)let d = ref(4)</script>
子组件:
<template><div class="child"><h3>子组件</h3><GrandChild v-bind="$attrs"/></div>
</template><script setup lang="ts" name="Child">import GrandChild from './GrandChild.vue'
</script>
孙组件:
<template><div class="grand-child"><h3>孙组件</h3><h4>a:{{ a }}</h4><h4>b:{{ b }}</h4><h4>c:{{ c }}</h4><h4>d:{{ d }}</h4></div>
</template><script setup lang="ts" name="GrandChild">defineProps(['a','b','c','d'])
</script>
2、provide inject
用法:
(1)父组件,先从vue中import引入provide ,而后使用provide向后代提供数据
provide('名字',值)
(2)后代组件,先import引入inject,而后使用inject接收数据,inject('名字','默认值')
父组件:
<template><div class="father"><h3>父组件</h3><h4>银子:{{ money }}万元</h4><h4>车子:一辆{{car.brand}}车,价值{{car.price}}万元</h4><Child/></div>
</template><script setup lang="ts" name="Father">import Child from './Child.vue'import {ref,reactive,provide} from 'vue'let money = ref(100)let car = reactive({brand:'奔驰',price:100})function updateMoney(value:number){money.value -= value}// 向后代提供数据provide('moneyContext',{money,updateMoney})provide('car',car)
孙组件:
<template><div class="grand-child"><h3>我是孙组件</h3><h4>银子:{{ money }}</h4><h4>车子:一辆{{car.brand}}车,价值{{car.price}}万元</h4><button @click="updateMoney(6)">花爷爷的钱</button></div>
</template><script setup lang="ts" name="GrandChild">import { inject } from "vue";let {money,updateMoney} = inject('moneyContext',{money:0,updateMoney:(param:number)=>{}})let car = inject('car',{brand:'未知',price:0})
</script>
四、孙传祖
1、$attrs
(1)父组件 绑定方法
(2)子组件 不接收使用$attrs传给孙组件
(3)孙组件 使用defineprops接收,并绑定点击事件
父组件:
<template><div class="father"><h3>父组件</h3><h4>a:{{a}}</h4><h4>b:{{b}}</h4><h4>c:{{c}}</h4><h4>d:{{d}}</h4><Child :a="a" :b="b" :c="c" :d="d" v-bind="{x:100,y:200}" :updateA="updateA"/></div>
</template><script setup lang="ts" name="Father">import Child from './Child.vue'import {ref} from 'vue'let a = ref(1)let b = ref(2)let c = ref(3)let d = ref(4)function updateA(value:number){a.value += value}
</script>
子组件:
<template><div class="child"><h3>子组件</h3><GrandChild v-bind="$attrs"/></div>
</template><script setup lang="ts" name="Child">import GrandChild from './GrandChild.vue'
</script>
孙组件:
<template><div class="grand-child"><h3>孙组件</h3><h4>a:{{ a }}</h4><h4>b:{{ b }}</h4><h4>c:{{ c }}</h4><h4>d:{{ d }}</h4><h4>x:{{ x }}</h4><h4>y:{{ y }}</h4><button @click="updateA(6)">点我将爷爷那的a更新</button></div>
</template><script setup lang="ts" name="GrandChild">defineProps(['a','b','c','d','x','y','updateA'])
</script>
2、provide inject
用法:
(1) 父组件,里面定义一个方法,在provide里面传的是money的值和这个方法给孙组件
(2)孙组件,可以把传过来的值和方法 利用解构赋值和inject接收,然后再添加一个按钮绑定这个方法,并传数据。就实现了孙传祖。
父组件:
<template><div class="father"><h3>父组件</h3><h4>银子:{{ money }}万元</h4><h4>车子:一辆{{car.brand}}车,价值{{car.price}}万元</h4><Child/></div>
</template><script setup lang="ts" name="Father">import Child from './Child.vue'import {ref,reactive,provide} from 'vue'let money = ref(100)let car = reactive({brand:'奔驰',price:100})function updateMoney(value:number){money.value -= value}// 向后代提供数据provide('moneyContext',{money,updateMoney})provide('car',car)
孙组件:
<template><div class="grand-child"><h3>我是孙组件</h3><h4>银子:{{ money }}</h4><h4>车子:一辆{{car.brand}}车,价值{{car.price}}万元</h4><button @click="updateMoney(6)">花爷爷的钱</button></div>
</template><script setup lang="ts" name="GrandChild">import { inject } from "vue";let {money,updateMoney} = inject('moneyContext',{money:0,updateMoney:(param:number)=>{}})let car = inject('car',{brand:'未知',price:0})
</script>
五、兄弟、任意组件
1、mitt任意组件通信
用法:
(1)提供数据的用emitter.emit触发事件。
@click="emitter.emit('send-toy',toy)">
(2)接收数据的用emitter.on绑定事件。
emitter.on('send-toy',(value:any)=>{
toy.value = value
})
Child1.vue
<template><div class="child1"><h3>子组件1</h3><h4>玩具:{{ toy }}</h4><button @click="emitter.emit('send-toy',toy)">玩具给弟弟</button></div>
</template><script setup lang="ts" name="Child1">
// @ts-nocheckimport {ref} from 'vue'import emitter from '@/utils/emitter';// 数据let toy = ref('奥特曼')
</script>
Child2.vue
<template><div class="child2"><h3>子组件2</h3><h4>电脑:{{ computer }}</h4><h4>哥哥给的玩具:{{ toy }}</h4></div>
</template><script setup lang="ts" name="Child2">
// @ts-nocheckimport {ref,onUnmounted} from 'vue'import emitter from '@/utils/emitter';// 数据let computer = ref('联想')let toy = ref('')// 给emitter绑定send-toy事件emitter.on('send-toy',(value:any)=>{toy.value = value})// 在组件卸载时解绑send-toy事件onUnmounted(()=>{emitter.off('send-toy')})
</script>
2、pinia
vue3组件常用的通信方式 Pinia_pinia实现组件的通信-CSDN博客
// 在 store.js 中定义 Pinia store
import { defineStore } from 'pinia';export const useCounterStore = defineStore({id: 'counter',state: () => ({count: 0,}),actions: {increment() {this.count++;},decrement() {this.count--;},},
});// 在组件中使用 store
<template><div><p>Count: {{ count }}</p><button @click="increment">Increment</button><button @click="decrement">Decrement</button></div>
</template><script>
import { useCounterStore } from './store';export default {setup() {const counterStore = useCounterStore();return {count: counterStore.count,increment: counterStore.increment,decrement: counterStore.decrement,};},
};
</script>
六、总结
这篇关于6、组件通信详解(父子、兄弟、祖孙)的文章就介绍到这儿,希望我们推荐的文章对编程师们有所帮助!


