本文主要是介绍【纯血鸿蒙】——响应式布局如何实现?,希望对大家解决编程问题提供一定的参考价值,需要的开发者们随着小编来一起学习吧!
前面介绍了自适应布局,但是将窗口尺寸变化较大时,仅仅依靠自适应布局可能出现图片异常放大或页面内容稀疏、留白过多等问题。此时就需要借助响应式布局能力调整页面结构。
响应式布局
响应式布局是指页面内的元素可以根据特定的特征(如窗口宽度、屏幕方向等)自动变化以适应外部容器变化的布局能力。响应式布局中最常使用的特征是窗口宽度,可以将窗口宽度划分为不同的范围(下文中称为断点)。当窗口宽度从一个断点变化到另一个断点时,改变页面布局(如将页面内容从单列排布调整为双列排布甚至三列排布等)以获得更好的显示效果。
当前系统提供了如下三种响应式布局能力,后文中我将依次展开介绍。
| 响应式布局能力 | 简介 |
|---|---|
| 断点 | 将窗口宽度划分为不同的范围(即断点),监听窗口尺寸变化,当断点改变时同步调整页面布局。 |
| 媒体查询 | 媒体查询支持监听窗口宽度、横竖屏、深浅色、设备类型等多种媒体特征,当媒体特征发生改变时同步调整页面布局。 |
| 栅格布局 | 栅格组件将其所在的区域划分为有规律的多列,通过调整不同断点下的栅格组件的参数以及其子组件占据的列数等,实现不同的布局效果。 |
1. 断点
1.1. 断点是什么?
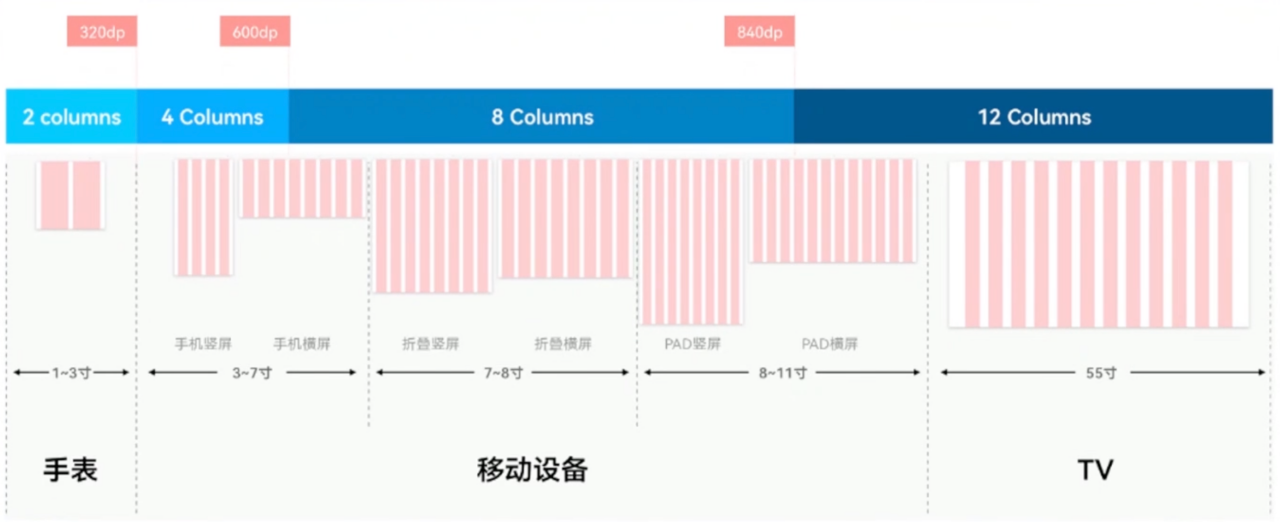
断点以应用窗口宽度为切入点,将应用窗口在宽度维度上分成了几个不同的区间即不同的断点,在不同的区间下,开发者可根据需要实现不同的页面布局效果。
| 断点名称 | 取值范围(**vp)** | 设备 |
|---|---|---|
| xs | [0, 320) | 手表等超小屏 |
| sm | [320, 600) | 手机竖屏 |
| md | [600, 840) | 手机横屏,折叠屏 |
| lg | [840, +∞) | 平板,2in1 设备 |
1.2. 监听断点
判断应用当前处于何种断点,进而可以调整应用的布局。常见的监听断点变化的方法如下所示:
-
获取窗口对象并监听窗口尺寸变化(了解)
-
通过媒体查询监听应用窗口尺寸变化(掌握)
-
借助栅格组件能力监听不同断点的变化(掌握)
2. 媒体查询获取当前断点
-
系统工具——BreakpointSystem
-
系统工具——BreakPointType
2.1 进行工具类封装
直接给上完整代码
import mediaQuery from '@ohos.mediaquery'
declare interface BreakPointTypeOption<T> {xs?: Tsm?: Tmd?: Tlg?: Txl?: Txxl?: T
}
interface Breakpoint {name: stringsize: numbermediaQueryListener?: mediaQuery.MediaQueryListener
}
export const BreakpointKey: string = 'currentBreakpoint'
export class BreakPointType<T> {options: BreakPointTypeOption<T>
constructor(option: BreakPointTypeOption<T>) {this.options = option}
getValue(currentBreakPoint: string) {if (currentBreakPoint === 'xs') {return this.options.xs} else if (currentBreakPoint === 'sm') {return this.options.sm} else if (currentBreakPoint === 'md') {return this.options.md} else if (currentBreakPoint === 'lg') {return this.options.lg} else if (currentBreakPoint === 'xl') {return this.options.xl} else if (currentBreakPoint === 'xxl') {return this.options.xxl} else {return undefined}}
}
export class BreakpointSystem {private currentBreakpoint: string = 'md'private breakpoints: Breakpoint[] = [{ name: 'xs', size: 0 }, { name: 'sm', size: 320 },{ name: 'md', size: 600 }, { name: 'lg', size: 840 }]
public register() {this.breakpoints.forEach((breakpoint: Breakpoint, index) => {let condition: stringif (index === this.breakpoints.length - 1) {condition = '(' + breakpoint.size + 'vp<=width' + ')'} else {condition = '(' + breakpoint.size + 'vp<=width<' + this.breakpoints[index + 1].size + 'vp)'}console.log(condition)breakpoint.mediaQueryListener = mediaQuery.matchMediaSync(condition)breakpoint.mediaQueryListener.on('change', (mediaQueryResult) => {if (mediaQueryResult.matches) {this.updateCurrentBreakpoint(breakpoint.name)}})})}
public unregister() {this.breakpoints.forEach((breakpoint: Breakpoint) => {if (breakpoint.mediaQueryListener) {breakpoint.mediaQueryListener.off('change')}})}
private updateCurrentBreakpoint(breakpoint: string) {if (this.currentBreakpoint !== breakpoint) {this.currentBreakpoint = breakpointAppStorage.Set<string>(BreakpointKey, this.currentBreakpoint)console.log('on current breakpoint: ' + this.currentBreakpoint)}}
}
export const breakpointSystem = new BreakpointSystem()2.2. 通过应用级存储为所有页面提供断点
目前查询的内容只在当前页面可以使用,如果希望应用中任意位置都可以使用,咱们可以使用AppStorage 进行共享。
核心步骤:
-
事件中通过
AppStorage.set(key,value)的方式保存当前断点值 -
需要使用的位置通过
AppStorage来获取即可
// 添加回调函数
listenerXS.on('change', (res: mediaquery.MediaQueryResult) => {console.log('changeRes:', JSON.stringify(res))if (res.matches == true) {// this.currentBreakpoint = 'xs'AppStorage.set('currentBreakpoint', 'xs')}
})-
使用断点值
// 组件中引入 AppStorage
@StorageProp('currentBreakpoint') currentBreakpoint: CurrentBreakpoint = 'xs'
// 在需要的位置使用 AppStorage 中保存的断点值
Text(this.currentBreakpoint)2.3. 使用断点
核心用法:
-
导入 BreakpointSystem
-
实例化BreakpointSystem
-
aboutToAppear中注册监听事件 aboutToDisappear中移除监听事件
-
通过 AppStorage,结合 获取断点值即可
// 1. 导入
import { BreakPointType, BreakpointSystem, BreakpointKey } from '../../common/breakpointsystem'
@Entry
@Component
struct Example {
// 2. 实例化breakpointSystem: BreakpointSystem = new BreakpointSystem()// 4. 通过 AppStorage 获取断点值@StorageProp(BreakpointKey)currentBreakpoint: string = 'sm'
// 3. 注册及移除监听事件aboutToAppear(): void {this.breakpointSystem.register()}
aboutToDisappear(): void {this.breakpointSystem.unregister()}
build() {// 略}
}2.4. 案例-电影列表
使用刚刚学习的媒体查询工具,结合断点来完成一个响应式案例效果,达到跨任意终端皆能实现响应式布局的效果。

完整代码:
import { BreakPointType, BreakpointSystem, BreakpointKey } from '../../common/breakpointsystem'
interface MovieItem {title: stringimg: ResourceStr
}
@Entry
@Component
struct Demo09_demo {items: MovieItem[] = [{ title: '电影标题1', img: $r('app.media.ic_video_grid_1') },{ title: '电影标题2', img: $r('app.media.ic_video_grid_2') },{ title: '电影标题3', img: $r('app.media.ic_video_grid_3') },{ title: '电影标题4', img: $r('app.media.ic_video_grid_4') },{ title: '电影标题5', img: $r('app.media.ic_video_grid_5') },{ title: '电影标题6', img: $r('app.media.ic_video_grid_6') },{ title: '电影标题7', img: $r('app.media.ic_video_grid_7') },{ title: '电影标题8', img: $r('app.media.ic_video_grid_8') },{ title: '电影标题9', img: $r('app.media.ic_video_grid_9') },{ title: '电影标题10', img: $r('app.media.ic_video_grid_10') },]breakpointSystem: BreakpointSystem = new BreakpointSystem()@StorageProp(BreakpointKey)currentBreakpoint: string = 'sm'
aboutToAppear(): void {this.breakpointSystem.register()}
aboutToDisappear(): void {this.breakpointSystem.unregister()}
build() {Grid() {ForEach(this.items, (item: MovieItem) => {GridItem() {Column({ space: 10 }) {Image(item.img).borderRadius(10)Text(item.title).width('100%').fontSize(20).fontWeight(600)
}}})}.columnsTemplate(new BreakPointType({xs: '1fr 1fr',sm: '1fr 1fr ',md: '1fr 1fr 1fr ',lg: '1fr 1fr 1fr 1fr '}).getValue(this.currentBreakpoint)).rowsGap(10).columnsGap(10).padding(10)}
}效果:

3. 栅格布局 Grid
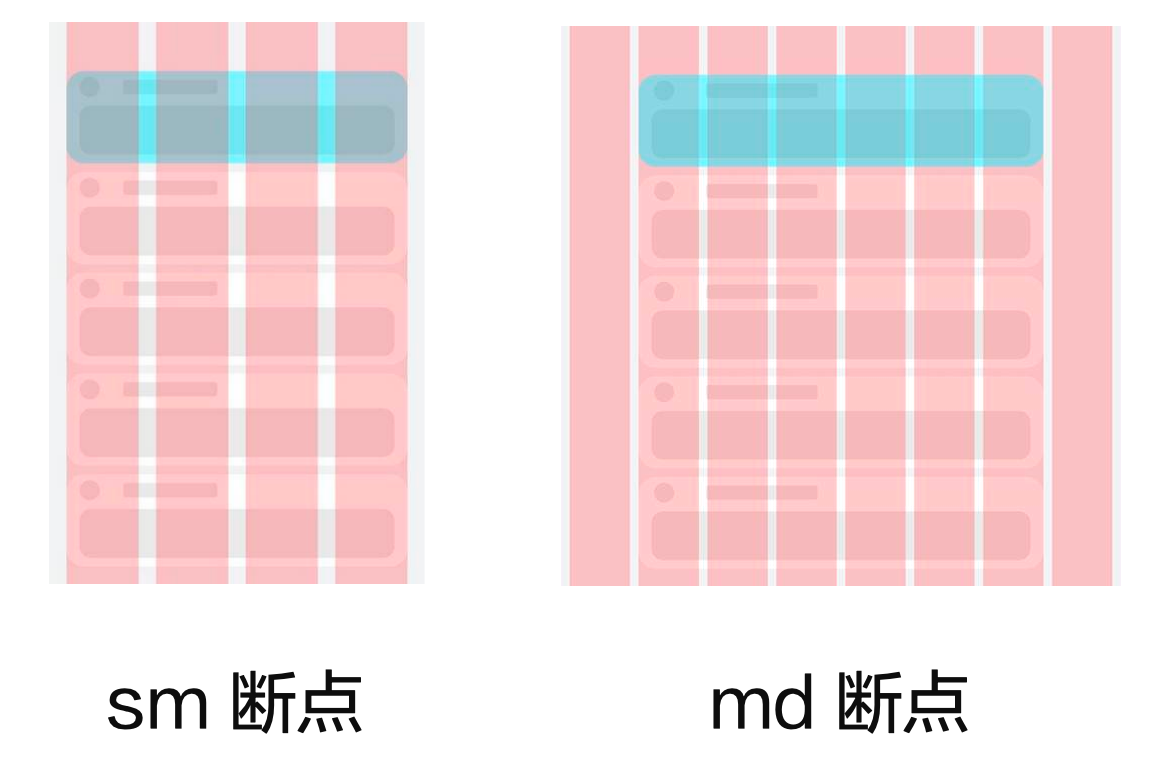
栅格组件的本质是:将组件划分为有规律的多列,通过调整【不同断点】下的【栅格组件的列数】,及【子组件所占列数】实现不同布局
比如:

参考栅格列数设置:

核心用法
优先级从上往下:
-
GridRow的 columns 属性、GridCol 的 span 属性(掌握)
-
GridRow 的 gutter属性、GridCol 的 offset 属性(掌握)
-
GridRow breakpoints属性 和 的 onBreakpointChange 事件(了解)
@Entry
@Component
struct Demo11_login {build() {Stack() {// 辅助用的栅格(顶层粉色区域)GridRow({ gutter: 10, columns: { sm: 4, md: 8, lg: 12 } }) {ForEach(Array.from({ length: 12 }), () => {GridCol().width('100%').height('100%').backgroundColor('#baffa2b4')})}.zIndex(2).height('100%')
// 内容区域GridRow({// TODO 分别设置不同断点的 列数columns: {sm: 4,md: 8,lg: 12}}) {// 列GridCol({// TODO 分别设置不同断点的 所占列数span: {sm: 4,md: 6,lg: 8},// TODO 分别设置不同断点的 偏移offset: {md: 1,lg: 2}
}) {Column() {// logo+文字LogoCom()
// 输入框 + 底部提示文本InputCom()
// 登录+注册账号按钮ButtonCom()
}}}.width('100%').height('100%').backgroundColor('#ebf0f2')}}
}
@Component
struct LogoCom {build() {Column({ space: 5 }) {Image($r('app.media.ic_logo')).width(80)Text('登录界面').fontSize(23).fontWeight(900)Text('登录账号以使用更多服务').fontColor(Color.Gray)}.margin({ top: 100 })}
}
@Component
struct InputCom {build() {Column() {Column() {TextInput({ placeholder: '账号' }).backgroundColor(Color.Transparent)Divider().color(Color.Gray)TextInput({ placeholder: '密码' }).type(InputType.Password).backgroundColor(Color.Transparent)
}.backgroundColor(Color.White).borderRadius(20).padding({ top: 10, bottom: 10 })
Row() {Text('短信验证码登录').fontColor('#006af7').fontSize(14)Text('忘记密码').fontColor('#006af7').fontSize(14)}.width('100%').justifyContent(FlexAlign.SpaceBetween).margin({ top: 10 })
}.padding(5).margin({ top: 80 })
}
}
@Component
struct ButtonCom {build() {Column({ space: 10 }) {Button('登录').width('90%')Text('注册账号').fontColor('#006af7').fontSize(16)}.margin({ top: 60 })}
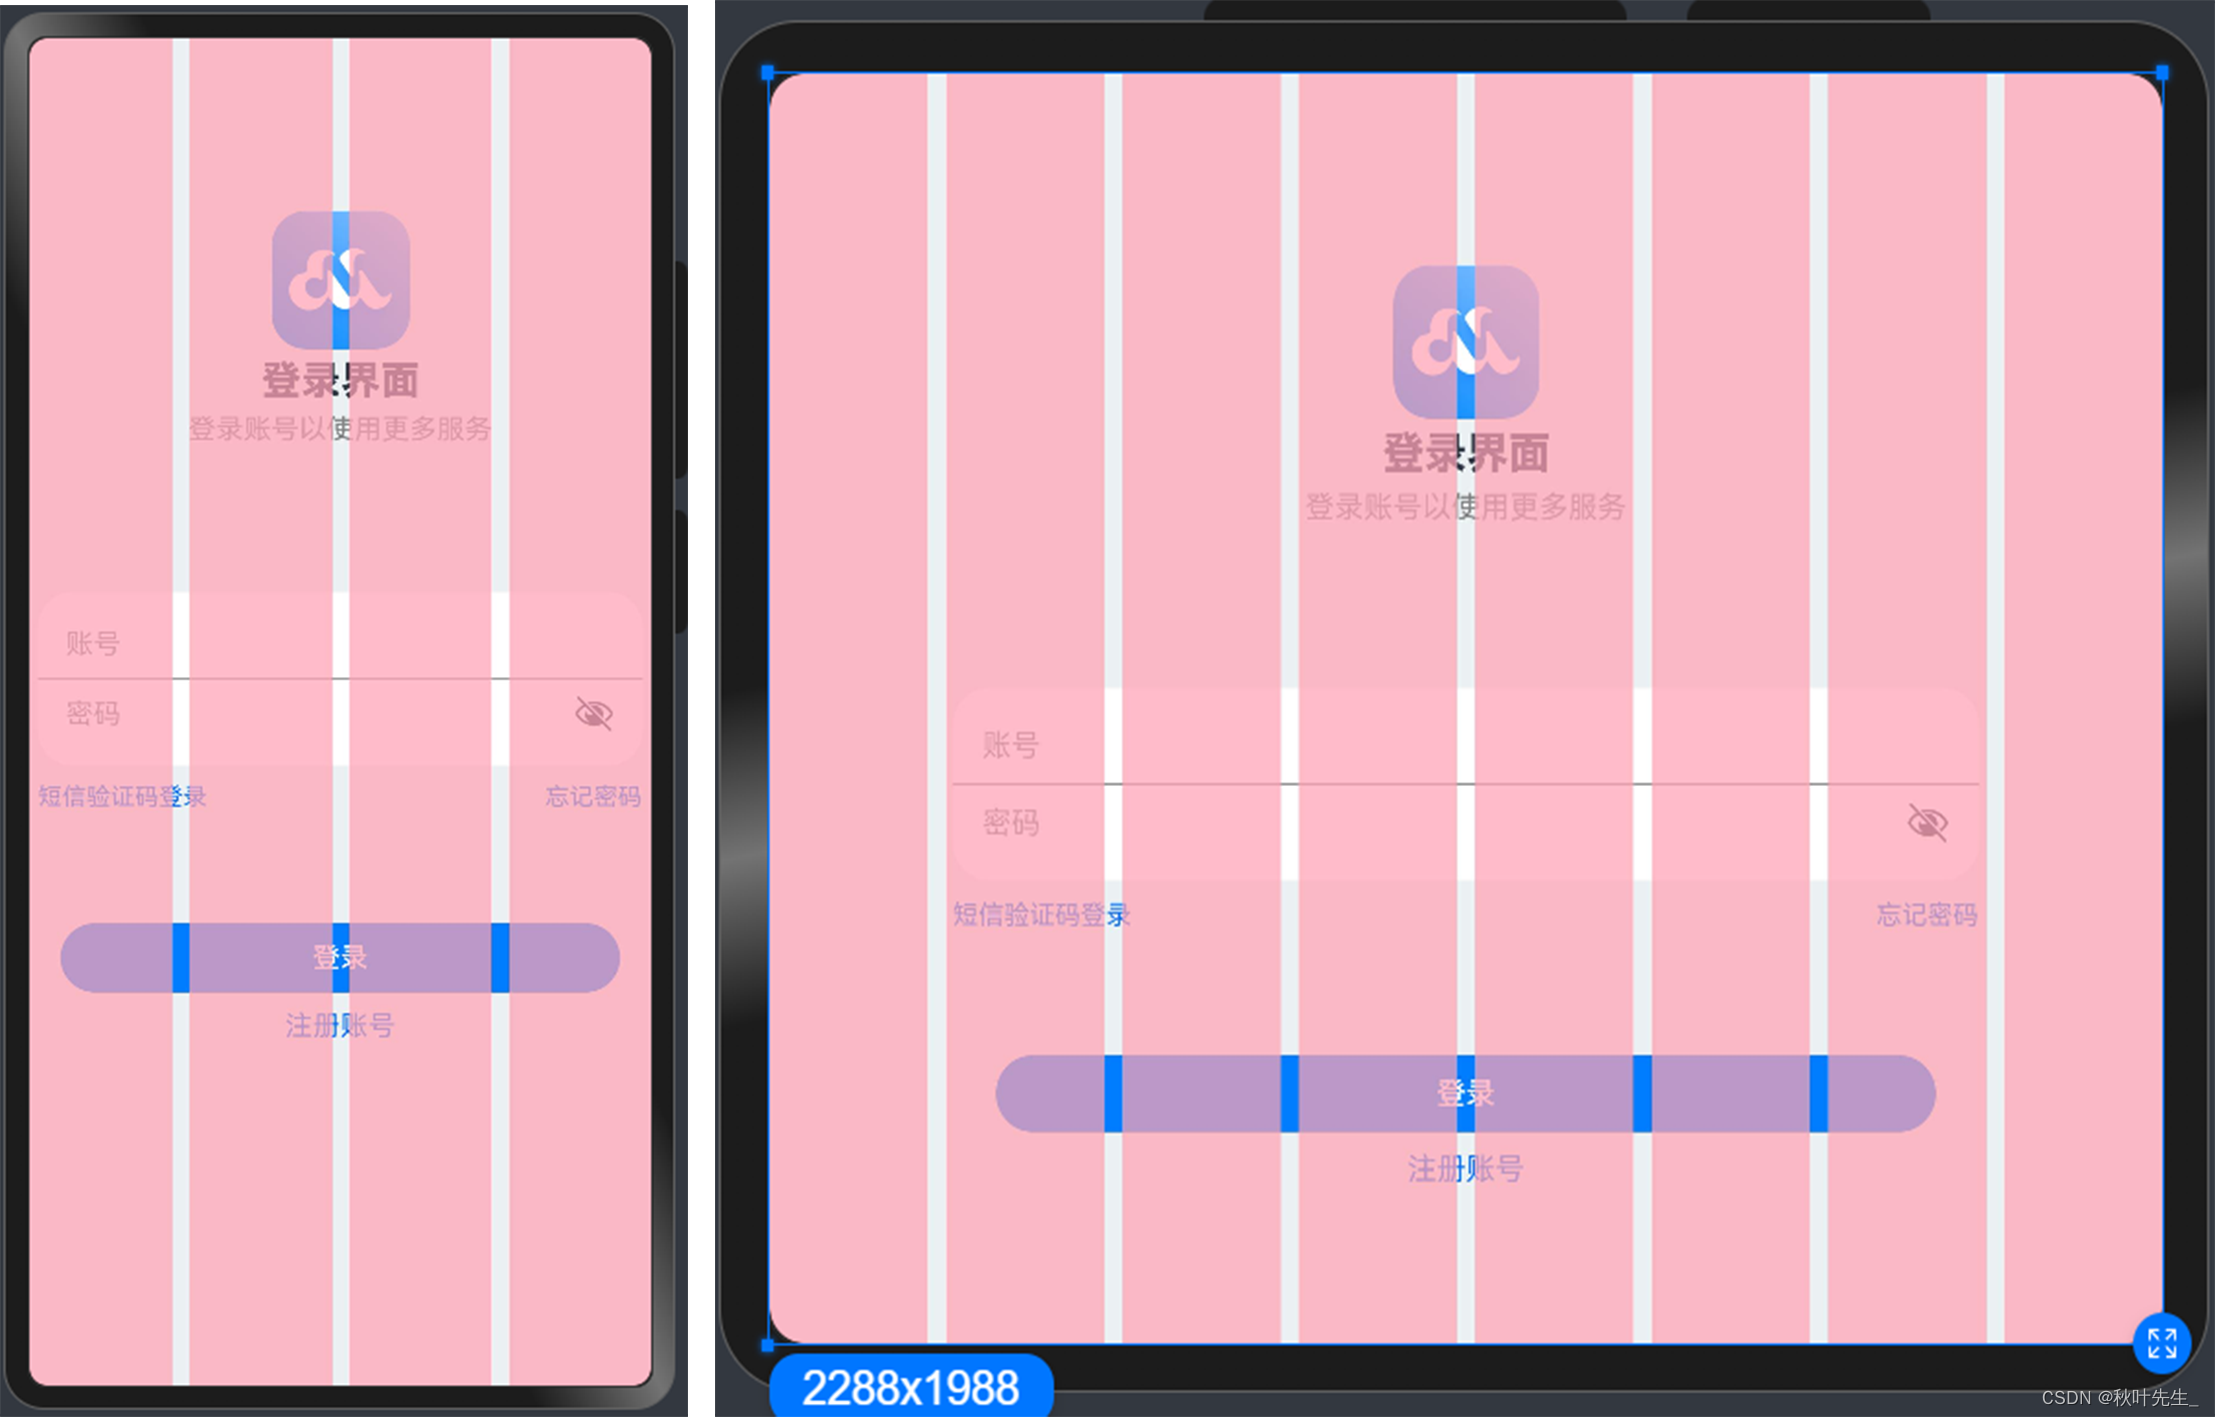
}下面我给栅格布局加了颜色方便展示效果:

这篇关于【纯血鸿蒙】——响应式布局如何实现?的文章就介绍到这儿,希望我们推荐的文章对编程师们有所帮助!


