本文主要是介绍QML官方系列教程——Use Case - Positioners and Layouts In QML,希望对大家解决编程问题提供一定的参考价值,需要的开发者们随着小编来一起学习吧!
附网址:http://qt-project.org/doc/qt-5/qtquick-usecase-layouts.html
Use Case - Positioners and Layouts In QML —— QML中的位置与布局
QML提供了多种调整组件位置的方式。
下面只是一个简要的介绍。要了解更多信息,请参考Important Concepts In Quick - Positioning。
Manual Positioning —— 手动定位
通过设置组件的x,y属性可以将他们放置在特定的坐标(x,y)上,该坐标以它们父对象的左上角为原心,visual coordinate system讲述了有关的规则。
通过对这些属性使用适当的绑定而不是常数赋值,我们很容易通过设置x,y的值实现相对布局。
<span style="font-size:14px;">import QtQuick 2.0Item {width: 100; height: 100Rectangle {// Manually positioned at 20,20x: 20y: 20width: 80height: 80color: "red"}
}</span>
Anchors —— 锚
Item类型提供了将自身系到其他Item对象上的能力。每个Item都有6根锚线,left,right,vertical center,top,bottom and horizontal center。垂直方向的3根锚线可以系到其他对象的任意3根垂直锚线上,水平方向类似。
更多的细节,可以参考Positioning with Anchors以及anchors property文档。
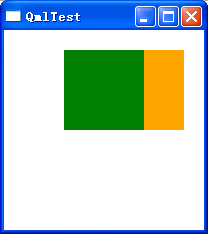
import QtQuick 2.0Item {width: 200; height: 200Rectangle {// Anchored to 20px off the top right corner of the parentanchors.right: parent.rightanchors.top: parent.topanchors.margins: 20 // Sets all margins at oncewidth: 80height: 80color: "orange"}Rectangle {// Anchored to 20px off the top center corner of the parent.// Notice the different group property syntax for 'anchors' compared to// the previous Rectangle. Both are valid.anchors { horizontalCenter: parent.horizontalCenter; top: parent.top; topMargin: 20 }width: 80height: 80color: "green"}
}
·

Positioners and Layouts —— 定位器和布局
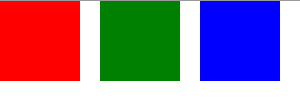
很多情况下我们都希望将一组组件以某个规律进行定位,Qt Quick提供了一些定位器类型。放置在定位器中的组件将以某种方式自动布局;例如Row定位类型会将其内部的组件水平布局。
更多的细节参见Item Positioners以及the positioner types文档。
import QtQuick 2.0Item {width: 300; height: 100Row { // The "Row" type lays out its child items in a horizontal linespacing: 20 // Places 20px of space between itemsRectangle { width: 80; height: 80; color: "red" }Rectangle { width: 80; height: 80; color: "green" }Rectangle { width: 80; height: 80; color: "blue" }}
}
·
如果定位与尺寸需要实时调整,你可以使用Qt Quick Layouts。
这篇关于QML官方系列教程——Use Case - Positioners and Layouts In QML的文章就介绍到这儿,希望我们推荐的文章对编程师们有所帮助!


