本文主要是介绍RocketMq源码解析四:生产者Producer启动,希望对大家解决编程问题提供一定的参考价值,需要的开发者们随着小编来一起学习吧!
一、主要接口和类
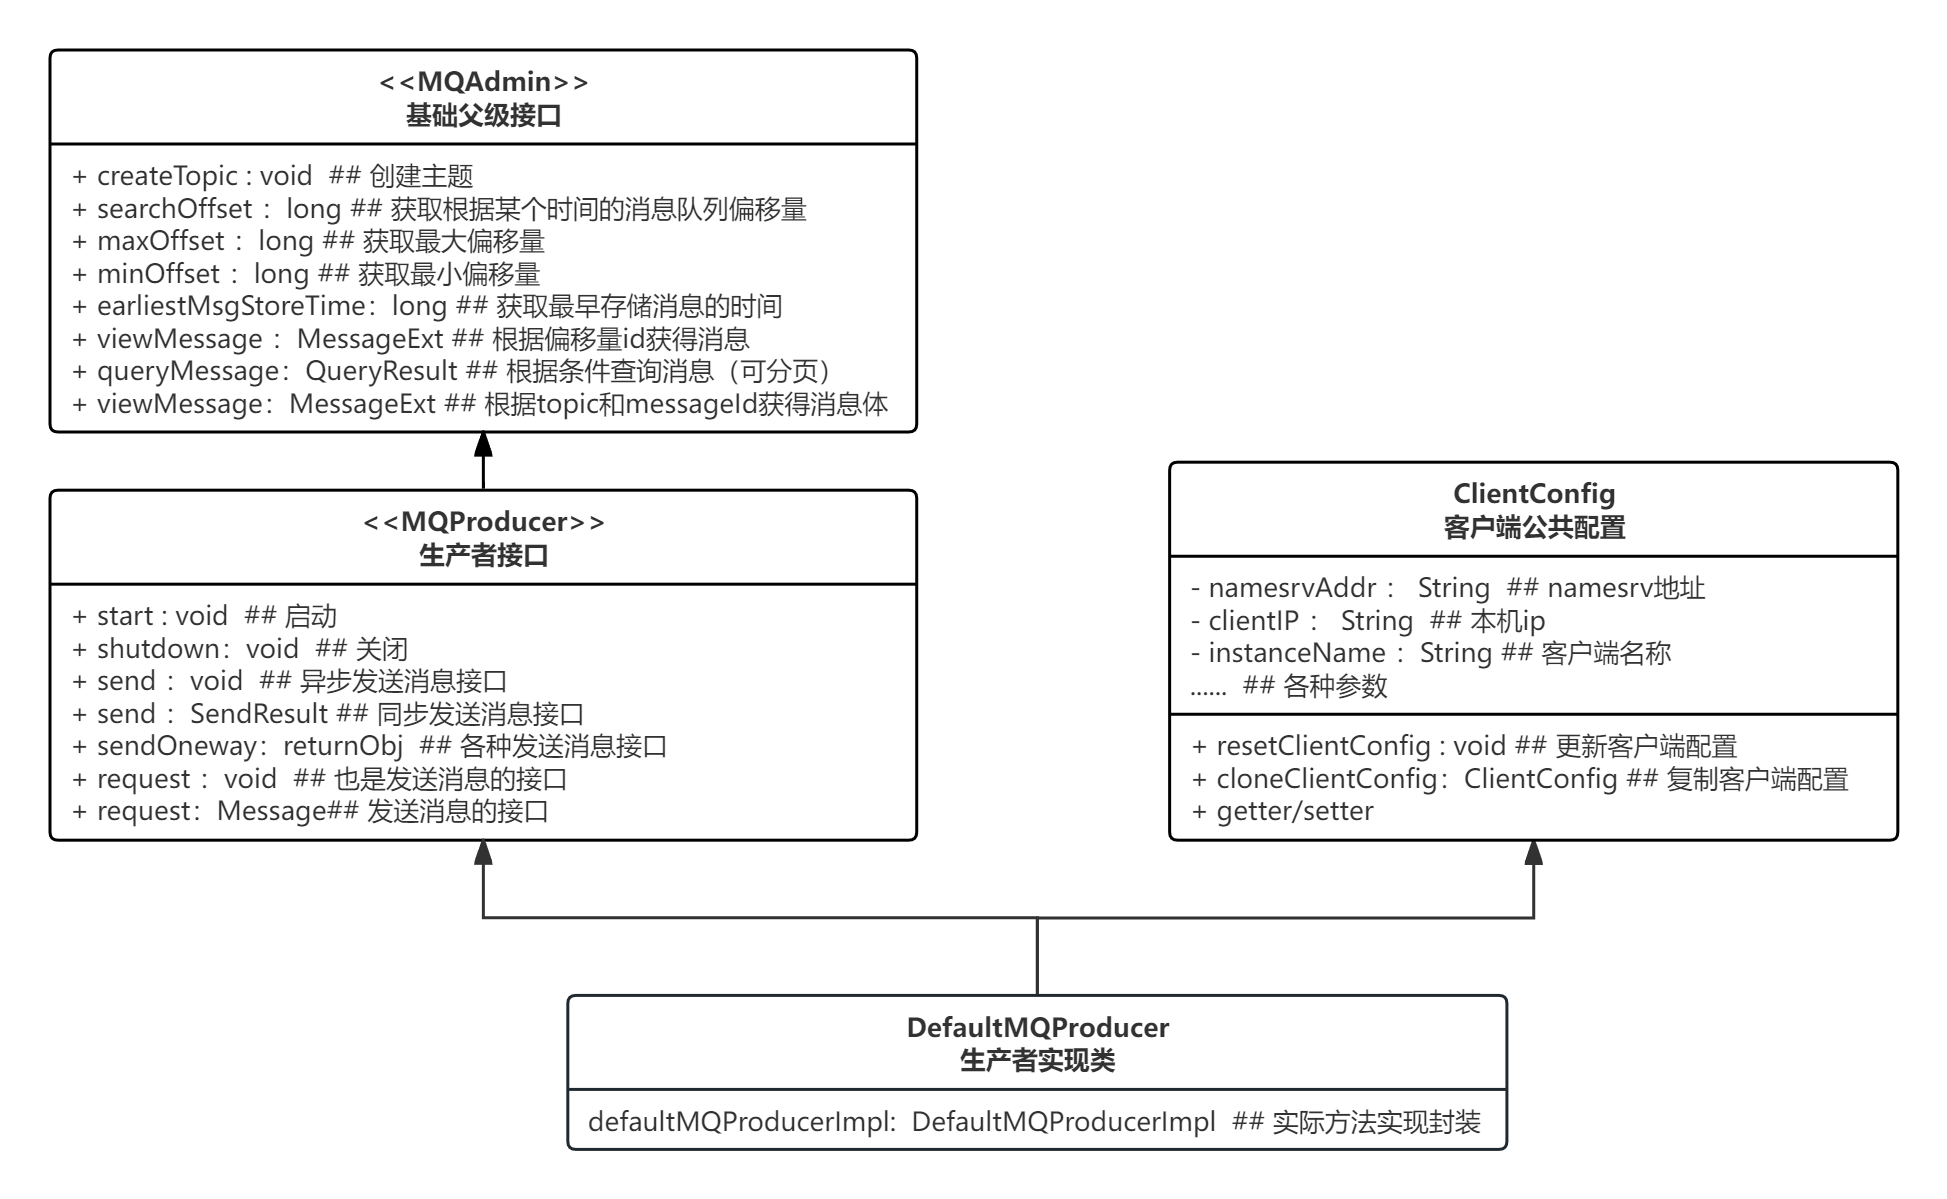
生产者服务核心接口和类的关系如下图所示:

MQProducer是生产者解耦,这里找几个有代表性的方法
// 同步发送消息
SendResult send(final Message msg) throws MQClientException, RemotingException, MQBrokerException,InterruptedException;
// 同步超时发送消息 如果超过了timeout的时间就抛出异常
SendResult send(final Message msg, final long timeout) throws MQClientException,
RemotingException, MQBrokerException, InterruptedException;// 异步发送消息
void send(final Message msg, final SendCallback sendCallback) throws MQClientException,RemotingException, InterruptedException;
// 异步超时发送消息 如果超过了timeout的时间就抛出异常
void send(final Message msg, final SendCallback sendCallback, final long timeout)
throws MQClientException, RemotingException, InterruptedException;// 指定消息队列同步发送消息
SendResult send(final Message msg, final MessageQueue mq) throws MQClientException,
RemotingException, MQBrokerException, InterruptedException;
DefaultMQProducer除了实现MQProducer的方法外,还继承了ClientConfig类,ClientConfig中主要记录了客户端的一些连接配置信息,我们重点看下DefaultMQProducer中有哪些核心属性
producerGroup:生产者所属组
createTopickey:默认TopicdefaultTopicQueueNums:默认主题在每一个Broker队列数量
sendMsgTimeout:发送消息默认超时时间,默认3s
compressMsgBodyOverHowmuch:消息体超过该值则启用压缩,默认4k
retryTimeswhensendFailed:同步方式发送消息重试次数,默认为2,总共执行3次retryTimeswhensendAsyncFailed:异步方法发送消息重试次数,默认为2
retryAnotherBrokerwhenNotstoreOK:消息重试时选择另外一个Broker时,是否不等待存储结果就返回,默认为false
maxMessagesize:允许发送的最大消息长度,默认为4M
我们看到 DefaultMQProducer中持有了一个transient 修饰的DefaultMQProducerImpl类的成员属性defaultMQProducerImpl,实际上核心的功能都封装在了这个DefaultMQProducerImpl类中,下面我们逐一来为读者展开说明。
二、生产者启动流程
我们先来看生产者启动的方法 DefaultMQProducer::start
@Overridepublic void start() throws MQClientException {this.setProducerGroup(withNamespace(this.producerGroup));this.defaultMQProducerImpl.start();if (null != traceDispatcher) {try {traceDispatcher.start(this.getNamesrvAddr(), this.getAccessChannel());} catch (MQClientException e) {log.warn("trace dispatcher start failed ", e);}}}第一步是获取并设置生产者组的信息;
第二步调用defaultMQProducerImpl的start方法,我们上文讲过DefaultMQProducer的大部分核心功能都是封装在DefaultMQProducerImpl类中。我们来看下defaultMQProducerImpl中的start方法:
流程图如下:

源码如下:
public void start(final boolean startFactory) throws MQClientException {switch (this.serviceState) {// 如果是启动case CREATE_JUST:this.serviceState = ServiceState.START_FAILED;// 1、先检查一下配置this.checkConfig();// 2、设置自身的客户端名称为进程IDif (!this.defaultMQProducer.getProducerGroup().equals(MixAll.CLIENT_INNER_PRODUCER_GROUP)) {this.defaultMQProducer.changeInstanceNameToPID();}// 3、获取MQClientManager并获得MQClientInstance实例this.mQClientFactory = MQClientManager.getInstance().getOrCreateMQClientInstance(this.defaultMQProducer, rpcHook);// 4、把当前的生产者注入MQClientFactory中boolean registerOK = mQClientFactory.registerProducer(this.defaultMQProducer.getProducerGroup(), this);if (!registerOK) {this.serviceState = ServiceState.CREATE_JUST;throw new MQClientException("The producer group[" + this.defaultMQProducer.getProducerGroup()+ "] has been created before, specify another name please." + FAQUrl.suggestTodo(FAQUrl.GROUP_NAME_DUPLICATE_URL),null);}this.topicPublishInfoTable.put(this.defaultMQProducer.getCreateTopicKey(), new TopicPublishInfo());// 5、调用start方法启动if (startFactory) {mQClientFactory.start();}log.info("the producer [{}] start OK. sendMessageWithVIPChannel={}", this.defaultMQProducer.getProducerGroup(),this.defaultMQProducer.isSendMessageWithVIPChannel());this.serviceState = ServiceState.RUNNING;break;...}this.mQClientFactory.sendHeartbeatToAllBrokerWithLock();RequestFutureHolder.getInstance().startScheduledTask(this);}重点讲一下第3步:获取MQClientManager并获得MQClientInstance实例。整个JVM中只存在一个MQClienManager实例,维护一个MQClientInstance缓存表
ConcurrentMap<String/* clientld */, MQClientinstance> factoryTable = newConcurrentHashMap<String,MQClientlnstance>():
同一个clientld只会创建一个MQClientInstance。MQClientinstance封装了RocketMQ网络处理API,是消息生产者和消息消费者与NameServer、Broker打交道的网络通道
代码:MQClientManager::getAndCreateMQClientInstance
public MQClientInstance getOrCreateMQClientInstance(final ClientConfig clientConfig, RPCHook rpcHook) {String clientId = clientConfig.buildMQClientId();MQClientInstance instance = this.factoryTable.get(clientId);if (null == instance) {instance =new MQClientInstance(clientConfig.cloneClientConfig(),this.factoryIndexGenerator.getAndIncrement(), clientId, rpcHook);MQClientInstance prev = this.factoryTable.putIfAbsent(clientId, instance);if (prev != null) {instance = prev;log.warn("Returned Previous MQClientInstance for clientId:[{}]", clientId);} else {log.info("Created new MQClientInstance for clientId:[{}]", clientId);}}return instance;}a:构建客户端的id;
b:从缓存表factoryTable中获取对应clientId的实例;
c:如果没有就生成一个并放入到缓存表中;
d:返回
最后我们来看下mQClientFactory.start()当中的源码。
// 先把服务状态改为失败
this.serviceState = ServiceState.START_FAILED;
// 如果配置中的namesrv地址为空,重新获取
if (null == this.clientConfig.getNamesrvAddr()) {
this.mQClientAPIImpl.fetchNameServerAddr();
}
// Start request-response channel 启动一个netty服务用于处理请求
this.mQClientAPIImpl.start();
// Start various schedule tasks 启动一系列定时任务用于更新namesrv地址,topic消费情况等
this.startScheduledTask();
// Start pull service 启动拉取消息服务
this.pullMessageService.start();
// Start rebalance service 启动relalance服务
this.rebalanceService.start();
// Start push service 启动推送服务
this.defaultMQProducer.getDefaultMQProducerImpl().start(false);
log.info("the client factory [{}] start OK", this.clientId);// 把服务状态改为运行中
this.serviceState = ServiceState.RUNNING;
至此生产者启动流程已经讲述完毕。
这篇关于RocketMq源码解析四:生产者Producer启动的文章就介绍到这儿,希望我们推荐的文章对编程师们有所帮助!


