本文主要是介绍【B站 heima】小兔鲜Vue3 项目学习笔记Day04,希望对大家解决编程问题提供一定的参考价值,需要的开发者们随着小编来一起学习吧!
文章目录
- 二级分类
- 1.整体认识和路由配置
- 2.面包屑导航功能实现
- 3. 基础商品列表实现
- 4. 定制路由滚动行为
- 详情页
- 1.整体认识和路由配置
- 2.基础数据渲染
- 3.热榜区域实现
- 4. 图片预览组件封装
- 5.放大镜-滑块跟随移动
- 左侧滑块跟随鼠标移动
- 放大镜-大图效果
- 6. props适配
- 7. SKU组件熟悉使用
- 8. 通用组件统一注册为全局组件
- 小结
持续更新~~
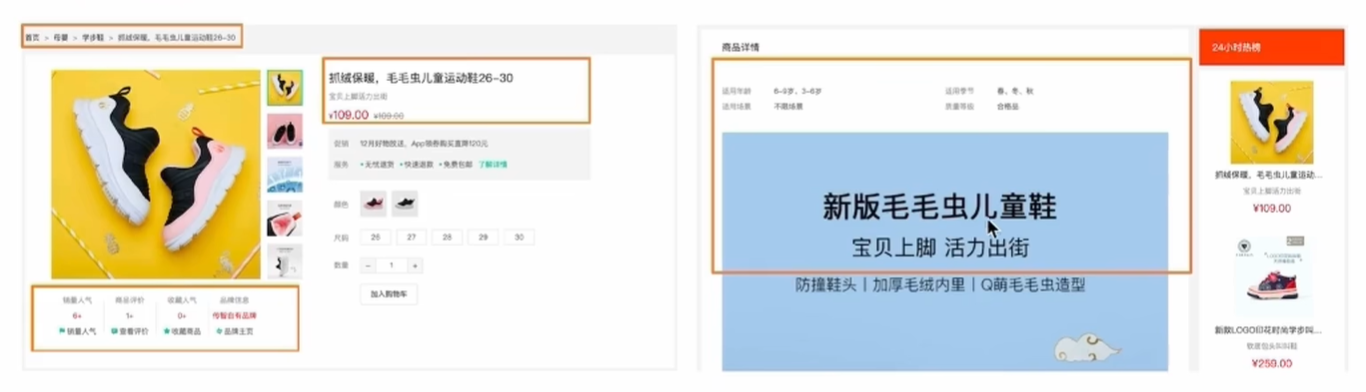
二级分类
1.整体认识和路由配置
步骤:
- 创建路由组件,静态模板
<!--views/subCategory/index.vue-->
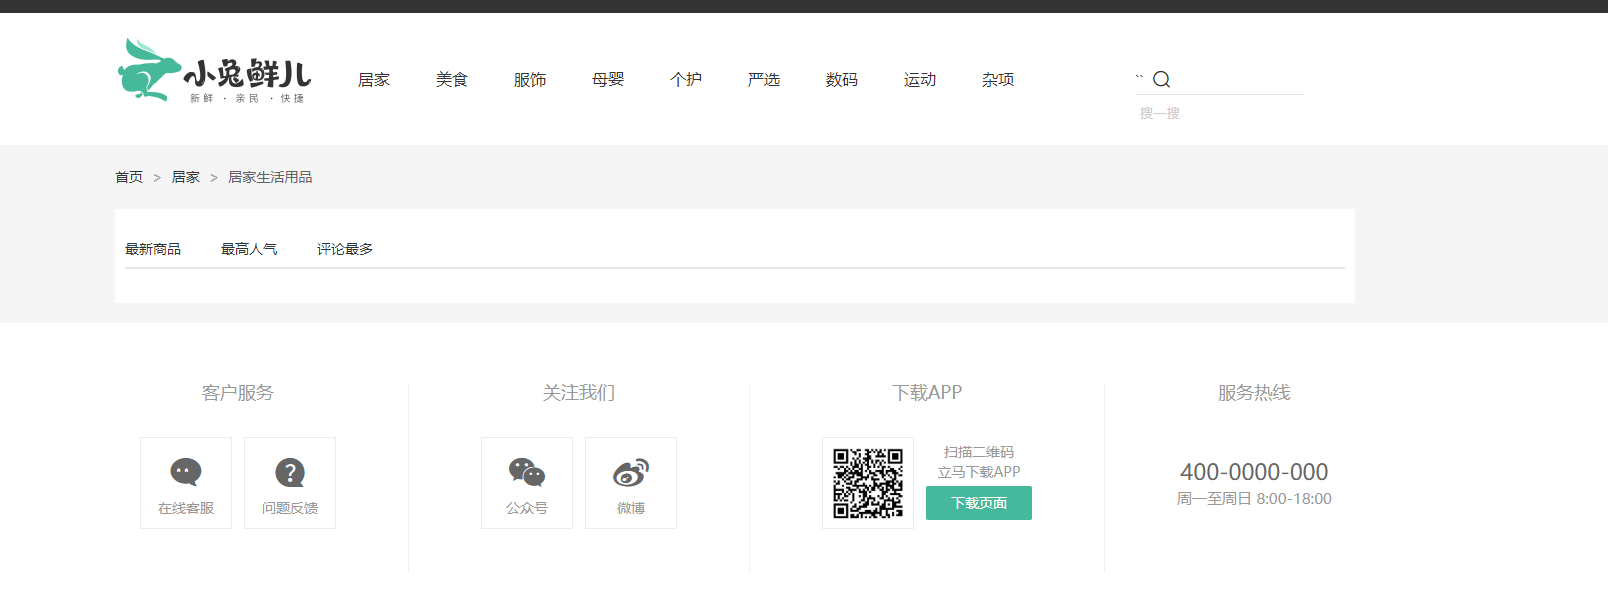
<script setup></script><template><div class="container "><!-- 面包屑 --><div class="bread-container"><el-breadcrumb separator=">"><el-breadcrumb-item :to="{ path: '/' }">首页</el-breadcrumb-item><el-breadcrumb-item :to="{ path: '/' }">居家</el-breadcrumb-item><el-breadcrumb-item>居家生活用品</el-breadcrumb-item></el-breadcrumb></div><div class="sub-container"><el-tabs><el-tab-pane label="最新商品" name="publishTime"></el-tab-pane><el-tab-pane label="最高人气" name="orderNum"></el-tab-pane><el-tab-pane label="评论最多" name="evaluateNum"></el-tab-pane></el-tabs><div class="body"><!-- 商品列表--></div></div></div></template><style lang="scss" scoped>
.bread-container {padding: 25px 0;color: #666;
}.sub-container {padding: 20px 10px;background-color: #fff;.body {display: flex;flex-wrap: wrap;padding: 0 10px;}.goods-item {display: block;width: 220px;margin-right: 20px;padding: 20px 30px;text-align: center;img {width: 160px;height: 160px;}p {padding-top: 10px;}.name {font-size: 16px;}.desc {color: #999;height: 29px;}.price {color: $priceColor;font-size: 20px;}}.pagination-container {margin-top: 20px;display: flex;justify-content: center;}}
</style>
- 配置路由关系

//router/index.js
import subCategory from '@/views/subCategory/index.vue'//在route的children配置二级路由{path: 'category/sub/:id',component: subCategory}
- 修改模板实现跳转
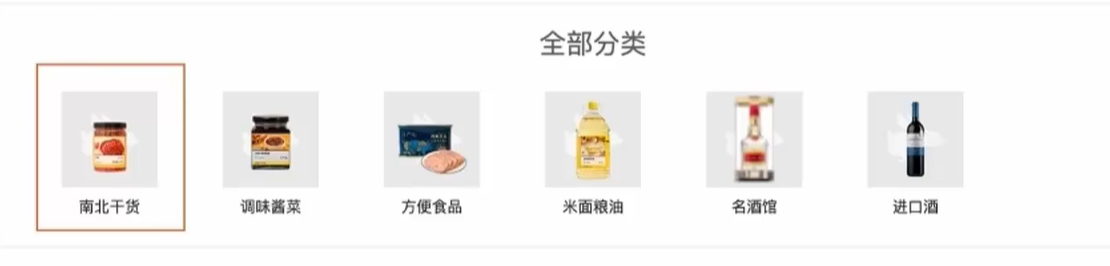
<!--Category/index.vue--><!-- 分类列表 --><div class="sub-list"><h3>全部分类</h3><ul><li v-for="i in categoryData.children" :key="i.id"><RouterLink :to="`/category/sub/${i.id}`"><img :src="i.picture" /><p>{{ i.name }}</p></RouterLink></li></ul></div>
最终效果:
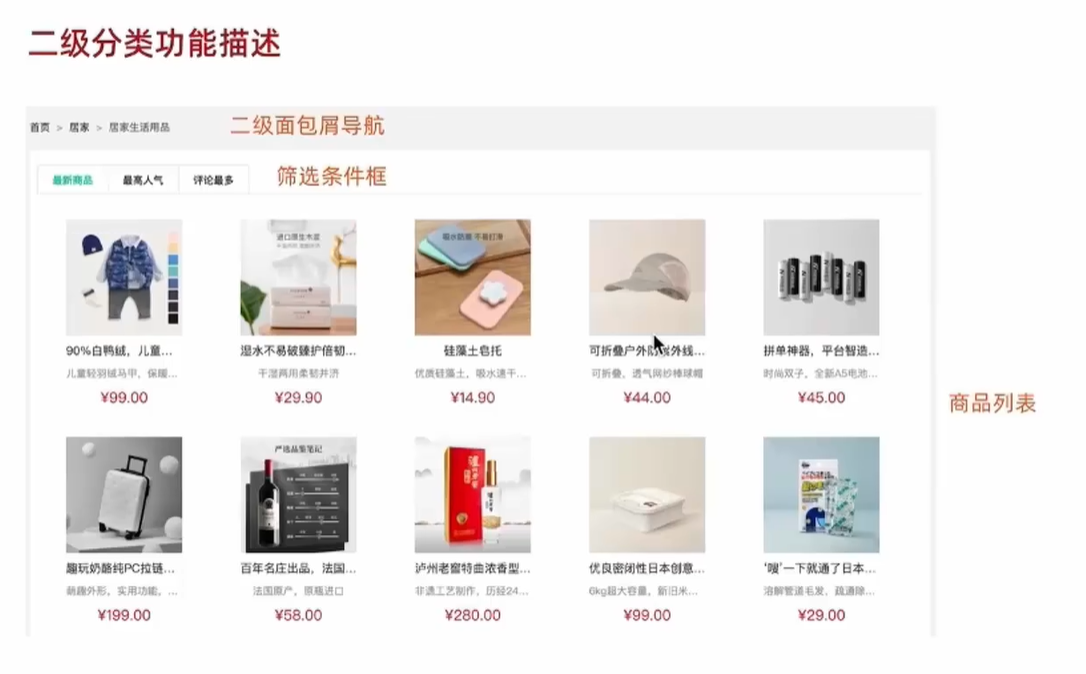
2.面包屑导航功能实现
步骤:
- 封装接口,获取面包屑数据
/**apis/category.js* @description: 获取二级分类列表数据* @param {*} id 分类id * @return {*}*/export const getCategoryFilterAPI = (id) => {return request({url: '/category/sub/filter',params: {id}})
}
- 调用接口渲染模板
<!-- subCategory/index.vue -->
<script setup>
import { getCategoryFilterAPI } from '@/apis/category.js'
import { ref, onMounted } from 'vue'
import { useRoute } from 'vue-router';const route = useRoute()
const categoryFilter = ref({})//获取面包屑导航数据
const getCategoryFilter = async () => {const res = await getCategoryFilterAPI(route.params.id)categoryFilter.value = res.result
}
onMounted(() => {getCategoryFilter()
})</script>
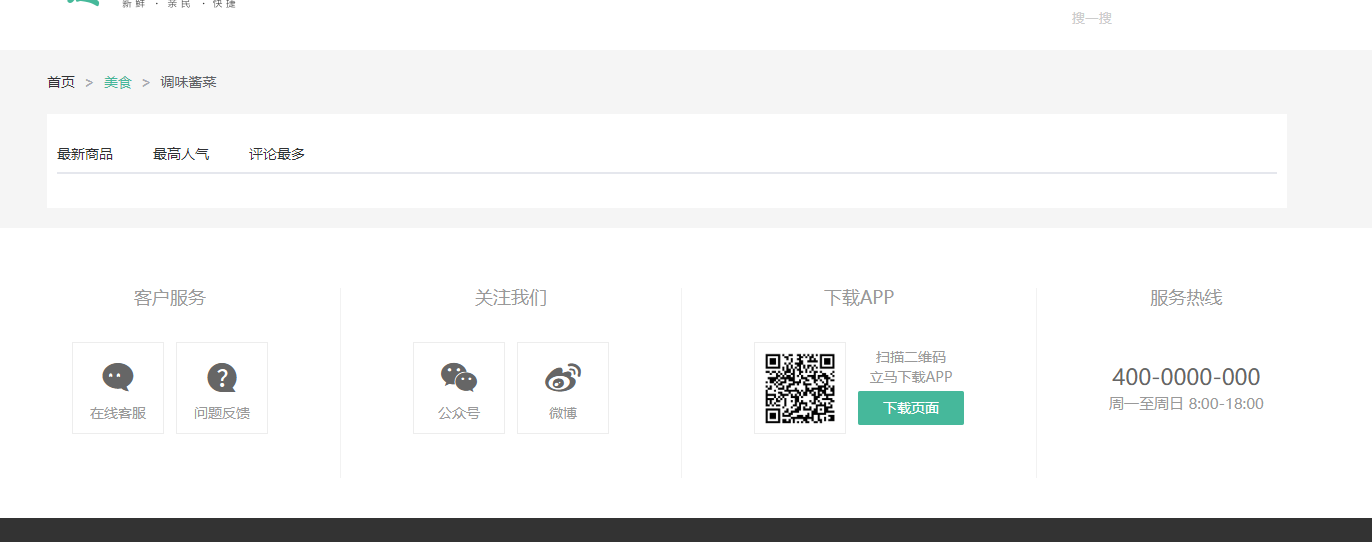
<!-- 面包屑 --><div class="bread-container"><el-breadcrumb separator=">"><el-breadcrumb-item :to="{ path: '/' }">首页</el-breadcrumb-item><el-breadcrumb-item :to="{ path: `/category/${categoryFilter.parentId}` }">{{ categoryFilter.parentName}}</el-breadcrumb-item><el-breadcrumb-item>{{ categoryFilter.name }}</el-breadcrumb-item></el-breadcrumb></div>
- 测试跳转
可以正常跳转,可以从面包屑这里进行跳转
3. 基础商品列表实现
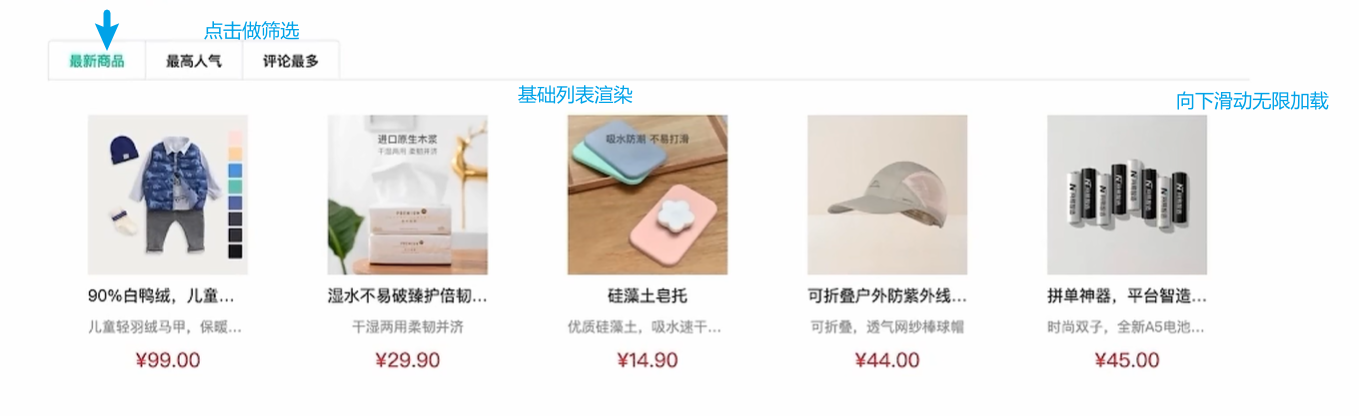
实现流程:
-
实现基础列表渲染(基础参数)
- 封装接口
/** apis/category.js* @description: 获取导航数据* @data { categoryId: 1005000 ,page: 1,pageSize: 20,sortField: 'publishTime' | 'orderNum' | 'evaluateNum'} * @return {*}*/ export const getSubCategoryAPI = (data) => {return request({url: '/category/goods/temporary',method: 'POST',data}) }- 准备基础参数
//获取基础列表数据 views/subCategory/index.vue const baseListData = ref({category: route.params.id,page: 1,pageSize: 20,sortField: 'publishTime' }) const getSubCategory = async () => {const res = await getSubCategoryAPI(baseListData.value) //数据要传进去// console.log(res)baseListData.value = res.result.items }onMounted(() => getSubCategory())- 获取数据渲染列表,使用我们之前封装的
GoodItem组件
<script>import GoodItem from '../Home/components/GoodItem.vue'; </script> <div class="body"><!-- 商品列表--><GoodItem :goods="goods" v-for="goods in baseListData" :key="goods.id" /></div> -
添加额外参数实现筛选功能
-
获取激活项数据。使用新参数发送请求重新渲染列表
使用的是
elementPlus的Tabs标签,这个v-model绑定的是选项中name的值
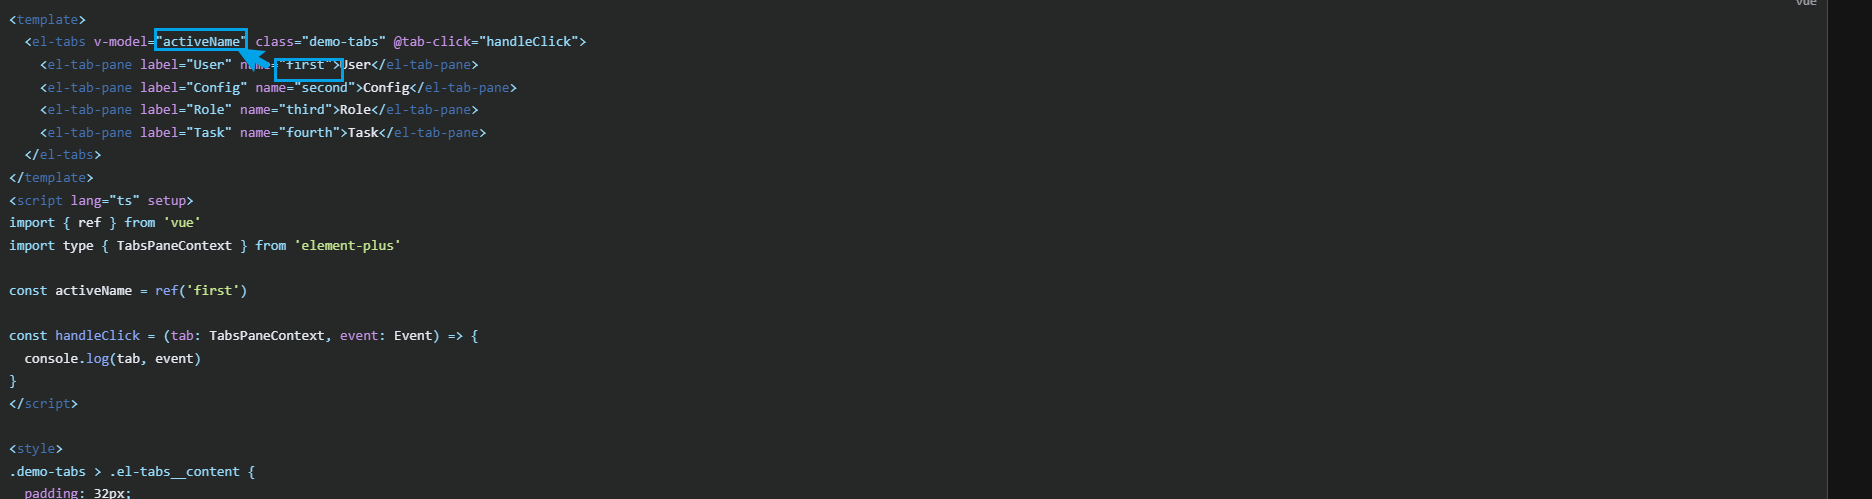
使用这个方法,当选项改变时执行回调

<!-- tab切换 subCategory.vue--><el-tabs v-model="baseListData.sortField" @tab-change="tabChange"><el-tab-pane label="最新商品" name="publishTime"></el-tab-pane><el-tab-pane label="最高人气" name="orderNum"></el-tab-pane><el-tab-pane label="评论最多" name="evaluateNum"></el-tab-pane></el-tabs>//切换tab执行的回调 subCategory.vue const tabChange = () => {baseListData.value.sortField = 1 //重置页数getSubCategory() //重新请求数据 }
-
-
无限加载功能实现
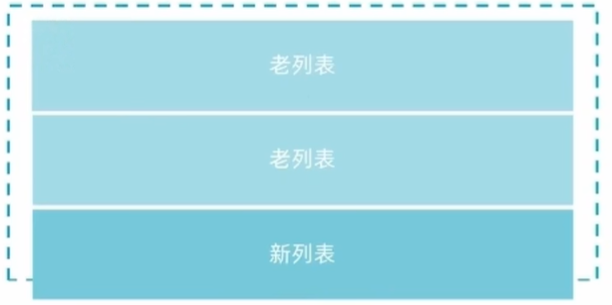
使用elementPlus提供的v-infinite-scroll指令监听是否满足触底条件,满足加载条件时让页数参数加一获取下一页数据,做新老数据拼接渲染。
步骤:
- 配置
v-infinite-scroll

相关代码  subCategory/index.vue
<div class="body" v-infinite-scroll="load">//load回调const load = ()=>{console.log('加载更多数据喽')
}
- 页数+1,获取下一页数据
//页数加一baseListData.value.page++//获取下一页的数据const res = await getSubCategoryAPI(baseListData.value)
- 新老数据拼接
//将新旧数据拼接 使用...,把拼接的数组重新赋值给baseListDatabaseListData.value = [...baseListData.value, ...res.value.items]
- 加载完毕结束监听
const disabled = ref(false)
//如果items为空,则停止加载if (baseListData.items.length === 0) {disabled.value = true}<div class="body" v-infinite-scroll="load" :infinite-scroll-disabled="disabled">
subCategory/index.vue 完整代码:
<!-- subCategory/index.vue -->
<script setup>
import { getCategoryFilterAPI, getSubCategoryAPI } from '@/apis/category.js'
import { ref, onMounted } from 'vue'
import { useRoute } from 'vue-router';
import GoodItem from '../Home/components/GoodItem.vue';const route = useRoute()//获取面包屑导航数据
const categoryFilter = ref({})
const getCategoryFilter = async () => {const res = await getCategoryFilterAPI(route.params.id)categoryFilter.value = res.result
}
onMounted(() => {getCategoryFilter()
})//获取基础列表数据
const baseListData = ref({category: route.params.id,page: 1,pageSize: 20,sortField: 'publishTime'
})
const getSubCategory = async () => {const res = await getSubCategoryAPI(baseListData.value)  //数据要传进去// console.log(res)baseListData.value = res.result.items
}onMounted(() => getSubCategory())//切换tab执行的回调
const tabChange = () => {baseListData.value.page = 1  //重置页数// console.log(baseListData.value.sortField)getSubCategory()  //重新请求数据
}//无限滚动
const disabled = ref(false)
const load = async () => {// console.log('加载更多数据喽')//页数加一baseListData.value.page++//获取下一页的数据const res = await getSubCategoryAPI(baseListData.value)//将新旧数据拼接  使用...,把拼接的数组重新赋值给baseListDatabaseListData.value = [...baseListData.value, ...res.value.items]//如果items为空,则停止加载if (baseListData.items.length === 0) {disabled.value = true}
}
</script><template><div class="container "><!-- 面包屑 --><div class="bread-container"><el-breadcrumb separator=">"><el-breadcrumb-item :to="{ path: '/' }">首页</el-breadcrumb-item><el-breadcrumb-item :to="{ path: `/category/${categoryFilter.parentId}` }">{{ categoryFilter.parentName}}</el-breadcrumb-item><el-breadcrumb-item>{{ categoryFilter.name }}</el-breadcrumb-item></el-breadcrumb></div><div class="sub-container"><!-- tab切换 --><el-tabs v-model="baseListData.sortField" @tab-change="tabChange"><el-tab-pane label="最新商品" name="publishTime"></el-tab-pane><el-tab-pane label="最高人气" name="orderNum"></el-tab-pane><el-tab-pane label="评论最多" name="evaluateNum"></el-tab-pane></el-tabs><div class="body" v-infinite-scroll="load" :infinite-scroll-disabled="disabled"><!-- 商品列表--><GoodItem :goods="goods" v-for="goods in baseListData" :key="goods.id" /></div></div></div></template><style lang="scss" scoped>
.bread-container {padding: 25px 0;color: #666;
}.sub-container {padding: 20px 10px;background-color: #fff;.body {display: flex;flex-wrap: wrap;padding: 0 10px;}.goods-item {display: block;width: 220px;margin-right: 20px;padding: 20px 30px;text-align: center;img {width: 160px;height: 160px;}p {padding-top: 10px;}.name {font-size: 16px;}.desc {color: #999;height: 29px;}.price {color: $priceColor;font-size: 20px;}}.pagination-container {margin-top: 20px;display: flex;justify-content: center;}}
</style>
4. 定制路由滚动行为
切换路由,自动滚动到页面的顶部
如何配置:vue-router支持scrollBehavior配置项,可以指定路由切换的滚动位置。
//router/index.js//路由滚动行为定制scrollBehavior() {return {top: 0}}
详情页
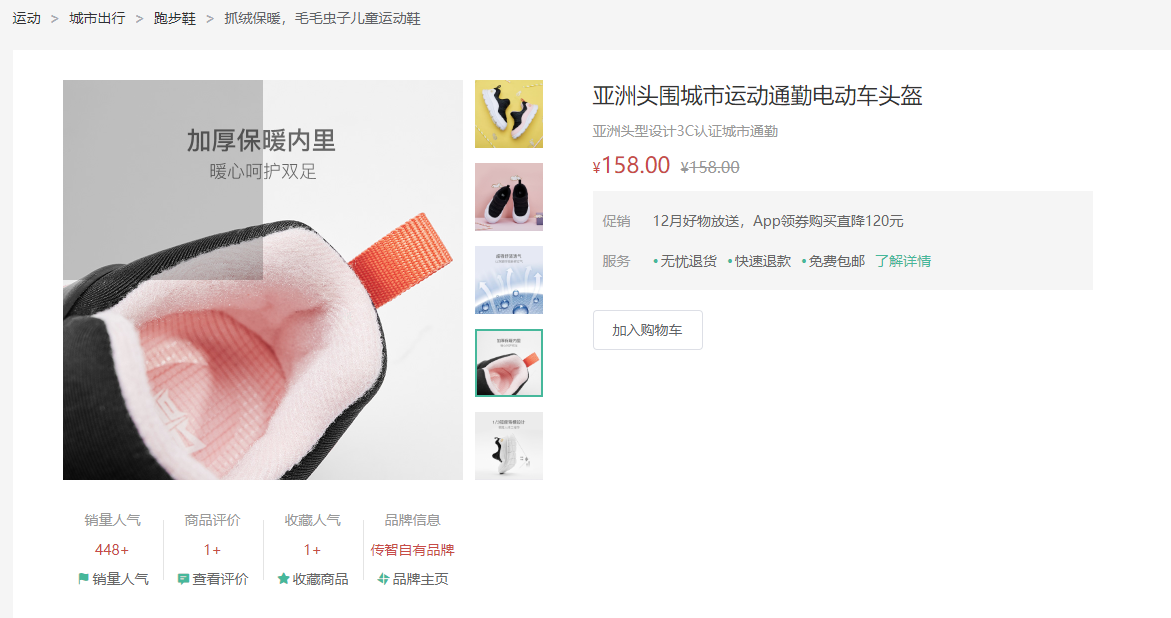
1.整体认识和路由配置
路由:
- 创建详情组件
Views/Detail/index.vue
<script setup></script><template><div class="xtx-goods-page"><div class="container"><div class="bread-container"><el-breadcrumb separator=">"><el-breadcrumb-item :to="{ path: '/' }">首页</el-breadcrumb-item><el-breadcrumb-item :to="{ path: '/' }">母婴</el-breadcrumb-item><el-breadcrumb-item :to="{ path: '/' }">跑步鞋</el-breadcrumb-item><el-breadcrumb-item>抓绒保暖,毛毛虫子儿童运动鞋</el-breadcrumb-item></el-breadcrumb></div><!-- 商品信息 --><div class="info-container"><div><div class="goods-info"><div class="media"><!-- 图片预览区 --><!-- 统计数量 --><ul class="goods-sales"><li><p>销量人气</p><p> 100+ </p><p><i class="iconfont icon-task-filling"></i>销量人气</p></li><li><p>商品评价</p><p>200+</p><p><i class="iconfont icon-comment-filling"></i>查看评价</p></li><li><p>收藏人气</p><p>300+</p><p><i class="iconfont icon-favorite-filling"></i>收藏商品</p></li><li><p>品牌信息</p><p>400+</p><p><i class="iconfont icon-dynamic-filling"></i>品牌主页</p></li></ul></div><div class="spec"><!-- 商品信息区 --><p class="g-name"> 抓绒保暖,毛毛虫儿童鞋 </p><p class="g-desc">好穿 </p><p class="g-price"><span>200</span><span> 100</span></p><div class="g-service"><dl><dt>促销</dt><dd>12月好物放送,App领券购买直降120元</dd></dl><dl><dt>服务</dt><dd><span>无忧退货</span><span>快速退款</span><span>免费包邮</span><a href="javascript:;">了解详情</a></dd></dl></div><!-- sku组件 --><!-- 数据组件 --><!-- 按钮组件 --><div><el-button size="large" class="btn">加入购物车</el-button></div></div></div><div class="goods-footer"><div class="goods-article"><!-- 商品详情 --><div class="goods-tabs"><nav><a>商品详情</a></nav><div class="goods-detail"><!-- 属性 --><ul class="attrs"><li v-for="item in 3" :key="item.value"><span class="dt">白色</span><span class="dd">纯棉</span></li></ul><!-- 图片 --></div></div></div><!-- 24热榜+专题推荐 --><div class="goods-aside"></div></div></div></div></div></div>
</template><style scoped lang='scss'>
.xtx-goods-page {.goods-info {min-height: 600px;background: #fff;display: flex;.media {width: 580px;height: 600px;padding: 30px 50px;}.spec {flex: 1;padding: 30px 30px 30px 0;}}.goods-footer {display: flex;margin-top: 20px;.goods-article {width: 940px;margin-right: 20px;}.goods-aside {width: 280px;min-height: 1000px;}}.goods-tabs {min-height: 600px;background: #fff;}.goods-warn {min-height: 600px;background: #fff;margin-top: 20px;}.number-box {display: flex;align-items: center;.label {width: 60px;color: #999;padding-left: 10px;}}.g-name {font-size: 22px;}.g-desc {color: #999;margin-top: 10px;}.g-price {margin-top: 10px;span {&::before {content: "¥";font-size: 14px;}&:first-child {color: $priceColor;margin-right: 10px;font-size: 22px;}&:last-child {color: #999;text-decoration: line-through;font-size: 16px;}}}.g-service {background: #f5f5f5;width: 500px;padding: 20px 10px 0 10px;margin-top: 10px;dl {padding-bottom: 20px;display: flex;align-items: center;dt {width: 50px;color: #999;}dd {color: #666;&:last-child {span {margin-right: 10px;&::before {content: "•";color: $xtxColor;margin-right: 2px;}}a {color: $xtxColor;}}}}}.goods-sales {display: flex;width: 400px;align-items: center;text-align: center;height: 140px;li {flex: 1;position: relative;~li::after {position: absolute;top: 10px;left: 0;height: 60px;border-left: 1px solid #e4e4e4;content: "";}p {&:first-child {color: #999;}&:nth-child(2) {color: $priceColor;margin-top: 10px;}&:last-child {color: #666;margin-top: 10px;i {color: $xtxColor;font-size: 14px;margin-right: 2px;}&:hover {color: $xtxColor;cursor: pointer;}}}}}
}.goods-tabs {min-height: 600px;background: #fff;nav {height: 70px;line-height: 70px;display: flex;border-bottom: 1px solid #f5f5f5;a {padding: 0 40px;font-size: 18px;position: relative;>span {color: $priceColor;font-size: 16px;margin-left: 10px;}}}
}.goods-detail {padding: 40px;.attrs {display: flex;flex-wrap: wrap;margin-bottom: 30px;li {display: flex;margin-bottom: 10px;width: 50%;.dt {width: 100px;color: #999;}.dd {flex: 1;color: #666;}}}>img {width: 100%;}
}.btn {margin-top: 20px;}.bread-container {padding: 25px 0;
}
</style>
- 绑定路由关系(参数),绑定模板
//router/index.js
import Detail from '@/views/Detail/index.vue'//二级路由
{path: 'detail/:id',component: Detail}
<!--HomeNew.vue-->
<RouterLink :to="`/detail/${item.id}`"><img :src="item.picture" alt="" /><p class="name">{{ item.name }}</p><p class="price">¥{{ item.price }}</p></RouterLink>
效果:
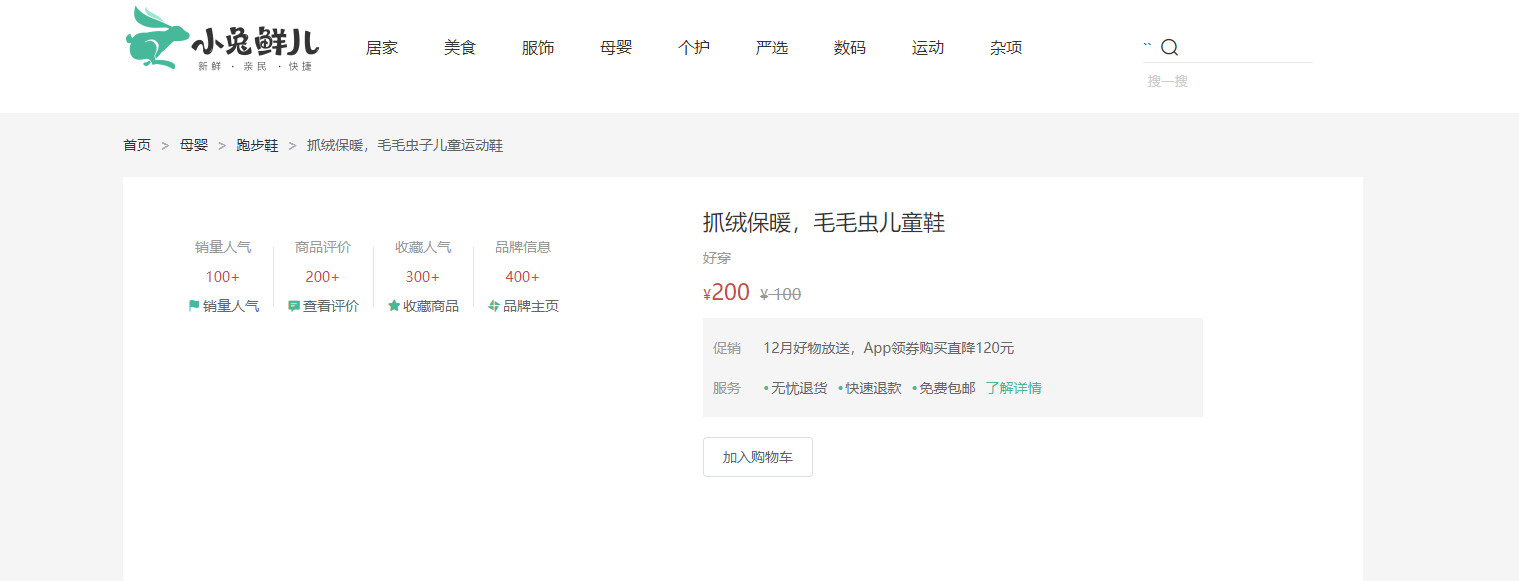
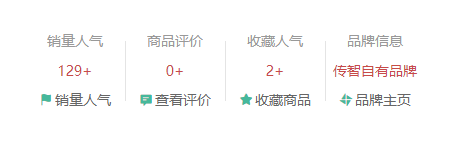
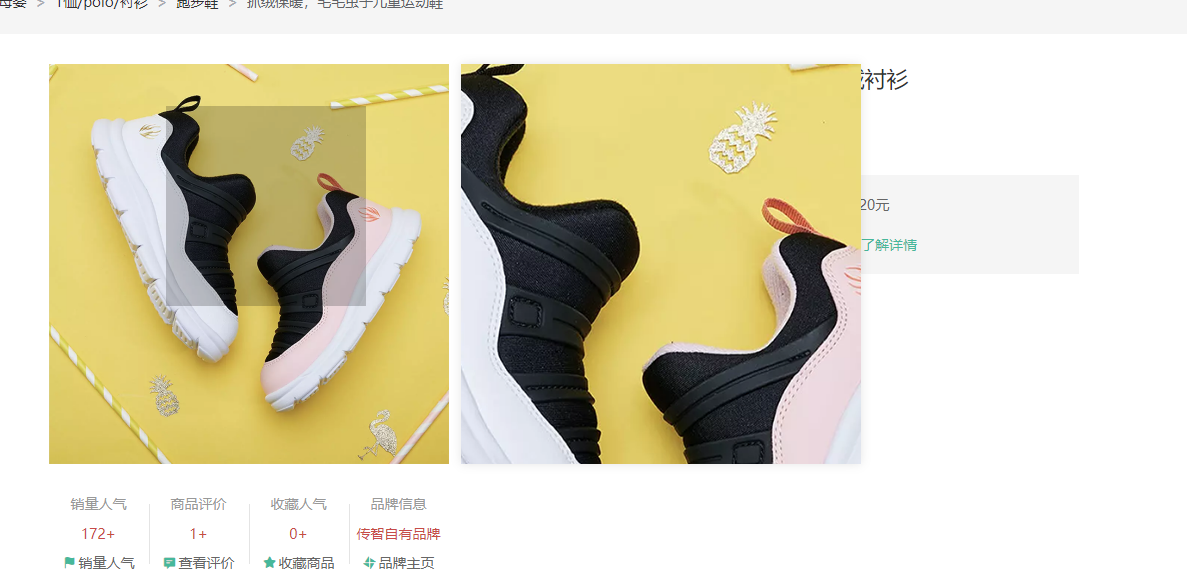
2.基础数据渲染
完成下图渲染,使用的统一接口
步骤:
- 封装接口
//apis/detail.js
//获取详情数据
export function getDetailAPI(id) {return httpInstance({url: '/goods',params: {id}})
}
- 获取数据
<!--Detail/index.vue-->
<script setup>
import { ref, onMounted } from 'vue';
import { getDetailAPI } from '@/apis/detail';
import { useRoute } from 'vue-router';const goods = ref({})
const route = useRoute()
const getGoods = async () => {const res = await getDetailAPI(route.params.id)goods.value = res.result
}
onMounted(() => getGoods())
</script>
- 渲染模板
面包屑导航
<!-- goods一开始时空对象,一开始访问是undefined[0] Detail/index.vue--><!-- 解决办法:1.可选链 2.v-if手动控制渲染时机,保证只有数据存在才渲染 --><el-breadcrumb-item :to="{ path: `/category/${goods.categories?.[1].id}` }">{{goods.categories?.[1].name }}</el-breadcrumb-item><el-breadcrumb-item :to="{ path: `/category/${goods.categories?.[0].id}` }">{{goods.categories?.[0].name }}</el-breadcrumb-item>
<!-- 统计数量 Detail/index.vue--><ul class="goods-sales"><li><p>销量人气</p><p> {{ goods.salesCount }}+ </p><p><i class="iconfont icon-task-filling"></i>销量人气</p></li><li><p>商品评价</p><p>{{ goods.commitCount }}+</p><p><i class="iconfont icon-comment-filling"></i>查看评价</p></li><li><p>收藏人气</p><p>{{ goods.collectCount }}+</p><p><i class="iconfont icon-favorite-filling"></i>收藏商品</p></li><li><p>品牌信息</p><p>{{goods.brand.name }}+</p><p><i class="iconfont icon-dynamic-filling"></i>品牌主页</p></li></ul>
<!-- 商品信息区 Detail/index.vue--><p class="g-name"> {{ goods.name }} </p><p class="g-desc">{{ goods.desc }}</p><p class="g-price"><span>{{ goods.oldPrice }}</span><span> {{ goods.price }}</span></p>

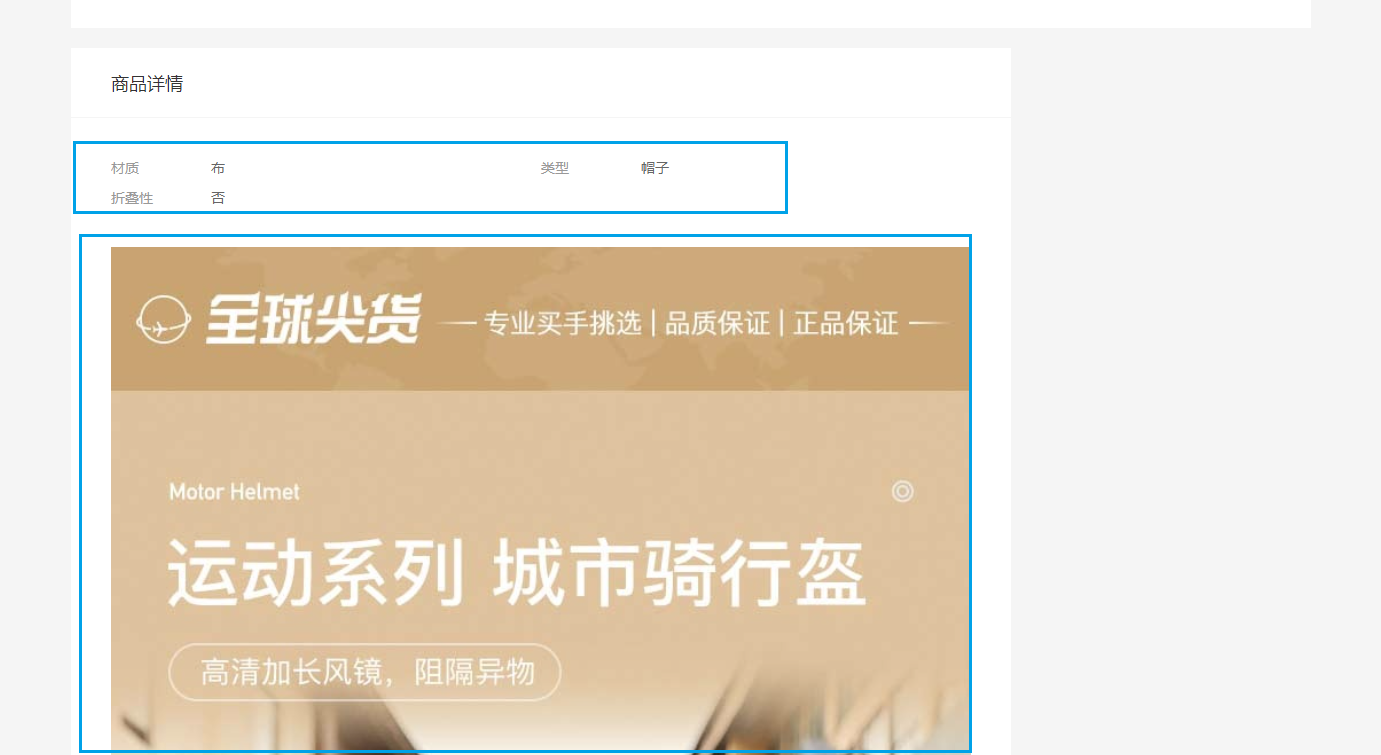
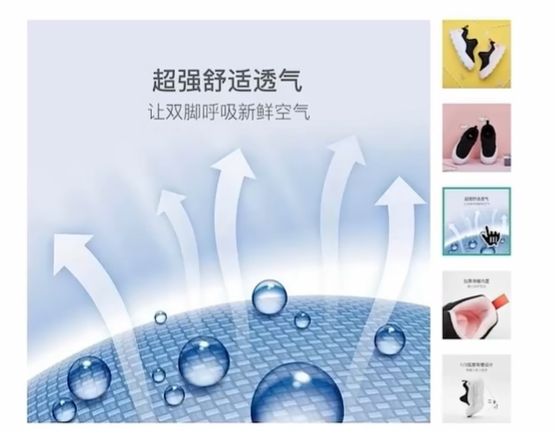
<!-- 商品详情 Detail/index.vue--><div class="goods-tabs"><nav><a>商品详情</a></nav><div class="goods-detail"><!-- 属性 --><ul class="attrs"><li v-for="item in goods.details?.properties" :key="item.value"><span class="dt">{{ item.name }}</span><span class="dd">{{ item.value }}</span></li></ul><!-- 图片 --><img v-for="img in goods.details?.pictures" :src="img" :key="img" alt="" /></div></div></div>
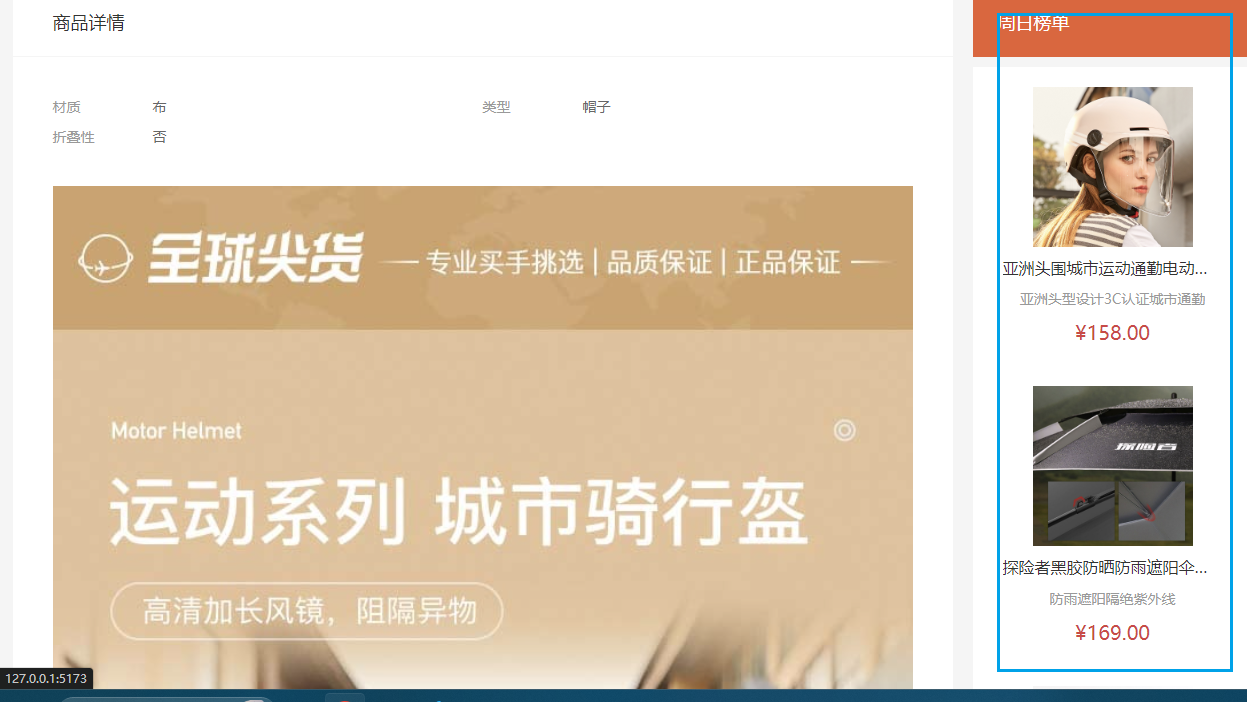
3.热榜区域实现
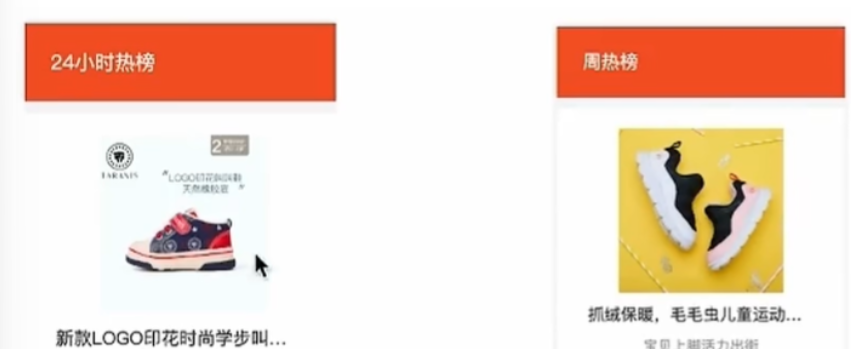
步骤:
- 封装组件(因为结构一致)
<!-- DetailHot.vue -->
<script setup></script><template><div class="goods-hot"><h3>周日榜单</h3><!-- 商品区块 --><RouterLink to="/" class="goods-item" v-for="item in 3" :key="item.id"><img :src="item.picture" alt="" /><p class="name ellipsis">一双男鞋</p><p class="desc ellipsis">一双好穿的男鞋</p><p class="price">¥200.00</p></RouterLink></div>
</template><style scoped lang="scss">
.goods-hot {h3 {height: 70px;background: $helpColor;color: #fff;font-size: 18px;line-height: 70px;padding-left: 25px;margin-bottom: 10px;font-weight: normal;}.goods-item {display: block;padding: 20px 30px;text-align: center;background: #fff;img {width: 160px;height: 160px;}p {padding-top: 10px;}.name {font-size: 16px;}.desc {color: #999;height: 29px;}.price {color: $priceColor;font-size: 20px;}}
}
</style>
在父组件中使用两次这个组件
 <!-- 24热榜+专题推荐 Detail/index.vue-->
import DetailHot from './components/DetailHot.vue'<div class="goods-aside"><!-- 24小时 --><DetailHot /><!-- 周日 --><DetailHot />
</div>
- 获取渲染基础数据
/*** 获取热榜商品* @param {Number} id - 商品id* @param {Number} type - 1代表24小时热销榜 2代表周热销榜* @param {Number} limit - 获取个数*/
export const getHotGoodsAPI = ({ id, type, limit = 3 }) => {return httpInstance({url: '/goods/hot',params: {id,type,limit}})
}
<!--Detail/components/DetailHot.vue-->
<script setup>
import { ref } from 'vue'
import { getHotGoodsAPI } from '@/apis/detail'
import { useRoute } from 'vue-router'const goodList = ref([])
const route = useRoute()
const getHotList = async () => {const res = await getHotGoodsAPI({id: route.params.id,type: 1})goodList.value = res.result
}
getHotList()</script>
<template><div class="goods-hot"><h3>周日榜单</h3><!-- 商品区块 --><RouterLink to="/" class="goods-item" v-for="item in goodList" :key="item.id"><img :src="item.picture" alt="" /><p class="name ellipsis">{{ item.name }}</p><p class="desc ellipsis">{{ item.desc }}</p><p class="price">¥{{ item.price }}</p></RouterLink></div>
</template>
- 适配不同标题Title和内容
定义props,给两个组件绑定不同的数据
//热榜类型 1为24小时热榜 2为周热榜  DetailHot.vue
const props = defineProps({hotType: {type: Number}
})
const TYPEMAP = {1: '24小时热榜',2: '周热榜'
}
const title = computed(() => TYPEMAP[props.hotType])<h3>{{ title }}</h3>
type决定着获取哪种数据,我们将1替换成props.hotType即可。
const getHotList = async () => {const res = await getHotGoodsAPI({id: route.params.id,type: props.hotType})goodList.value = res.result
4. 图片预览组件封装
功能:
- 小图切换大图功能
思路:维护一个数组图片列表,鼠标划入小图记录当前小图下标值,通过下标值在数组中取对应图片,显示到大图位置
步骤:
准备组件静态模板(包括图片数据列表)
<!--component/ImageView/index.vue-->
<script setup>
// 图片列表
const imageList = ["https://yanxuan-item.nosdn.127.net/d917c92e663c5ed0bb577c7ded73e4ec.png","https://yanxuan-item.nosdn.127.net/e801b9572f0b0c02a52952b01adab967.jpg","https://yanxuan-item.nosdn.127.net/b52c447ad472d51adbdde1a83f550ac2.jpg","https://yanxuan-item.nosdn.127.net/f93243224dc37674dfca5874fe089c60.jpg","https://yanxuan-item.nosdn.127.net/f881cfe7de9a576aaeea6ee0d1d24823.jpg"
]
</script><template><div class="goods-image"><!-- 左侧大图--><div class="middle" ref="target"><img :src="imageList[0]" alt="" /><!-- 蒙层小滑块 --><div class="layer" :style="{ left: `0px`, top: `0px` }"></div></div><!-- 小图列表 --><ul class="small"><li v-for="(img, i) in imageList" :key="i"><img :src="img" alt="" /></li></ul><!-- 放大镜大图 --><div class="large" :style="[{backgroundImage: `url(${imageList[0]})`,backgroundPositionX: `0px`,backgroundPositionY: `0px`,},]" v-show="false"></div></div>
</template><style scoped lang="scss">
.goods-image {width: 480px;height: 400px;position: relative;display: flex;.middle {width: 400px;height: 400px;background: #f5f5f5;}.large {position: absolute;top: 0;left: 412px;width: 400px;height: 400px;z-index: 500;box-shadow: 0 0 10px rgba(0, 0, 0, 0.1);background-repeat: no-repeat;// 背景图:盒子的大小 = 2:1  将来控制背景图的移动来实现放大的效果查看 background-positionbackground-size: 800px 800px;background-color: #f8f8f8;}.layer {width: 200px;height: 200px;background: rgba(0, 0, 0, 0.2);// 绝对定位 然后跟随咱们鼠标控制left和top属性就可以让滑块移动起来left: 0;top: 0;position: absolute;}.small {width: 80px;li {width: 68px;height: 68px;margin-left: 12px;margin-bottom: 15px;cursor: pointer;&:hover,&.active {border: 2px solid $xtxColor;}}}
}
</style>
引入,并使用组件
<!-- 图片预览区 Detail/index.vue-->
<ImageView />
为小图绑定事件mouseEnter,记录当前激活下标值activeIndex,通过下标i切换大图显示,通过下标实现激活状态显示
//ImageView/index.vue
const activeIndex = ref(null)
//鼠标移入小图回调
const mouseEnter = (i) => {activeIndex.value = i
}<!-- 小图列表 --><ul class="small"><li v-for="(img, i) in imageList" :key="i" @mouseenter="mouseEnter(i)"><img :src="img" alt="" /></li></ul>
鼠标离开也激活
<li v-for="(img, i) in imageList " :key="i" @mouseenter="mouseEnter(i)":class="{ active: i === activeIndex }">//激活样式scss&.active {border: 2px solid $xtxColor;}
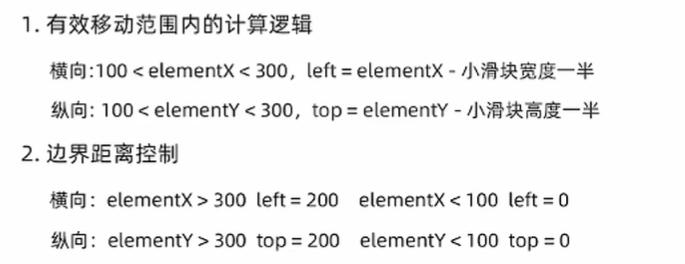
5.放大镜-滑块跟随移动
核心功能:左侧滑块跟随鼠标移动、右侧大图放大效果实现、滑块和大图的显示与隐藏
左侧滑块跟随鼠标移动
使用useMouseInElement
<script setup>
import { ref } from 'vue';
import { useMouseInElement } from '@vueuse/core';
import { watch } from 'vue';
// 图片列表
const imageList = ["https://yanxuan-item.nosdn.127.net/d917c92e663c5ed0bb577c7ded73e4ec.png","https://yanxuan-item.nosdn.127.net/e801b9572f0b0c02a52952b01adab967.jpg","https://yanxuan-item.nosdn.127.net/b52c447ad472d51adbdde1a83f550ac2.jpg","https://yanxuan-item.nosdn.127.net/f93243224dc37674dfca5874fe089c60.jpg","https://yanxuan-item.nosdn.127.net/f881cfe7de9a576aaeea6ee0d1d24823.jpg"
]
const activeIndex = ref(null)
//鼠标移入小图回调
const mouseEnter = (i) => {activeIndex.value = i
}//2.获取鼠标相对位置
const target = ref(null)
const { elementX, elementY, isOutside } = useMouseInElement(target)//3.控制滑块跟随鼠标移动,监听elementX/Y变化,一旦变化,重新设置left/top
const left = ref(0)
const top = ref(0)
watch([elementX, elementY], () => {//有效范围控制滑块距离//横向if (elementX.value > 100 && elementX.value < 300) {left.value = elementX.value - 100}//纵向if (elementY.value > 100 && elementY.value < 300) {top.value = elementY.value - 100}//处理边界if (elementX.value > 300) { left.value = 200 }if (elementX.value < 100) { left.value = 0 }if (elementY.value > 300) { top.value = 200 }if (elementY.value < 100) { top.value = 0 }
})
</script><template><div class="goods-image"><!-- 左侧大图--><div class="middle" ref="target"><img :src="imageList[activeIndex]" alt="" /><!-- 蒙层小滑块 --><div class="layer" :style="{ left: `${left}px`, top: `${top}px` }"></div></div><!-- 小图列表 --><ul class="small"><li v-for="(img, i) in   imageList  " :key="i" @mouseenter="mouseEnter(i)":class="{ active: i === activeIndex }"><img :src="img" alt="" /></li></ul><!-- 放大镜大图 --><div class="large" :style="[{backgroundImage: `url(${imageList[0]})`,backgroundPositionX: `0px`,backgroundPositionY: `0px`,},]" v-show="false"></div></div>
</template><style scoped lang="scss">
.goods-image {width: 480px;height: 400px;position: relative;display: flex;.middle {width: 400px;height: 400px;background: #f5f5f5;}.large {position: absolute;top: 0;left: 412px;width: 400px;height: 400px;z-index: 500;box-shadow: 0 0 10px rgba(0, 0, 0, 0.1);background-repeat: no-repeat;// 背景图:盒子的大小 = 2:1  将来控制背景图的移动来实现放大的效果查看 background-positionbackground-size: 800px 800px;background-color: #f8f8f8;}.layer {width: 200px;height: 200px;background: rgba(0, 0, 0, 0.2);// 绝对定位 然后跟随咱们鼠标控制left和top属性就可以让滑块移动起来left: 0;top: 0;position: absolute;}.small {width: 80px;li {width: 68px;height: 68px;margin-left: 12px;margin-bottom: 15px;cursor: pointer;&:hover,&.active {border: 2px solid $xtxColor;}}}
}
</style>
放大镜-大图效果
大图的宽高是小图的两倍
实现思路:大图的移动方向和滑动移动方向相反,且数值两倍
<script setup>
import { ref } from 'vue';
import { useMouseInElement } from '@vueuse/core';
import { watch } from 'vue';
// 图片列表
const imageList = ["https://yanxuan-item.nosdn.127.net/d917c92e663c5ed0bb577c7ded73e4ec.png","https://yanxuan-item.nosdn.127.net/e801b9572f0b0c02a52952b01adab967.jpg","https://yanxuan-item.nosdn.127.net/b52c447ad472d51adbdde1a83f550ac2.jpg","https://yanxuan-item.nosdn.127.net/f93243224dc37674dfca5874fe089c60.jpg","https://yanxuan-item.nosdn.127.net/f881cfe7de9a576aaeea6ee0d1d24823.jpg"
]
const activeIndex = ref(null)
//鼠标移入小图回调
const mouseEnter = (i) => {activeIndex.value = i
}//2.获取鼠标相对位置
const target = ref(null)
const { elementX, elementY, isOutside } = useMouseInElement(target)//3.控制滑块跟随鼠标移动,监听elementX/Y变化,一旦变化,重新设置left/top
const left = ref(0)
const top = ref(0)
const positionX = ref(0)
const positionY = ref(0)
watch([elementX, elementY], () => {//如果鼠标未移入盒子,下列逻辑不执行if (isOutside.value) return//有效范围控制滑块距离//横向if (elementX.value > 100 && elementX.value < 300) {left.value = elementX.value - 100}//纵向if (elementY.value > 100 && elementY.value < 300) {top.value = elementY.value - 100}//处理边界if (elementX.value > 300) { left.value = 200 }if (elementX.value < 100) { left.value = 0 }if (elementY.value > 300) { top.value = 200 }if (elementY.value < 100) { top.value = 0 }//控制大图的显示positionX.value = -left.value * 2positionY.value = -top.value * 2
})
</script><template><div class="goods-image"><!-- 左侧大图--><div class="middle" ref="target"><img :src="imageList[activeIndex]" alt="" /><!-- 蒙层小滑块 --><div class="layer" v-show="!isOutside" :style="{ left: `${left}px`, top: `${top}px` }"></div></div><!-- 小图列表 --><ul class="small"><li v-for="(img, i) in   imageList  " :key="i" @mouseenter="mouseEnter(i)":class="{ active: i === activeIndex }"><img :src="img" alt="" /></li></ul><!-- 放大镜大图 --><div class="large" :style="[{backgroundImage: `url(${imageList[0]})`,backgroundPositionX: `${positionX}px`,backgroundPositionY: `${positionY}px`,},]" v-show="!isOutside"></div></div>
</template><style scoped lang="scss">
.goods-image {width: 480px;height: 400px;position: relative;display: flex;.middle {width: 400px;height: 400px;background: #f5f5f5;}.large {position: absolute;top: 0;left: 412px;width: 400px;height: 400px;z-index: 500;box-shadow: 0 0 10px rgba(0, 0, 0, 0.1);background-repeat: no-repeat;// 背景图:盒子的大小 = 2:1  将来控制背景图的移动来实现放大的效果查看 background-positionbackground-size: 800px 800px;background-color: #f8f8f8;}.layer {width: 200px;height: 200px;background: rgba(0, 0, 0, 0.2);// 绝对定位 然后跟随咱们鼠标控制left和top属性就可以让滑块移动起来left: 0;top: 0;position: absolute;}.small {width: 80px;li {width: 68px;height: 68px;margin-left: 12px;margin-bottom: 15px;cursor: pointer;&:hover,&.active {border: 2px solid $xtxColor;}}}
}
</style>
6. props适配
//ImageView.vue
defineProps({imageList: {type: Array,default: () => { }}
})
 <!-- 图片预览区   Detail/index.vue-->
<ImageView :image-list="goods.mainPictures"/>
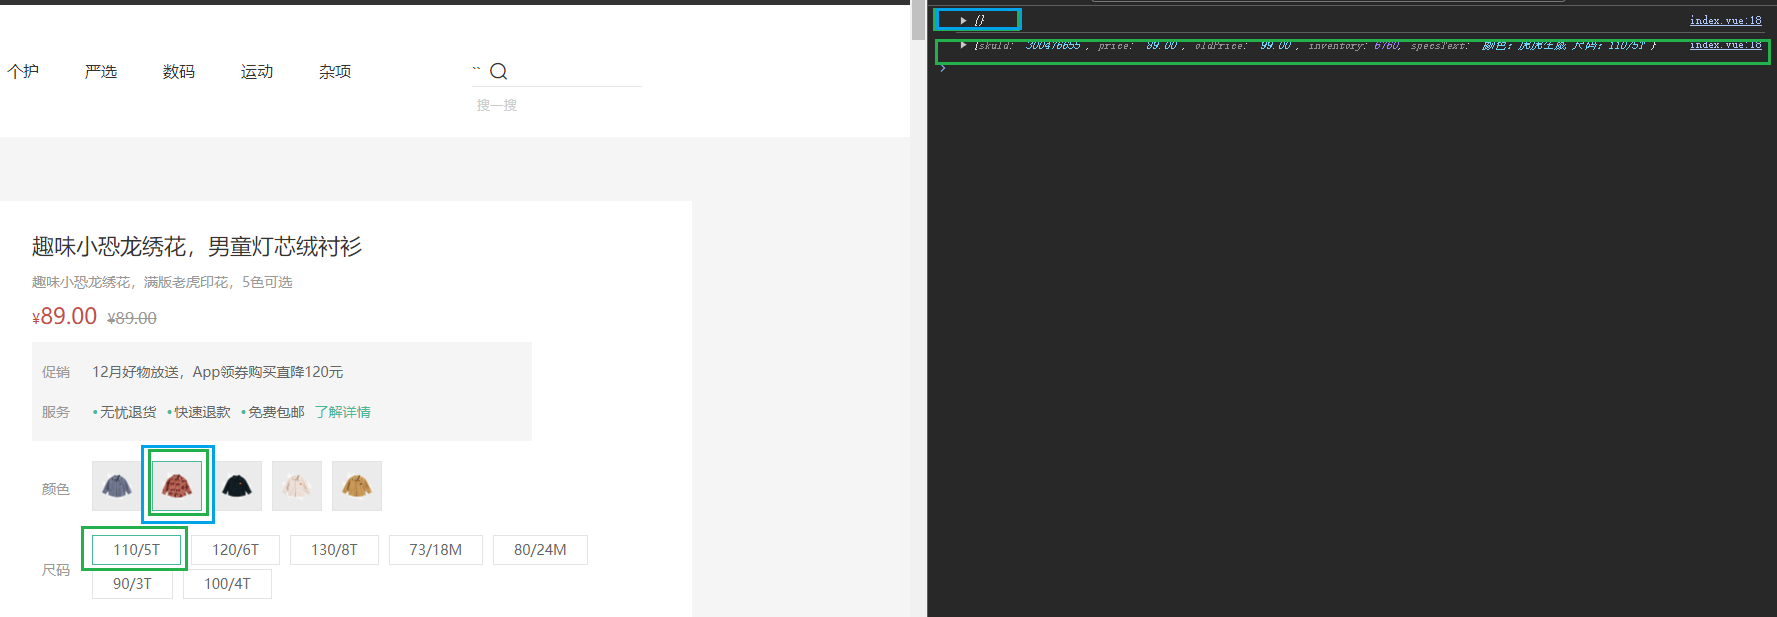
7. SKU组件熟悉使用
在实际工作中,经常遇到别人写好的组件。熟悉一个三方组件,重点看什么?
答:props和emit。验证必要数据是否交互功能正常,点击选择规格是否正常产出数据。
三方 文件准备好了,就是资料里的XtxSku(一个index.vue,一个power-set.js文件)文件夹,粘到components文件夹下即可
<!-- XtsSku/index.vue -->
<template><div class="goods-sku"><dl v-for="item in goods.specs" :key="item.id"><dt>{{ item.name }}</dt><dd><template v-for="val in item.values" :key="val.name"><img :class="{ selected: val.selected, disabled: val.disabled }" @click="clickSpecs(item, val)"v-if="val.picture" :src="val.picture" /><span :class="{ selected: val.selected, disabled: val.disabled }" @click="clickSpecs(item, val)" v-else>{{val.name}}</span></template></dd></dl></div>
</template>
<script>
import { watchEffect } from 'vue'
import getPowerSet from './power-set'
const spliter = '★'
// 根据skus数据得到路径字典对象
const getPathMap = (skus) => {const pathMap = {}if (skus && skus.length > 0) {skus.forEach(sku => {// 1. 过滤出有库存有效的skuif (sku.inventory) {// 2. 得到sku属性值数组const specs = sku.specs.map(spec => spec.valueName)// 3. 得到sku属性值数组的子集const powerSet = getPowerSet(specs)// 4. 设置给路径字典对象powerSet.forEach(set => {const key = set.join(spliter)// 如果没有就先初始化一个空数组if (!pathMap[key]) {pathMap[key] = []}pathMap[key].push(sku.id)})}})}return pathMap
}// 初始化禁用状态
function initDisabledStatus(specs, pathMap) {if (specs && specs.length > 0) {specs.forEach(spec => {spec.values.forEach(val => {// 设置禁用状态val.disabled = !pathMap[val.name]})})}
}// 得到当前选中规格集合
const getSelectedArr = (specs) => {const selectedArr = []specs.forEach((spec, index) => {const selectedVal = spec.values.find(val => val.selected)if (selectedVal) {selectedArr[index] = selectedVal.name} else {selectedArr[index] = undefined}})return selectedArr
}// 更新按钮的禁用状态
const updateDisabledStatus = (specs, pathMap) => {// 遍历每一种规格specs.forEach((item, i) => {// 拿到当前选择的项目const selectedArr = getSelectedArr(specs)// 遍历每一个按钮item.values.forEach(val => {if (!val.selected) {selectedArr[i] = val.name// 去掉undefined之后组合成keyconst key = selectedArr.filter(value => value).join(spliter)val.disabled = !pathMap[key]}})})
}export default {name: 'XtxGoodSku',props: {// specs:所有的规格信息  skus:所有的sku组合goods: {type: Object,default: () => ({ specs: [], skus: [] })}},emits: ['change'],setup(props, { emit }) {let pathMap = {}watchEffect(() => {// 得到所有字典集合pathMap = getPathMap(props.goods.skus)// 组件初始化的时候更新禁用状态initDisabledStatus(props.goods.specs, pathMap)})const clickSpecs = (item, val) => {if (val.disabled) return false// 选中与取消选中逻辑if (val.selected) {val.selected = false} else {item.values.forEach(bv => { bv.selected = false })val.selected = true}// 点击之后再次更新选中状态updateDisabledStatus(props.goods.specs, pathMap)// 把选择的sku信息传出去给父组件// 触发change事件将sku数据传递出去const selectedArr = getSelectedArr(props.goods.specs).filter(value => value)// 如果选中得规格数量和传入得规格总数相等则传出完整信息(都选择了)// 否则传出空对象if (selectedArr.length === props.goods.specs.length) {// 从路径字典中得到skuIdconst skuId = pathMap[selectedArr.join(spliter)][0]const sku = props.goods.skus.find(sku => sku.id === skuId)// 传递数据给父组件emit('change', {skuId: sku.id,price: sku.price,oldPrice: sku.oldPrice,inventory: sku.inventory,specsText: sku.specs.reduce((p, n) => `${p} ${n.name}:${n.valueName}`, '').trim()})} else {emit('change', {})}}return { clickSpecs }}
}
</script><style scoped lang="scss">
@mixin sku-state-mixin {border: 1px solid #e4e4e4;margin-right: 10px;cursor: pointer;&.selected {border-color: $xtxColor;}&.disabled {opacity: 0.6;border-style: dashed;cursor: not-allowed;}
}.goods-sku {padding-left: 10px;padding-top: 20px;dl {display: flex;padding-bottom: 20px;align-items: center;dt {width: 50px;color: #999;}dd {flex: 1;color: #666;>img {width: 50px;height: 50px;margin-bottom: 4px;@include sku-state-mixin;}>span {display: inline-block;height: 30px;line-height: 28px;padding: 0 20px;margin-bottom: 4px;@include sku-state-mixin;}}}
}
</style>
//power-set.js
export default function bwPowerSet (originalSet) {const subSets = []// We will have 2^n possible combinations (where n is a length of original set).// It is because for every element of original set we will decide whether to include// it or not (2 options for each set element).const numberOfCombinations = 2 ** originalSet.length// Each number in binary representation in a range from 0 to 2^n does exactly what we need:// it shows by its bits (0 or 1) whether to include related element from the set or not.// For example, for the set {1, 2, 3} the binary number of 0b010 would mean that we need to// include only "2" to the current set.for (let combinationIndex = 0; combinationIndex < numberOfCombinations; combinationIndex += 1) {const subSet = []for (let setElementIndex = 0; setElementIndex < originalSet.length; setElementIndex += 1) {// Decide whether we need to include current element into the subset or not.if (combinationIndex & (1 << setElementIndex)) {subSet.push(originalSet[setElementIndex])}}// Add current subset to the list of all subsets.subSets.push(subSet)}return subSets
}
我们在Detail/index.vue中使用这个三方组件
引入,使用,传数据,相关代码如下:
import XtxSku from '@/components/XtxSku.index.vue'<!-- sku组件 -->
<XtxSku :goods="goods" />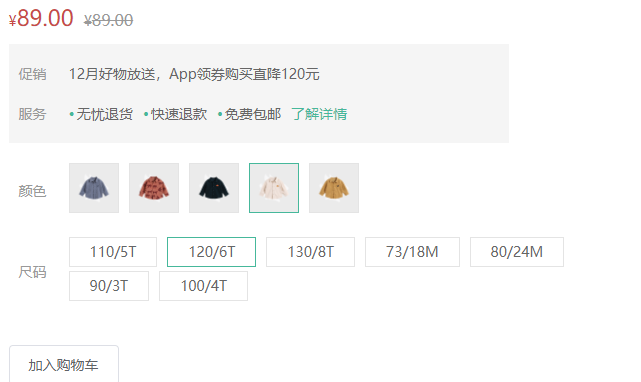
给组件绑定一个时间,查看sku对象,选中一个规格是空对象,选中两个规格不是空对象
const skuChange = (sku) => {console.log(sku)
}<!-- sku组件 -->
<XtxSku :goods="goods" @change="skuChange"/>
8. 通用组件统一注册为全局组件
步骤:把components目录下的所有组件进行全局注册,在main.js中注册插件
//@/components/index.js
// 把components中的所组件都进行全局化注册
// 通过插件的方式
import ImageView from './ImageView/index.vue'
import Sku from './XtxSku/index.vue'
export const componentPlugin = {install (app) {// app.component('组件名字',组件配置对象)app.component('XtxImageView', ImageView)app.component('XtxSku', Sku)}
}
//main.js// 引入全局组件插件
import { componentPlugin } from '@/components'app.use(componentPlugin)
小结
Day04 结束
老是写bug真是困扰emmm
笔记上的代码不太全,和视频有的都对不上emmm
祝大家学习顺利
love and peace
这篇关于【B站 heima】小兔鲜Vue3 项目学习笔记Day04的文章就介绍到这儿,希望我们推荐的文章对编程师们有所帮助!


