本文主要是介绍AJAX前端与后端交互技术知识点以及案例,希望对大家解决编程问题提供一定的参考价值,需要的开发者们随着小编来一起学习吧!
Promise
promise对象用于表示一个异步操作的最终完成(或失败)及其结果值
好处:
- 逻辑更清晰
- 了解axios函数内部运作机制
- 成功和失败状态,可以关联对应处理程序
- 能解决回调函数地狱问题

/*** 目标:使用Promise管理异步任务*/// 1. 创建Promise对象const p = new Promise((resolve, reject) => {// 2. 执行异步代码setTimeout(() => {// resolve('模拟AJAX请求-成功结果')reject(new Error('模拟AJAX请求-失败结果'))}, 2000)})// 3. 获取结果p.then(result => {console.log(result)}).catch(error => {console.log(error)})Promise - 三种状态
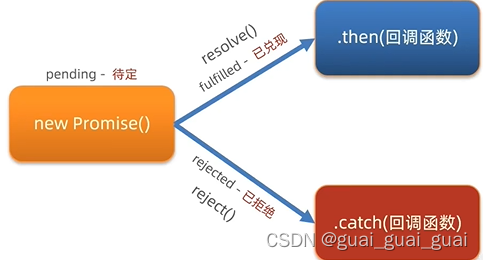
作用:了解Promise对象如何关联的处理函数,以及代码的执行顺序
- 待定(pending):初始状态,既没有被兑现,也没有被拒绝
- 已兑现:意味着,操作成功完成
- 已拒绝:意味着,操作失败

注意:Promise对象一旦被兑现/拒绝,就是已经敲定了,状态无法再被改变
/*** 目标:认识Promise状态*/// 1. 创建Promise对象(pending-待定状态)const p = new Promise((resolve, reject) => {// Promise对象创建时,这里的代码都会执行了// 2. 执行异步代码setTimeout(() => {// resolve() => 'fulfilled状态-已兑现' => then()resolve('模拟AJAX请求-成功结果')// reject() => 'rejected状态-已拒绝' => catch()reject(new Error('模拟AJAX请求-失败结果'))}, 2000)})console.log(p)// 3. 获取结果p.then(result => {console.log(result)}).catch(error => {console.log(error)})

使用Promise+XHR获取省份列表
需求:使用Promise管理XHR获取省份列表,并展示到页面上
/*** 目标:使用Promise管理XHR请求省份列表* 1. 创建Promise对象* 2. 执行XHR异步代码,获取省份列表* 3. 关联成功或失败函数,做后续处理*/// 1. 创建Promise对象const p = new Promise((resolve, reject) => {// 2. 执行XHR异步代码,获取省份列表const xhr = new XMLHttpRequest()xhr.open('GET', 'http://hmajax.itheima.net/api/province')xhr.addEventListener('loadend', () => {// xhr如何判断响应成功还是失败的?// 2xx开头的都是成功响应状态码if (xhr.status >= 200 && xhr.status < 300) {resolve(JSON.parse(xhr.response))} else {reject(new Error(xhr.response))}})xhr.send()})// 3. 关联成功或失败函数,做后续处理p.then(result => {console.log(result)document.querySelector('.my-p').innerHTML = result.list.join('<br>')}).catch(error => {// 错误对象要用console.dir详细打印console.dir(error)// 服务器返回错误提示消息,插入到p标签显示document.querySelector('.my-p').innerHTML = error.message})封装_简易axios_获取省份列表
需求:基于Promise+XHR封装myAxios函数,获取省份列表展示
步骤:
- 发起myAxios函数,接收配置对象,返回Promise对象
- 发起XHR请求,默认请求方法为GET
- 调用成功/失败的处理程序
- 使用myAxios函数,获取省份列表展示
/*** 目标:封装_简易axios函数_获取省份列表* 1. 定义myAxios函数,接收配置对象,返回Promise对象* 2. 发起XHR请求,默认请求方法为GET* 3. 调用成功/失败的处理程序* 4. 使用myAxios函数,获取省份列表展示*/// 1. 定义myAxios函数,接收配置对象,返回Promise对象function myAxios(config) {return new Promise((resolve, reject) => {// 2. 发起XHR请求,默认请求方法为GETconst xhr = new XMLHttpRequest()xhr.open(config.method || 'GET', config.url)xhr.addEventListener('loadend', () => {// 3. 调用成功/失败的处理程序if (xhr.status >= 200 && xhr.status < 300) {resolve(JSON.parse(xhr.response))} else {reject(new Error(xhr.response))}})xhr.send()})}// 4. 使用myAxios函数,获取省份列表展示myAxios({url: 'http://hmajax.itheima.net/api/province'}).then(result => {console.log(result)document.querySelector('.my-p').innerHTML = result.list.join('<br>')}).catch(error => {console.log(error)document.querySelector('.my-p').innerHTML = error.message})封装_简易axios_获取地区列表、
需求:修改myAxios函数支持传递查询参数,获取"辽宁省"、"大连市"对应地区列表展示
/*** 目标:封装_简易axios函数_获取地区列表* 1. 判断有params选项,携带查询参数* 2. 使用URLSearchParams转换,并携带到url上* 3. 使用myAxios函数,获取地区列表*/function myAxios(config) {return new Promise((resolve, reject) => {const xhr = new XMLHttpRequest()// 1. 判断有params选项,携带查询参数if (config.params) {// 2. 使用URLSearchParams转换,并携带到url上const paramsObj = new URLSearchParams(config.params)const queryString = paramsObj.toString()// 把查询参数字符串,拼接在url?后面config.url += `?${queryString}`}xhr.open(config.method || 'GET', config.url)xhr.addEventListener('loadend', () => {if (xhr.status >= 200 && xhr.status < 300) {resolve(JSON.parse(xhr.response))} else {reject(new Error(xhr.response))}})xhr.send()})}// 3. 使用myAxios函数,获取地区列表myAxios({url: 'http://hmajax.itheima.net/api/area',params: {pname: '辽宁省',cname: '大连市'}}).then(result => {console.log(result)document.querySelector('.my-p').innerHTML = result.list.join('<br>')})
封装_简易_axios_注册用户
需求:修改myAxios函数支持传递请求体数据,完成用户注册功能
步骤:
- myaxios函数调用后,判断data选项
- 转换数据类型,在send方法中发送
- 使用自己封装的myAxios函数完成注册用户功能
/*** 目标:封装_简易axios函数_注册用户* 1. 判断有data选项,携带请求体* 2. 转换数据类型,在send中发送* 3. 使用myAxios函数,完成注册用户*/function myAxios(config) {return new Promise((resolve, reject) => {const xhr = new XMLHttpRequest()if (config.params) {const paramsObj = new URLSearchParams(config.params)const queryString = paramsObj.toString()config.url += `?${queryString}`}xhr.open(config.method || 'GET', config.url)xhr.addEventListener('loadend', () => {if (xhr.status >= 200 && xhr.status < 300) {resolve(JSON.parse(xhr.response))} else {reject(new Error(xhr.response))}})// 1. 判断有data选项,携带请求体if (config.data) {// 2. 转换数据类型,在send中发送const jsonStr = JSON.stringify(config.data)//需要自己手动设置传递内容类型为json字符串xhr.setRequestHeader('Content-Type', 'application/json')xhr.send(jsonStr)} else {// 如果没有请求体数据,正常的发起请求xhr.send()}})}document.querySelector('.reg-btn').addEventListener('click', () => {// 3. 使用myAxios函数,完成注册用户myAxios({url: 'http://hmajax.itheima.net/api/register',method: 'POST',data: {username: 'itheima999',password: '666666'}}).then(result => {console.log(result)}).catch(error => {console.dir(error)})})案例 - 天气预报
步骤:
- 获取北京市天气数据,展示
- 搜索城市列表,展示
- 点击城市,显示对应天气数据
/*** 目标1:默认显示-北京市天气* 1.1 获取北京市天气数据* 1.2 数据展示到页面*/
// 获取并渲染城市天气函数
function getWeather(cityCode) {// 1.1 获取北京市天气数据myAxios({url: 'http://hmajax.itheima.net/api/weather',params: {city: cityCode}}).then(result => {console.log(result)const wObj = result.data// 1.2 数据展示到页面// 阳历和农历日期const dateStr = `<span class="dateShort">${wObj.date}</span><span class="calendar">农历 <span class="dateLunar">${wObj.dateLunar}</span></span>`document.querySelector('.title').innerHTML = dateStr// 城市名字document.querySelector('.area').innerHTML = wObj.area// 当天气温const nowWStr = `<div class="tem-box"><span class="temp"><span class="temperature">${wObj.temperature}</span><span>°</span></span></div><div class="climate-box"><div class="air"><span class="psPm25">${wObj.psPm25}</span><span class="psPm25Level">${wObj.psPm25Level}</span></div><ul class="weather-list"><li><img src="${wObj.weatherImg}" class="weatherImg" alt=""><span class="weather">${wObj.weather}</span></li><li class="windDirection">${wObj.windDirection}</li><li class="windPower">${wObj.windPower}</li></ul></div>`document.querySelector('.weather-box').innerHTML = nowWStr// 当天天气const twObj = wObj.todayWeatherconst todayWStr = `<div class="range-box"><span>今天:</span><span class="range"><span class="weather">${twObj.weather}</span><span class="temNight">${twObj.temNight}</span><span>-</span><span class="temDay">${twObj.temDay}</span><span>℃</span></span></div><ul class="sun-list"><li><span>紫外线</span><span class="ultraviolet">${twObj.ultraviolet}</span></li><li><span>湿度</span><span class="humidity">${twObj.humidity}</span>%</li><li><span>日出</span><span class="sunriseTime">${twObj.sunriseTime}</span></li><li><span>日落</span><span class="sunsetTime">${twObj.sunsetTime}</span></li></ul>`document.querySelector('.today-weather').innerHTML = todayWStr// 7日天气预报数据展示const dayForecast = wObj.dayForecastconst dayForecastStr = dayForecast.map(item => {return `<li class="item"><div class="date-box"><span class="dateFormat">${item.dateFormat}</span><span class="date">${item.date}</span></div><img src="${item.weatherImg}" alt="" class="weatherImg"><span class="weather">${item.weather}</span><div class="temp"><span class="temNight">${item.temNight}</span>-<span class="temDay">${item.temDay}</span><span>℃</span></div><div class="wind"><span class="windDirection">${item.windDirection}</span><span class="windPower">${item.windPower}</span></div></li>`}).join('')// console.log(dayForecastStr)document.querySelector('.week-wrap').innerHTML = dayForecastStr})
}// 默认进入网页-就要获取天气数据(北京市城市编码:'110100')
getWeather('110100')/*** 目标2:搜索城市列表* 2.1 绑定input事件,获取关键字* 2.2 获取展示城市列表数据*/
// 2.1 绑定input事件,获取关键字
document.querySelector('.search-city').addEventListener('input', (e) => {console.log(e.target.value)// 2.2 获取展示城市列表数据myAxios({url: 'http://hmajax.itheima.net/api/weather/city',params: {city: e.target.value}}).then(result => {console.log(result)const liStr = result.data.map(item => {return `<li class="city-item" data-code="${item.code}">${item.name}</li>`}).join('')console.log(liStr)document.querySelector('.search-list').innerHTML = liStr})
})/*** 目标3:切换城市天气* 3.1 绑定城市点击事件,获取城市code值* 3.2 调用获取并展示天气的函数*/
// 3.1 绑定城市点击事件,获取城市code值
document.querySelector('.search-list').addEventListener('click', e => {if (e.target.classList.contains('city-item')) {// 只有点击城市li才会走这里const cityCode = e.target.dataset.codeconsole.log(cityCode)// 3.2 调用获取并展示天气的函数getWeather(cityCode)}
})同步代码和异步代码
同步代码:浏览器按照我们书写代码的顺序一行一行执行程序的,浏览器会等待代码的解析和工作,在上一行完成之后才会执行下一行,这样做是很有必要的,因为每一行新的代码都是建立在前面代码的基础之上的。
异步代码:使程序可在执行一个可能长期运行的任务的同时继续对其他事件作出反应而不必等待任务完成,与此同时,程序也将在任务完成后显示结果
同步代码:逐行执行,需原地等待结果后,才可继续向下执行
异步代码:调用后耗时,不阻塞代码继续执行(不必原地等待),在将来完成后触发一个回调函数
回调函数地狱
需求:展示默认第一个省,第一个城市,第一个地区在下拉菜单中


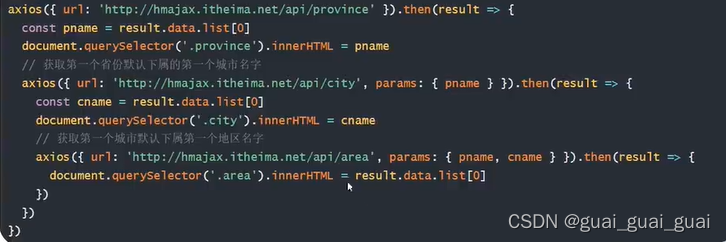
概念:在回调函数中嵌套回调函数,一直嵌套下去就形成了回调函数地狱
缺点:可读性差,异常无法捕获,耦合性严重,牵一发动全身
/*** 目标:演示回调函数地狱* 需求:获取默认第一个省,第一个市,第一个地区并展示在下拉菜单中* 概念:在回调函数中嵌套回调函数,一直嵌套下去就形成了回调函数地狱* 缺点:可读性差,异常无法获取,耦合性严重,牵一发动全身*/// 1. 获取默认第一个省份的名字axios({url: 'http://hmajax.itheima.net/api/province'}).then(result => {const pname = result.data.list[0]document.querySelector('.province').innerHTML = pname// 2. 获取默认第一个城市的名字axios({url: 'http://hmajax.itheima.net/api/city', params: { pname }}).then(result => {const cname = result.data.list[0]document.querySelector('.city').innerHTML = cname// 3. 获取默认第一个地区的名字axios({url: 'http://hmajax.itheima.net/api/area', params: { pname, cname }}).then(result => {console.log(result)const areaName = result.data.list[0]document.querySelector('.area').innerHTML = areaName})})}).catch(error => {console.dir(error)})Promise - 链式调用
概念:依靠then()方法会返回一个新生成的Promise对象特性,继续串联下一环任务,直到结束
细节:then()回调函数中的返回值,会影响新生成的Promise对象最终状态和结果
好处:通过链式调用,解决回调函数嵌套问题
/*** 目标:掌握Promise的链式调用* 需求:把省市的嵌套结构,改成链式调用的线性结构*/// 1. 创建Promise对象-模拟请求省份名字const p = new Promise((resolve, reject) => {setTimeout(() => {resolve('北京市')}, 2000)})// 2. 获取省份名字const p2 = p.then(result => {console.log(result)// 3. 创建Promise对象-模拟请求城市名字// return Promise对象最终状态和结果,影响到新的Promise对象return new Promise((resolve, reject) => {setTimeout(() => {resolve(result + '--- 北京')}, 2000)})})// 4. 获取城市名字p2.then(result => {console.log(result)})// then()原地的结果是一个新的Promise对象console.log(p2 === p)Promise链式应用
目标:使用Promise链式调用,解决回调函数地狱问题
做法:每个Promise对象中管理一个异步任务,用then返回Promise对象,串联起来

/*** 目标:把回调函数嵌套代码,改成Promise链式调用结构* 需求:获取默认第一个省,第一个市,第一个地区并展示在下拉菜单中*/let pname = ''// 1. 得到-获取省份Promise对象axios({url: 'http://hmajax.itheima.net/api/province'}).then(result => {pname = result.data.list[0]document.querySelector('.province').innerHTML = pname// 2. 得到-获取城市Promise对象return axios({url: 'http://hmajax.itheima.net/api/city', params: { pname }})}).then(result => {const cname = result.data.list[0]document.querySelector('.city').innerHTML = cname// 3. 得到-获取地区Promise对象return axios({url: 'http://hmajax.itheima.net/api/area', params: { pname, cname }})}).then(result => {console.log(result)const areaName = result.data.list[0]document.querySelector('.area').innerHTML = areaName})async函数(修饰函数)和await
async函数是使用async关键字声明的函数,async函数是AsyncFunction构造函数的实例,并且其中允许使用await关键字,async和await关键字让我们可以用一种更简洁的方式写出基于Promise的异步行为,而无需刻意地链式调用promise
概念:在async函数内,使用await关键字取代then函数,等待获取Promise对象成功状态的结果值
用async和await也可直接获得promise对象返回的结果,不使用.then
/*** 目标:掌握async和await语法,解决回调函数地狱* 概念:在async函数内,使用await关键字,获取Promise对象"成功状态"结果值* 注意:await必须用在async修饰的函数内(await会阻止"异步函数内"代码继续执行,原地等待结果)*/// 1. 定义async修饰函数async function getData() {// 2. await等待Promise对象成功的结果const pObj = await axios({url: 'http://hmajax.itheima.net/api/province'})const pname = pObj.data.list[0]const cObj = await axios({url: 'http://hmajax.itheima.net/api/city', params: { pname }})const cname = cObj.data.list[0]const aObj = await axios({url: 'http://hmajax.itheima.net/api/area', params: { pname, cname }})const areaName = aObj.data.list[0]document.querySelector('.province').innerHTML = pnamedocument.querySelector('.city').innerHTML = cnamedocument.querySelector('.area').innerHTML = areaName}getData()async函数和await_捕获错误
使用try...catch
try...catch语句标记要尝试的语句块,并指定一个出现异常时抛出的响应

/*** 目标:async和await_错误捕获*/async function getData() {// 1. try包裹可能产生错误的代码try {const pObj = await axios({ url: 'http://hmajax.itheima.net/api/province' })const pname = pObj.data.list[0]const cObj = await axios({ url: 'http://hmajax.itheima.net/api/city', params: { pname } })const cname = cObj.data.list[0]const aObj = await axios({ url: 'http://hmajax.itheima.net/api/area', params: { pname, cname } })const areaName = aObj.data.list[0]document.querySelector('.province').innerHTML = pnamedocument.querySelector('.city').innerHTML = cnamedocument.querySelector('.area').innerHTML = areaName} catch (error) {// 2. 接着调用catch块,接收错误信息// 如果try里某行代码报错后,try中剩余的代码不会执行了console.dir(error)}}getData()认识 - 事件循环(EventLoop)
概念:JavaScript有一个基于事件循环的并发类型,事件循环负责执行代码,收集和处理事件以及执行队列中的子任务,这个模型与其它语言中的模型截然不同,比如C和Java。
原理:JavaScript单线程(某一刻只能执行一行代码),为了让耗时代码不阻塞其他代码运行,设计了事件循环模型
事件循环 - 执行过程
定义:执行代码和收集异步任务的模型,在调用栈空闲,反复调用任务队列里回调函数的执行机制,就叫事件循环
// 目标:回答代码执行顺序console.log(1)setTimeout(() => {console.log(2)const p = new Promise(resolve => resolve(3))p.then(result => console.log(result))}, 0)const p = new Promise(resolve => {setTimeout(() => {console.log(4)}, 0)resolve(5)})p.then(result => console.log(result))const p2 = new Promise(resolve => resolve(6))p2.then(result => console.log(result))console.log(7)// 1 7 5 6 2 3 4宏任务与微任务
ES6之后引入了Promise对象,让JS引擎也可以发起异步任务
异步任务分为:
- 宏任务:由浏览器环境执行的异步代码
- 微任务:由JS引擎环境执行的异步代码
宏任务:
| 任务(代码) | 执行所在环境 |
|---|---|
| JS脚本执行事件 | 浏览器 |
| setTimeout/setInterval | 浏览器 |
| AJAX请求完成事件 | 浏览器 |
| 用户交互事件等 | 浏览器 |
微任务:
| 任务(代码) | 执行所在环境 |
|---|---|
| Promise对象.then() | JS引擎 |
Promise本身是同步的,而then和catch回调函数是异步的
js内代码如何执行
- 执行第一个script脚本事件宏任务,里面同步代码(先执行同步任务)
- 遇到宏任务/微任务交给宿主环境,有结果回调函数进入对应队列(宏任务和微任务队列)
- 当执行栈空闲时,清空微任务队列,再执行下一个宏任务(先执行微任务再执行宏任务)
// 目标:回答代码执行顺序console.log(1)setTimeout(() => {console.log(2)const p = new Promise(resolve => resolve(3))p.then(result => console.log(result))}, 0)const p = new Promise(resolve => {setTimeout(() => {console.log(4)}, 0)resolve(5)})p.then(result => console.log(result))const p2 = new Promise(resolve => resolve(6))p2.then(result => console.log(result))console.log(7)// 1 7 5 6 2 3 4Promise.all静态方法
概念:合并多个Promise对象,等待所有同时成功完成(或某一个失败),做后续逻辑

需求:同时请求"北京","上海","广州","深圳"的天气并在网页中尽可能同时显示
*/// 1. 请求城市天气,得到Promise对象const bjPromise = axios({ url: 'http://hmajax.itheima.net/api/weather', params: { city: '110100' } })const shPromise = axios({ url: 'http://hmajax.itheima.net/api/weather', params: { city: '310100' } })const gzPromise = axios({ url: 'http://hmajax.itheima.net/api/weather', params: { city: '440100' } })const szPromise = axios({ url: 'http://hmajax.itheima.net/api/weather', params: { city: '440300' } })// 2. 使用Promise.all,合并多个Promise对象const p = Promise.all([bjPromise, shPromise, gzPromise, szPromise])p.then(result => {//result为合并的promise对象返回的结果的数组// 注意:结果数组顺序和合并时顺序是一致console.log(result)const htmlStr = result.map(item => {return `<li>${item.data.data.area} --- ${item.data.data.weather}</li>`}).join('')document.querySelector('.my-ul').innerHTML = htmlStr}).catch(error => {console.dir(error)})商品分类
需求:尽可能同时展示所有商品分类到页面上
步骤:
- 获取所有的一级分类数据
- 遍历id,创建获取二级分类请求
- 合并所有二级分类Promise对象
- 等待同时成功,开始渲染页面
/*** 目标:把所有商品分类“同时”渲染到页面上* 1. 获取所有一级分类数据* 2. 遍历id,创建获取二级分类请求* 3. 合并所有二级分类Promise对象* 4. 等待同时成功后,渲染页面*/// 1. 获取所有一级分类数据axios({url: 'http://hmajax.itheima.net/api/category/top'}).then(result => {console.log(result)// 2. 遍历id,创建获取二级分类请求const secPromiseList = result.data.data.map(item => {return axios({url: 'http://hmajax.itheima.net/api/category/sub',params: {id: item.id // 一级分类id}})})console.log(secPromiseList) // [二级分类请求Promise对象,二级分类请求Promise对象,...]// 3. 合并所有二级分类Promise对象const p = Promise.all(secPromiseList)p.then(result => {console.log(result)// 4. 等待同时成功后,渲染页面const htmlStr = result.map(item => {const dataObj = item.data.data // 取出关键数据对象return `<div class="item"><h3>${dataObj.name}</h3><ul>${dataObj.children.map(item => {return `<li><a href="javascript:;"><img src="${item.picture}"><p>${item.name}</p></a></li>`}).join('')}</ul></div>`}).join('')console.log(htmlStr)document.querySelector('.sub-list').innerHTML = htmlStr})})学习反馈 - 省市区切换
需求:完成省市区切换效果
步骤:
- 设置省份数据到下拉菜单
- 切换省份,设置城市数据到下拉菜单,并清空地区下拉菜单
- 切换城市,设置地区数据到下拉菜单
/*** 目标1:完成省市区下拉列表切换*  1.1 设置省份下拉菜单数据*  1.2 切换省份,设置城市下拉菜单数据,清空地区下拉菜单*  1.3 切换城市,设置地区下拉菜单数据*/
// 1.1 设置省份下拉菜单数据
axios({url: 'http://hmajax.itheima.net/api/province'
}).then(result => {const optionStr = result.data.list.map(pname => `<option value="${pname}">${pname}</option>`).join('')document.querySelector('.province').innerHTML = `<option value="">省份</option>` + optionStr
})// 1.2 切换省份,设置城市下拉菜单数据,清空地区下拉菜单
document.querySelector('.province').addEventListener('change', async e => {// 获取用户选择省份名字// console.log(e.target.value)const result = await axios({ url: 'http://hmajax.itheima.net/api/city', params: { pname: e.target.value } })const optionStr = result.data.list.map(cname => `<option value="${cname}">${cname}</option>`).join('')// 把默认城市选项+下属城市数据插入select中document.querySelector('.city').innerHTML = `<option value="">城市</option>` + optionStr// 清空地区数据document.querySelector('.area').innerHTML = `<option value="">地区</option>`
})// 1.3 切换城市,设置地区下拉菜单数据
document.querySelector('.city').addEventListener('change', async e => {console.log(e.target.value)const result = await axios({url: 'http://hmajax.itheima.net/api/area', params: {pname: document.querySelector('.province').value,cname: e.target.value}})console.log(result)const optionStr = result.data.list.map(aname => `<option value="${aname}">${aname}</option>`).join('')console.log(optionStr)document.querySelector('.area').innerHTML = `<option value="">地区</option>` + optionStr
})
学习反馈 - 数据提交
需求:收集学习反馈数据,提交保存
步骤:
- 监听提交按钮的点击事件
- 依靠插件收集表单数据
- 基于axios提交保存,显示结果
/*** 目标2:收集数据提交保存*  2.1 监听提交的点击事件*  2.2 依靠插件收集表单数据*  2.3 基于axios提交保存,显示结果*/
// 2.1 监听提交的点击事件
document.querySelector('.submit').addEventListener('click', async () => {// 2.2 依靠插件收集表单数据const form = document.querySelector('.info-form')const data = serialize(form, { hash: true, empty: true })console.log(data)// 2.3 基于axios提交保存,显示结果try {const result = await axios({url: 'http://hmajax.itheima.net/api/feedback',method: 'POST',data})console.log(result)alert(result.data.message)} catch (error) {console.dir(error)alert(error.response.data.message)}
})
这篇关于AJAX前端与后端交互技术知识点以及案例的文章就介绍到这儿,希望我们推荐的文章对编程师们有所帮助!


