本文主要是介绍【达内课程】布局控件之 GridLayout 和 AbsoluteLayout,希望对大家解决编程问题提供一定的参考价值,需要的开发者们随着小编来一起学习吧!
文章目录
- GridLayout
- AbsoluteLayout
GridLayout
介绍
网格布局是 Android 4.0 之后添加的布局,跟 TableLayout 有点像,但更加好用,它把容器分为一个 rows*columns 的网格,每个网格都是一个组件位,可是通过设置让组件位占据多行/列。
与之相似地,还有一个叫做 GridView 的组件,无论功能和名称都很相似,不过GridView 使用 Adapter 来填充组件位,GridLayout 则要简化得多。
GridLayout 本身的属性
| 属性 | 对应方法 | 属性说明 |
|---|---|---|
| android:columnCount | setColumCount(int) | 设置布局的最大列数 |
| android:rowCount | setRowCount(int) | 设置布局的最大行数 |
| android:alignmentMode | setAilgnmentMode(int) | 设置布局的对其方式(alignBounds: 对齐子视图边界;alignMargins: 对齐子视图边距;) |
| android:columnOrderPeserved | setColumOrderPreserved(boolean) | 设置容器是否保留列序号 |
| android:rowOrderPeserved | setRowOrderPeserved(boolean) | 设置容器是否保留行序号 |
| android:useDefaultMargins | setUseDefaultMargins(boolean) | 设置容器是否使用默认的页边距 |
针对容器内的子组件的属性
| 属性 | 作用 |
|---|---|
| android:layout_column | 指定该单元格在第几列显示 |
| android:layout_row | 指定该单元格在第几行显示 |
| android:layout_columnSpan | 指定该单元格占据的列数 |
| android:layout_rowSpan | 指定该单元格占据的行数 |
| android:layout_gravity | 指定该单元格在容器中的位置 |
| android:layout_columnWeight | (API21加入)列权重 |
| android:layout_rowWeight | (API21加入) 行权重 |
这里的 LayoutGravity 跟一般的 LayoutGravity 有点区别,这里的摆放位置是相对于所属网格的,而不是对于布局父容器来说的。
| android:layout_gravity | 作用 |
|---|---|
| center | 不改变元素的大小,仅居中 |
| center_horizontal | 不改变大小,水平居中 |
| center_vertical | 不改变大小,垂直居中 |
| top | 不改变大小,置于顶部 |
| left | 不改变大小,置于左边 |
| bottom | 不改变大小,置于底部 |
| right | 不改变大小,置于右边 |
| start | 不改变大小,根据系统语言,置于开始位置 |
| end | 不改变大小,置于结尾 |
| fill | 拉伸元素控件,填满其应该所占的格子 |
| fill_vertical | 仅垂直方向上拉伸填充 |
| fill_horizontal | 仅水平方向上拉伸填充 |
| clip_vertical | 垂直方向上裁剪元素,仅当元素大小超过格子的空间时 |
| clip_horizontal | 水平方向上裁剪元素,仅当元素大小超过格子的空间时 |
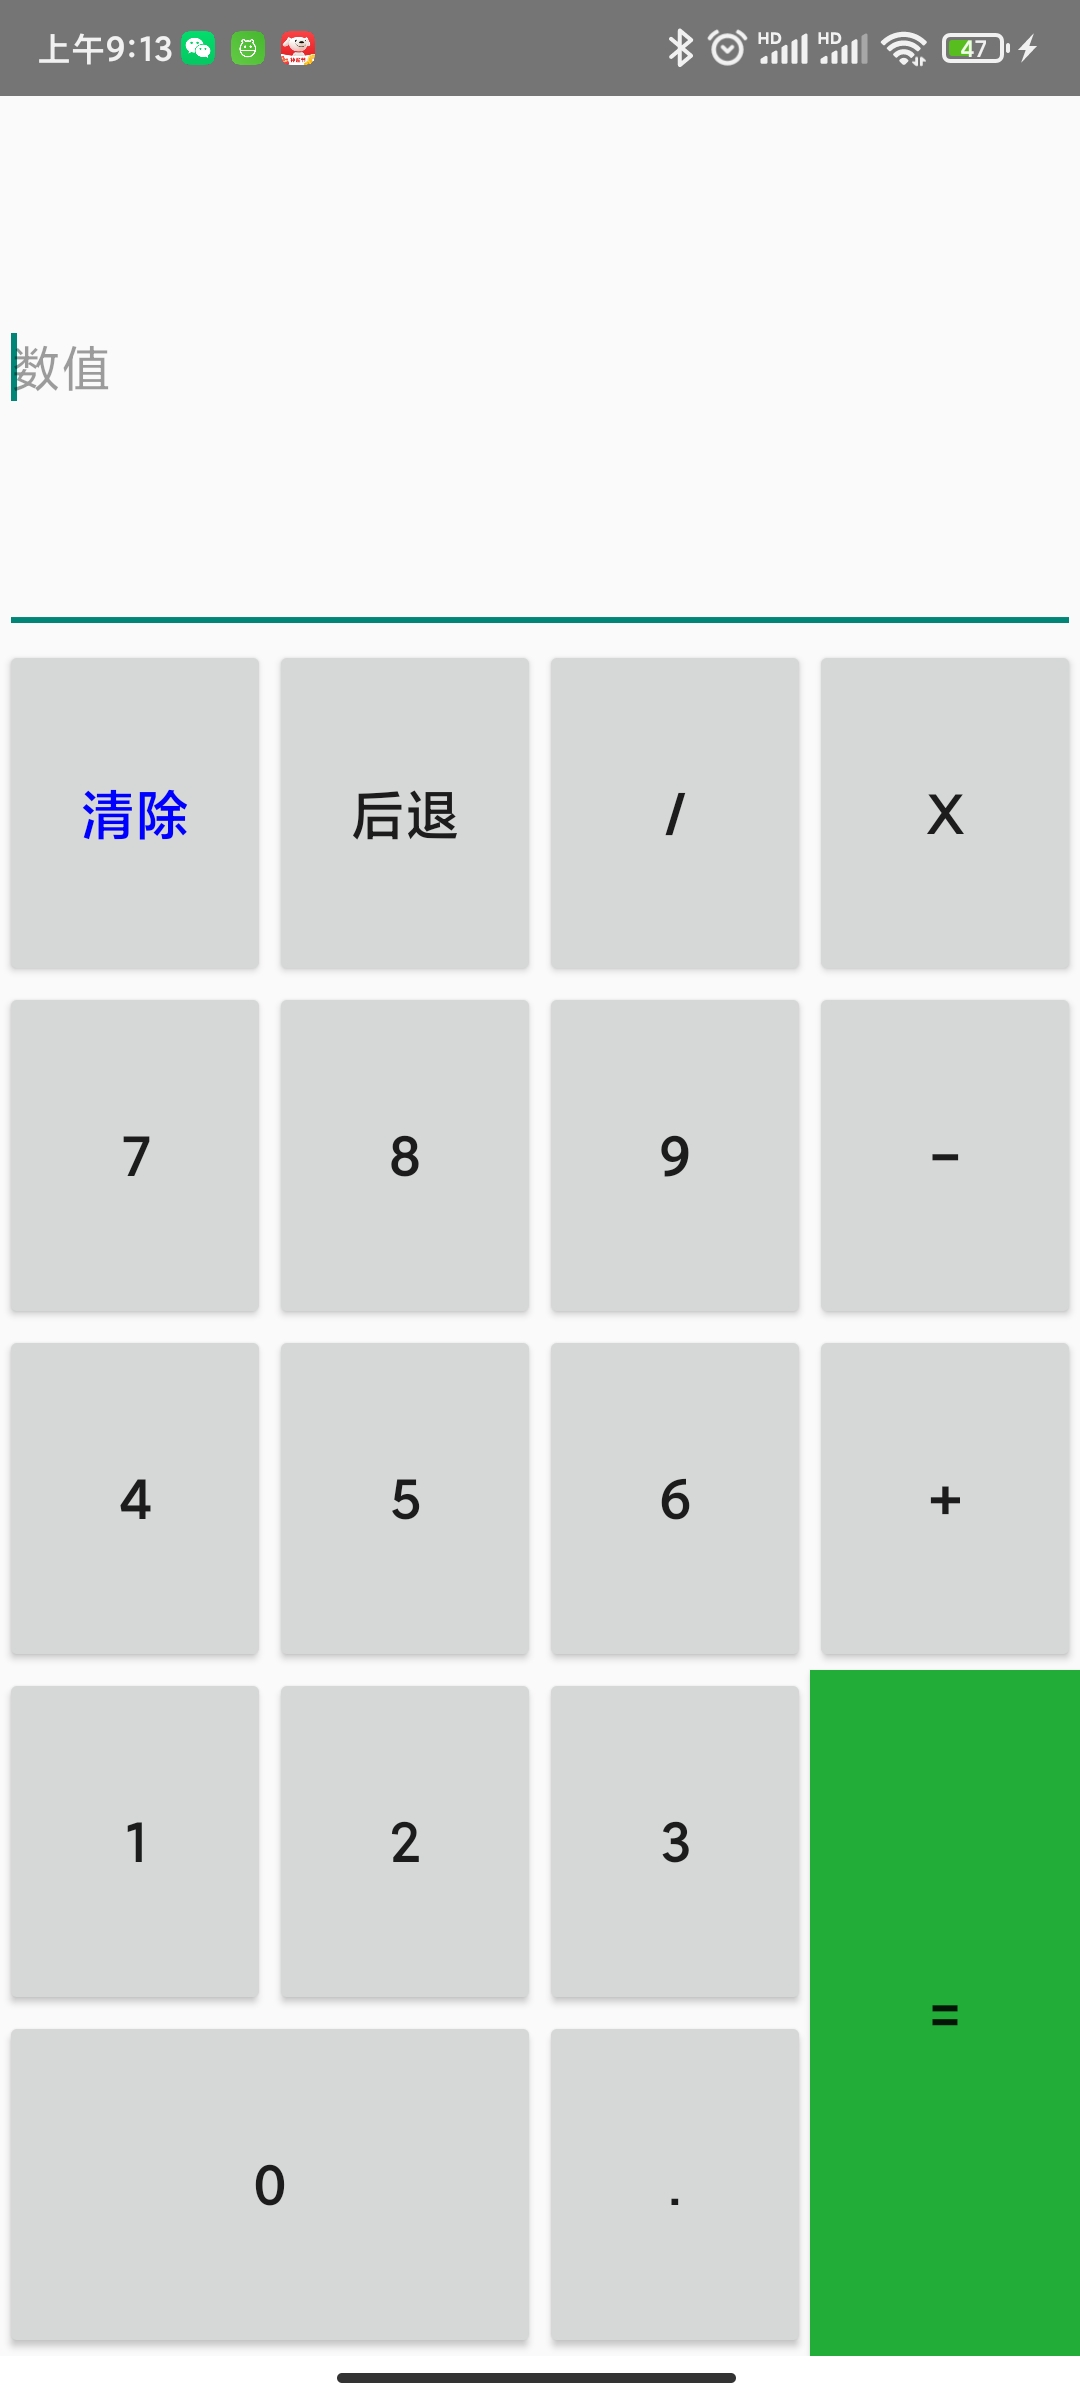
举例:GridLayout 练习,实现计算器效果
xml
<GridLayout xmlns:android="http://schemas.android.com/apk/res/android"android:layout_width="match_parent"android:layout_height="match_parent"android:columnCount="4"android:rowCount="6"><!--6行4列 实现占满整个屏幕--><!--跨四列 自动填充 权重2--><EditTextandroid:layout_rowWeight="2"android:layout_columnSpan="4"android:layout_gravity="fill_horizontal"android:hint="数值" /><!--列 行权重为1--><Buttonandroid:layout_rowWeight="1"android:layout_columnWeight="1"android:text="清除"android:textColor="#00F"android:textSize="20dp" /><!--列 行权重为1--><Buttonandroid:layout_rowWeight="1"android:layout_columnWeight="1"android:text="后退"android:textSize="20dp" /><Buttonandroid:layout_rowWeight="1"android:layout_columnWeight="1"android:text="/"android:textSize="20dp" /><Buttonandroid:layout_rowWeight="1"android:layout_columnWeight="1"android:text="x"android:textSize="20dp" /><Buttonandroid:layout_rowWeight="1"android:layout_columnWeight="1"android:text="7"android:textSize="20dp" /><Buttonandroid:layout_rowWeight="1"android:layout_columnWeight="1"android:text="8"android:textSize="20dp" /><Buttonandroid:layout_rowWeight="1"android:layout_columnWeight="1"android:text="9"android:textSize="20dp" /><Buttonandroid:layout_rowWeight="1"android:layout_columnWeight="1"android:text="-"android:textSize="20dp" /><Buttonandroid:layout_rowWeight="1"android:layout_columnWeight="1"android:text="4"android:textSize="20dp" /><Buttonandroid:layout_rowWeight="1"android:layout_columnWeight="1"android:text="5"android:textSize="20dp" /><Buttonandroid:layout_rowWeight="1"android:layout_columnWeight="1"android:text="6"android:textSize="20dp" /><Buttonandroid:layout_rowWeight="1"android:layout_columnWeight="1"android:text="+"android:textSize="20dp" /><Buttonandroid:layout_rowWeight="1"android:layout_columnWeight="1"android:text="1"android:textSize="20dp" /><Buttonandroid:layout_rowWeight="1"android:layout_columnWeight="1"android:text="2"android:textSize="20dp" /><Buttonandroid:layout_rowWeight="1"android:layout_columnWeight="1"android:text="3"android:textSize="20dp" /><!--跨两行 自动填充 绿色 列权重1 行权重2--><Buttonandroid:layout_rowSpan="2"android:layout_rowWeight="2"android:layout_columnWeight="1"android:layout_gravity="fill_vertical"android:background="#22ac38"android:text="="android:textSize="20dp" /><!--跨两列 自动填充 列权重2 行权重1--><Buttonandroid:layout_rowWeight="1"android:layout_columnSpan="2"android:layout_columnWeight="2"android:layout_gravity="fill_horizontal"android:text="0"android:textSize="20dp" /><Buttonandroid:layout_rowWeight="1"android:layout_columnWeight="1"android:text="."android:textSize="20dp" /></GridLayout>
运行结果:

解决 API<21 时 GridLayout 平均分配格行/列的问题
问题:GridLayout 在 API21 时引入了Android:layout_columnWeight和android:layout_rowWeight来解决平分问题,但是 api21 前就不可以使用,这是需要引入兼容包
compile 'com.android.support:gridlayout-v7:25.+'
使用如下:
<android.support.v7.widget.GridLayoutapp:layout_columnWeight="1" app:layout_rowWeight="1" ......
/>
AbsoluteLayout
介绍
绝对布局 AbsoluteLayout 通过指定组件的确切X、Y坐标来确定组件的位置。在 Android2.3 以被弃用,不推荐使用。以下教程仅作为了解。
属性
android:layout_x设置组件的X坐标
android:layout_y设置组件的Y坐标
<?xml version="1.0" encoding="utf-8"?>
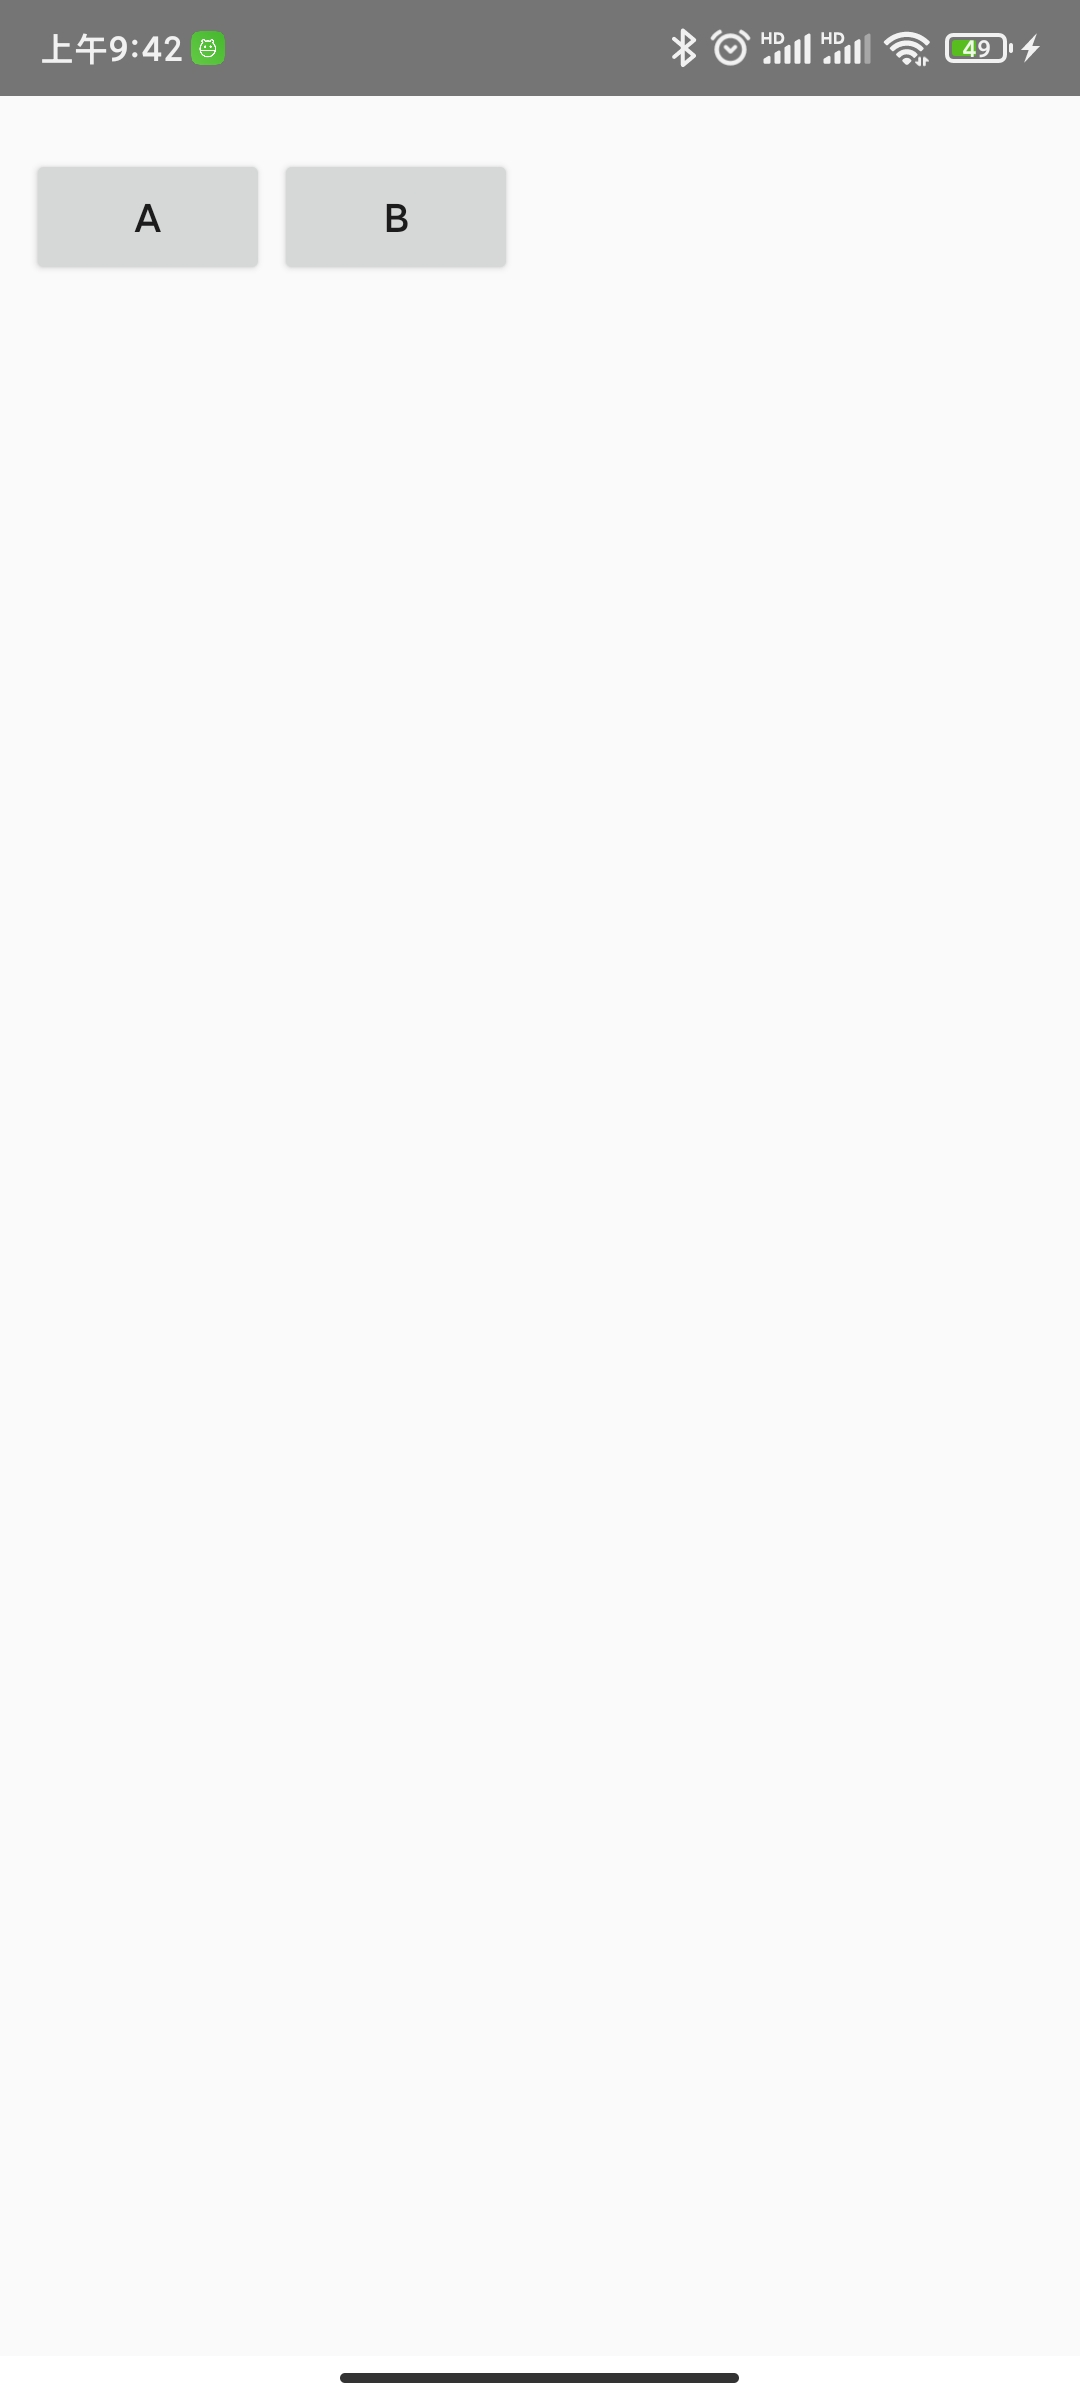
<AbsoluteLayout xmlns:android="http://schemas.android.com/apk/res/android"android:layout_width="match_parent"android:layout_height="match_parent"><Buttonandroid:id="@+id/Button01"android:layout_width="wrap_content"android:layout_height="wrap_content"android:layout_x="10dp"android:layout_y="20dp"android:text="A" /><Buttonandroid:id="@+id/Button02"android:layout_width="wrap_content"android:layout_height="wrap_content"android:layout_x="100dp"android:layout_y="20dp"android:text="B" /></AbsoluteLayout>
运行结果:

这篇关于【达内课程】布局控件之 GridLayout 和 AbsoluteLayout的文章就介绍到这儿,希望我们推荐的文章对编程师们有所帮助!


