本文主要是介绍有了Supervisor,再也不用担心程序撂挑子了!,希望对大家解决编程问题提供一定的参考价值,需要的开发者们随着小编来一起学习吧!
目录
1. 概述
2. 问题场景
3. Supervisor 简介
4.部署流程
4.1. 安装 Supervisor
4.2. 自定义服务配置文件
4.3. 自定义应用配置文件
4.4. 启动 supervisord 服务进程
4.5. 启动 supervisorctl 客户端进程
4.6. 验证 supervisor 的监控重启特性
5. 高级特性
5.1. 进程组管理
5.2. [program:x] 配置参数详解
5.3. supervisorctl 命令详解
5.4. 应用进程的信号处理
5.5. 可视化操作模式
6. 自动重启机制的简单分析
7. 总结
1. 概述
Supervisor 是一个 C/S 架构的进程监控与管理工具,本文主要介绍其基本用法和部分高级特性,用于解决部署持久化进程的稳定性问题。
2. 问题场景
在实际的工作中,往往会有部署持久化进程的需求,比如接口服务进程,又或者是消费者进程等。这类进程通常是作为后台进程持久化运行的。
一般的部署方法是通过 nohup cmd & 命令来部署。但是这种方式有个弊端是在某些情况下无法保证目标进程的稳定性运行,有的时候 nohup 运行的后台任务会因为未知原因中断,从而导致服务或者消费中断,进而影响项目的正常运行。
为了解决上述问题,通过引入 Supervisor 来部署持久化进程,提高系统运行的稳定性。
3. Supervisor 简介
Supervisor is a client/server system that allows its users to control a number of processes on UNIX-like operating systems.
Supervisor 是一个 C/S 架构的进程监控与管理工具,其最主要的特性是可以监控目标进程的运行状态,并在其异常中断时自动重启。同时支持对多个进程进行分组管理。
完整特性详见官方文档 github 与 document。
4.部署流程
4.1. 安装 Supervisor
通过 pip 命令安装 Supervisor 工具:
pip install supervisor
PS : 根据官方文档的说明 Supervisor 不支持在 windows 环境下运行
4.2. 自定义服务配置文件
在安装完成后,通过以下命令生成配置文件到指定路径:
echo_supervisord_conf > /etc/supervisord.conf
配置文件的一些主要配置参数如下
[unix_http_server]
file=/tmp/supervisor.sock   ; the path to the socket file
;chmod=0700                 ; socket file mode (default 0700)
;chown=nobody:nogroup       ; socket file uid:gid owner
;username=user              ; default is no username (open server)
;password=123               ; default is no password (open server)[supervisord]
logfile=/tmp/supervisord.log ; main log file; default $CWD/supervisord.log
logfile_maxbytes=50MB        ; max main logfile bytes b4 rotation; default 50MB
logfile_backups=10           ; # of main logfile backups; 0 means none, default 10
loglevel=info                ; log level; default info; others: debug,warn,trace
pidfile=/tmp/supervisord.pid ; supervisord pidfile; default supervisord.pid[supervisorctl]
serverurl=unix:///tmp/supervisor.sock ; use a unix:// URL  for a unix socket
;serverurl=http://127.0.0.1:9001 ; use an http:// url to specify an inet socket
;username=chris              ; should be same as in [*_http_server] if set
;password=123                ; should be same as in [*_http_server] if set
;prompt=mysupervisor         ; cmd line prompt (default "supervisor")
;history_file=~/.sc_history  ; use readline history if available;[program:theprogramname]
;command=/bin/cat              ; the program (relative uses PATH, can take args);[group:thegroupname]
;programs=progname1,progname2  ; each refers to 'x' in [program:x] definitions
;priority=999                  ; the relative start priority (default 999);[include]
;files = relative/directory/*.ini
对于上述配置参数,可以按照具体的需求进行自定义,大多数参数可以保持默认设置。但是为了方便多个项目的统一管理,需要启用 [include] 参数。该参数用于将指定文件包含到配置中,通过这种方式来 "扩展" 服务配置文件。
创建配置目录,并修改 files 参数 :
mkdir /etc/supervisord.d
[include]
files = /etc/supervisord.d/*.ini
4.3. 自定义应用配置文件
假设现在有一个测试项目 (test),里面有个 test.py 脚本需要持久化运行。现在切换到项目目录 (/root/test),并按照以下格式创建应用配置文件。
supervisor-{porject_name}.ini
配置项目的进程启动参数 :
; /root/test/supervisor-test.ini
[program:test]
command=python -u ./test.py          ; 运行命令
directory=/root/test/                ; 运行目录
redirect_stderr=true                 ; 将 stderr 重定向到 stdout
stdout_logfile=/root/test/test.log   ; 日志文件输出路径
将上述配置文件链接到服务配置文件中 [include] 参数设置的目录下 (或者复制):
ln ./supervisor-test.ini /etc/supervisord.d/supervisor-test.ini
需要注意的是,对于 supervisor 来说,上述 服务配置文件 和 应用配置文件 并没有直接区别。之所以将其划分成两类配置文件的目的在于当添加新项目时,不需要手动修改配置文件。
4.4. 启动 supervisord 服务进程
supervisord 是 supervisor 的核心服务进程,通过配置文件中的参数来创建具体的子进程,并对其进行监控与管理。通过以下命令来启动:
supervisord
默认情况下,按照以下路径顺序查找并加载配置文件
-
../etc/supervisord.conf (Relative to the executable)
-
../supervisord.conf (Relative to the executable)
-
$CWD/supervisord.conf
-
$CWD/etc/supervisord.conf
-
/etc/supervisord.conf
-
/etc/supervisor/supervisord.conf (since Supervisor 3.3.0)
也可以通过 -c 参数来指定配置文件路径。
supervisord -c conf_file_path
4.5. 启动 supervisorctl 客户端进程
supervisorctl 是 supervisor 的客户端进程,通过与 supervisord 服务进程建立 socket 连接来进行交互。使用以下命令进行交互式连接:
supervisorctl
成功连接后会显示当前运行的任务状态,或者使用 status 命令查看:
test RUNNING pid 2612, uptime 0:17:06
使用 tail -f test 来查看指定应用的日志输出:
1712051907.8820918
1712051908.8822799
1712051909.8824165
1712051910.8826928
...
PS : 使用 help 命令可以查看支持的所有操作。
4.6. 验证 supervisor 的监控重启特性
文章开头描述了引入 supervisor 的主要目的,即通过监控目标进程的运行状态,并在其异常中断后自动重启来提高运行的稳定性,接下来就验证一下是否满足这个需求。
在此通过手动 kill 目标进程的方式来模拟异常中断。
(base) root:~/test# ps -ef | grep test
root      3359  2394  0 10:15 ?        00:00:00 python -u ./test.py
(base) root:~/test# kill -9 3359
(base) root:~/test# ps -ef | grep test
root      3472  2394  1 10:16 ?        00:00:00 python -u ./test.py
通过上述测试可以看到,当手动 kill 掉目标进程后,supervisor 又自动重启了目标进程 (pid 发生了变化)。
要主动退出目标进程,可以通过以下命令实现:
supervisorctl stop test
5. 高级特性
5.1. 进程组管理
对于大多数项目,通常会包含多个进程,supervisor 支持将多个进程组成一个 进程组 来进行统一管理。
通过添加 [group:thegroupname] 参数并设置 programs 字段来设置进程组。
[group:test]
programs=test-task_service, test-collector[program:test-task_service]
command=python -u ./task_service.py
directory=/root/test/[program:test-collector]
command=python -u ./collector.py
directory=/root/test/
进入 supervisor 并使用 update 命令后查看运行状态:
(base) root:~# supervisorctl
test:test-collector              RUNNING   pid 1133, uptime 0:02:40
test:test-task_service           RUNNING   pid 1359, uptime 0:00:01
在使用 restart, start, stop 等命令时,可以通过指定进程组名称来进行批量操作。
supervisor> stop test:
test:test-task_service: stopped
test:test-collector: stopped
PS: 进行进程组操作时需要加上 : 号,即 cmd groupname:。
5.2. [program:x] 配置参数详解
-
command : 用于指定待运行的命令。
[program:test]
command=python -u /root/test/test.py
-
directory : 指定在执行 command 命令前切换的目录,当 command 使用相对路径时,可以与该参数配合使用。
[program:test]
command=python -u ./test.py
directory=/root/test
-
numprocs : 用于指定运行时的进程实例数量,需要与 process_name 参数配合使用。
[program:test]
command=python -u /root/test/test.py
process_name=%(program_name)s_%(process_num)s
numprocs=3
supervisor> status
test:test_0                      RUNNING   pid 2463, uptime 0:00:02
test:test_1                      RUNNING   pid 2464, uptime 0:00:02
test:test_2                      RUNNING   pid 2465, uptime 0:00:02
-
autostart : 用于控制是否在 supervisord 进程启动时同时启动 (默认为 true)
[program:test1]
command=python -u /root/test/test.py[program:test2]
command=python -u /root/test/test.py
autostart=false
supervisor> reload
Really restart the remote supervisord process y/N? y
Restarted supervisord
supervisor> status
test1                            RUNNING   pid 3253, uptime 0:00:02
test2                            STOPPED   Not started
-
stdout_logfile : 指定标准输出流的日志文件路径。
-
stdout_logfile_maxbytes : 单个日志文件的最大字节数,当超过该值时将对日志进行切分。
-
stdout_logfile_backups : 切分日志后保留的副本数,与 stdout_logfile_maxbytes 配合使用实现滚动日志效果。
-
redirect_stderr : 将 stderr 重定向到 stdout。
[program:test]
command=python -u /root/test/test.py
stdout_logfile=/root/test/test.log
stdout_logfile_maxbytes=1KB
stdout_logfile_backups=5
redirect_stderr=true
test.log
test.log.1
test.log.2
test.log.3
test.log.4
test.log.5
5.3. supervisorctl 命令详解
supervisorctl 支持的所有操作可以通过 help 命令来查看:
supervisor> helpdefault commands (type help <topic>):
=====================================
add    exit      open  reload  restart   start   tail
avail  fg        pid   remove  shutdown  status  update
clear  maintail  quit  reread  signal    stop    version
通过 help cmd 可以查看每个命令的意义和用法:
supervisor> help restart
restart <name>          Restart a process
restart <gname>:*       Restart all processes in a group
restart <name> <name>   Restart multiple processes or groups
restart all             Restart all processes
Note: restart does not reread config files. For that, see reread and update.
其中与 supervisord 服务进程相关的命令有:
-
open : 连接到远程 supervisord 进程。
-
reload : 重启 supervisord 进程。
-
shutdown : 关闭 supervisord 进程。
而以下命令则用于进行具体的应用进程管理:
-
status : 查看应用进程的运行状态。
-
start : 启动指定的应用进程。
-
restart : 重启指定的应用进程。
-
stop : 停止指定的应用进程。
-
signal : 向指定应用进程发送信号。
-
update : 重新加载配置参数,并根据需要重启应用进程。
5.4. 应用进程的信号处理
在某些应用场景,需要在进程结束前进行一些处理操作,比如清理缓存,上传执行状态等。对于这种需求可以通过引入 signal 模块并注册相关处理逻辑,同时结合 supervisorctl 的 signal 命令来实现。
测试代码如下:
import time
import signal# 运行标志
RUN = True# 信号处理逻辑
def exit_handler(signum, frame):print(f'processing signal({signal.Signals(signum).name})')print("update task status")print("clear cache data")global RUNRUN = False# 注册信号
signal.signal(signal.SIGTERM, exit_handler)# 模拟持久化行为
while RUN:print(time.strftime("%Y-%m-%d %H:%M:%S", time.localtime(int(time.time()))))time.sleep(1)print("exited")
上述代码在 signal.SIGTERM 信号上注册了一个处理函数,用来在退出之前处理相关逻辑。
通过 supervisorctl 的 signal 向目标进程发送 signal.SIGTERM(15) 信号。
supervisor> status
test                             RUNNING   pid 2855, uptime 0:00:06
supervisor> signal 15 test
test: signalled
supervisor> status
test                             EXITED    Apr 03 03:51 AM
可以看到目标进程正常退出了,再查看日志验证是否执行了 exit 函数的逻辑:
2024-04-03 03:51:34
2024-04-03 03:51:35
2024-04-03 03:51:36
2024-04-03 03:51:37
2024-04-03 03:51:38
processing signal(SIGTERM)
update task status
clear cache data
exited
日志的输出结果与代码的预期一致。
PS : stop test 与 signal 15 test 有相同的效果。
5.5. 可视化操作模式
除了使用 supervisorctl 以交互式命令行终端的形式连接 supervisord 外,还支持以可视化 web 页面的方式来操作。修改 服务配置文件 (/etc/supervisord.conf) 并启用以下配置:
[inet_http_server]
port=0.0.0.0:9001
username=user
password=123
重启后访问 http://127.0.0.1:9001/ 输入认证密码后,可以看到以下页面:
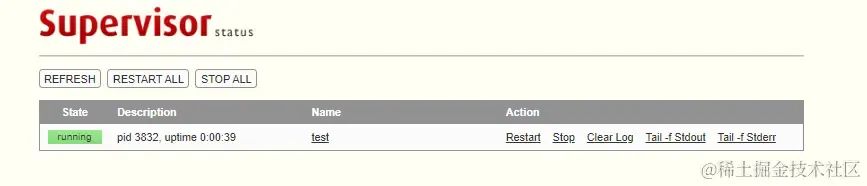
PS : 根据配置文档中的警告,以这种模式启动时,应考虑安全问题,不应该把服务接口暴露到公网上。
6. 自动重启机制的简单分析
在上一节的 "[program:x] 配置参数详解" 部分,有几个与自动重启机制相关的关键配置参数没有描述,在此通过具体的代码实验来看看这些参数对自动重启机制的影响。
控制自动重启机制的关键参数是:
autorestart=unexpected
autorestart 参数用来确定 supervisord 服务进程是否会自动重启目标进程,其有三个可选值,根据这三个值的不同有对应的处理逻辑。
-
autorestart=unexpected: 这是默认选项,当目标进程 “异常” 退出时,服务进程将自动重启目标进程,这里的 “异常” 指的是目标进程的 exitcode 与 exitcodes 配置的参数不一致时。_exitcodes_ 配置用于指定程序 “预期” 的退出代码列表,默认为exitcodes=0。
用以下代码来进行测试行为:
import timedef worker(end_count=5, exit_mode=1):count = 0while True:print(time.strftime("%Y-%m-%d %H:%M:%S", time.localtime(int(time.time()))))time.sleep(1)if count >= end_count:if exit_mode == 1:breakelif exit_mode == 2:raise Exception("test")elif exit_mode == 3:exit(1)else:passcount += 1worker(exit_mode=1)
# worker(exit_mode=2)
# worker(exit_mode=3)
# worker(exit_mode=4)
分别对以上 4 种退出模式进行测试,观察服务进程是否会自动重启目标进程。
-
exit_mode == 1: 通过break跳出循环正常结束
supervisor> status
test                             RUNNING   pid 5965, uptime 0:00:05
supervisor> status
test                             EXITED    Apr 03 08:59 AM
可以看到目标进程在正常结束后,服务进程不会对其自动重启。
-
exit_mode == 2: 通过Exception抛出异常,模拟内部异常导致的退出。
supervisor> status
test                             RUNNING   pid 6056, uptime 0:00:05
supervisor> status
test                             STARTING
supervisor> status
test                             RUNNING   pid 6103, uptime 0:00:02
可以看到以这种方式退出后,服务进程会自动重启目标进程。
-
exit_mode == 3: 通过exit(1)方法返回与exitcodes=0不一致的退出代码来测试。
supervisor> status
test                             RUNNING   pid 6209, uptime 0:00:05
supervisor> status
test                             STARTING
supervisor> status
test                             RUNNING   pid 6240, uptime 0:00:01
与 exit_mode == 2 的测试结果一致。
-
exit_mode == 4: 通过手动kill目标进程来测试,发现与上述结果一致。
通过配置 exitcodes 参数,可以根据具体的场景来自定义自动重启的行为,比如为每一个关键异常赋予一个退出代码,当进程出现内部异常时,可以根据这些退出代码来控制自动重启行为。
例如目标进程依赖于一个数据库,如果数据库连接失败,那么后续逻辑将无法执行,在这种情况下不需要再自动重启,因此可以在捕获该异常时产生一个对应的退出代码,比如 exit(100),然后将其配置到 exitcodes=0,100 中。这样当这个特定异常触发时,产生特殊的退出代码,从而不再重启进程。
-
autorestart=true: 当使用这种模式时,就算程序正常退出也会自动重启。 -
autorestart=false: 当使用这种模式时,将停用自动重启机制。
自动重启机制的相关源码片段如下:
# supervisor.process@functools.total_ordering
class Subprocess(object):...def transition(self):now = time.time()state = self.stateself._check_and_adjust_for_system_clock_rollback(now)logger = self.config.options.loggerif self.config.options.mood > SupervisorStates.RESTARTING:# dont start any processes if supervisor is shutting downif state == ProcessStates.EXITED:if self.config.autorestart:if self.config.autorestart is RestartUnconditionally:# EXITED -> STARTINGself.spawn()else: # autorestart is RestartWhenExitUnexpectedif self.exitstatus not in self.config.exitcodes:# EXITED -> STARTINGself.spawn()elif state == ProcessStates.STOPPED and not self.laststart:if self.config.autostart:# STOPPED -> STARTINGself.spawn()elif state == ProcessStates.BACKOFF:if self.backoff <= self.config.startretries:if now > self.delay:# BACKOFF -> STARTINGself.spawn()...
startsecs 是与自动重启相关的另一个配置参数。其作用是用于判断进程是否启动成功,只有当目标进程运行时间大于该配置时,才会判断成成功。
这意味着就算目标进程是正常退出的 (exitcodes=0),如果其运行时间小于设置的参数,也会判断成失败。
import time
print(time.strftime("%Y-%m-%d %H:%M:%S", time.localtime(int(time.time()))))
supervisor> status
test                             BACKOFF   Exited too quickly (process log may have details)
supervisor> status
test                             STARTING
supervisor> status
test                             FATAL     Exited too quickly (process log may have details)
import time
print(time.strftime("%Y-%m-%d %H:%M:%S", time.localtime(int(time.time()))))
time.sleep(3)
supervisor> status
test                             RUNNING   pid 7049, uptime 0:00:02
supervisor> status
test                             EXITED    Apr 03 09:41 AM
startretries 参数需要与 startsecs 参数配合使用,用于控制目标进程的重启尝试次数,并且每次重试花费的时间间隔越来越长。可以通过以下代码测试一下:
startsecs=1
startretries=5
import time
print(time.strftime("%Y-%m-%d %H:%M:%S", time.localtime(int(time.time()))))
测试代码的输出结果如下,可以看到每次重试的间隔时间呈 1, 2, 3, ... 增长。
2024-04-03 09:59:20
2024-04-03 09:59:21
2024-04-03 09:59:23
2024-04-03 09:59:26
2024-04-03 09:59:30
2024-04-03 09:59:35
7. 总结
以上就是对 Supervisor 的简单介绍与应用,除了上述介绍的基本用法和高级特性外,还支持以 RPC 的方式进行调用,但由于现阶段还未遇到相关的应用场景,因此考虑后续深度使用后再研究相关代码。
这篇关于有了Supervisor,再也不用担心程序撂挑子了!的文章就介绍到这儿,希望我们推荐的文章对编程师们有所帮助!


