本文主要是介绍Android Studio上传Library库到JCenter,并同步到Maven Central,希望对大家解决编程问题提供一定的参考价值,需要的开发者们随着小编来一起学习吧!
如果你想在Android Studio中引入一个library到你的项目中,你只需添加如下一行代码到模块的build.gradle文件中:
dependencies {compile 'com.wx.wheelview:wheelview:1.3.3'
}
就这么简单,读完本篇文章后你就可以把自己写好的library发布出去,分享给世界各地的开发者。
JCenter 和 Maven Central 是两个不同的公共仓库。JCenter是由JFrog公司提供的Bintray中的Maven仓库,Maven Central 则是由sonatype.org维护的Maven仓库。两者维护在不同的服务器上,由不同的人提供内容,两者相互之间没有任何关系。下面我将详细介绍如何将Library上传到这两个仓库。
JCenter
1.注册Bintray帐号
https://bintray.com
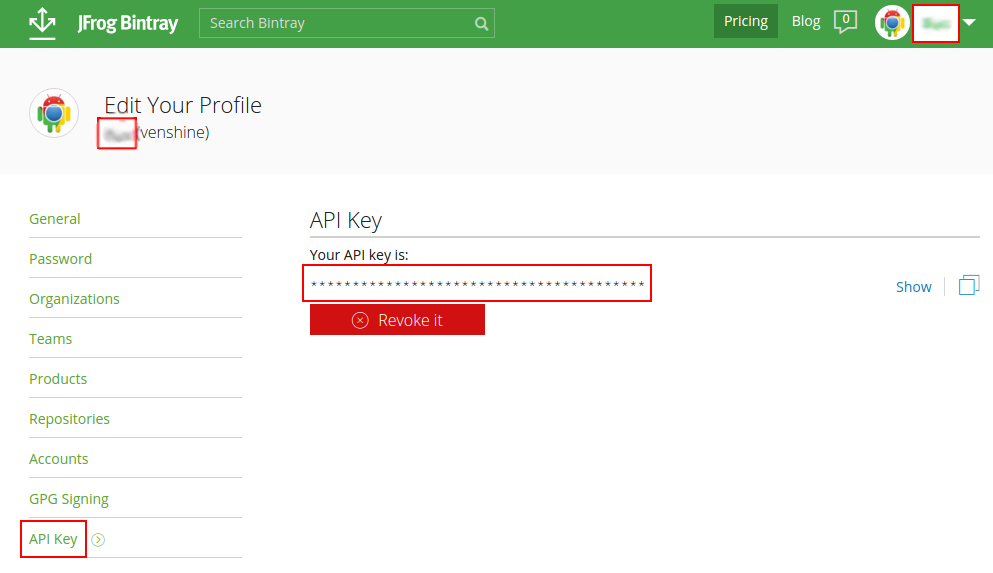
2.记录UserID和API Key
https://bintray.com/profile/edit
3.创建工程
4.配置项目
修改项目里的build.gradle(注意是项目不是库),增加以下两个dependencies:
classpath 'com.jfrog.bintray.gradle:gradle-bintray-plugin:1.2'
classpath 'com.github.dcendents:android-maven-gradle-plugin:1.3'
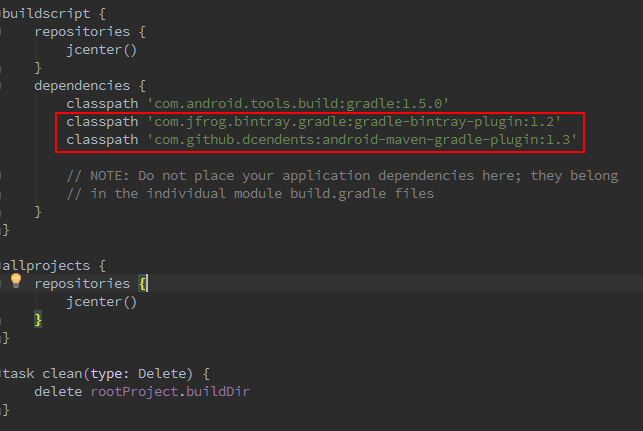
具体参考:https://github.com/venshine/gradle-bintray-upload
5.配置Library
修改Library库的build.gradle文件,详情如下:
apply plugin: 'com.android.library'
apply plugin: 'com.github.dcendents.android-maven'
apply plugin: 'com.jfrog.bintray'
artifactversion = "1.0.1"android {compileSdkVersion 23buildToolsVersion "23.0.2"resourcePrefix "wx__"defaultConfig {minSdkVersion 14targetSdkVersion 23versionCode 1versionName "1.0"} buildTypes {release {minifyEnabled falseproguardFiles getDefaultProguardFile('proguard-android.txt'), 'proguard-rules.pro'}}}dependencies {compile fileTree(dir: 'libs', include: ['*.jar'])compile 'com.google.code.gson:gson:2.6.1'compile 'com.wx.logger:logger:1.0.1'
}def siteUrl = 'https://github.com/venshine/AndroidCommon'
def gitUrl = 'https://github.com/venshine/AndroidCommon.git'
group = "com.wx.android.common" install {repositories.mavenInstaller {pom {project {packaging 'aar' name 'AndroidCommon' description 'Android Common Library'url siteUrl licenses {license {name 'The Apache Software License, Version 2.0'url 'http://www.apache.org/licenses/LICENSE-2.0.txt'}}developers {developer {id 'venshine'name 'venshine'email 'venshine.cn@gmail.com'}}scm {connection gitUrldeveloperConnection gitUrlurl siteUrl}}}}
}task sourcesJar(type: Jar) {from android.sourceSets.main.java.srcDirsclassifier = 'sources'
}task javadoc(type: Javadoc) {source = android.sourceSets.main.java.srcDirsclasspath += project.files(android.getBootClasspath().join(File.pathSeparator))
}task javadocJar(type: Jar, dependsOn: javadoc) {classifier = 'javadoc'from javadoc.destinationDir
}javadoc {options {encoding "UTF-8"}
}artifacts {archives javadocJararchives sourcesJar
}Properties properties = new Properties()
properties.load(project.rootProject.file('local.properties').newDataInputStream())bintray {user = properties.getProperty("bintray.user")key = properties.getProperty("bintray.apikey")configurations = ['archives']pkg {repo = "maven" name = "AndroidCommon"websiteUrl = siteUrlvcsUrl = gitUrllicenses = ["Apache-2.0"]publish = true}
}
- 1
- 2
- 3
- 4
- 5
- 6
- 7
- 8
- 9
- 10
- 11
- 12
- 13
- 14
- 15
- 16
- 17
- 18
- 19
- 20
- 21
- 22
- 23
- 24
- 25
- 26
- 27
- 28
- 29
- 30
- 31
- 32
- 33
- 34
- 35
- 36
- 37
- 38
- 39
- 40
- 41
- 42
- 43
- 44
- 45
- 46
- 47
- 48
- 49
- 50
- 51
- 52
- 53
- 54
- 55
- 56
- 57
- 58
- 59
- 60
- 61
- 62
- 63
- 64
- 65
- 66
- 67
- 68
- 69
- 70
- 71
- 72
- 73
- 74
- 75
- 76
- 77
- 78
- 79
- 80
- 81
- 82
- 83
- 84
- 85
- 86
- 87
- 88
- 89
- 90
- 91
- 92
- 93
- 94
- 95
- 96
- 97
- 98
- 99
- 100
- 101
- 102
- 103
- 104
- 105
- 106
- 107
- 108
- 109
- 110
具体参考:https://github.com/venshine/gradle-bintray-upload
6.配置UserID和API Key
这两个值就是第2步记录下来的值。
打开项目的local.properties文件,加入以下两句:
bintray.user=your_bintray_user_name
bintray.apikey=your_bintray_api_key
注:这个文件必须忽略掉,切勿上传到github上去。
具体参考:https://github.com/venshine/gradle-bintray-upload
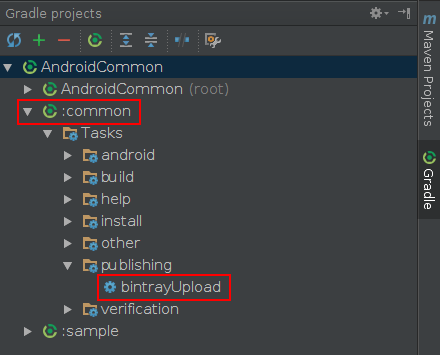
7.执行命令
./gradlew install
./gradlew bintrayUpload
或
点击工具栏中的Sync projects with Gradle files按钮对项目进行重建,然后可以看到Gradle视图中的Task中出现了bintrayUpload,双击即可将项目上传到Bintray中。
8.审核
登录Bintray网站,去自己的仓库首页(https://bintray.com/**/maven) ,找到该库,点击Add to JCenter按钮,然后发送消息,等待审核结果,一般几个小时的时间就会审核通过。以后再更新项目上传到Bintray就不需要再次审核了。

9.使用
审核通过后,我们即可在其他项目中方便引入这个库。
compile 'com.wx.android.common:common:1.0.4'
Maven Central
1.注册帐号
https://issues.sonatype.org
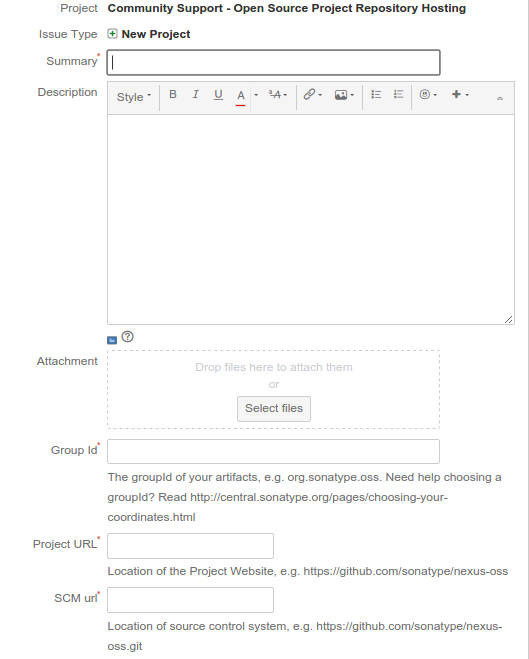
2.创建Issue
https://issues.sonatype.org/secure/CreateIssue!default.jspa
Summary:填写名称
Description:填写描述
Group Id:域名反转(有效域名),如果没有域名,可以直接使用自己的github反转(如github.com/venshine反转后是com.github.venshine,其中venshine是你的github用户名。为了规范化,建议全小写。)
Project URL:项目的url,可以是项目的github地址
其他的条目可以不填,然后提交审核即可,一般2天以内即可审核通过。(审核通过前,你的仓库是无法使用的)
3.创建 GPG 签名
安装GPG生成工具,然后按照下面的步骤操作:
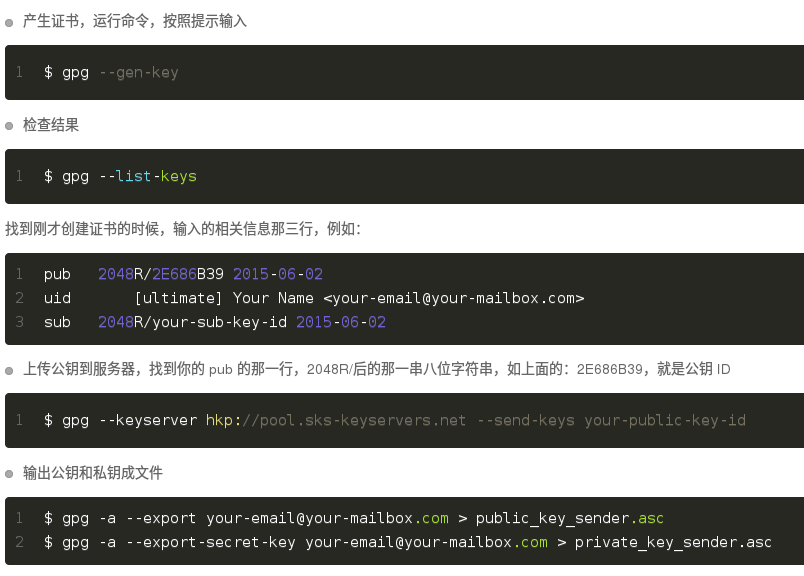
注:创建的GPG证书密码一定保存好
4.配置GPG
打开项目的local.properties文件,加入以下三句:
bintray.gpg.password=your_pgp_password
bintray.oss.user=your_maven_central_user_name
bintray.oss.password=your_maven_central_password
具体参考:https://github.com/venshine/gradle-bintray-upload
5.执行命令
./gradlew install
./gradlew bintrayUpload
6.发布到Maven Central
项目主页:https://github.com/venshine/gradle-bintray-upload
这篇关于Android Studio上传Library库到JCenter,并同步到Maven Central的文章就介绍到这儿,希望我们推荐的文章对编程师们有所帮助!


