本文主要是介绍Ansible-inventory和playbook,希望对大家解决编程问题提供一定的参考价值,需要的开发者们随着小编来一起学习吧!
文章目录
- 一、inventory 主机清单
- 1、列表表示
- 2、inventory 中的变量
- 3、变量
- 3.1 主机变量
- 3.2 组变量
- 3.3 组嵌套
- 二、playbook剧本
- 1、playbook的组成
- 2、编写剧本
- 2.1 剧本制作
- 2.2 准备nginx.conf
- 2.3 运行剧本
- 2.4 查看webservers服务器
- 2.5 补充参数
- 3、剧本定义、引用变量
- 3.1 剧本制作
- 3.2 运行剧本
- 3.3 查看dbservers服务器
- 3.4 在命令行定义变量运行剧本
- 3.5 查看dbservers服务器
- 4、when条件判断剧本
- 4.1 剧本制作
- 4.2 运行剧本
- 4.3 查看远程服务器
- 5、迭代剧本
- 5.1 剧本制作
- 5.2 执行剧本
- 5.3 查看验证
一、inventory 主机清单
- Inventory支持对主机进行分组,每个组内可以定义多个主机,每个主机都可以定义在任何一个或多个主机组内。
1、列表表示
- 如果是名称类似的主机,可以使用列表的方式标识各个主机。
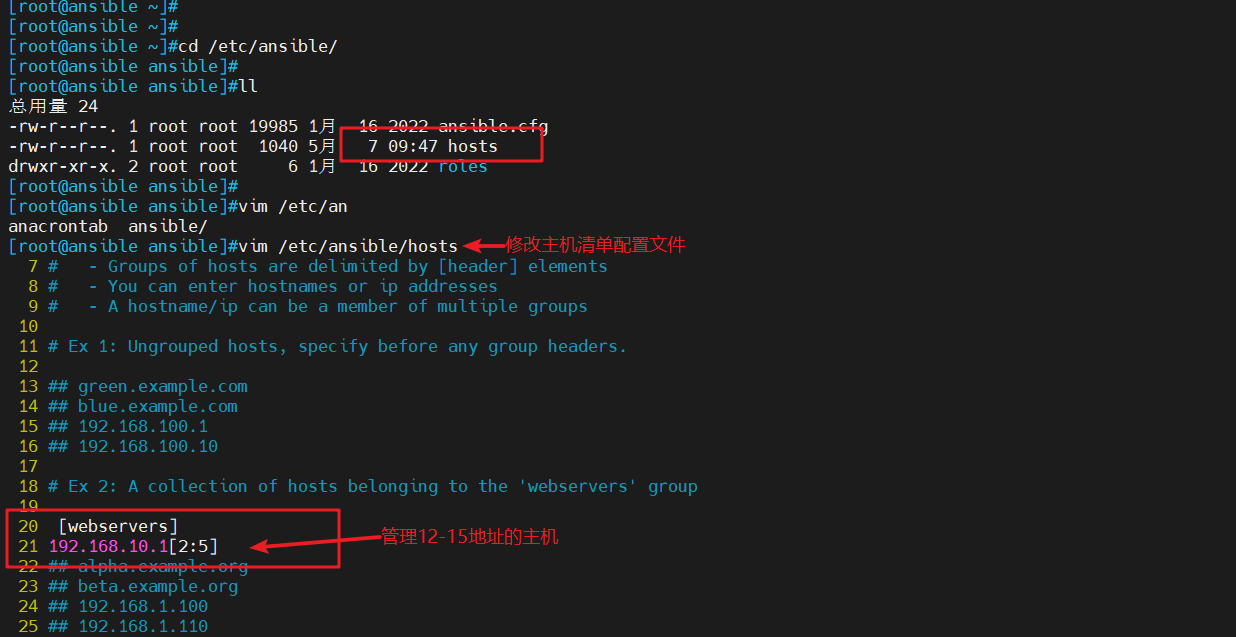
#编辑主机清单配置文件
vim /etc/ansible/hosts
[webservers]
192.168.10.1[2:5]
#表示12-15的地址范围,(可以使用[ ]表示连续的主机范围值)

#编辑主机清单配置文件
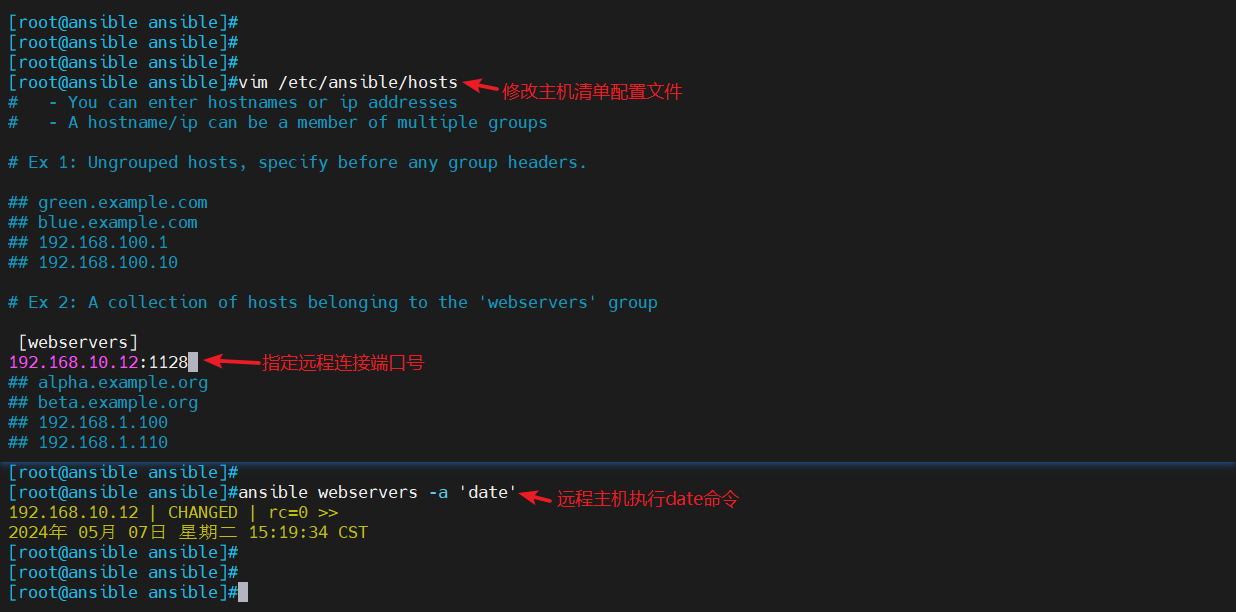
vim /etc/ansible/hosts
[webservers]
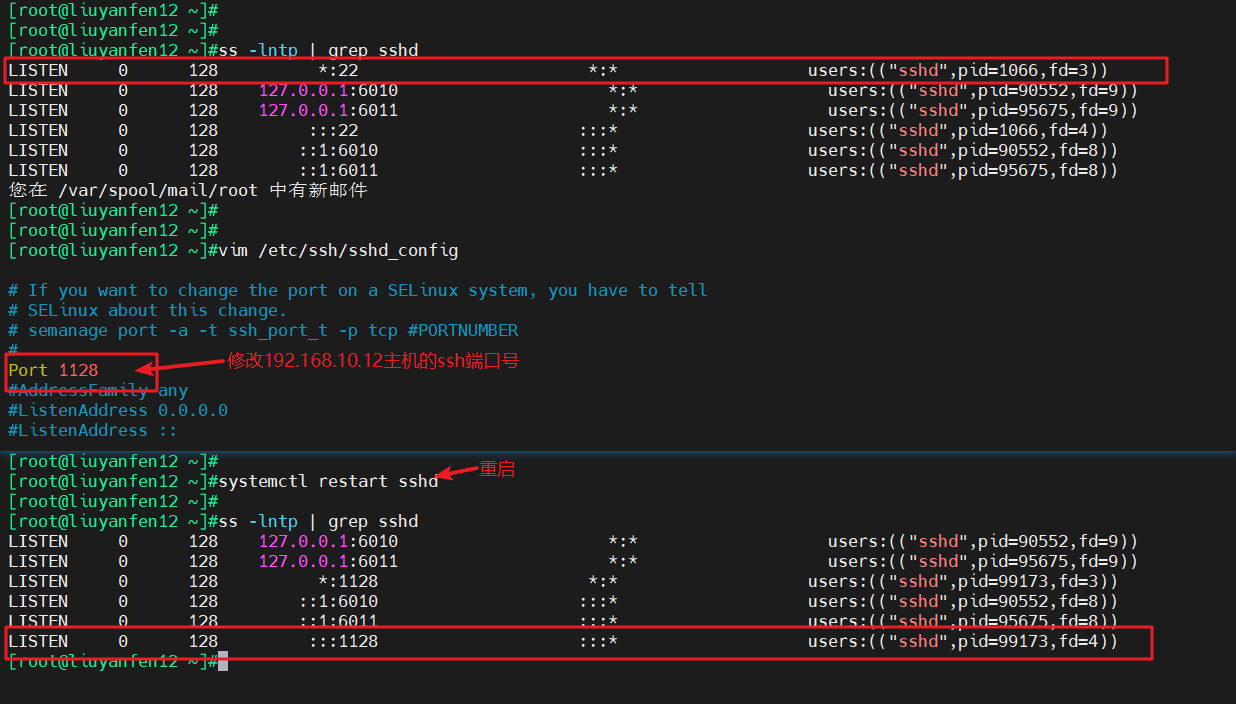
192.168.10.12:1128
#指定远程连接端口号为1128
#冒号后定义远程连接端口,默认是 ssh 的 22 端口
#编辑主机清单配置文件
vim /etc/ansible/hosts
[dbservers]
db-[a:f].example.org
#支持匹配 a~f
2、inventory 中的变量
| Inventory变量名 | 含义 |
|---|---|
| ansible_host | ansible连接节点时的IP地址 |
| ansible_port | 连接对方的端口号,ssh连接时默认为22 |
| ansible_user | 连接对方主机时使用的主机名。不指定时,将使用执行ansible或ansible-playbook命令的用户 |
| ansible_password | 连接时的用户的ssh密码,仅在未使用密钥对验证的情况下有效 |
| ansible_ssh_private_key_file | 指定密钥认证ssh连接时的私钥文件 |
| ansible_ssh_common_args | 提供给ssh、sftp、scp命令的额外参数 |
| ansible_become | 允许进行权限提升 |
| ansible_become_method | 指定提升权限的方式,例如可使用sudo/su/runas等方式 |
| ansible_become_user | 提升为哪个用户的权限,默认提升为root |
| ansible_become_password | 提升为指定用户权限时的密码 |
3、变量
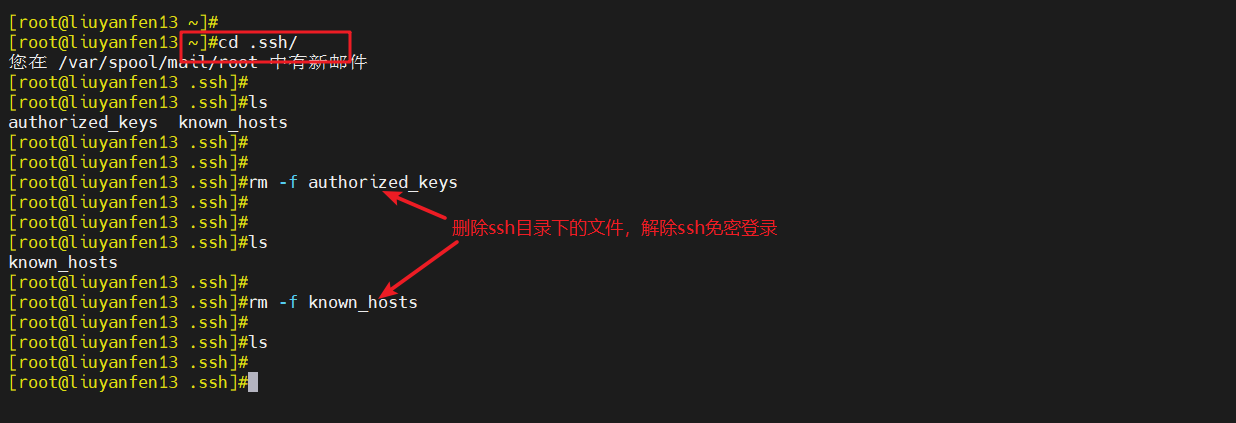
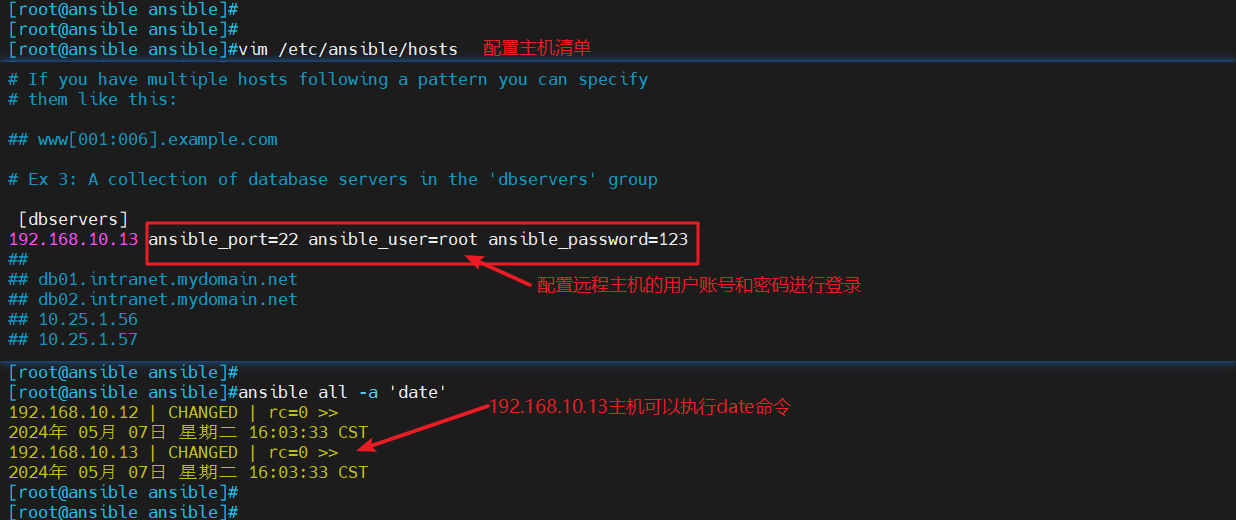
3.1 主机变量
#修改主机清单配置文件
vim /etc/ansible/hosts
[dbservers]
192.168.10.13 ansible_port=22 ansible_user=root ansible_password=123
#通过远程主机的用户账号和密码进行登录,而不是使用ssh协议(每个主机可以设置不同的变量)ansible dbservers -a 'date'
#远程主机执行date命令

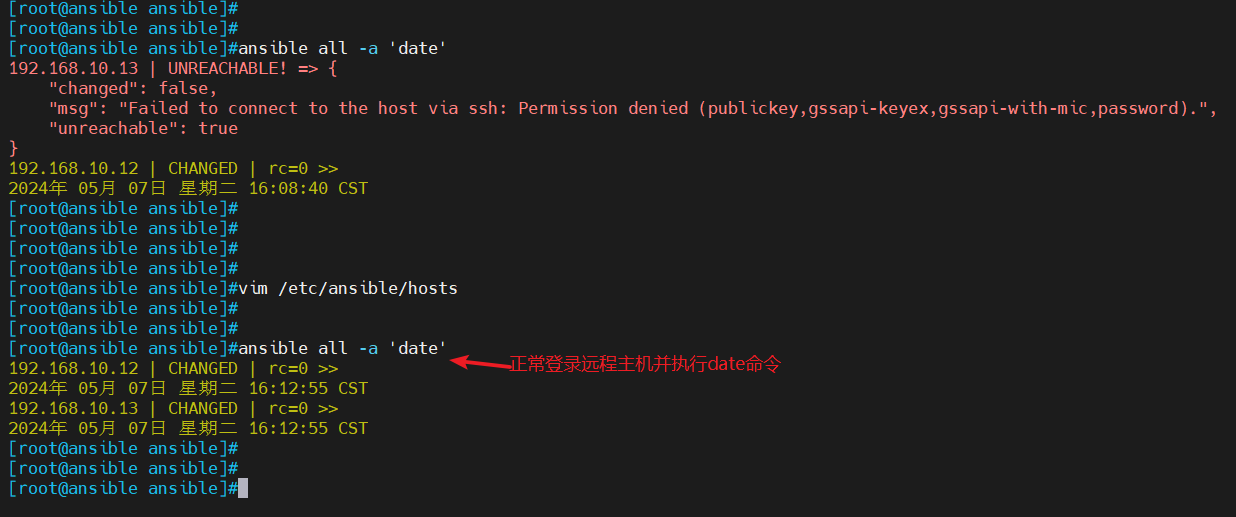
3.2 组变量
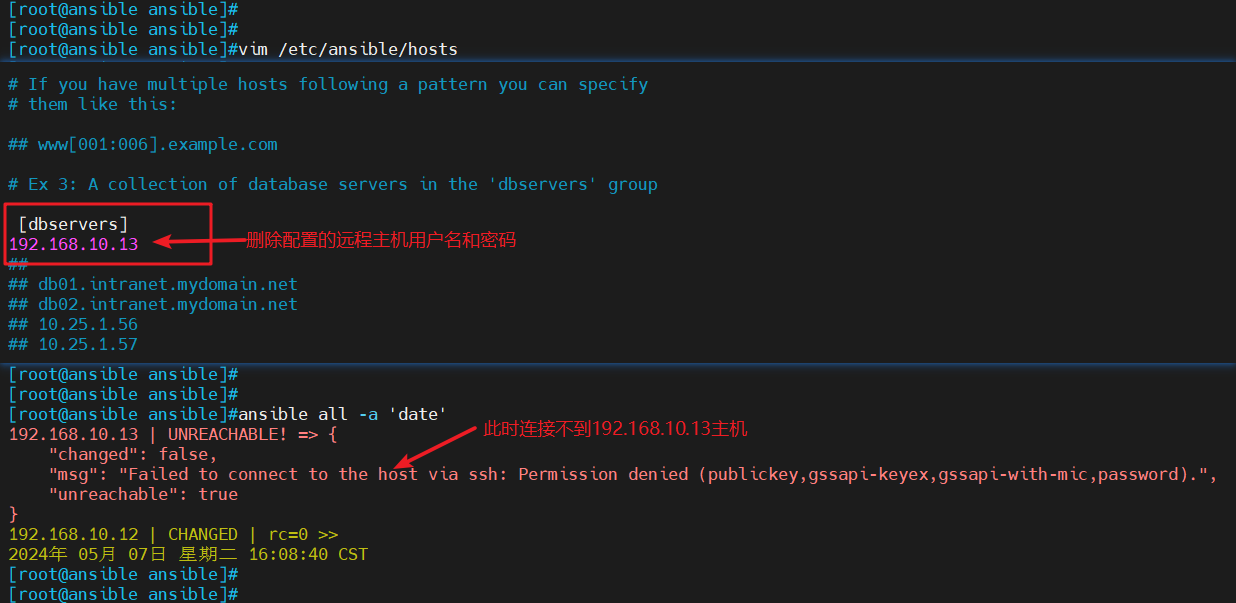
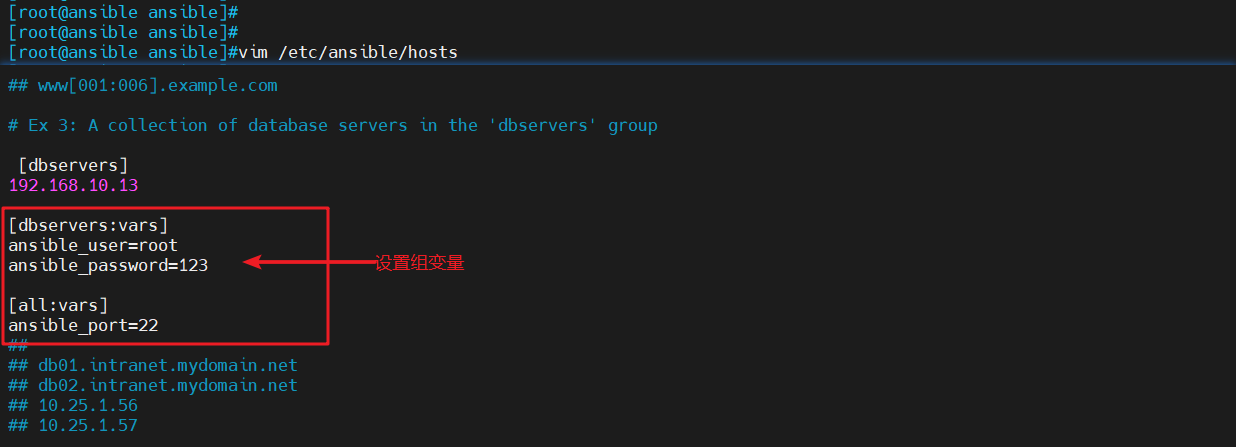
#修改主机清单配置文件
vim /etc/ansible/hosts
[dbservers:vars]
#表示为 webservers 组内所有主机定义变量
ansible_user=root
ansible_password=123[all:vars]
#表示为所有组内的所有主机定义变量
ansible_port=22
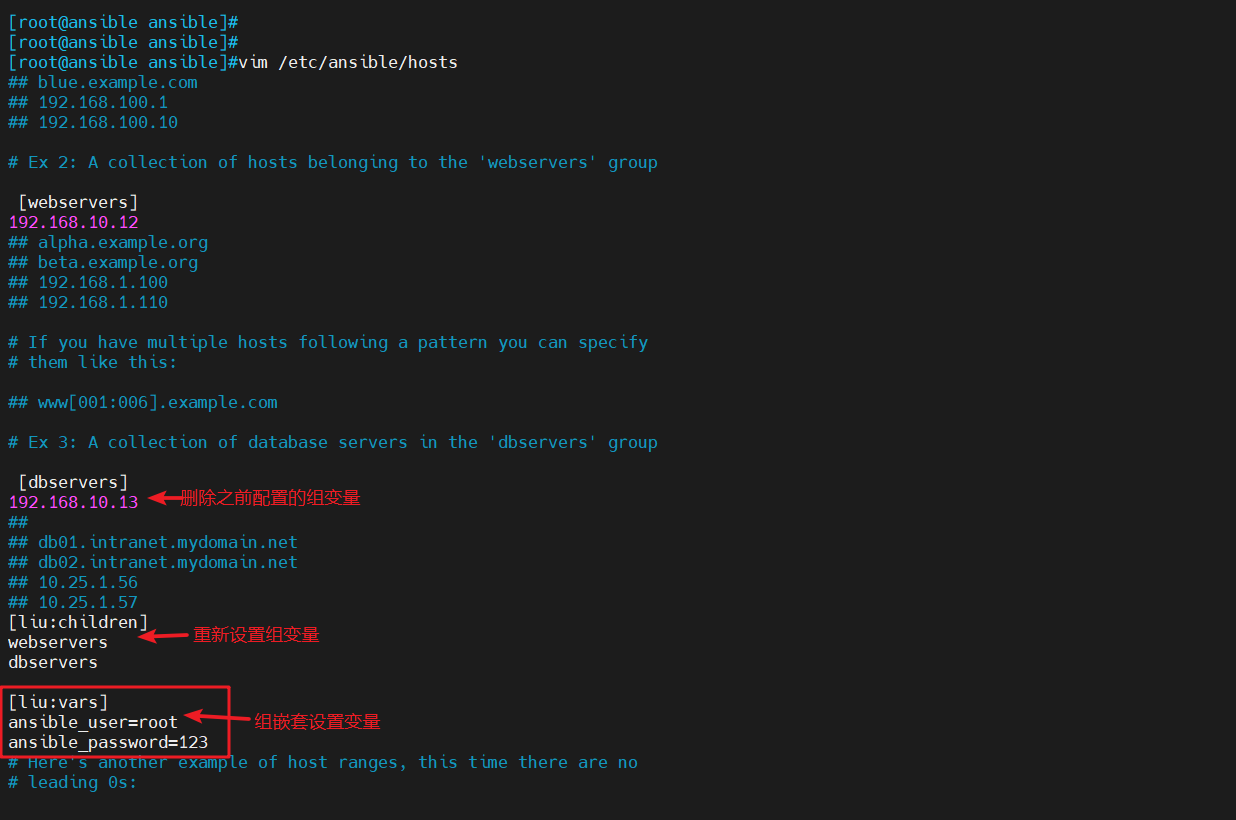
3.3 组嵌套
#修改主机清单配置文件
vim /etc/ansible/hosts
[liu:children]
#表示为 [liu:children] 组内所有主机定义变量(组嵌套)
webservers
dbservers[liu:vars]
#表示为所有组内的所有主机定义变量
ansible_user=root
ansible_password=123

二、playbook剧本
1、playbook的组成
playbooks 本身由以下各部分组成
- Tasks:任务,即通过 task 调用 ansible 的模板将多个操作组织在一个 playbook 中运行
- Variables:变量
- Templates:模板
- Handlers:处理器,当changed状态条件满足时,(notify)触发执行的操作
- Roles:角色
2、编写剧本
- 编辑关闭防火墙和核心防护playbook剧本
#编辑yaml脚本,详细解释看上面文档
vim playbook.yaml
---
- name: first play for install nginx#gather_facts: falsehosts: webserversremote_user: roottasks:- name: disable firewalldservice: name=firewalld state=stopped- name: disable selinuxcommand: '/sbin/setenforce 0'ignore_errors: yesansible-playbook playbook.yaml
#执行yaml脚本


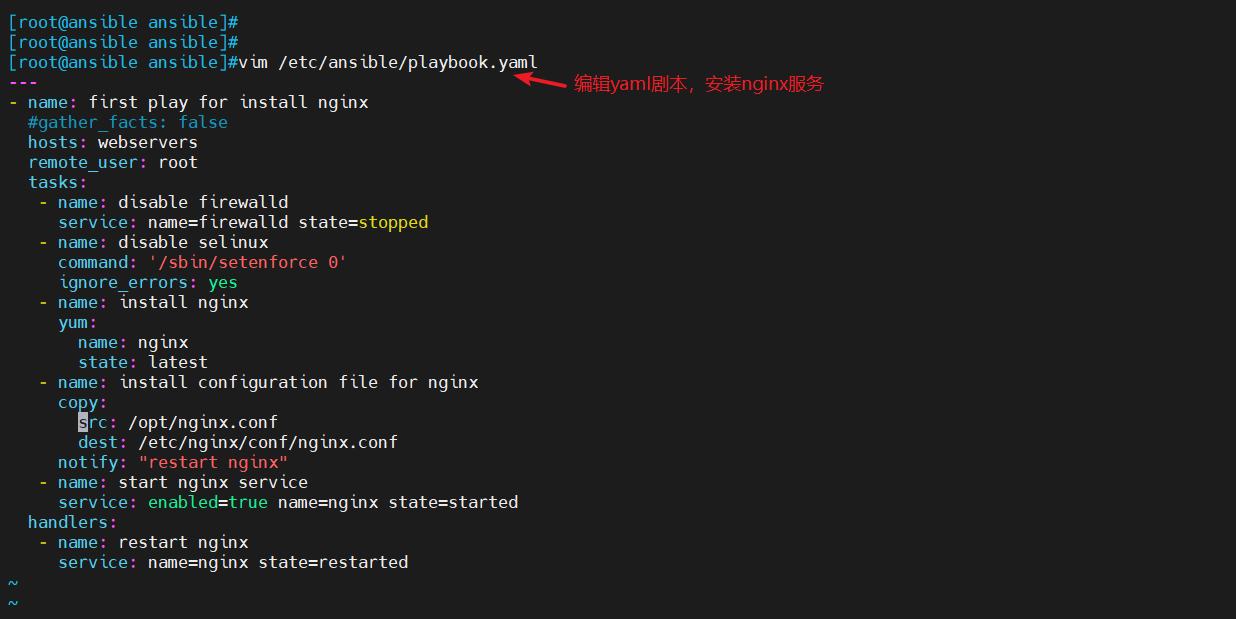
2.1 剧本制作
vim playbook.yaml
---
#yaml文件以---开头,以表明这是一个yaml文件,可省略
- name: first play for install nginx
#定义一个play的名称,可省略#gather_facts: false#设置不进行facts信息收集,这可以加快执行速度,可省略hosts: webservers#指定要执行任务的被管理主机组,如多个主机组用冒号分隔remote_user: root#指定被管理主机上执行任务的用户tasks:#定义任务列表,任务列表中的各任务按次序逐个在hosts中指定的主机上执行- name: disable firewalld#自定义任务名称service: name=firewalld state=stopped#关闭防火墙#使用 module: options 格式来定义任务,option使用key=value格式- name: disable selinux#自定义任务名称command: '/sbin/setenforce 0'#关闭核心防护#command模块和shell模块无需使用key=value格式ignore_errors: yes#ignore_errors: True(或者使用true)#如执行命令的返回值不为0,就会报错,tasks停止,可使用ignore_errors忽略失败的任务,,继续执行后续任务- name: install nginx#自定义任务名称yum:#安装nginx服务name: nginxstate: latest- name: install configuration file for nginx#自定义任务名称copy:#复制配置文件到指定目录src: /opt/nginx.conf#这里需要事先准备好/opt/nginx.conf文件dest: /etc/nginx/conf/nginx.conf#远程主机目标路径要存在notify: "restart nginx"#如以上操作后为changed的状态时,会通过notify指定的名称触发对应名称的handlers操作,即重启nginx服务- name: start nginx service#自定义任务名称service: enabled=true name=nginx state=started#开启服务handlers:#handlers中定义的就是任务,此处handlers中的任务使用的是service模块- name: restart nginx#notify和handlers中任务的名称必须一致service: name=nginx state=restarted#重启nginx服务   vim playbook.yaml
---
- name: first play for install nginx#gather_facts: falsehosts: webserversremote_user: roottasks:- name: disable firewalldservice: name=firewalld state=stopped- name: disable selinuxcommand: '/sbin/setenforce 0'ignore_errors: yes- name: install nginxyum:name: nginxstate: latest- name: install configuration file for nginxcopy:src: /opt/nginx.conf#需要事先准备nginx.conf配置文件dest: /etc/nginx/conf/nginx.conf#远程主机目标目录要存在notify: "restart nginx"- name: start nginx serviceservice: enabled=true name=nginx state=startedhandlers:- name: restart nginxservice: name=nginx state=restarted
Ansible在执行完某个任务之后并不会立即去执行对应的handler,而是在当前play中所有普通任务都执行完后再去执行handler,这样的好处是可以多次触发notify,但最后只执行一次对应的handler,从而避免多次重启。
2.2 准备nginx.conf
cd /opt
#切换目录#上传nginx.conf配置文件

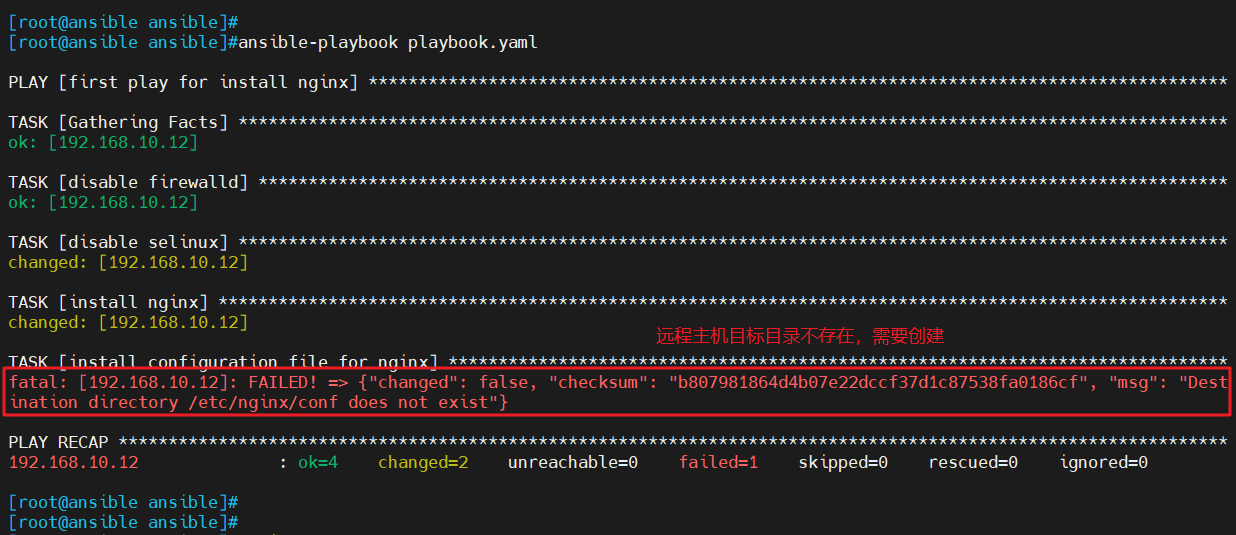
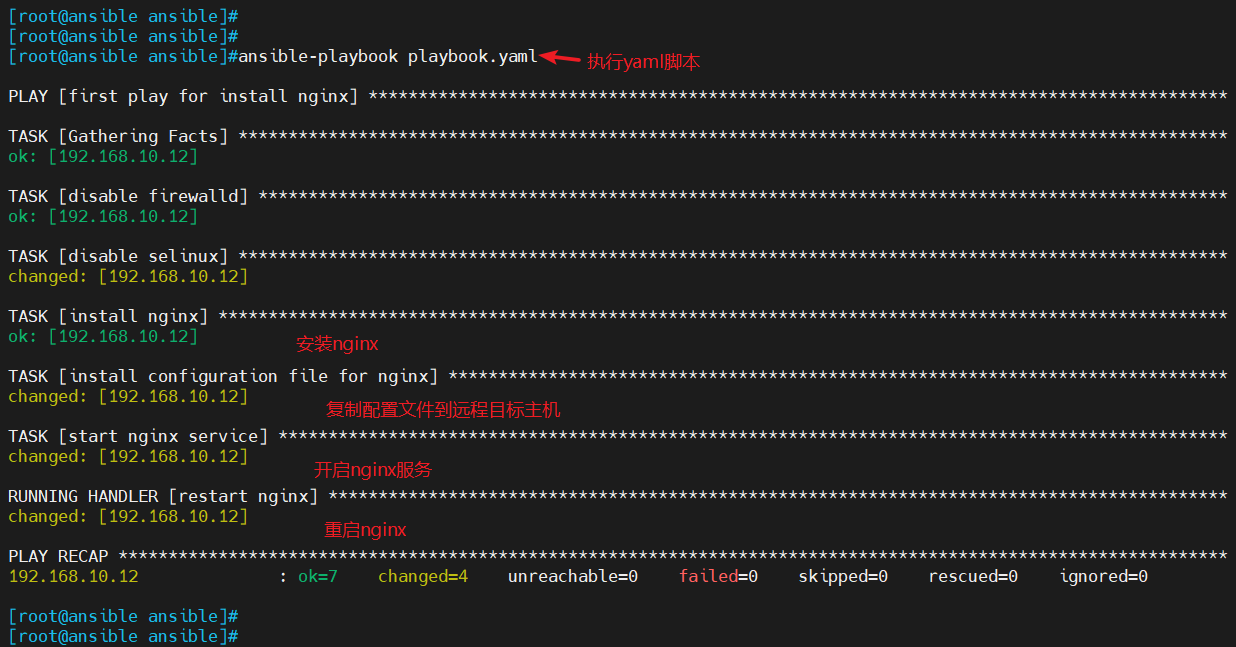
2.3 运行剧本
ansible-playbook playbook.yaml
#执行yaml脚本

2.4 查看webservers服务器
ansible webservers -m shell -a 'ss -natp | grep nginx'
#查看远程主机nginx服务进程

2.5 补充参数
----------------------------------------------------------------------------------------------------------
-k(–ask-pass):用来交互输入ssh密码
-K(-ask-become-pass):用来交互输入sudo密码
-u:指定用户
----------------------------------------------------------------------------------------------------------
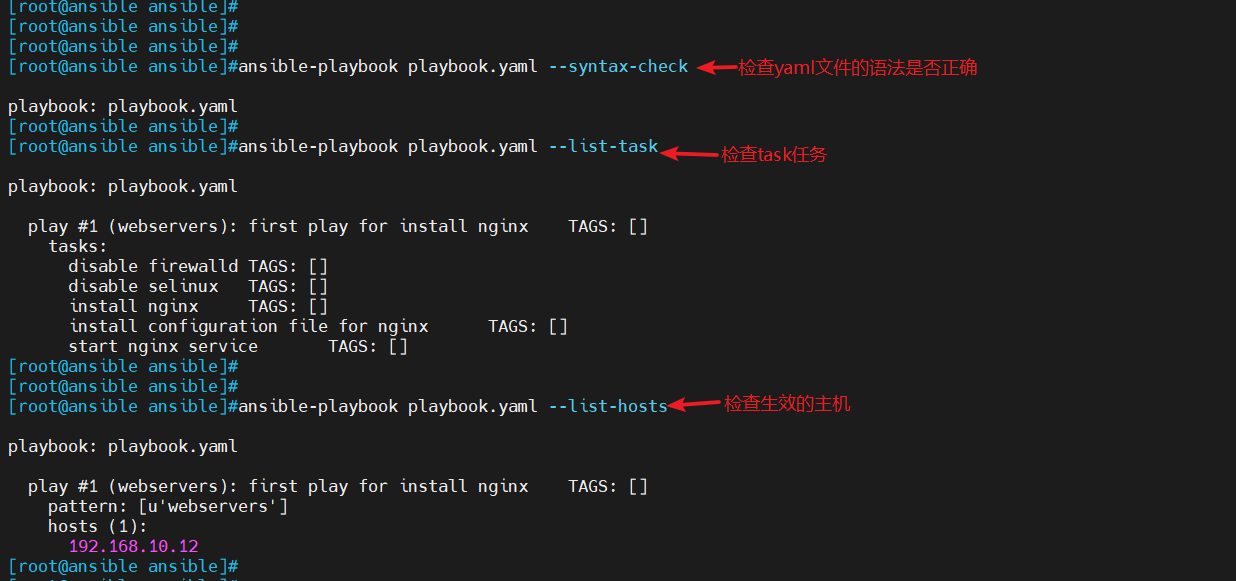
ansible-playbook playbook.yaml --syntax-check
#检查yaml文件的语法是否正确ansible-playbook playbook.yaml --list-task
#检查tasks任务ansible-playbook playbook.yaml --list-hosts
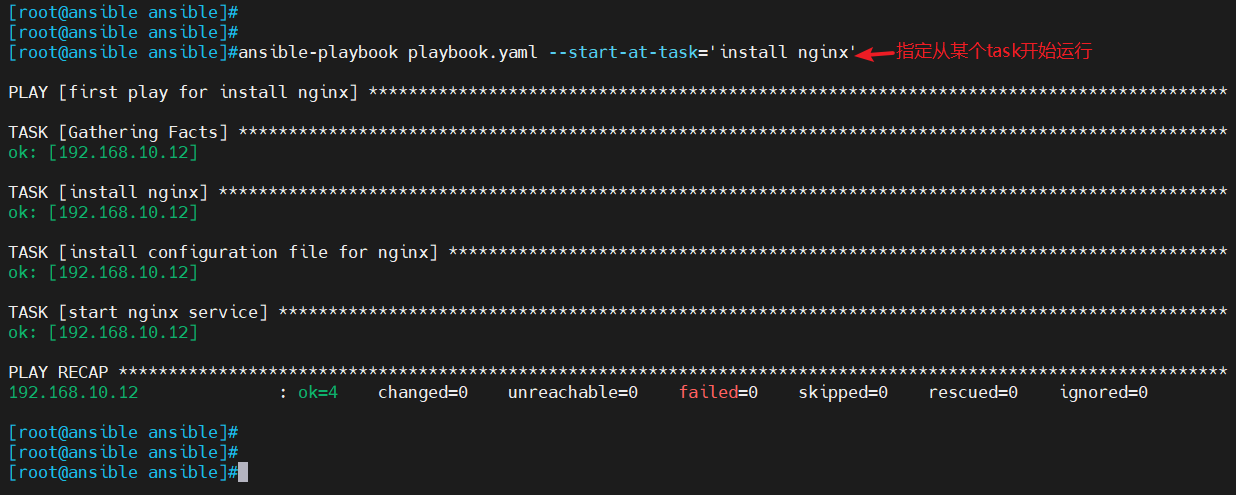
#检查生效的主机ansible-playbook playbook.yaml --start-at-task='install nginx'
#指定从某个task开始运行
3、剧本定义、引用变量
3.1 剧本制作
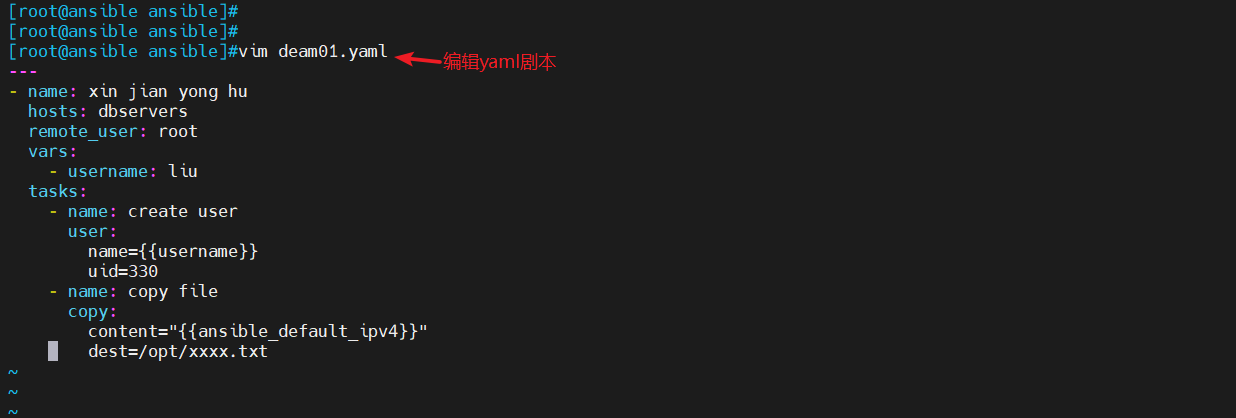
#编辑yaml剧本
vim deam01.yaml
---
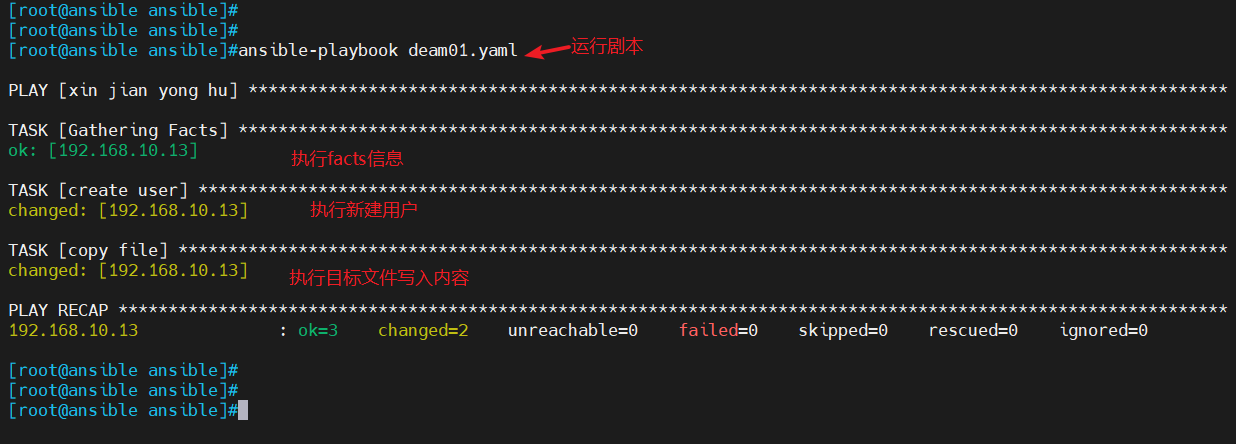
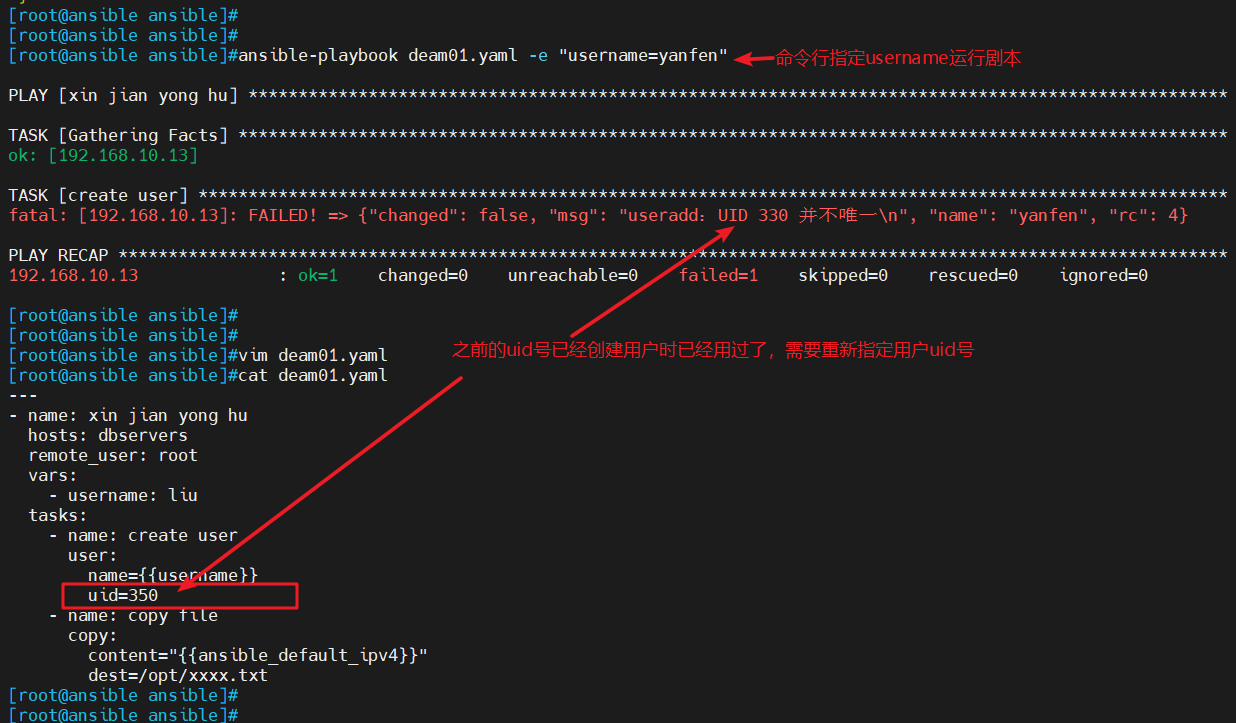
- name: xin jian yong hu#自定义任务名称hosts: dbservers#指定要执行任务的被管理主机组remote_user: root#指定被管理主机上执行任务的用户vars:#定义任务列表- username: liu#格式为 key: valuetasks:#定义任务列表- name: create user#自定义任务名称user:name={{username}}#使用 {{key}} 引用变量的值uid=330- name: copy file#自定义任务名称copy:content="{{ansible_default_ipv4}}"#指定写入文件的内容dest=/opt/xxxx.txt#远程主机目标路径
3.2 运行剧本
ansible-playbook deam01.yaml#运行剧本
3.3 查看dbservers服务器
ansible dbservers -a 'grep "liu" /etc/passwd'
#查看创建的用户信息ansible dbservers -a 'cat /opt/xxxx.txt'
#查看新建的文件内容

3.4 在命令行定义变量运行剧本
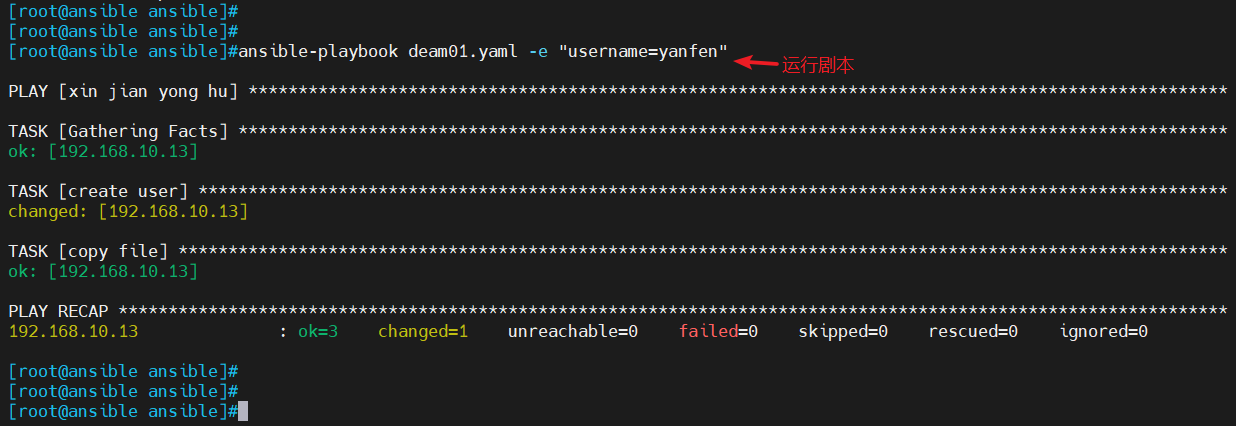
ansible-playbook deam01.yaml -e "username=yanfen"
#命令行定义变量剧本
3.5 查看dbservers服务器
ansible dbservers -a 'grep "yanfen" /etc/passwd'
#查看命令行指定创建的用户

4、when条件判断剧本
-
在Ansible中,提供的唯一一个通用的条件判断是when指令,当when指令的值为true时,则该任务执行,否则不执行该任务。
-
when一个比较常见的应用场景是实现跳过某个主机不执行任务或者只有满足条件的主机执行任务
4.1 剧本制作
#编辑剧本
vim deam03.yaml
---
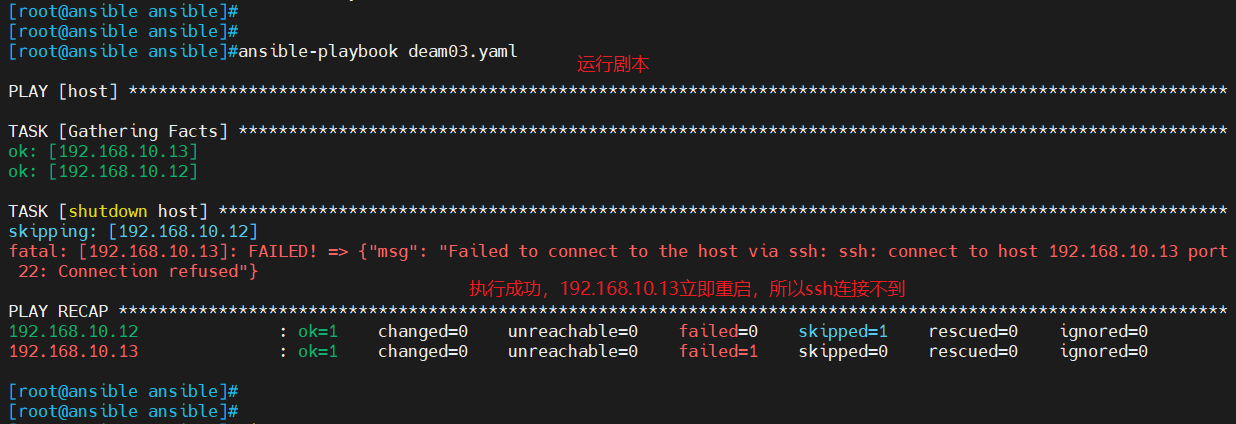
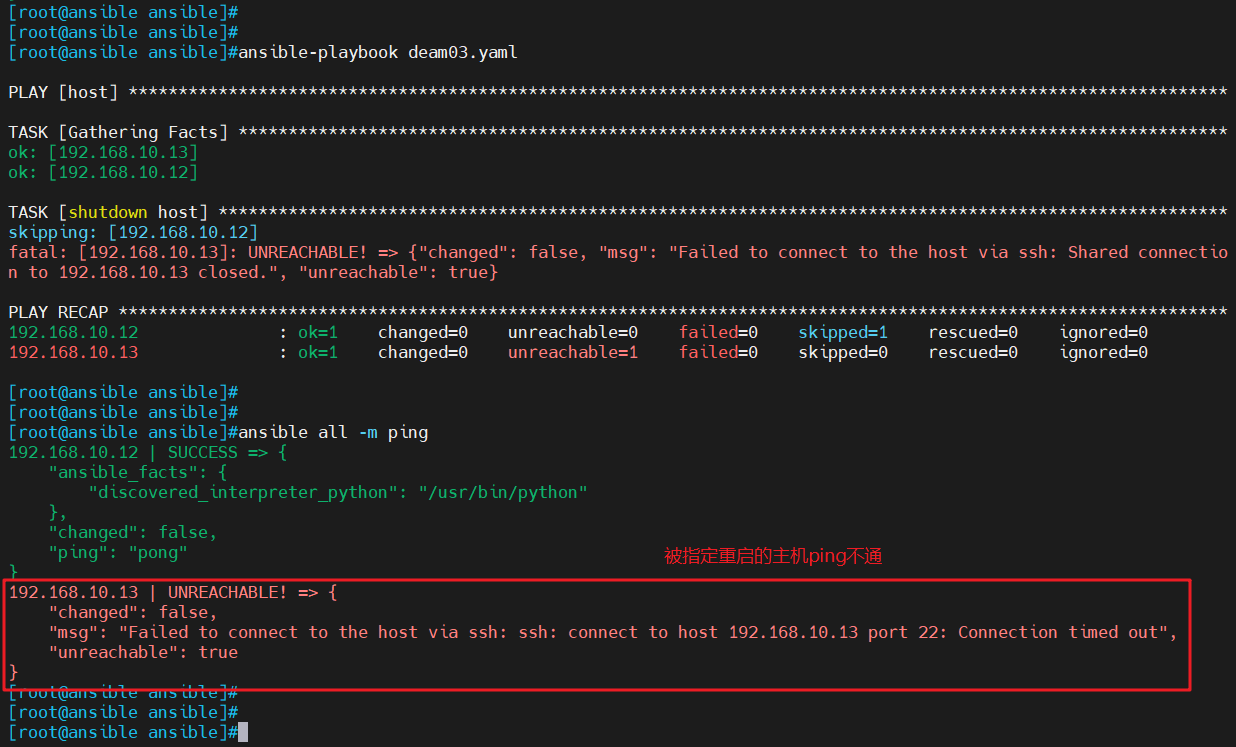
- name: hosthosts: allremote_user: roottasks:- name: shutdown hostcommand: /sbin/shutdown -r nowwhen: ansible_default_ipv4.address == "192.168.10.13"#只在主机192.168.10.13上执行command#when指令中的变量名不需要手动加上{{}}
#when: inventory_hostname == "<主机名>"

4.2 运行剧本
ansible-playbook deam03.yaml
#运行剧本
4.3 查看远程服务器
- 执行后,仅有指定主机重启,执行ping模块查看
ansible all -m ping
#ping远程主机
5、迭代剧本
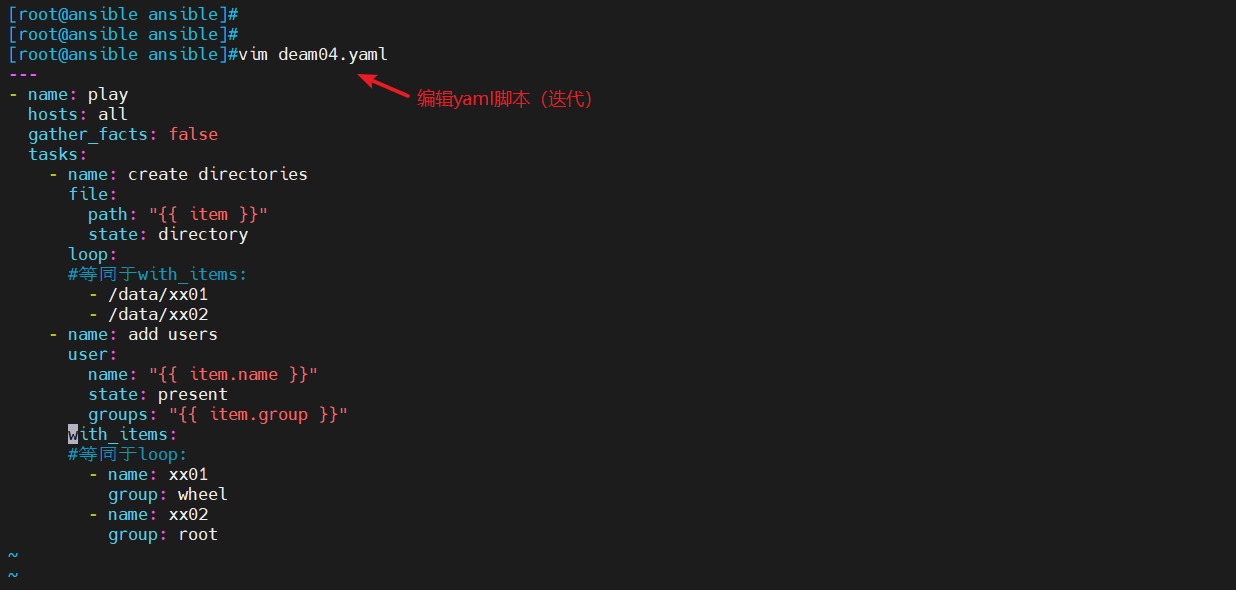
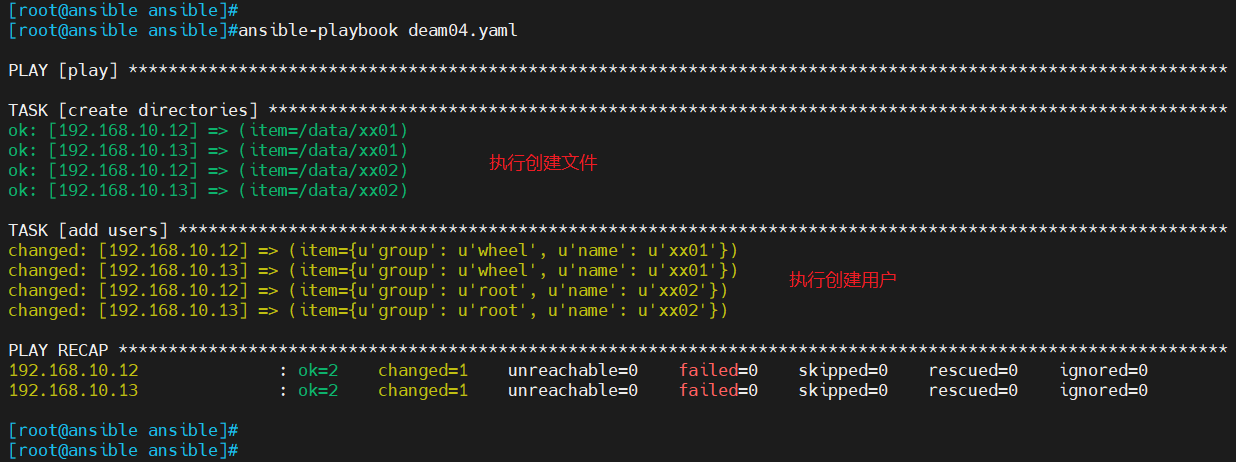
- Ansible提供了很多种循环结构,一般都命名为with_items,作用等同于 loop 循环。
5.1 剧本制作
#编辑yaml剧本(迭代)
vim deam04.yaml
---
- name: play
#自定义任务名称hosts: allgather_facts: falsetasks:- name: create directories#自定义任务名称file:#使用path: "{{ item }}"#每次迭代中,{{ item }} 变量会被替换为列表中的当前项,从而允许 file 模块为这些路径创建目录state: directoryloop:#迭代一个列表- /data/xx01- /data/xx02- name: add users#自定义原始任务名称user:name: "{{ item.name }}"state: presentgroups: "{{ item.group }}"with_items:#等同于loop:- name: xx01group: wheel- name: xx02group: root#或使用以下格式
#      with_items:
#        - {name:'xx01', groups:'wheel'}
#        - {name:'xx01', groups:'root'}vim deam04.yaml
---
- name: playhosts: allgather_facts: falsetasks:- name: create directoriesfile:path: "{{ item }}"state: directoryloop:#等同于with_items:- /data/xx01- /data/xx02- name: add usersuser:name: "{{ item.name }}"state: presentgroups: "{{ item.group }}"with_items:#等同于loop:- name: xx01group: wheel- name: xx02group: root#或使用以下格式
#      with_items:
#        - {name:'xx01', groups:'wheel'}
#        - {name:'xx01', groups:'root'}
5.2 执行剧本
ansible-playbook deam04.yaml
#运行脚本
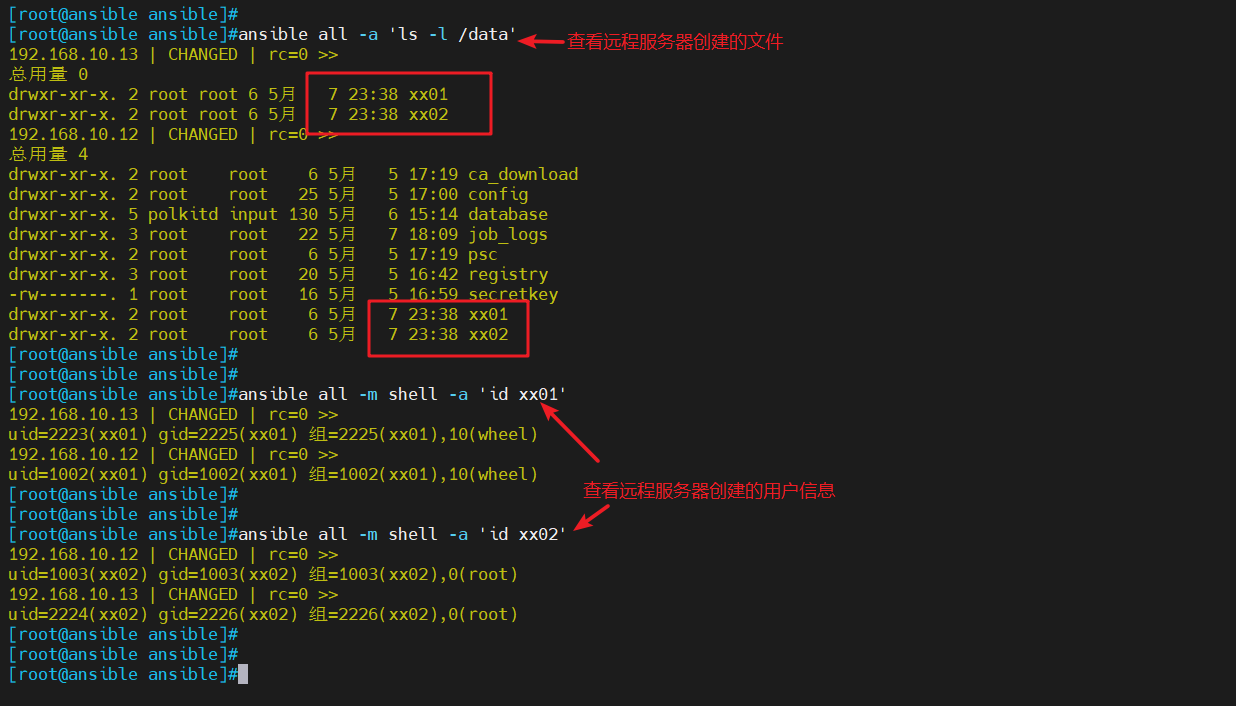
5.3 查看验证
ansible all -a 'ls -l /data'
#查看被控制节点创建的文件ansible all -m shell -a 'id xx01'
#查看远程服务器节点用户xx01的信息ansible all -m shell -a 'id xx02'
#查看远程服务器节点用户xx02的信息
这篇关于Ansible-inventory和playbook的文章就介绍到这儿,希望我们推荐的文章对编程师们有所帮助!


