本文主要是介绍一个全新的Android自定义区间滑块控件——DoubleSlideSeekBar,希望对大家解决编程问题提供一定的参考价值,需要的开发者们随着小编来一起学习吧!
序言
最近有一个项目,正在提取需求的阶段,项目有些复杂,在这里就不多讲了,主要是在我们的Android项目中使用到了一个区间滑块控件,这让我一下字有了想法,系统是没有提供这个控件的,那我就只能自己来创造了,有了这个想法,那就要实现起来了。
思路
(好久不写,不知道怎么写文章了)有了这个想法,我们就要先有一个思路,当时我有过两个想法:1、在原有的SeekBar控件上写,也就是继承SeekBar,但是发现过于复杂;2、就是直接写一个自定义View;经过多次分析,决定自己重写一个自定义的View。本文引用了网上一个帅哥的代码,如有冒犯,还请原谅。
代码
先来看看代码部分吧:
先定义好控件中要使用的一些属性,有些属性可以通过Xml文件进行设置,每个属性的意思注释都写的比较清楚了,这里就不在多说了。
/*** 线条(进度条)的宽度*/private int lineWidth;/*** 线条(进度条)的长度*/private int lineLength = 400;/*** 字所在的高度 100$*/private int textHeight;/*** 游标 图片宽度*/private int imageWidth;/*** 游标 图片高度*/private int imageHeight;/*** 是否有刻度线*/private boolean hasRule;/*** 左边的游标是否在动*/private boolean isLowerMoving;/*** 右边的游标是否在动*/private boolean isUpperMoving;/*** 字的大小 100$*/private int textSize;/*** 字的颜色 100$*/private int textColor;/*** 两个游标内部 线(进度条)的颜色*/private int inColor = Color.BLUE;/*** 两个游标外部 线(进度条)的颜色*/private int outLeftColor = Color.BLUE;private int outRightColor = Color.GREEN;/*** 刻度的颜色*/private int ruleColor = Color.BLUE;/*** 刻度上边的字 的颜色*/private int ruleTextColor = Color.BLUE;/*** 左边图标的图片*/private Bitmap bitmapLow;/*** 右边图标 的图片*/private Bitmap bitmapBig;/*** 左边图标所在X轴的位置*/private int slideLowX;/*** 右边图标所在X轴的位置*/private int slideBigX;/*** 图标(游标) 高度*/private int bitmapHeight;/*** 图标(游标) 宽度*/private int bitmapWidth;/*** 加一些padding 大小酌情考虑 为了我们的自定义view可以显示完整*/private int paddingLeft = 100;private int paddingRight = 100;private int paddingTop = 50;private int paddingBottom = 100;/*** 线(进度条) 开始的位置*/private int lineStart = paddingLeft;/*** 线的Y轴位置*/private int lineY;/*** 线(进度条)的结束位置*/private int lineEnd = lineLength + paddingLeft;/*** 选择器的最大值*/private int bigValue = 100;/*** 选择器的最小值*/private int smallValue = 0;/*** 选择器的当前最小值*/private float smallRange;/*** 选择器的当前最大值*/private float bigRange;/*** 单位 元*/private String unit = " ";/*** 单位份数*/private int equal = 20;/*** 刻度单位 $*/private String ruleUnit = " ";/*** 刻度上边文字的size*/private int ruleTextSize = 20;/*** 刻度线的高度*/private int ruleLineHeight = 20;private Paint linePaint;private Paint linePaint_L_R;//左边和右边的线private Paint bitmapPaint;private Paint textPaint;private Paint paintRule;
拉下来看初始化,在初始化中注释也写的很清楚,就是对一些默认的属性进行设置,包括游标图片的宽高,还有大小缩放等等,这里我们要注意一下怎么样配置属性;
初始化:
private void init() {/**游标的默认图*/if (bitmapLow == null) {bitmapLow = BitmapFactory.decodeResource(getResources(), R.drawable.left);}if (bitmapBig == null) {bitmapBig = BitmapFactory.decodeResource(getResources(), R.drawable.right);}/**游标图片的真实高度 之后通过缩放比例可以把图片设置成想要的大小*/bitmapHeight = bitmapLow.getHeight();bitmapWidth = bitmapLow.getWidth();// 设置想要的大小int newWidth = imageWidth;int newHeight = imageHeight;// 计算缩放比例float scaleWidth = ((float) newWidth) / bitmapWidth;float scaleHeight = ((float) newHeight) / bitmapHeight;Matrix matrix = new Matrix();matrix.postScale(scaleWidth, scaleHeight);/**缩放图片*/bitmapLow = Bitmap.createBitmap(bitmapLow, 0, 0, bitmapWidth, bitmapHeight, matrix, true);bitmapBig = Bitmap.createBitmap(bitmapBig, 0, 0, bitmapWidth, bitmapHeight, matrix, true);/**重新获取游标图片的宽高*/bitmapHeight = bitmapLow.getHeight();bitmapWidth = bitmapLow.getWidth();/**初始化两个游标的位置*/slideLowX = lineStart;slideBigX = lineEnd;smallRange = smallValue;bigRange = bigValue;if (hasRule) {//有刻度时 paddingTop 要加上(text高度)和(刻度线高度加刻度线上边文字的高度和) 之间的最大值paddingTop = paddingTop + Math.max(textSize, ruleLineHeight + ruleTextSize);} else {//没有刻度时 paddingTop 加上 text的高度paddingTop = paddingTop + textSize;}}
属性
<!--线(进度条)宽度--><attr name="lineHeight" format="dimension" /><!--字的大小 100元--><attr name="textSize" format="dimension" /><!--字的颜色 100元--><attr name="textColor" format="color" /><!--两个游标内部 线(进度条)的颜色--><attr name="inColor" format="color" /><!--两个游标外部 线(进度条)的颜色--><attr name="outColor" format="color" /><!--左边图标的图片--><attr name="imageLow" format="reference" /><!--右边图标 的图片--><attr name="imageBig" format="reference" /><!--游标 图片宽度--><attr name="imagewidth" format="dimension" /><!--游标 图片高度--><attr name="imageheight" format="dimension" /><!--是否有刻度线--><attr name="hasRule" format="boolean" /><!--刻度的颜色--><attr name="ruleColor" format="color" /><!--刻度上边的字 的颜色--><attr name="ruleTextColor" format="color" /><!--单位 元--><attr name="unit" format="string" /><!--单位份数--><attr name="equal" format="integer" /><!--刻度单位 $--><attr name="ruleUnit" format="string" /><!--刻度上边文字的size--><attr name="ruleTextSize" format="dimension" /><!--刻度线的高度--><attr name="ruleLineHeight" format="dimension" /><!--选择器的最大值--><attr name="bigValue" format="integer" /><!--选择器的最小值--><attr name="smallValue" format="integer" /><declare-styleable name="DoubleSlideSeekBar"><attr name="lineHeight" /><attr name="textSize" /><attr name="textColor" /><attr name="inColor" /><attr name="outLeftColor" /><attr name="outRightColor"/><attr name="imageLow" /><attr name="imageBig" /><attr name="imagewidth" /><attr name="imageheight" /><attr name="hasRule" /><attr name="ruleColor" /><attr name="ruleTextColor" /><attr name="unit" /><attr name="equal" /><attr name="ruleUnit" /><attr name="ruleTextSize" /><attr name="ruleLineHeight" /><attr name="bigValue" /><attr name="smallValue" /></declare-styleable>
在接下来就是对View进行测量,测量代码如下:
@Overrideprotected void onMeasure(int widthMeasureSpec, int heightMeasureSpec) {int width = getMyMeasureWidth(widthMeasureSpec);int height = getMyMeasureHeight(heightMeasureSpec);setMeasuredDimension(width, height);}private int getMyMeasureHeight(int heightMeasureSpec) {int mode = MeasureSpec.getMode(heightMeasureSpec);int size = MeasureSpec.getSize(heightMeasureSpec);if (mode == MeasureSpec.EXACTLY) {// matchparent 或者 固定大小 view最小应为 paddingBottom + paddingTop + bitmapHeight + 10 否则显示不全size = Math.max(size, paddingBottom + paddingTop + bitmapHeight + 10);} else {//wrap contentint height = paddingBottom + paddingTop + bitmapHeight + 10;size = Math.min(size, height);}return size;}private int getMyMeasureWidth(int widthMeasureSpec) {int mode = MeasureSpec.getMode(widthMeasureSpec);int size = MeasureSpec.getSize(widthMeasureSpec);if (mode == MeasureSpec.EXACTLY) {size = Math.max(size, paddingLeft + paddingRight + bitmapWidth * 2);} else {//wrap contentint width = paddingLeft + paddingRight + bitmapWidth * 2;size = Math.min(size, width);}// match parent 或者 固定大小 此时可以获取线(进度条)的长度lineLength = size - paddingLeft - paddingRight - bitmapWidth;//线(进度条)的结束位置lineEnd = lineLength + paddingLeft + bitmapWidth / 2;//线(进度条)的开始位置lineStart = paddingLeft + bitmapWidth / 2;//初始化 游标位置slideBigX = lineEnd;slideLowX = lineStart;return size;}
再者就是绘制了,绘制的时候要注意,这里有三部分要注意,首先,就是左边的部分,中间的部分,还有就是右边的部分,三个部分要分别来画:
@Overrideprotected void onDraw(Canvas canvas) {super.onDraw(canvas);// Y轴 坐标lineY = getHeight() - paddingBottom - bitmapHeight / 2;// 字所在高度 100$textHeight = lineY - bitmapHeight / 2 - 10;//是否画刻度if (hasRule) {drawRule(canvas);}if (linePaint == null) {linePaint = new Paint();}//画内部线linePaint.setAntiAlias(true);linePaint.setStrokeWidth(lineWidth);linePaint.setColor(inColor);linePaint.setStrokeCap(Paint.Cap.BUTT);canvas.drawLine(slideLowX, lineY, slideBigX, lineY, linePaint);if (linePaint_L_R == null) {linePaint_L_R = new Paint();}linePaint_L_R.setAntiAlias(true);linePaint_L_R.setColor(outLeftColor);linePaint_L_R.setStrokeCap(Paint.Cap.BUTT);linePaint_L_R.setStrokeWidth(lineWidth);//画外部线canvas.drawLine(lineStart, lineY, slideLowX, lineY, linePaint_L_R);linePaint_L_R.setColor(outRightColor);canvas.drawLine(slideBigX, lineY, lineEnd, lineY, linePaint_L_R);//画游标if (bitmapPaint == null) {bitmapPaint = new Paint();}canvas.drawBitmap(bitmapLow, slideLowX - bitmapWidth / 2, lineY + lineWidth / 2, bitmapPaint);canvas.drawBitmap(bitmapBig, slideBigX - bitmapWidth / 2, lineY + lineWidth / 2, bitmapPaint);//画 游标上边的字if (textPaint == null) {textPaint = new Paint();}textPaint.setColor(textColor);textPaint.setTextSize(textSize);textPaint.setAntiAlias(true);canvas.drawText(String.format("%.0f" + unit, smallRange), slideLowX - bitmapWidth / 2, textHeight, textPaint);canvas.drawText(String.format("%.0f" + unit, bigRange), slideBigX - bitmapWidth / 2, textHeight, textPaint);}
最后就是触摸事件了,这里主要考虑的是要确定自己在屏幕上按下的坐标位置以及是按住的是左滑块还是右滑块:
@Overridepublic boolean onTouchEvent(MotionEvent event) {//事件机制super.onTouchEvent(event);float nowX = event.getX();float nowY = event.getY();switch (event.getAction()) {case MotionEvent.ACTION_DOWN://按下 在线(进度条)范围上boolean rightY = Math.abs(nowY - lineY) < lineY + bitmapHeight / 2;//按下 在左边游标上//boolean lowSlide = Math.abs(nowX - slideLowX - bitmapWidth) < bitmapWidth / 2;boolean lowSlide = Math.abs(nowX - slideLowX) < bitmapWidth;//按下 在右边游标上boolean bigSlide = Math.abs(nowX - slideBigX) < bitmapWidth;if (rightY && lowSlide) {isLowerMoving = true;} else if (rightY && bigSlide) {isUpperMoving = true;//点击了游标外部 的线上} else if (nowX >= lineStart && nowX <= slideLowX - bitmapWidth / 2 && rightY) {slideLowX = (int) nowX;updateRange();postInvalidate();} else if (nowX <= lineEnd && nowX >= slideBigX + bitmapWidth / 2 && rightY) {slideBigX = (int) nowX;updateRange();postInvalidate();}break;case MotionEvent.ACTION_MOVE://左边游标是运动状态if (isLowerMoving) {//当前 X坐标在线上 且在右边游标的左边if (nowX <= slideBigX && nowX >= lineStart - bitmapWidth / 2) {slideLowX = (int) nowX;if (slideLowX < lineStart) {slideLowX = lineStart;}//更新进度updateRange();postInvalidate();}} else if (isUpperMoving) {//当前 X坐标在线上 且在左边游标的右边if (nowX >= slideLowX && nowX <= lineEnd + bitmapWidth / 2) {slideBigX = (int) nowX;if (slideBigX > lineEnd) {slideBigX = lineEnd;}//更新进度updateRange();postInvalidate();}}break;//手指抬起case MotionEvent.ACTION_UP:isUpperMoving = false;isLowerMoving = false;break;default:break;}return true;}
代码中最重要的就是,我们在使用这个控件的时候是要获取最终的值,值的计算方法如下:
/*** 获取当前值*/private float computRange(float range) {return (range - lineStart) * (bigValue - smallValue) / lineLength + smallValue;}
我们看下使用方法,在你的activity的布局文件中添加如下代码:
<com.zds.view.DoubleSlideSeekBarandroid:id="@+id/doubleslide_withoutrule"android:layout_width="300dp"android:layout_height="wrap_content"android:layout_marginTop="40dp"custom:bigValue="1000"custom:hasRule="false"custom:imageBig="@drawable/right"custom:imageLow="@drawable/left"custom:imageheight="20dp"custom:imagewidth="20dp"custom:inColor="#FBCC5B"custom:lineHeight="5dp"custom:outLeftColor="#5CC25B"custom:outRightColor="#F6666D"custom:smallValue="0"custom:textColor="#e40627"custom:textSize="16sp" />
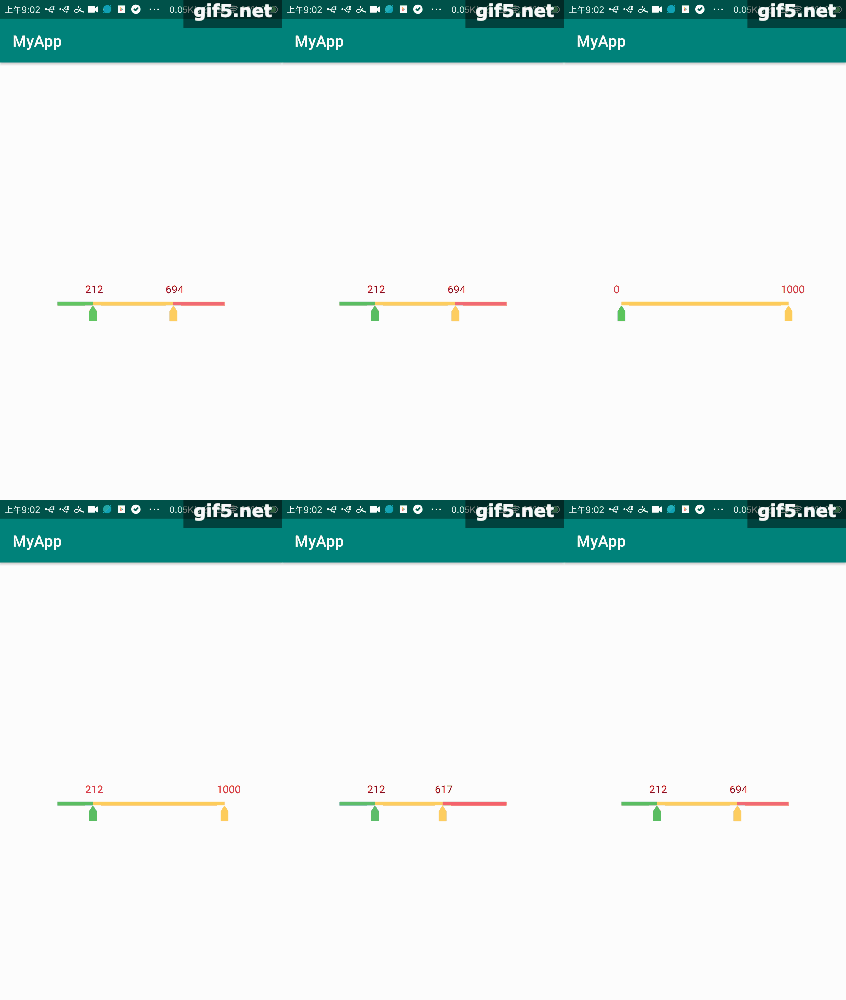
到这里基本就讲完了,大部分的讲解我放在了注释里面,有不懂的可以留言,我看到都会回复,然后我们看下效果图。
效果图

大体来看还是可以的,说了这么多,最后来说下使用方法,在Maven中如下配置:
<dependency><groupId>com.zds.view</groupId><artifactId>doubleslideseekbar</artifactId><version>1.0.0</version><type>pom</type>
</dependency>
在AndroidStudio中使用的话,打开项目的build.gradle文件,在文件中引用如下配置:
implementation 'com.zds.view:doubleslideseekbar:1.0.0'
到此,文章就写完了,项目我放在GitHub上了,有需要的可以点击下面进行下载,写了这么多,也不容易,如果对你有帮助,记得帮我点个赞,谢谢(鞠躬):
区间滑块控件
这篇关于一个全新的Android自定义区间滑块控件——DoubleSlideSeekBar的文章就介绍到这儿,希望我们推荐的文章对编程师们有所帮助!


