本文主要是介绍Android手工打造脑图控件,希望对大家解决编程问题提供一定的参考价值,需要的开发者们随着小编来一起学习吧!
背景
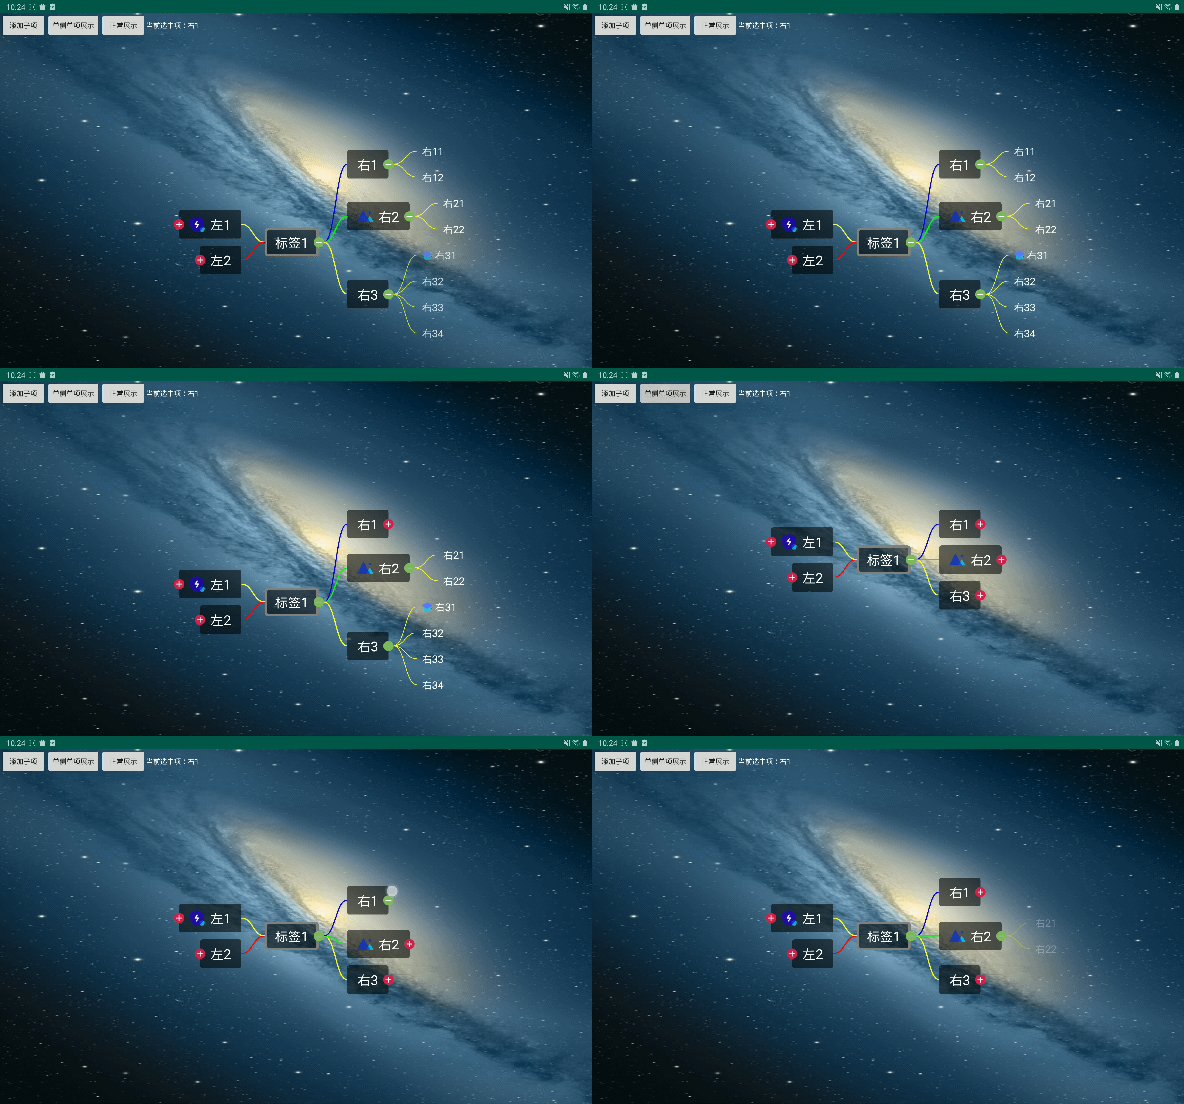
所有的开发背景都是项目需要。先上屌炸天的设计图。

效果
导出效果不清晰,尽量看吧。

功能
- 脑图展示
- 样式订制(文字颜色、图标、样式、边框..)
- 折叠方式支持两种:a、同侧折叠不影响其他。b、同侧展开其他项折叠
- 整体拖动
- 待扩展...
前期思考
作为一个油腻的安卓程序猿,当看到效果图后,第一步想到的就是找开源插件。找插件的目的:第一、看看网上有没有现成的控件,有的话拿过来直接用。第二、即使没有现成的控件,也可能找到点实现思路。经过一番百度后,发现现成的控件并不能满足需求,而且可扩展性比较差,还要通读一遍别人的代码,才能改造成满足自己的需求,也有可能通读一遍,陷入别人的坑中,成功率不高。
发现第三方控件成功率不高时,现在就该考虑第二个方向了:自己造轮子。
自己造轮子也不能瞎造,参考一下别人的成品吧。看了几个demo,其中手机版的XMind思维导图布局应该是网页实现的,通过与原生进行增删。也有的是用ViewGroup控件堆叠的。那么我们造轮子的方向就明确了分三个:
-
网页绘制(通过与前端铁子交流,强大的js插件确实有不少,但是都需要改样式。无奈的是前端铁子工期排不开。pass了)
-
SurfaceView纯Canvas绘制(Canvas固然万能,布局样式没问题,拖动也没问题,但是考虑到交互折叠啥的,点击事件定位不好确定。pass了)
-
ViewGroup通过布局来实现(最后一根救命稻草,只能通过组件堆叠来实现了。布局能实现,但是拖动不好整,这个拖动先不考虑,后面给出解决办法。开整)
开整之前参考了前辈文章:利用递归算法、堆栈打造一个android可擦除思维导图
DIV设计
第一步:根据效果图和功能设计节点数据格式
话不多说,上代码。数据模型先给出来,具体字段注释都有解释。
/*** 思维导图节点*/
public class SparkModel {/*** 在父节点的方位 1:左侧 0:右侧* 因为节点有的在左侧有的在右侧,所有设置这个字段*/private int side;/*** 节点所在的层级。 中心节点为0级*/private int level;/*** 本节点与父节点之间连线的颜色*/private int lineColor;/*** 本节点文字展示的颜色*/private int textColor;/*** 本节点文字内容描述*/private String content;/*** 本节点图标*/private Bitmap icon;/*** 本节点展开状态 true为展开  false为折叠*/private boolean isExpanded;/*** 当前节点唯一标识(代码自动生成)*/private String cId;/*** 父节点唯一标识*/private String pId;/*** 节点布局样式,可以根据自己的需求进行定制扩展*/private int styleType;/*** 可以定制扩展边框类型,给节点添加背景*/private int borderType;/*** 当前节点下的子节点树*/private List<SparkModel> children;//TODO 此处省略参数的set/get方法。。。
}
第二步:根据功能设计控件使用接口
/*** 思维导图使用接口*/
public interface IMindMap {/*** 设置数据** @param sparkModel*/void setData(SparkModel sparkModel);/*** 设置脑图展示类型** @param showType*/void setShowType(ShowType showType);/*** 隐藏子项*/void hideChildren();
}
根据需求展开方式分两种,所以有了ShowType.java
/*** 脑图展示类型* single :单侧单项展示————当点击同级节点时,其他节点的子节点清除* normal :正常展示————可以无限点击各个节点,不清除之前的节点*/
public enum ShowType {single,normal
}
第三步:开始DIV
核心代码先贴出来:MindMapView。然后跟着我的思路去一步步理解。
/*** ==============================================* author : carl* e-mail : 991579741@qq.com* time   : 2019/07/11* desc   : 脑图控件* version: 1.0* ==============================================*/
public class MindMapView extends RelativeLayout implements IMindMap {//行间距private int rowSpace = 30;//列间距private int columnSpace = 100;private static final String TAG = "MindMapView";private SparkModel tree = null;//树形图//存的是Id对应的视图private HashMap<String, View> childViews = new HashMap<>();//存的是Id对应的父节点和本节点连线控件private HashMap<String, DrawGeometryView> childLineViews = new HashMap<>();private MindMapClickListener mindMapClickListener = null;//每个节点子控件尺寸private HashMap<String, ChildSize> childSizes = new HashMap<>();private int maxLineWidth = 5;//连线的最大宽度,防止连线过细//展示类型private ShowType showType = ShowType.normal;public MindMapView(Context context) {this(context, null);}public MindMapView(Context context, @Nullable AttributeSet attrs) {this(context, attrs, 0);}public MindMapView(Context context, @Nullable AttributeSet attrs, int defStyleAttr) {super(context, attrs, defStyleAttr);init();}/*** 初始化数据*/private void init() {childViews.clear();childLineViews.clear();removeAllViews();//将树绘制到界面if (null != tree) {tree.setLevel(0);initView(tree);}addChild2Root();}/*** 将所有节点对应的View加载出来,并根据节点内容赋值到View上** @param sparkModel*/private void initView(SparkModel sparkModel) {//如果节点没有设置Id,自动为节点生成Idif (null == sparkModel.getcId() || "".equals(sparkModel.getcId())) {sparkModel.setcId(UUID.randomUUID().toString());}View rootView = null;//根据节点getStyleType指定的布局样式加载出不同的布局文件switch (sparkModel.getStyleType()) {case 0:if (sparkModel.getSide() == 1) {rootView = LayoutInflater.from(getContext()).inflate(R.layout.item_left0, null);} else {rootView = LayoutInflater.from(getContext()).inflate(R.layout.item_right0, null);}break;case 1:if (sparkModel.getSide() == 1) {rootView = LayoutInflater.from(getContext()).inflate(R.layout.item_left1, null);} else {rootView = LayoutInflater.from(getContext()).inflate(R.layout.item_right1, null);}break;//TODO 我只定义了两套样式,这里可根据需求扩展自己的布局样式}if (null == rootView) {return;}//把节点数据填装到布局文件fillItem(rootView, sparkModel);//保存视图到映射表,方便以后操作childViews.put(sparkModel.getcId(), rootView);//如果不是根节点,那么当前节点肯定会有一条与父节点的连线。生成对应的连线对象,放到连线的Map中if (sparkModel.getLevel() != 0) {DrawGeometryView drawGeometryView = new DrawGeometryView(getContext());childLineViews.put(sparkModel.getcId(), drawGeometryView);}/*** 如果有子节点,则递归添加子节点*/if (null != sparkModel.getChildren() && sparkModel.getChildren().size() > 0) {for (int i = 0; i < sparkModel.getChildren().size(); i++) {//因为节点的pId和level(节点所在的层级)属性对后面的绘制过程很重要,防止用户写错,我们代码中校验一下sparkModel.getChildren().get(i).setpId(sparkModel.getcId());sparkModel.getChildren().get(i).setLevel(sparkModel.getLevel() + 1);initView(sparkModel.getChildren().get(i));}}}/*** 将所有的节点View和对应的连线View添加到我们的ViewGroup中*/private void addChild2Root() {Iterator iter = childViews.entrySet().iterator();while (iter.hasNext()) {Map.Entry<String, View> entry = (Map.Entry<String, View>) iter.next();addView(entry.getValue());}Iterator lineIter = childLineViews.entrySet().iterator();while (lineIter.hasNext()) {Map.Entry<String, View> entry = (Map.Entry<String, View>) lineIter.next();addView(entry.getValue());}}@Overrideprotected void onMeasure(int widthMeasureSpec, int heightMeasureSpec) {super.onMeasure(widthMeasureSpec, heightMeasureSpec);int measureWidth = MeasureSpec.getSize(widthMeasureSpec);int measureHeight = MeasureSpec.getSize(heightMeasureSpec);int measureWidthMode = MeasureSpec.getMode(widthMeasureSpec);int measureHeightMode = MeasureSpec.getMode(heightMeasureSpec);int height = 0;int width = 0;if (null != tree) {width = getChildAllWidth(tree, widthMeasureSpec, heightMeasureSpec);height = getChildAllHeight(tree, widthMeasureSpec, heightMeasureSpec);}setMeasuredDimension((measureWidthMode == MeasureSpec.EXACTLY) ? measureWidth : width, (measureHeightMode == MeasureSpec.EXACTLY) ? measureHeight : height);}@Overrideprotected void onLayout(boolean changed, int left, int top, int right, int bottom) {if (null != tree) {if (null != tree.getChildren() && tree.getChildren().size() > 0 && tree.isExpanded()) {//计算左侧节点总体宽高int leftWidth = calculateSideWidth(tree, 1);int leftHeight = calculateSideHeight(tree, 1);//计算右侧节点总体宽高int rightWidth = calculateSideWidth(tree, 0);int rightHeight = calculateSideHeight(tree, 0);//布局根节点数据View root = childViews.get(tree.getcId());root.layout(leftWidth, (bottom - top) / 2 - root.getMeasuredHeight() / 2, leftWidth + root.getMeasuredWidth(), (bottom - top) / 2 + root.getMeasuredHeight() / 2);int leftTop = ((bottom - top) - leftHeight) / 2;int leftBottom = bottom - leftTop;//布局左侧数据layoutLeftSide(tree, 0, leftTop, leftWidth, leftBottom, (bottom - top) / 2);int rightTop = ((bottom - top) - rightHeight) / 2;int rightBottom = bottom - rightTop;//布局右侧数据layoutRightSide(tree, leftWidth + root.getMeasuredWidth(), rightTop, right, rightBottom, (bottom - top) / 2);} else {View root = childViews.get(tree.getcId());root.layout(0, 0, root.getMeasuredWidth(), root.getMeasuredHeight());}}}/*** 进行左侧布局** @param sparkModel* @param left* @param top* @param right* @param bottom*/private void layoutLeftSide(SparkModel sparkModel, int left, int top, int right, int bottom, int pCenterY) {if (null != sparkModel.getChildren() && sparkModel.getChildren().size() > 0) {//如果当前节点为展开状态if (sparkModel.isExpanded()) {
这篇关于Android手工打造脑图控件的文章就介绍到这儿,希望我们推荐的文章对编程师们有所帮助!


