本文主要是介绍Swift学习第十三枪-使用Swift开发IOS中蓝牙4.0的开发流程,希望对大家解决编程问题提供一定的参考价值,需要的开发者们随着小编来一起学习吧!
前面总结了几篇关于Swift的使用,今天要讲的是关于使用Swift开发IOS中蓝牙4.0的开发流程,我以前只是会搞android的蓝牙开发,最近开始了Swift的学习,作为一个swift爱好者,想把蓝牙4.0的这个装逼神器在swift中使用一下。
使用Swift开发IOS中蓝牙4.0的开发流程有如下的几个步骤:
建立桥接文件
案例的实现
1. 建立桥接文件
1.1在用Swift使用OC中得类文件的时候,需要进行桥接,首先建一个.h的头文件。
注意:桥接文件的命名规则:项目名-Bridging-Header.Swift
//
// Swfit-BLE-Bridging-Header.h
// Swift-BLE
//
// Created by lidong on 16/7/3.
// Copyright © 2016年 李东. All rights reserved.
//
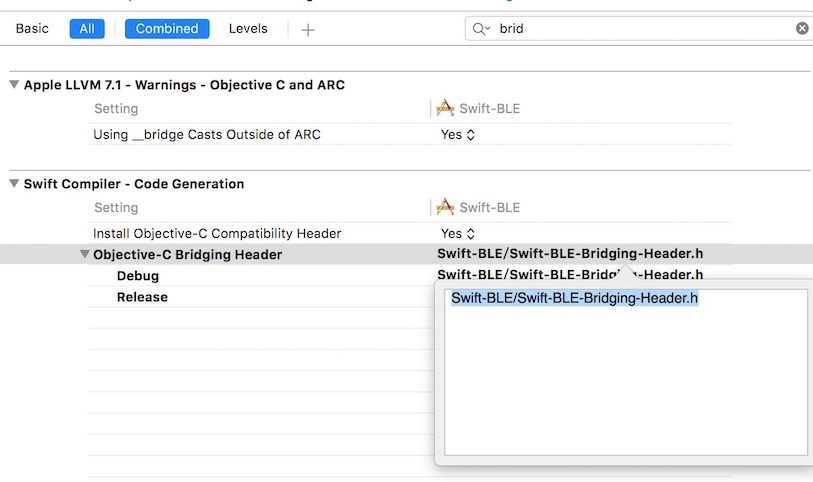
#import <CoreBluetooth/CoreBluetooth.h>1.2 在Build-settings -> Swift Complier - Code Generaton —>Objective C Briding Herder中添加自己的桥接文件。
如下图:
2.案例的实现
首先,CoreBluetooth库文件为我们提供两个类CBCentralManagerDelegate,CBPeripheralDelegate ,是蓝牙操作的核心类。
CBCentralManagerDelegate 中心管理器的代理类
CBPeripheralDelegate 外围设备的代理类
2.1创建CBCentralManager,设置代理
var  myCentralManager:CBCentralManager!
myCentralManager = CBCentralManager()
myCentralManager.delegate = self
2.2启动扫描发现设备
print("扫描设备。。。。 ")         myCentralManager.scanForPeripheralsWithServices(nil, options: nil)
//蓝牙的状态func centralManager(central: CBCentralManager, didDisconnectPeripheral peripheral: CBPeripheral, error: NSError?) {switch (central.state) {case CBCentralManagerState.PoweredOn:print("蓝牙已打开, 请扫描外设!");break;case CBCentralManagerState.PoweredOff:print("蓝牙关闭,请先打开蓝牙");default:break;}}//发现设备func centralManager(central: CBCentralManager, didDiscoverPeripheral peripheral: CBPeripheral, advertisementData: [String : AnyObject], RSSI: NSNumber) {print("--didDiscoverPeripheral-")if peripheral.name == DEVICENAME{self.myPeripheral = peripheral;self.myCentralManager = central;central.connectPeripheral(self.myPeripheral, options: nil)print(self.myPeripheral);}}
2.3 发现设备后,连接设备,连接成功,关闭中心啊管理者的扫描,发现设备的服务,设置外围设备的代理
//设备已经接成功func centralManager(central: CBCentralManager, didConnectPeripheral peripheral: CBPeripheral) {print("---------didConnectPeripheral-")print(central)print(peripheral)//关闭扫描self.myCentralManager.stopScan()self.myPeripheral.delegate = selfself.myPeripheral.discoverServices(nil)print("扫描服务...");}
2.4 根据服务发现特征
/**发现服务调用次方法- parameter peripheral: <#peripheral description#>- parameter error: <#error description#>*/func peripheral(peripheral: CBPeripheral, didDiscoverServices error: NSError?) {print("---发现服务调用次方法-")for s in peripheral.services!{peripheral.discoverCharacteristics(nil, forService: s)print(s.UUID.UUIDString)}}/**根据服务找特征- parameter peripheral: <#peripheral description#>- parameter service: <#service description#>- parameter error: <#error description#>*/func peripheral(peripheral: CBPeripheral, didDiscoverCharacteristicsForService service: CBService, error: NSError?) {print("----发现特征------")for c in service.characteristics! {if c.UUID.UUIDString == "2AF0"{print(c.UUID.UUIDString)peripheral.setNotifyValue(true, forCharacteristic: c)}if c.UUID.UUIDString == "2AF1"{print(c.UUID.UUIDString)self.writeCharacteristic = c}}}2.5向设备发送指令,获取数据
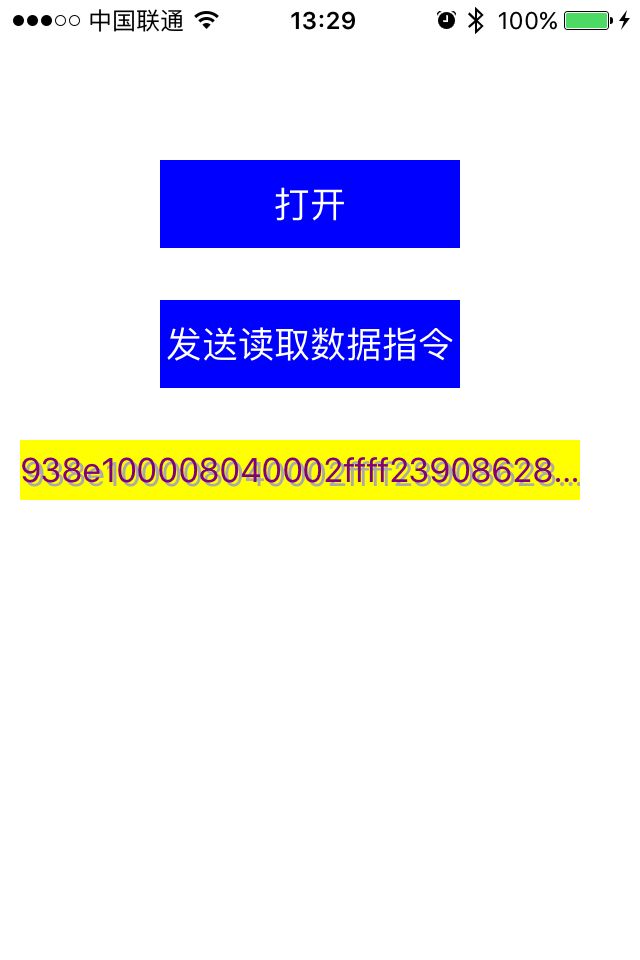
/**写入后的回掉方法- parameter peripheral: <#peripheral description#>- parameter characteristic: <#characteristic description#>- parameter error: <#error description#>*/func peripheral(peripheral: CBPeripheral, didWriteValueForCharacteristic characteristic: CBCharacteristic, error: NSError?) {print("didWriteValueForCharacteristic")}/**<#设置特征为正在监听,读取数据#>- parameter peripheral: <#peripheral description#>- parameter characteristic: <#characteristic description#>- parameter error: <#error description#>*/func peripheral(peripheral: CBPeripheral, didUpdateNotificationStateForCharacteristic characteristic: CBCharacteristic, error: NSError?) {print("-----didUpdateNotificationStateForCharacteristic-----")if (error != nil) {print(error?.code);}//Notification has startedif(characteristic.isNotifying){peripheral.readValueForCharacteristic(characteristic);print(characteristic.UUID.UUIDString);}}/**获取外设的数据- parameter peripheral: <#peripheral description#>- parameter characteristic: <#characteristic description#>- parameter error: <#error description#>*/func peripheral(peripheral: CBPeripheral, didUpdateValueForCharacteristic characteristic: CBCharacteristic, error: NSError?) {print("----didUpdateValueForCharacteristic---")if characteristic.UUID.UUIDString == "2AF0" {let data:NSData = characteristic.value!print(data)let d = Array(UnsafeBufferPointer(start: UnsafePointer<UInt8>(data.bytes), count: data.length))print(d)let s:String = HexUtil.encodeToString(d)if s != "00" {result += sprint(result )print(result.characters.count )}if result.characters.count == 38 {lable.text = result}}}
2.6 发送指令的方法
/**发送指令到设备*/func writeToPeripheral(bytes:[UInt8]) {if writeCharacteristic != nil {let data1:NSData = dataWithHexstring(bytes)self.myPeripheral.writeValue(data1, forCharacteristic: writeCharacteristic, type: CBCharacteristicWriteType.WithResponse)} else{}}/**将[UInt8]数组转换为NSData- parameter bytes: <#bytes description#>- returns: <#return value description#>*/func dataWithHexstring(bytes:[UInt8]) -> NSData {let data = NSData(bytes: bytes, length: bytes.count)return data}总结:使用Swift开发IOS中蓝牙4.0的开发流程基本就是如上两大步骤,六小步骤,如果有不明白,可以联系我。
注意:蓝牙调试代码只能真机,模拟器是没效果的。
代码地址https://github.com/lidong1665/Swift-BLE
这篇关于Swift学习第十三枪-使用Swift开发IOS中蓝牙4.0的开发流程的文章就介绍到这儿,希望我们推荐的文章对编程师们有所帮助!


